There’s a little know command in the CM CLI: cmf dev iot convertCodeTasks. It converts your existing code tasks into proper custom tasks automatically. This post is about why you might want that and what you gain when you do.
The Code Task and How It Drifts#
Connect IoT is a low-code designer where each functional block (task) performs an atomic action or transformation. CM ships a full suite of out-of-the-box tasks covering math operations, MES requests, driver interactions, and more. But there are always use cases that fall outside that set.
The code task is the escape hatch: write TypeScript directly, access a curated set of framework utilities and APIs, and have it available to the controller immediately — no build pipeline, no deployment step.
    import { Framework } from 'framework';

    export default class {
        /** Allows accessing external functions */
        public framework: Framework;
        constructor(framework: Framework) {
            this.framework = framework;
        }
        /*
            * Entry point of the class (IMPORTANT: don't change the signature of this method)
            * Should return an object containing the values for each output to emit
            * If necessary, use the parameter "outputs" to emit data while running the code.
        */
        public async main(inputs: any, outputs: any): Promise<any> {

            // Add code here

            // emit output during execution: outputs.output1.emit("something");
            // return example: return { output1: inputs.input1, output2: "Hello World" };
        }
    }
For a quick, focused snippet this is exactly right. The problem is how code tasks tend to grow over time.
The typical path: one code task for a parsing edge case, another for a validation, another for an MES call, until a controller has half its logic buried in scattered TypeScript snippets that nobody wants to touch. It doesn’t happen by bad intent. It happens by convenience, one task at a time.
As a rule of thumb: if a code task reaches the hundreds-of-lines range, it’s doing more than one thing.
At that point you’ve lost the visual clarity of the low-code designer without gaining the structure of a proper software project. And the two constraints that make it a real problem are testing and libraries.
Code task logic cannot be unit-tested in isolation — you can validate the workflow with the TestOrchestrator, but you cannot write tests against the TypeScript class itself. For a small snippet, that’s fine. For complex logic spanning many branches, it becomes a liability.
Code tasks also can’t import external npm packages. Every piece of logic has to be written from scratch, no battle-tested libraries, no shared utilities across tasks.
One performance note worth keeping in mind: the code task runs inside a sandbox, which carries a small startup cost. Usually negligible; in high-volume scenarios with many code tasks, it compounds.
What a Custom Task Gives You#
The alternative is a Custom Task: a proper TypeScript project, packaged and installed like any other IoT component, indistinguishable from a built-in CM task to whoever builds workflows with it.
The historical friction was real, building a custom task required juggling the Node execution layer alongside an Angular presentation layer. Version 10.2 eliminated that. With automation task libraries, the IoT customization layer no longer needs Angular code task rendering is described by a JSON metadata definition.
Creating a customization task is now fully embedded in the CM CLI, becoming a natural part of the development flow.
What you get in return for that ownership:
Full unit test coverage. The logic is a real TypeScript class — test it like any other. Fast, isolated, no controller needed.
Native debugging and IntelliSense. Standard development tooling, not workarounds.
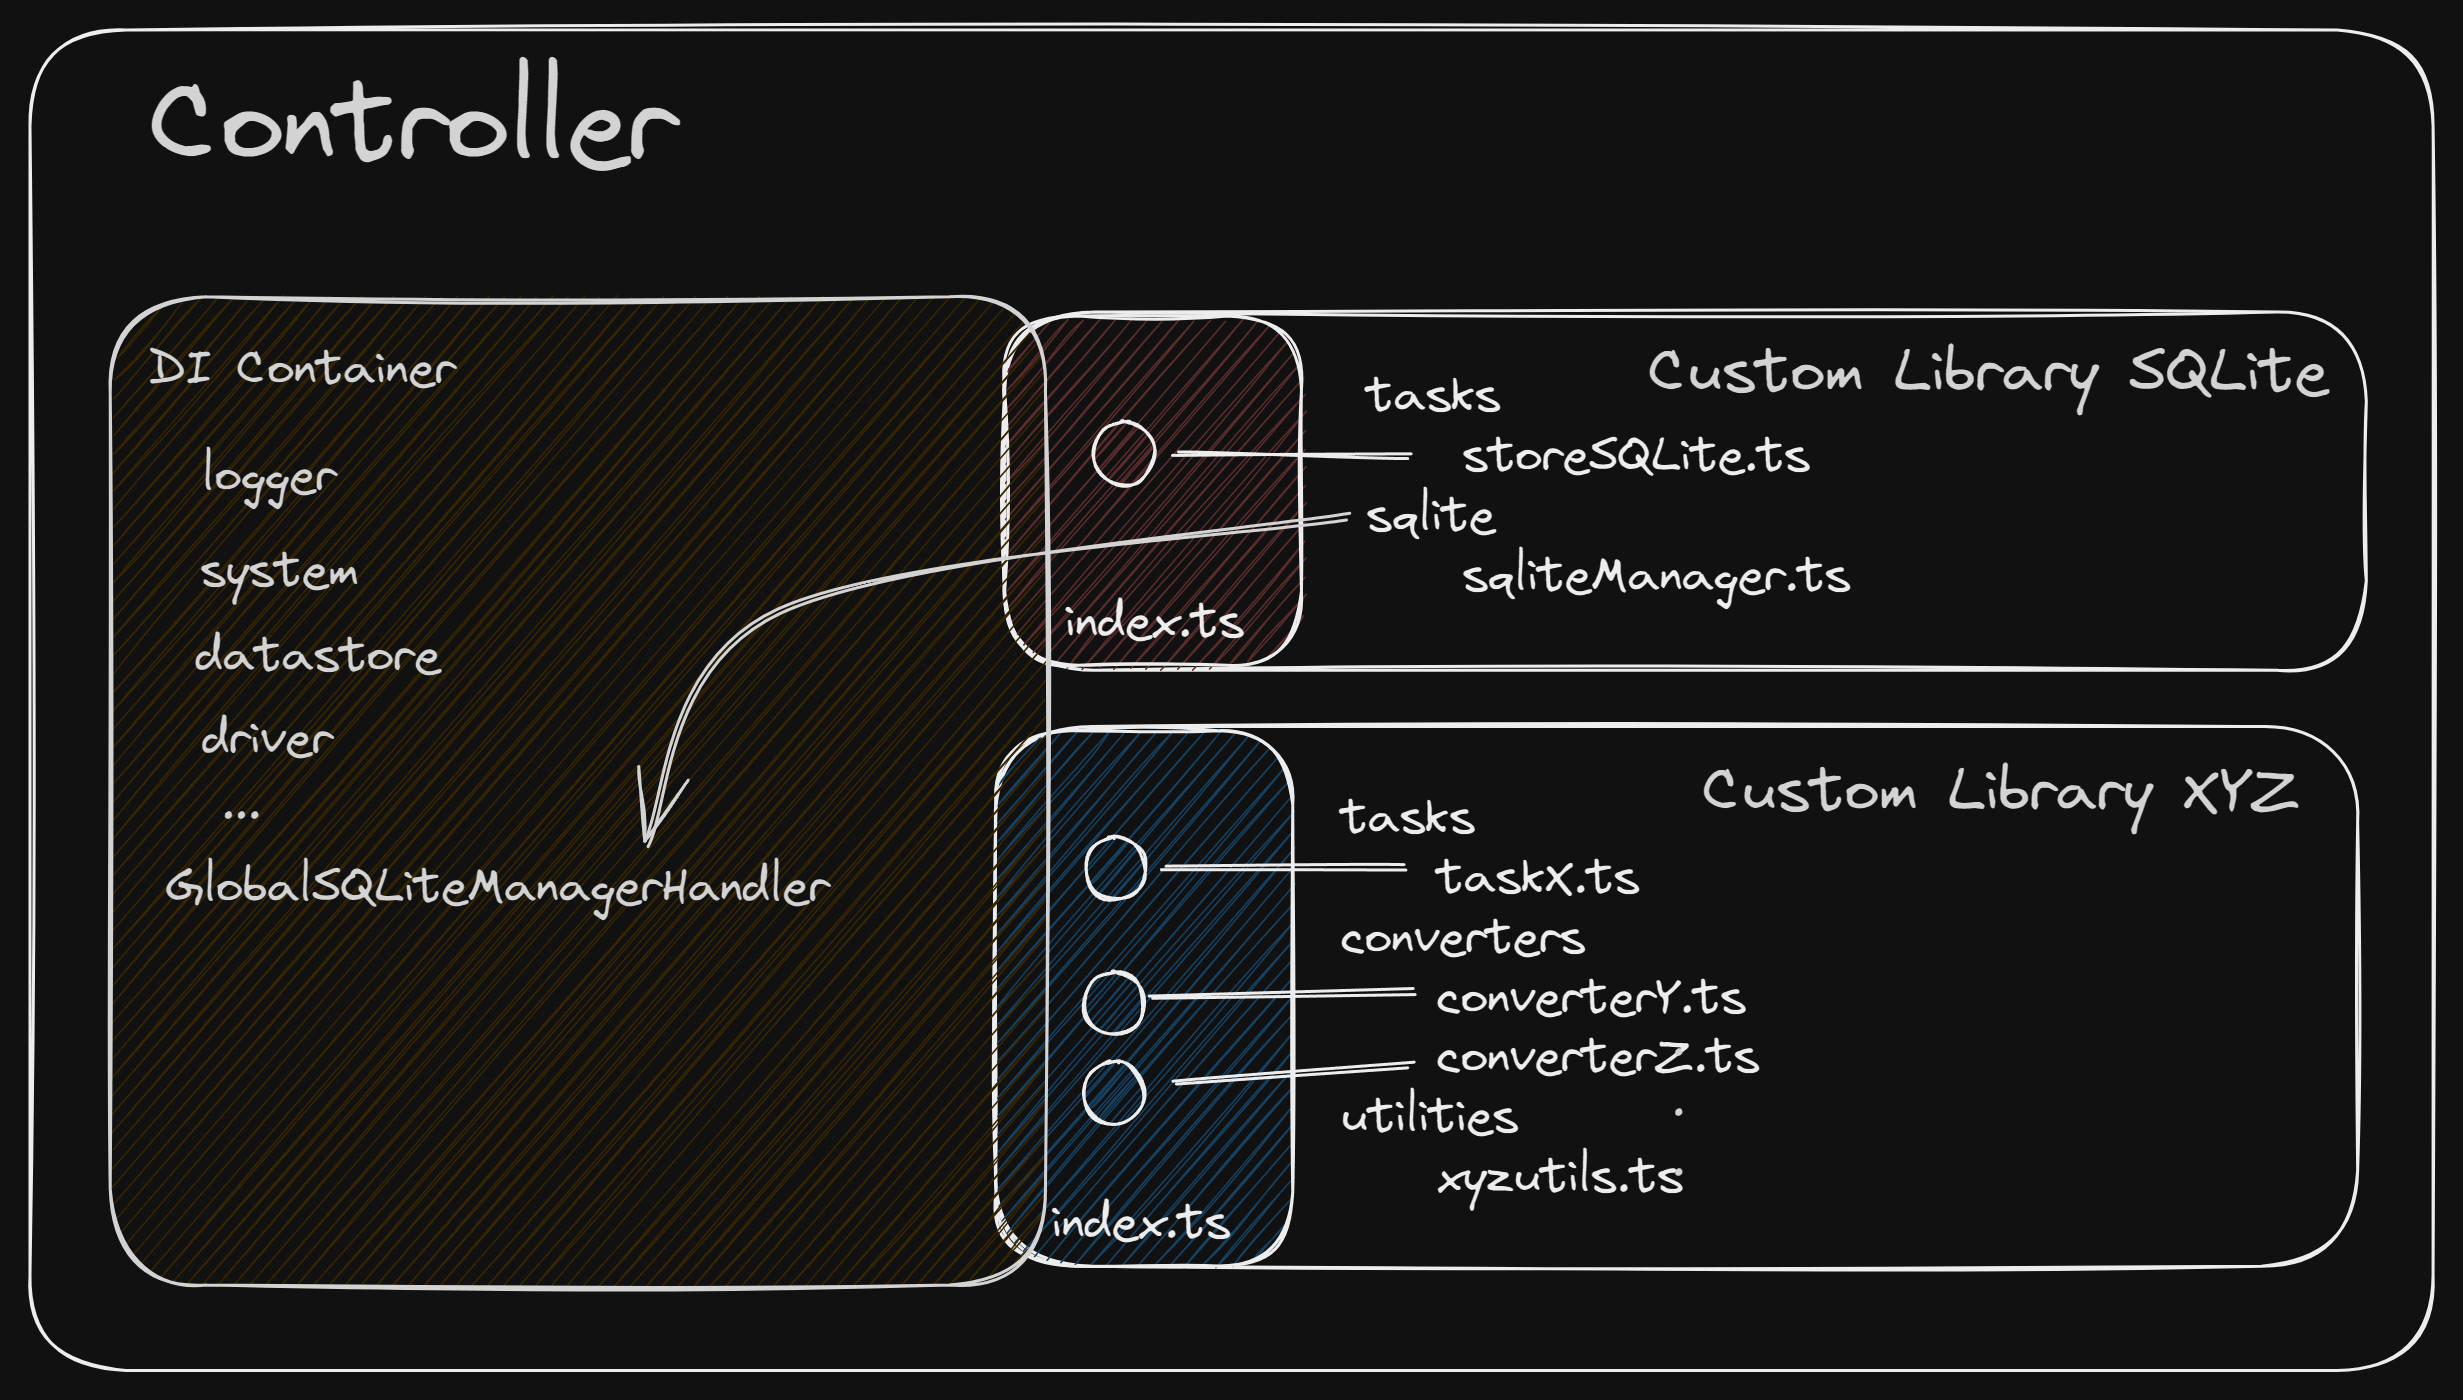
External npm packages. The entire node ecosystem is available. Beyond packages, custom tasks unlock Connect IoT’s dependency injection mechanism — instead of instantiating a shared resource in every task, you register it once and every task draws from the same instance. We covered this in depth in the SQLite series: Third-Party Components in Connect IoT and Sharing Injected Components in Connect IoT.
Reuse without workflow coupling. A code task can only be shared through a subworkflow reference, which forces an architectural decision into every workflow that needs it. Custom tasks are available wherever you define them, no coupling required.
Distributable packages. Custom tasks live in an installable package. If you’re building a golden template or a baseline for multiple sites, you ship one package and every project gets the same tasks, maintained in one place. That same package can also include custom converters, custom drivers, and shared injectable services.
The tradeoff is ownership: when CM releases a new version, you update your custom task dependencies and validate. It’s typically straightforward, but it’s a step code task users don’t have to think about.
convertCodeTasks in Action#
Seeing it Work#
Let’s walk through a concrete example: a test machine outputting a non-trivial report file.
### MACHINE TEST REPORT ###
# Generated by AutoTestBench v3.2
Machine-ID   : MTB-2291
Machine Name : Line3-Press-07
Operator     : jsmith
Timestamp    : 2026-07-01T14:32:09Z

--- PRODUCT INFO ---
Product Name: Bracket-Assembly-X200
Material    : Al-6061-T6
Batch#: 88213

--- TEST RESULTS ---
# code | description        | value   | unit | status
T01    | Tensile Strength    | 310.5   | MPa  | PASS
T02    | Yield Strength      | 275.2   | MPa  | PASS
T03    | Elongation          | 12.8    | %    | FAIL
T04    | Hardness            | 95      | HB   | PASS

OVERALL_RESULT: FAIL
CHECKSUM=9f3a21
### END OF REPORT ###
A common request would be to extract fields like the Material, Product Name, Machine Name and test result.
The developer could first use the file raw business scenario to create a template for file integrations.
The file isn’t CSV or JSON — it’s a machine-specific format, common for test equipment. We parse it directly in the workflow with a code task.
    import { Framework } from 'framework';

    interface TestRow {
    code: string;
    description: string;
    value: string;
    unit: string;
    status: string;
    }

    interface ParsedTestFile {
    machineName: string;
    productName: string;
    materialName: string;
    overallResult: string;
    testResults: TestRow[];
    }

    export default class {

    /** Allows accessing external functions */
    private framework: Framework;

    constructor(framework: Framework) {
        this.framework = framework;
    }

    /**
     * Pulls a single "Label : value" style field out of the raw text.
     * Tolerant of variable whitespace around the colon and label casing.
     */
    private extractField(raw: string, label: string): string {
        const regex = new RegExp(`^${label}\\s*:\\s*(.+)$`, 'im');
        const match = raw.match(regex);
        return match ? match[1].trim() : '';
    }

    /**
     * Parses the pipe-delimited results table between
     * "--- TEST RESULTS ---" and the next blank line / section.
     */
    private extractTestResults(raw: string): TestRow[] {
        const rows: TestRow[] = [];

        const sectionMatch = raw.match(/---\s*TEST RESULTS\s*---([\s\S]*?)(?:\n\s*\n|OVERALL_RESULT)/i);
        if (!sectionMatch) return rows;

        const lines = sectionMatch[1]
        .split('\n')
        .map(l => l.trim())
        .filter(l => l.length > 0 && !l.startsWith('#'));

        for (const line of lines) {
        const cols = line.split('|').map(c => c.trim());
        if (cols.length < 5) continue; // skip malformed rows

        const [code, description, value, unit, status] = cols;
        rows.push({ code, description, value, unit, status });
        }

        return rows;
    }

    /**
     * Entry point of the class (IMPORTANT: don't change the signature of this method)
     * Should return an object containing the values for each output to emit
     * If necessary, use the parameter "outputs" to emit data while running the code.
     */
    public async main(inputs: any, outputs: any): Promise<any> {
        const rawContent: string = inputs.fileContent ?? '';

        if (!rawContent) {
        throw new Error('No file content provided in inputs.fileContent');
        }

        const machineName = this.extractField(rawContent, 'Machine Name');
        const productName = this.extractField(rawContent, 'Product Name');
        const materialName = this.extractField(rawContent, 'Material');
        const overallResult = this.extractField(rawContent, 'OVERALL_RESULT');
        const testResults = this.extractTestResults(rawContent);

        const parsed: ParsedTestFile = {
        machineName,
        productName,
        materialName,
        overallResult,
        testResults,
        };

        outputs.result.emit(parsed);
    }
    }
By running it, we see that it’s working as expected. This is still a fairly contained scenario, but it’s already a few dozen lines of TypeScript.
Now let’s push it further: add a retrieve from the persistency layer, an MES service call to record defects, and some guard clauses.
(...)
    public async main(inputs: any, outputs: any): Promise<any> {
        const rawContent: string = inputs.fileContent ?? '';

        if (!rawContent) {
            throw new Error('No file content provided in inputs.fileContent');
        }

        const machineName = this.extractField(rawContent, 'Machine Name');
        const productName = this.extractField(rawContent, 'Product Name');
        const materialName = this.extractField(rawContent, 'Material');
        const overallResult = this.extractField(rawContent, 'OVERALL_RESULT');
        const testResults = this.extractTestResults(rawContent);

        const expectedMaterialName = await this.framework.dataStore.retrieve("materialName", "");
        const expectedProductName = await this.framework.dataStore.retrieve("productName", "");

        if(materialName != expectedMaterialName &&
            productName!= expectedProductName) {
            throw new Error(`Invalid Material ${materialName} and Product ${productName}`);
        }

        const parsed: ParsedTestFile = {
            machineName,
            productName,
            materialName,
            overallResult,
            testResults,
        };

        this.framework.logger.info(`Overall Test Result for ${materialName} - ${overallResult}`);

        if (overallResult == "FAIL") {

            const recordDefect = new this.framework.LBOS.Cmf.Navigo.BusinessOrchestration.MaterialManagement.InputObjects.RecordMaterialDefectsInput();
            recordDefect.Material = new this.framework.LBOS.Cmf.Navigo.BusinessObjects.Material();
            recordDefect.Material.Name = machineName;
            recordDefect.MaterialDefects = new this.framework.LBOS.Cmf.Navigo.BusinessObjects.MaterialDefectCollection();

            for (const result of testResults) {
            if (result.status == "FAIL") {
                const defect = new this.framework.LBOS.Cmf.Navigo.BusinessObjects.MaterialDefect();
                defect.DefectSource = this.framework.LBOS.Cmf.Navigo.BusinessObjects.MaterialDefectSource.None;
                defect.DefectType = this.framework.LBOS.Cmf.Navigo.BusinessObjects.MaterialDefectDefectType.Unit;
                defect.Reason = new this.framework.LBOS.Cmf.Navigo.BusinessObjects.Reason();
                defect.Reason.Name = result.code;

                recordDefect.MaterialDefects.push(defect);

                this.framework.logger.debug(`Adding Defect for ${materialName} : ${result.code}`);
            }
            }

            await this.framework.system.call(recordDefect);
            this.framework.logger.info(`Added Defects for ${materialName}`);
        }

        outputs.result.emit(parsed);
    }
Now the code has real branching, class instantiation, and business logic. This is exactly the inflection point, still manageable today, painful in six months. This is where convertCodeTasks becomes relevant.
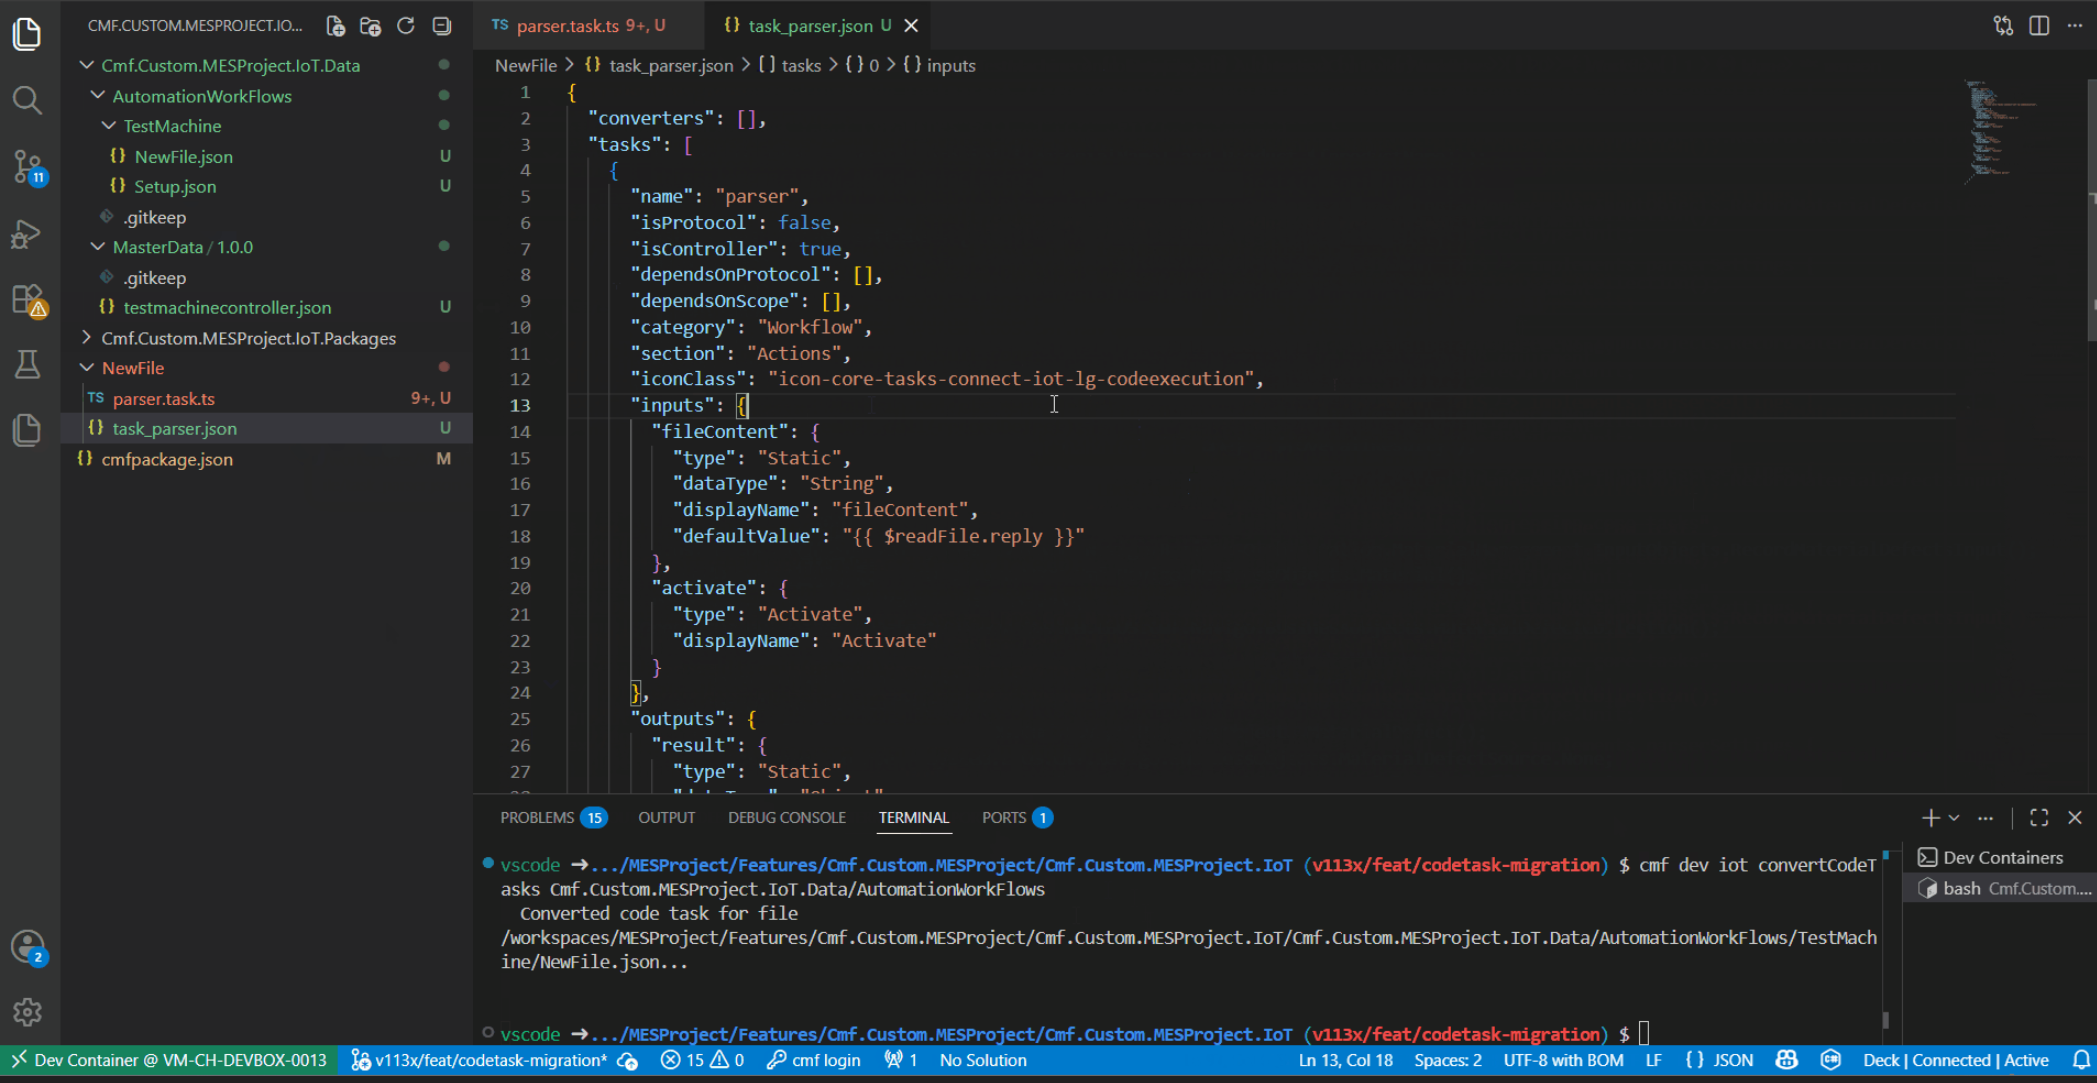
We run the command against the folder containing our workflows:
cmf dev iot convertCodeTasks Cmf.Custom.MESProject.IoT.Data/AutomationWorkFlows
The command nests the output under a folder named after each workflow. In our case we’re converting everything in the NewFiles.json workflow, so the output lands in a NewFiles folder. From there we add it to a custom IoT project, install, and compile.
With one command the code task is now a proper custom task — IntelliSense, external dependencies, unit testability, and full ownership of the code as a real project.
The conversion is best-effort and will flag any edge cases it can’t handle automatically.
Final Thoughts#
Code tasks and custom tasks aren’t in competition. Code tasks are the right tool for quick, atomic, self-contained logic — especially when you want zero maintenance overhead on version updates. Custom tasks are the right tool when the logic is complex, reusable, or needs to be tested and shared.
The problem has never been using code tasks. It’s been letting them grow beyond the role they were designed for, and feeling stuck there because migration seemed expensive.
That excuse no longer holds.