Overview#
In Guaranteed Outcomes: Building Deterministic Chat Workflows with Business Scenarios we did a deep dive on using business scenarios and in Edge Deploy we explained how the automatic edge deploy works with Connect IoT.
Creating a new integration today means manually creating protocols, driver definitions, controllers, managers, and instances, wiring them together. With business scenarios we can automate all of that.

Automatic Edge Deployment#
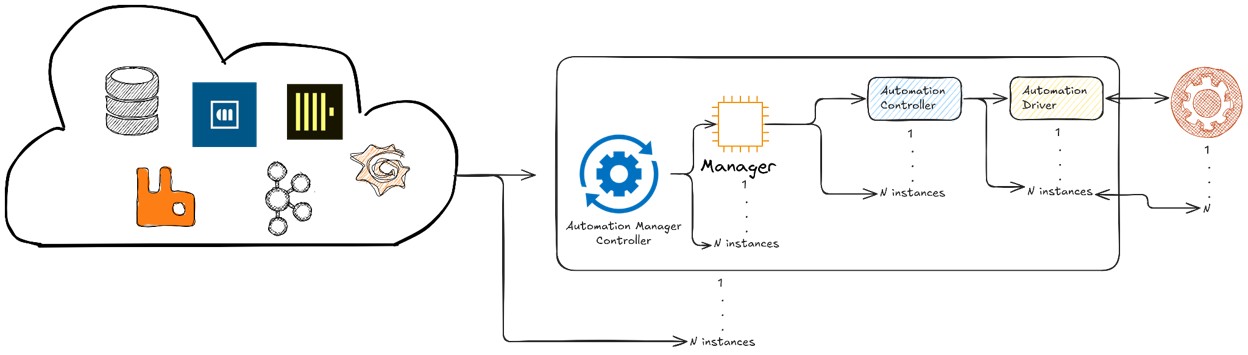
The Connect IoT startup nodejs application, the Automation Manager is very adaptable. It can run on Edge or on Cloud, it can be installed in Linux or Windows.
It can be deployed via the CM Devops Center, or it can be deployed with a One Click Deploy. The One Click Deploy is an implicit installation via a middleware component, solely focused on Automation Manager deployment, the Automation Manager Controller.
The Automation Manager Controller will query the MES for what managers does it need to deploy and deploy them. It can run in the MES cluster or in an edge cluster.
Business Scenarios#
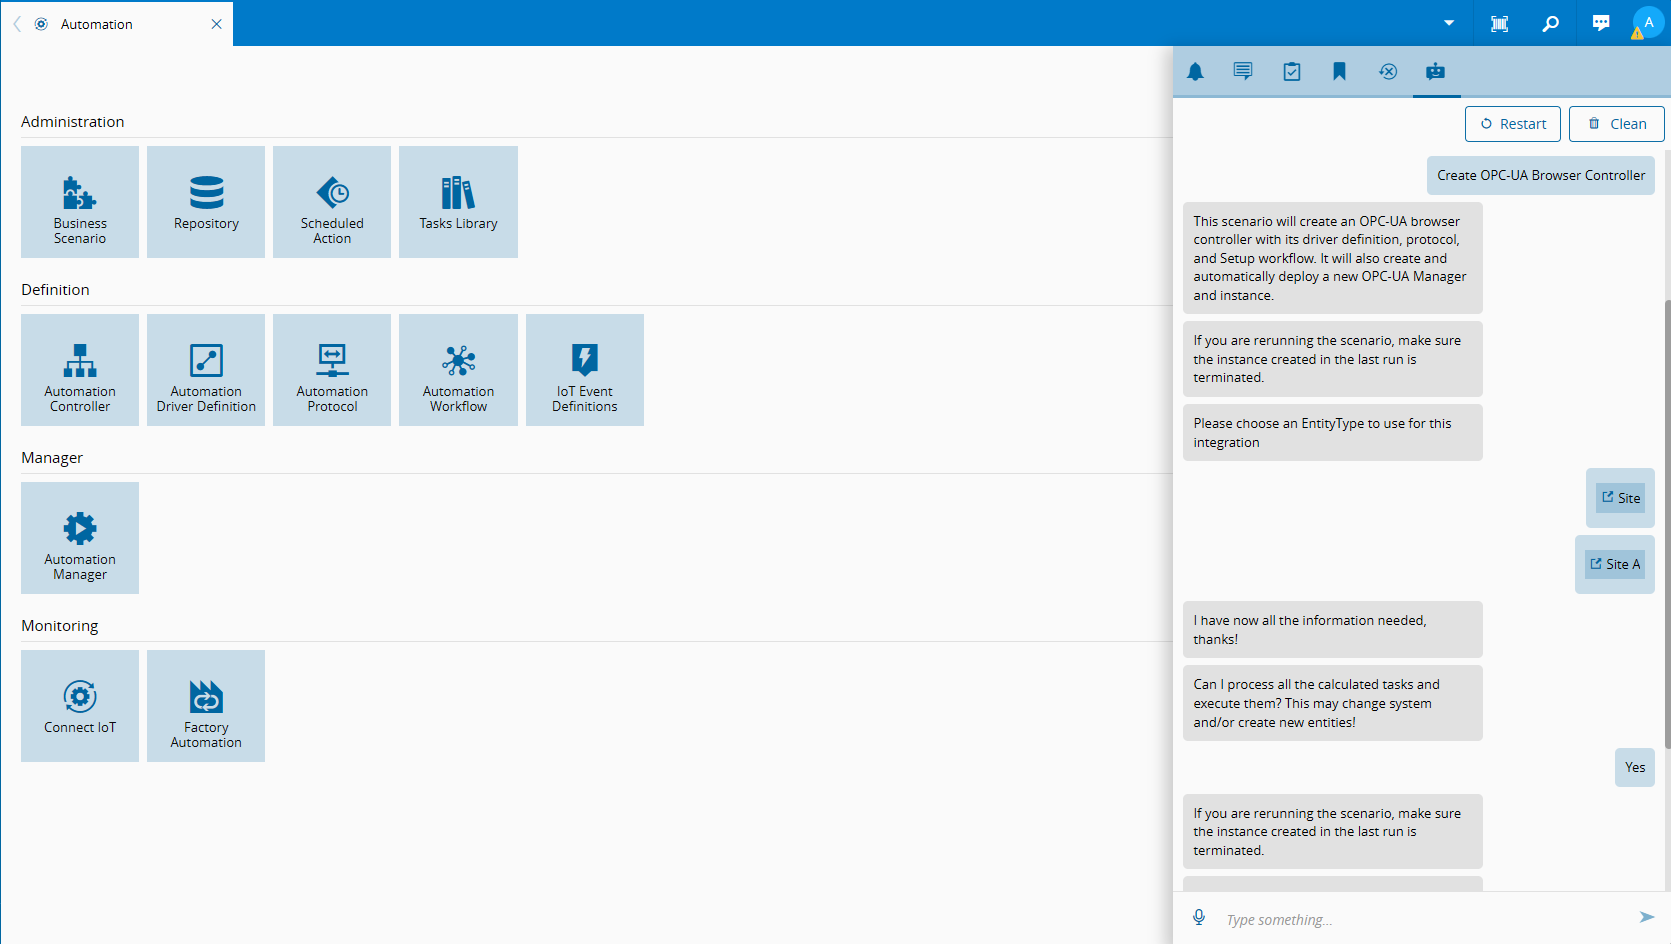
Business scenarios are focused on a question and answer back and forth, with deterministic outcomes. The goal is to give to the user who makes the scenario and the user that is answering the scenario a gated use-case where the outcome is expected and valid.
It is defined in a json metadata where we define a set of sequential steps.
Creating an Automatic Deploy Scenario#
I split my business scenario into four distinct stages, validation (orange), information gathering (blue), generation (grey) and execution (green).
Here we can see the full execution map from Script steps to run code, Question steps prompt the user, Condition steps branch the flow, and Message steps display information without requiring input.
graph TD
    classDef startClass fill:#0074b7,stroke:#005490,color:#ffffff
    classDef endClass fill:#2e7d32,stroke:#005490,color:#ffffff
    classDef validation fill:#d06b1f,stroke:#005490,color:#ffffff
    classDef informationgathering fill:#005490,stroke:#3a78b5,color:#ffffff
    classDef generation fill:#7e8c7e,stroke:#005490,color:#ffffff
    classDef execution fill:#24b324,stroke:#005490,color:#ffffff

    CheckIfUserIsIntegrationUser["Script:
CheckIfUserIsIntegrationUser
(selectedUser)"]:::validation --> InformTheUser
    InformTheUser["Message:
InformTheUser"]:::validation --> NoAutomationInstances
    NoAutomationInstances["Message:
NoAutomationInstances"]:::validation --> ResolveIoTEnabledEntities
    ResolveIoTEnabledEntities["Script:
ResolveIoTEnabledEntities
(iotEnabledEntities)"]:::validation --> IoTEntityEnabled
    IoTEntityEnabled["Condition:
IoTEntityEnabled"]:::validation -->
|"size(iotEnabledEntities)[0] > 1"|AskWhichIoTEntityType
    IoTEntityEnabled["Condition:
IoTEntityEnabled"]:::informationgathering -->
|"size(iotEnabledEntities)[0] == 1"|AskWhichIoTEntity
    AskWhichIoTEntityType["Question:
AskWhichIoTEntityType
(iotEnabledEntityType)"]:::informationgathering --> AskWhichIoTEntity
    AskWhichIoTEntity["Question:
AskWhichIoTEntity
(iotEnabledEntity)"]:::informationgathering --> GenerateOpcUaController:::generation
    ExecuteMasterData["Script:
ExecuteMasterData
(masterdataResult)"]:::execution --> ScenarioExecuted
    ScenarioExecuted["Message:
ScenarioExecuted"]:::execution --> ScenarioExecutedPackage:::execution
    StartStep["Start Step"]:::startClass  --> CheckIfUserIsIntegrationUser
    EndStep["End Step"]:::endClass --> ExecuteMasterData
All business scenarios showed here were made using the CLI and customization framework, which provides scaffolding, intellisense and other helpers.
Validation#
This stage we make sure the user has all the required permissions and the system has all the required pre-conditions to execute the scenario.
The user can only deploy the automation manager if he is an integration user. So we add a silent step to validate that condition.
   {
      "name": "CheckIfUserIsIntegrationUser",
      "type": "Script",
      "resultKey": "selectedUser",
      "settings": {
         "script": [
         "if(!this.securityService.user.IsIntegrationUser) {",
         "   throw new Error('This scenario can only be executed by a User that is an Integration User');",
         "}",
         "this.securityService.user"
         ]
      },
      "next": "InformTheUser"
   },
Our integration will require an appended MES entity to run the automation. The entity can be any entity type as long as the entity type is marked as connect iot enabled.
   {
      "name": "ResolveIoTEnabledEntities",
      "type": "Script",
      "resultKey": "iotEnabledEntities",
      "settings": {
         "script": [
         "(async () => {",
         "   const entities = await this.lboUtilities.iotEnabledEntities();",
         "   if(entities.length == 1) {",
         "       this.answers.iotEnabledEntity = entities[0];",
         "   }",
         "   return entities;",
         "})()"
         ]
      },
      "next": "IoTEntityEnabled"
   }
We will make sure there is at least one entity type iot enabled.
Information Gathering#
This stage is where we start asking the user for relevant information for the integration.
First, we add a flow where the user chooses the entity type and the entity. If there’s only one entity type marked as connect iot enabled we will auto fill the answer.
   {
      "name": "IoTEntityEnabled",
      "type": "Condition",
      "settings": {
         "condition": {
         "size(iotEnabledEntities)[0] > 1": "AskWhichIoTEntityType",
         "size(iotEnabledEntities)[0] == 1": "AskWhichIoTEntity"
         }
      },
      "next": ""
   },
   {
      "name": "AskWhichIoTEntityType",
      "type": "Question",
      "resultKey": "iotEnabledEntityType",
      "settings": {
         "message": "Please choose an EntityType to use for this integration",
         "dataType": "EntityType",
         "settings": {
         "data": [
            "this.answers.iotEnabledEntities"
         ]
         }
      },
      "next": "AskWhichIoTEntity"
   },
   {
      "name": "AskWhichIoTEntity",
      "type": "Question",
      "message": "Select an entity type",
      "resultKey": "iotEnabledEntity",
      "settings": {
         "dataType": "FindEntity",
         "settings": {
         "query": "${script(./scripts/create-opcua-controller/find_entity.ts)}",
         "displayField": "Name"
         }
      },
      "next": "GenerateOpcUaController"
   },
In this scenario, the workflow is already pre-defined and the only variable is the the entity to associate to the instance. So we won’t require any more information from the user.
Generation#
The generation stage is where we will gather all the information collected from the user and build the entities to add to the system. In this example, we are building a master data package to be uploaded to the system.
   {
      "name": "GenerateOpcUaController",
      "type": "Script",
      "settings": {
         "script": "${script(./scripts/create-opcua-controller/generate_opcua_controller.ts)}"
      },
      "next": ""
   },
The script will be focused on mirroring the workflow and creating the entities for the deployment.
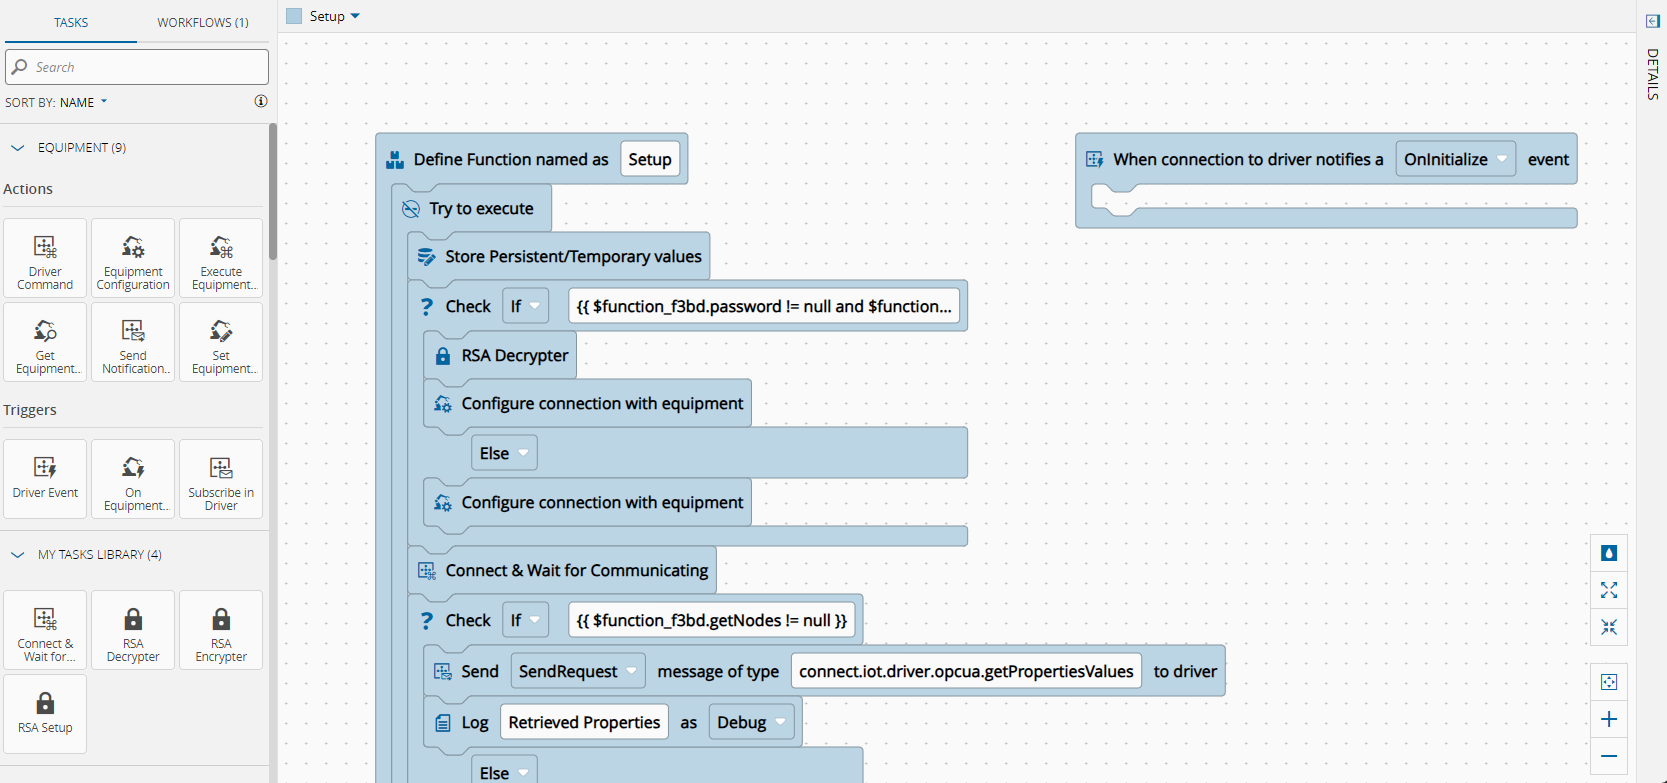
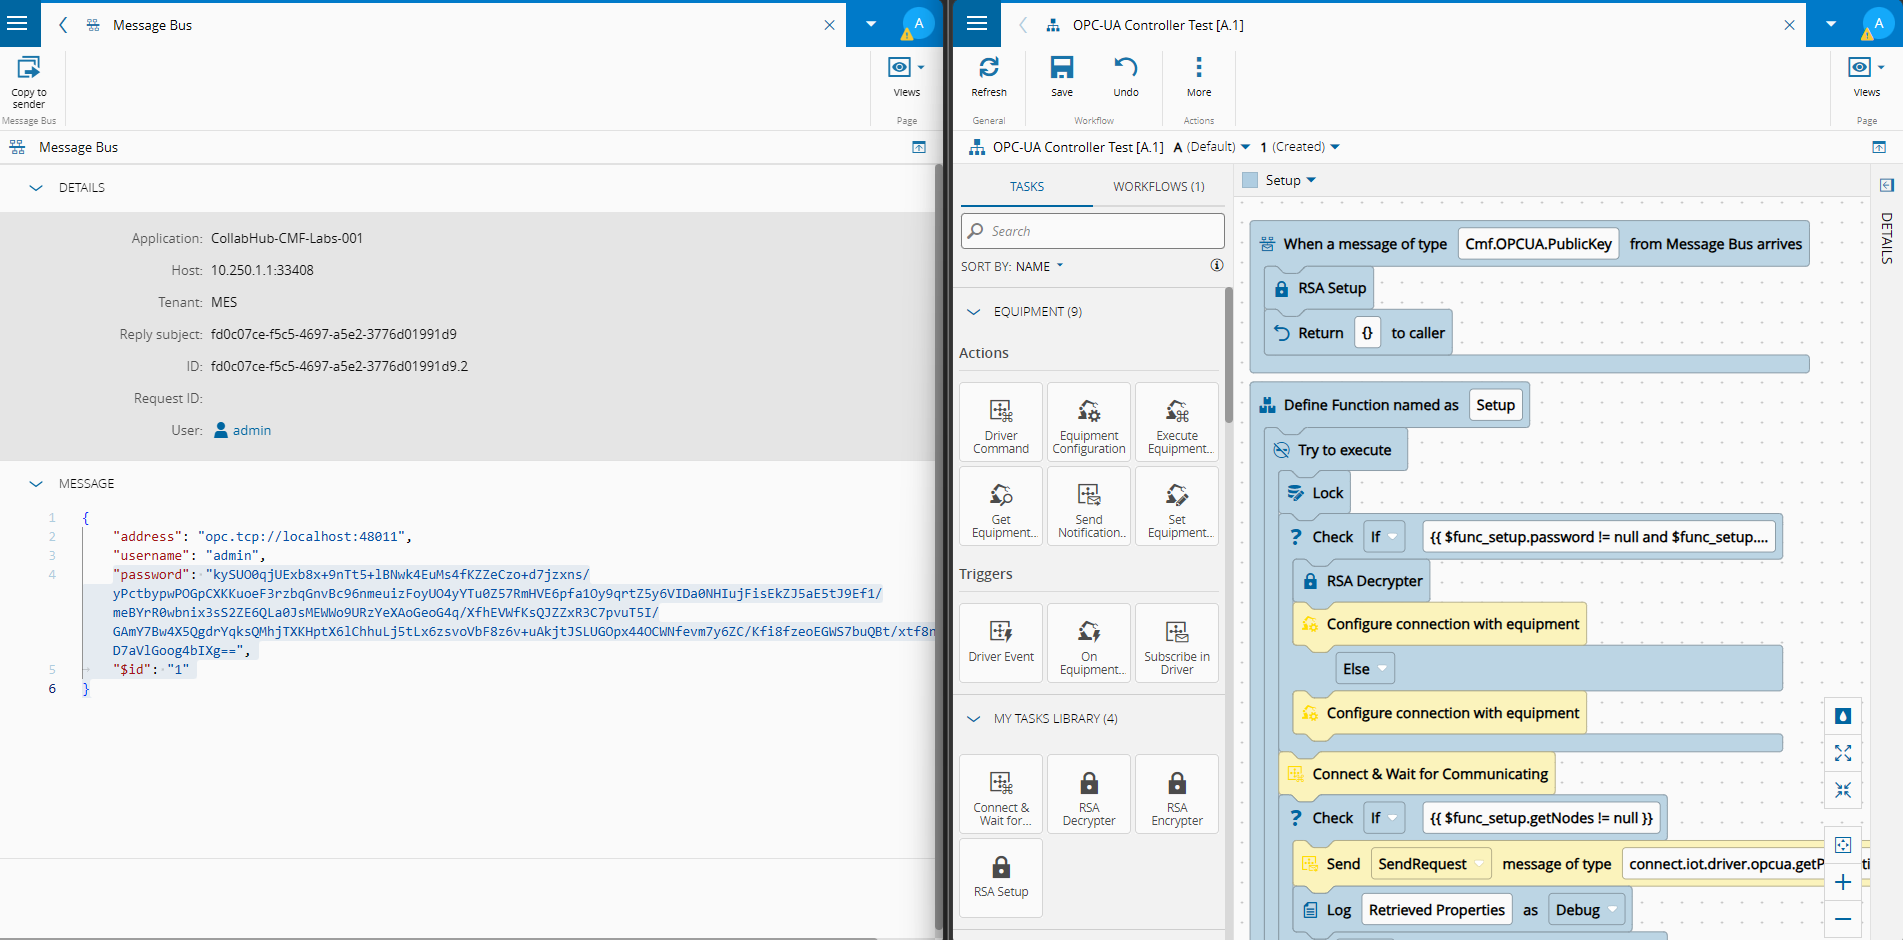
This is an example workflow that we will have be deployed via business scenario and automatically deployed.
The script builds the full Connect IoT entity stack for an OPC-UA integration: a Protocol defines the communication type, a Driver Definition maps the communication interface, a Controller holds the workflow logic, and a Manager and Automation Instance tie everything to an MES entity (mapping a physical machine).
The script will extract the user answers and the names for the iot entities.
   // PackagePacker: Start of Script
   (async () => {
      const managerName = "OPCUA Browser Manager";
      const controllerName = "OPCUA Browser Controller";
      const protocolName = "OPCUA Browser Protocol";
      const driverDefName = "OPCUA Browser Driver Definition ";
      const driverAlias = "OPCUA";
      const opcuaPackage = "@criticalmanufacturing/connect-iot-driver-opcua";
      const coreTasksPackage = "@criticalmanufacturing/connect-iot-controller-engine-core-tasks";
      const customTasksPackage = "@criticalmanufacturing/connect-iot-controller-engine-custom-tasks";
      const tasksPackages = [coreTasksPackage, customTasksPackage];
      const entityType = this.answers.iotEnabledEntityType.Name;

      // ────────────────────────────────────────────────────────────────────────────
Then we can start building the iot entities.
   // ── 1. Protocol ──────────────────────────────────────────────────────────
   await this.masterdataDirector.buildProtocol({
         name: protocolName,
         type: "Ephemeral",
         packageName: opcuaPackage,
   });

   // ── 2. Driver Definition ─────────────────────────────────────────────────
   await this.masterdataDirector.buildDriverDefinition(
         {
            name: driverDefName,
            type: "Ephemeral",
            automationProtocol: protocolName,
            objectType: entityType,
         },
         [], // properties
         [], // events
         [] // eventProperties
   );
The Automation Controller is the more complex one as it will have all the workflow logic. Here the idea is we have a set of root tasks and the other tasks are nested under the root tasks. Similar to what you see in the workflow editor
   const setupRoot = positionRootTask(await this.workflowBuilder.addRootTask(
         coreTasksPackage,
         "function",
         { name: "Setup" },
         [
            { name: "address", displayName: "address", dataType: "String", value: "" },
            { name: "username", displayName: "username", dataType: "String" },
            { name: "password", displayName: "password", dataType: "String" },
            { name: "getNodes", displayName: "getNodes", dataType: "Object" },
         ],
         [
            { name: "browse", displayName: "browse", dataType: "Object", value: "" },
            { name: "getProps", displayName: "getProps", dataType: "Object" },
         ]
   ));

   // tryCatch wrapper inside the handler branch
   const tryCatch = await this.workflowBuilder.addTask(
         setupRoot.id,
         "handler",
         coreTasksPackage,
         "tryCatch",
         {},
         [],
         []
   );
(...)
An interesting use case to point out is the condition task as it creates a branching between the handler and the else. This is quite easy to distinguish we just need to nest the following tasks into the different branches.
   // try: condition – check if password is provided
   const pwCondition = await this.workflowBuilder.addTask(
         tryCatch.id,
         "try",
         coreTasksPackage,
         "condition",
         {},
         [],
         [],
         [
            {
               name: "handler",
               settings: { type: "If", condition: `{{ $${setupRoot.name}.password != null and $${setupRoot.name}.password != "" }}` },
               tasks: [],
            },
            {
               name: "else",
               settings: { type: "Else" },
               tasks: [],
            },
         ]
   );

   // if password set: rsaDecrypter – decrypt the incoming encrypted password
   const rsaDecrypter = await this.workflowBuilder.addTask(
         pwCondition.id,
         "handler",
         customTasksPackage,
         "rsaDecrypter",
         {},
         [{ name: "encryptedBase64", displayName: "encryptedBase64", value: ` {{ $${setupRoot.name}.password }}`, dataType: "String" }],
         [{ name: "value", displayName: "value", value: "{{ $this.value }}", dataType: "String" }]
   );
(...)
Now that we populated the workflow builder we can extract the master data and add the automation controller.
   // ── 4. Controller ─────────────────────────────────────────────────────────
   await this.masterdataDirector.buildController(
         {
            name: controllerName,
            type: "Ephemeral",
            scope: "ConnectIoT",
            objectType: entityType,
            tasksPackages: tasksPackages,
            tasksLibraryPackages: tasksLibraryPackages,
            controllerPackageVersion: undefined,
            defaultWorkflowType: "ControlFlow",
         },
         [
            {
               automationController: controllerName,
               name: driverAlias,
               displayName: driverAlias,
               automationDriverDefinition: driverDefName,
               color: "#ffdd00",
               order: 1,
            },
         ],
         [
            {
               automationController: controllerName,
               name: "Setup",
               displayName: "Setup",
               workflow: setupWorkflow,
               order: 1,
               isFile: true,
               workflowType: "ControlFlow",
            },
         ]
   );
The next step is creating the automation manager and the instance. If you are curious to understand how all these entities relate with each other you can read about it overview Connect IoT Structure and IoT Extensibility.
(...)
   // ── 5. Manager ─────────────────────────────────────────────────────────
(...)
   const managerInfo: any = {
         Name: managerName,
         LogicalAddress: managerName,
         Type: "Ephemeral",
         DeploymentMode: "AutomaticDeploy",
         DeploymentState: "Ready",
         MonitorPackageVersion: getNewestVersion(getNPMPackageVersionOutput.PackageVersions.get("@criticalmanufacturing/connect-iot-monitor")),
         ManagerPackageVersion: getNewestVersion(getNPMPackageVersionOutput.PackageVersions.get("@criticalmanufacturing/connect-iot-manager"))
   };
   this.masterdataDirector.builder.addGeneric("<SM>AutomationManager", managerInfo);

   // ── 7. AutomationInstances ─────────────────────────────────────────────────────────

   const worksheetNameMapping: any = {
         WorksheetName: "AutomationInstances",
         Value: "<DM>AutomationControllerInstance"
   };
   this.masterdataDirector.builder.addGeneric("WorksheetNameMapping", worksheetNameMapping);

   const aciInfo: any = {
         AutomationController: controllerName,
         AutomationManager: managerName,
         EntityName: this.answers.iotEnabledEntity.Name
   };
   this.masterdataDirector.builder.addGeneric("<LOOKUP>AutomationInstances", aciInfo);

   const adiInfo: any = {
         AutomationController: controllerName,
         AutomationManager: managerName,
         EntityName: this.answers.iotEnabledEntity.Name,
         DriverName: driverAlias
   };

   this.masterdataDirector.builder.addGeneric("<LOOKUP>AutomationInstances", adiInfo);
})();
// PackagePacker: End of Script
An important highlight is that our manager will be created with the Deployment Mode automatic deploy. This means that right away it is marked as a manager that is to be deployed by automation manager controller. The Deployment State is important in having the deployment be automatic, if it is in a ready state this means it is marked to be automatically deployed, if it’s not set as ready the user will have to manually press in the deploy button.
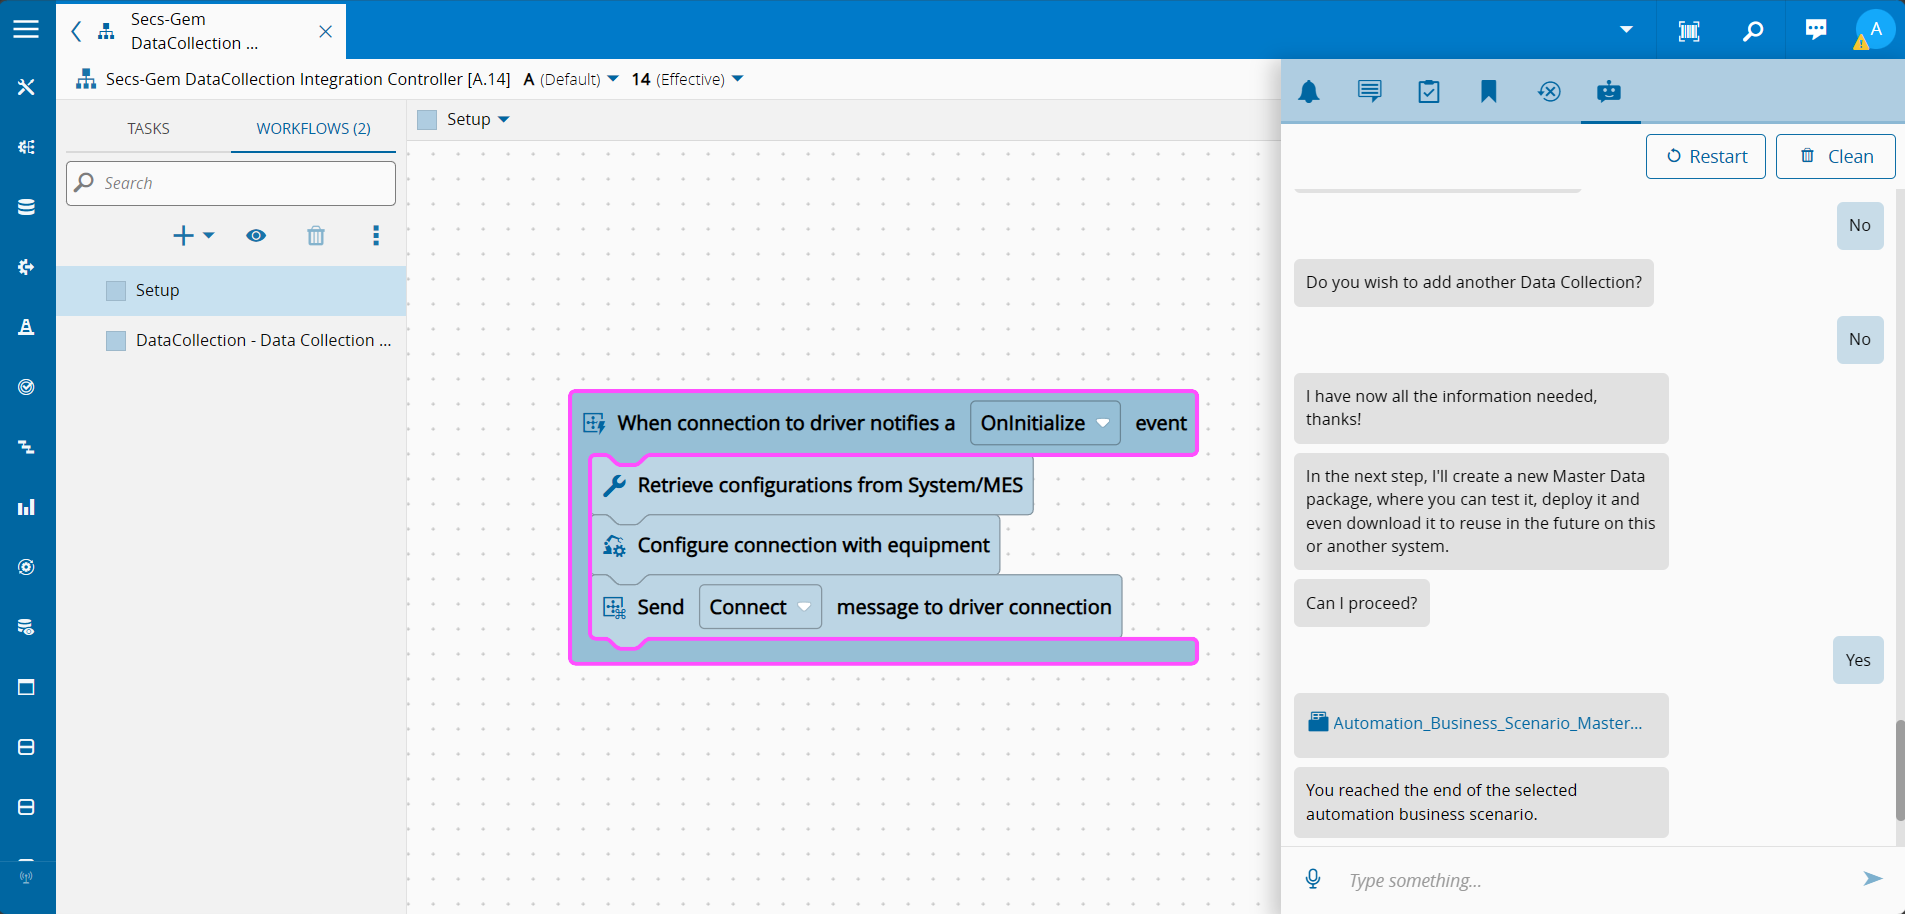
Executing the Scenario#
We can now import the scenario to our MES. Either via an installation of the customization or directly in the system.
Note that the scenario generated a master data package that will upload our master data to the system. When it finishes running we have all the connect iot entities with an Automation Manager in the state ready and a controller instance associated to it.
At this point the integration is live. The Automation Manager will be picked up by the Automation Manager Controller and deployed automatically — no further manual steps, no SSH session, no configuration file editing, no server or cluster access.
Automatic Deployment#
The automation manager controller is has now deployed the automation manager with an instance. You can see in the Connect IoT UI that the instance is now green and in the state ready. If we take a look in the cluster we can see that we now have a deployment and a pod running.
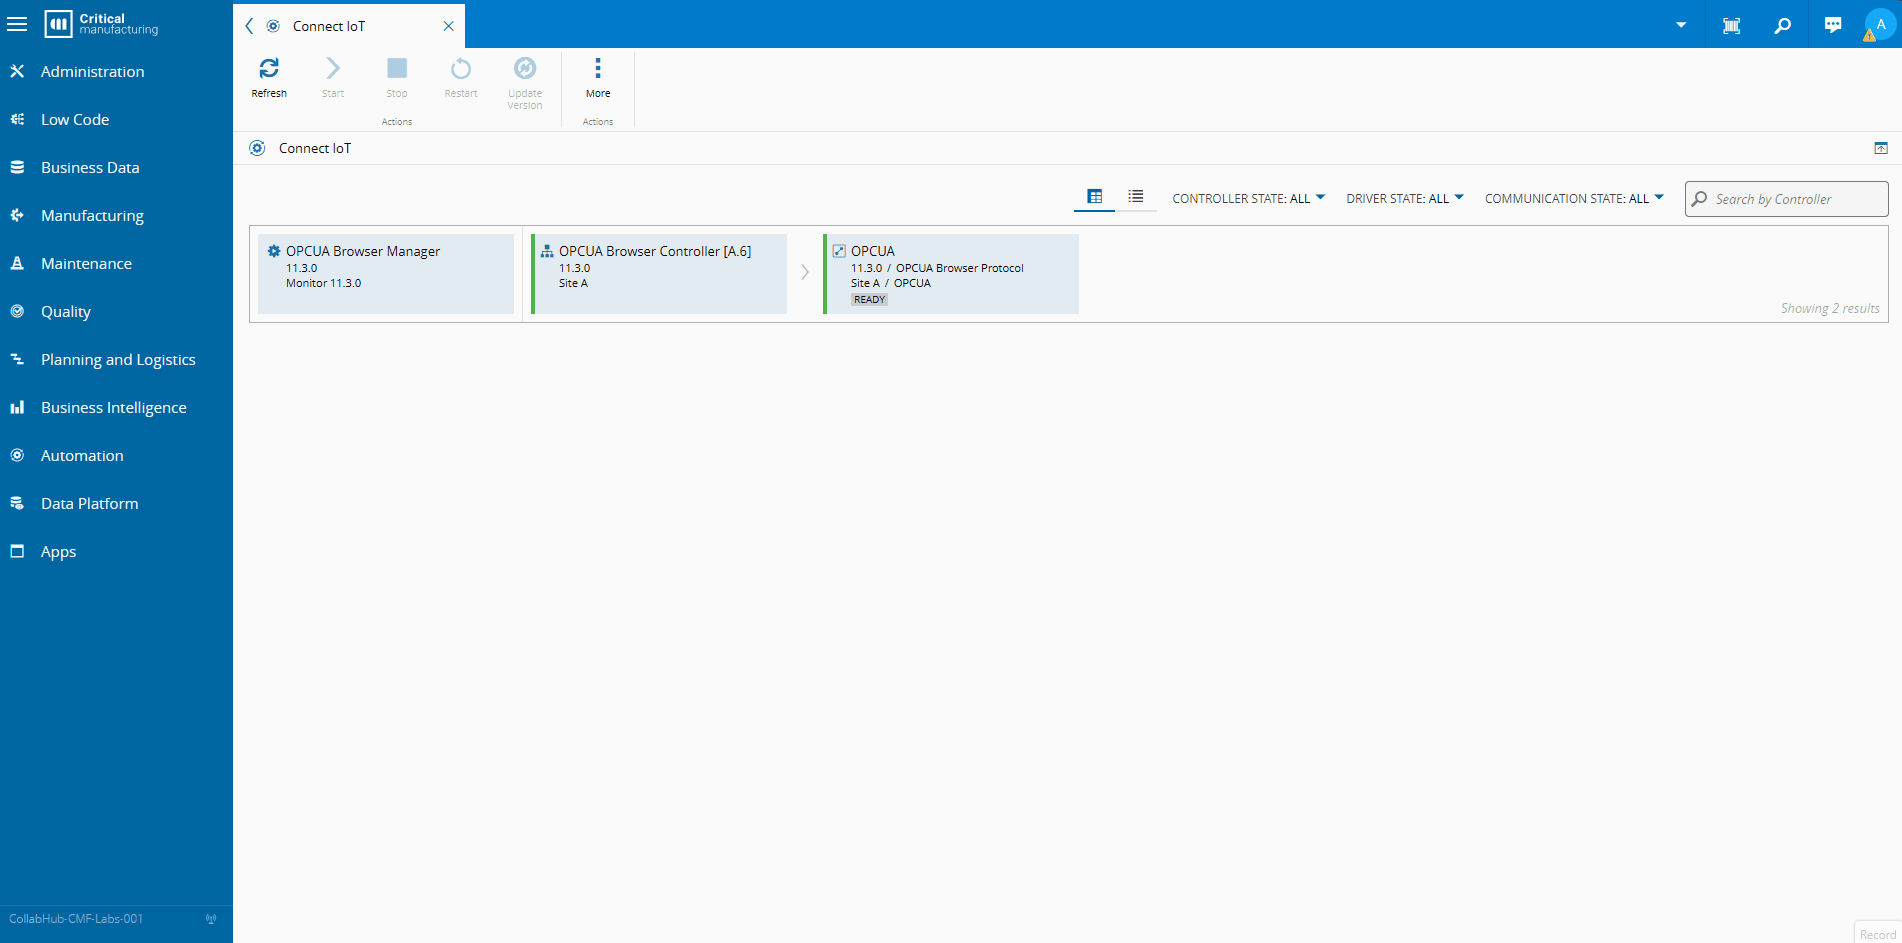
In this use-case the automation manager controller is running in the same stack of the MES but it could also be deployed alone in an edge stack.
Final Thoughts#
This use case opens up the door for an easy way to quickly handle edge deployments.
The possibilities are endless and can be fine-tuned to your particular needs.
The same pattern could deploy a different protocol type based on user selection, provision multiple machines in a single scenario run, or include a validation step that checks whether a compatible Automation Manager is already running in the target cluster.