The rise of AI has brought action and insight through a normal conversation. We’ve been building a lot of support for leveraging AI flows From Insight to Action: AI That Actually Does Something and Data Platform - Agentic Use-Case, today we are addressing a different type of solution.
This can be a great way for dynamic engagements, but it is also a probabilistic tool. It does not guarantee a set path of available options.
Even constrained AI’s with grammar or low temperature, are based on probabilistic outcomes and required a deep validation of the solution offered and the actions to perform.
Business Scenarios were thought exactly to tackle those kinds of problems. They are focused on a question and answer back and forth, with deterministic outcomes. The goal is to give to the user who makes the scenario and the user that is answering the scenario a gated use-case where the outcome is expected and valid.

Overview#
Business scenarios are made up of a scope, of steps and checkpoint hooks. They are defined in an easy to see and interpret JSON metadata object.
The scope will be in which view of the MES they will be accessible. If a user is in the BusinessData view he can add the scope LandingPage/BusinessData, this means that the scenario will only be visible if the user is in the BusinessData landing page.
A scenario can be created for any action in the MES.
A common approach in creating complex scenarios is to make a set of questions to the user and then generate a master data package that he can view, validate and execute.
Create an MES User#
Let’s start with a simple scenario. We want via chat to be able to create an MES User.
We will define in what scopes we want the user to be able to create users. For this example, I chose scope Security. The scope security already safeguards that only users with access to the page with the security feature can access this scenario.
Now we can define our flow. We will create a set of questions we need in order to be able to create a user.
graph TD
    classDef startClass fill:#0074b7,stroke:#005490,color:#ffffff
    classDef endClass fill:#2e7d32,stroke:#1b5e20,color:#ffffff
    classDef questionClass fill:#5b9bd5,stroke:#3a78b5,color:#ffffff
    classDef scriptClass fill:#d06b1f,stroke:#a05010,color:#ffffff

    StartStep["Start Step"]:::startClass --> AskUserAccount
    AskUserAccount["Question:
AskUserAccount
(userAccount)"]:::questionClass --> AskName
    AskName["Question:
AskName
(userName)"]:::questionClass --> AskEmail
    AskEmail["Question:
AskEmail
(mailAddress)"]:::questionClass --> LoadRoles
    LoadRoles["Script:
LoadRoles
(rolesList)"]:::scriptClass --> AskPrimaryRole
    AskPrimaryRole["Question:
AskPrimaryRole
(primaryRole)"]:::questionClass --> AskAuthStrategy
    AskAuthStrategy["Question:
AskAuthStrategy
(authenticationStrategy)"]:::questionClass --> AskPassword
    AskPassword:::questionClass
    EndStep["End Step"]:::endClass --> CreateUser
    CreateUser:::endClass
Creating a Scenario#
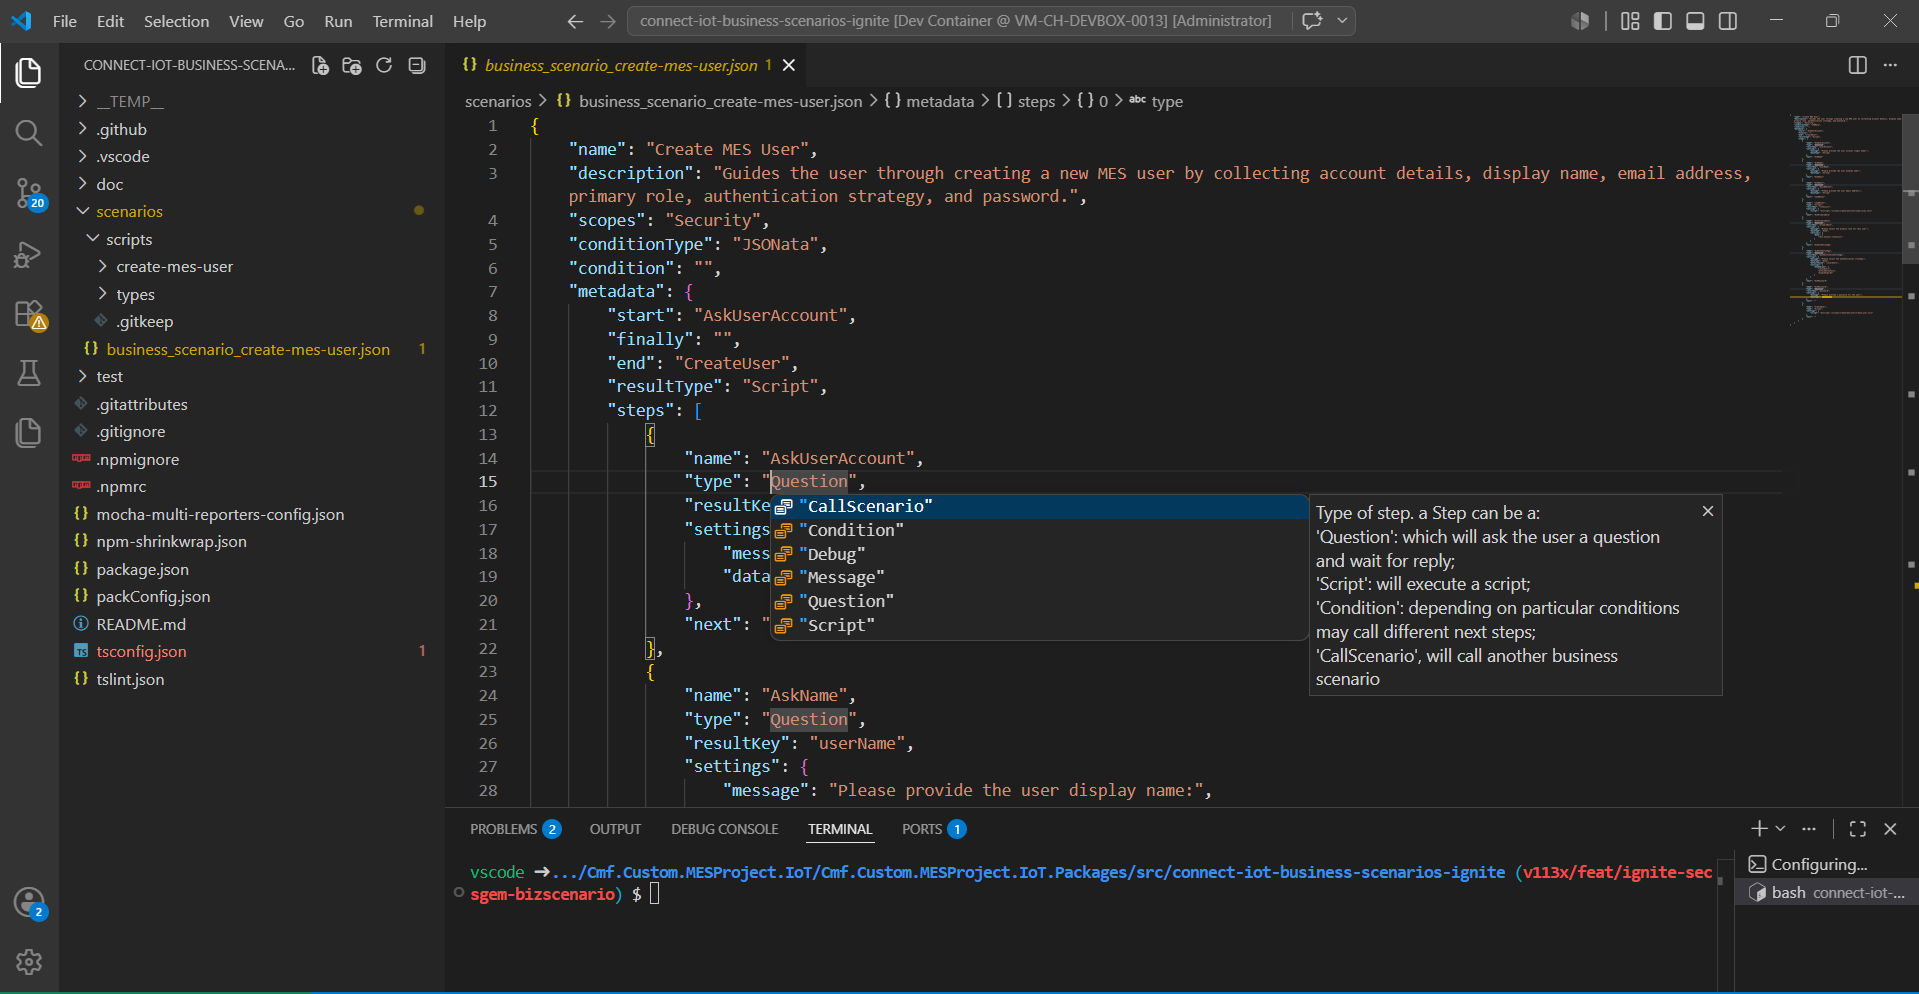
A scenario is composed of a json that defines each of the steps to execute.
A scenario can be created directly in the MES UI, but typically the scenario is managed through a customization project and this is what we will focus on today.
Development Workspace#
The Business Scenarios are handled in customization as part of the IoT customization package.
In order to generate a new iot package the CLI provides the command:
cmf new iotIn the IoT.Packages generated we can now create the package that will hold our business scenarios, by executing:
cmf new iot businessScenarioThe command will generate the following structure:
📂.vscode
┣ 📂doc
┃ ┗📜business_scenario_<scenario>.md
┣ 📂scenarios
┃ ┗📂scripts
┃ ┗📜business_scenario_<scenario>.json
(...)
Let’s take a look at some developer experience features the development workspace gives you.
The first one is having json schema intellisense that can complement the information provided in the documentation portal.
The second is the ability to easily compile and deploy the changes to the scenario.
The creation of the scenario in the MES can be done like any other iot package with the use of the command:
npm run packagePackerThen the user can add it to the repository and create the scenario. The user can also go to the folder TEMP which will have the package.json with the scenario with the embedded scripts.
Any time we want to change the scenario we can edit it and change the metadata information.
Finally, the ability to generate mermaid flowcharts mapping our scenario, is very handy when our scenarios start to become complex, with the use of the vscode extension Automation Business Scenarios Renderer.
Breaking Down our Create User Scenario#
First, we start off by providing a valid name and description. As explained previously the scopes will be where the scenario is available. The scopes are comma separated, for our scenario we just have the scenario available for the Security page.
{
    "name": "Create MES User",
    "description": "Guides the user through creating a new MES user by collecting account details, display name, email address, primary role, authentication strategy, and password.",
    "scopes": "Security",
    (...)
    "metadata": {
The metadata field is where we will have our steps and our checkpoint hooks. For this, scenario we have two stages, the main stage where we are asking the user questions and the end stage where we want to call a script to create the user in the MES.
Our first question is to ask for the user account, so this is our start checkpoint and we will have an end step which will invoke a script, where we create a user, therefore the resultType is Script and our end step is CreateUser.
(...)
    "start": "AskUserAccount",
    "finally": "",
    "end": "CreateUser",
    "resultType": "Script",
    "steps": [...]
A step is defined by having a name, a type, a set of settings and a next step. If a step is a Question it will have a resultKey, which will be where the step stores the answer.
(...)
    {
        "name": "AskUserAccount",
        "type": "Question",
        "resultKey": "userAccount",
        "settings": {
            "message": "Please provide the user account (login name):",
            "dataType": "String"
        },
        "next": "AskName"
    },
(...)
    {
        "name": "LoadRoles",
        "type": "Script",
        "resultKey": "rolesList",
        "settings": {
            "script": "${script(./scripts/create-mes-user/load_roles.ts)}"
        },
        "next": "AskPrimaryRole"
    },
    {
        "name": "AskPrimaryRole",
        "type": "Question",
        "resultKey": "primaryRole",
        "settings": {
            "message": "Please select the primary role for this user:",
            "dataType": "Enum",
            "settings": {
                "data": [ "this.answers.rolesList;" ]
            }
        },
        "next": "AskAuthStrategy"
    },
(...)
The LoadRoles is a Script step. Script steps are steps that execute a browser side code script. Scripts can be directly referenced, or can be stored in a separate typescript file and then bundled into the scenario.
A Script is defined by having a start and end token (// PackagePacker: Start of Script // PackagePacker: End of Script). Scripts have access to several utilities and can perform actions or query the MES.
import { Cmf } from "cmf-lbos";
import { ScriptScopeBase } from "../types/globals";
class LoadRolesWrapper extends ScriptScopeBase {
    private loadRoles() {
        // PackagePacker: Start of Script
        (async () => {
            const output = await this.System.call(
              new Cmf.Foundation.BusinessOrchestration.SecurityManagement.InputObjects
                .GetAllRolesInput())
                as Cmf.Foundation.BusinessOrchestration.SecurityManagement.OutputObjects.GetAllRolesOutput;
            return output.Roles.map((r: any) => ({ Id: r.Id, Name: r.Name }));
        })();
        // PackagePacker: End of Script
    }
}
The LoadRoles script is quite simple, it retrieves all the roles and prepares them in a format that can be then ingested by the Enum Question step.
Note: Result keys of the steps are available in the this.answers object.
debugger; token you are able to debug your script execution in your browser devtools.(...)
{
"name": "CreateUser",
"type": "Script",
"settings": {
"script": "${script(./scripts/create-mes-user/create_user.ts)}"
},
"next": ""
}
(...)The CreateUser is similar to the LoadRoles, but invokes a slightly more complex script.
  import { Cmf } from "cmf-lbos";
  import { ScriptScopeBase } from "../types/globals";
class CreateUserWrapper extends ScriptScopeBase {
    private createUser() {
        // PackagePacker: Start of Script
        (async () => {
            const rolesList: Array<{ Id: string; Name: string }> = this.answers.rolesList ?? [];
// The Enum question with {Id, Name}[] data stores the selected Id;
            // fall back to Name match in case the runtime stores the Name instead.
            const selectedRole =
                rolesList?.find((r) => r.Id === this.answers.primaryRole) ??
                rolesList.find((r) => r.Name === this.answers.primaryRole);
const user = new Cmf.Foundation.Security.User();
            user.IsEnabled = true;
            user.UserAccount = this.answers.userAccount;
            user.UserName = this.answers.userName;
            user.MailAddress = this.answers.mailAddress;
            user.AuthenticationStrategy = this.answers.authenticationStrategy;
            user.Password = this.answers.password;
const role = new Cmf.Foundation.Security.Role();
            role.Id = selectedRole.Id;
            role.Name = selectedRole.Name;
            user.PrimaryRole = role;
const input = new Cmf.Foundation.BusinessOrchestration.SecurityManagement.InputObjects
                                .CreateUserInput();
            input.User = user;
            input.Password = this.answers.password;
            input.IgnoreLastServiceId = true;
            input.IsToSkipSyncFromAd = true;
            input.PlainSecureFields = true;
await this.System.call(input);
        })();
        // PackagePacker: End of Script
    }
  }
The script uses the information from the previous questions steps, stored in the this.answers and invokes the CreateUser MES service.
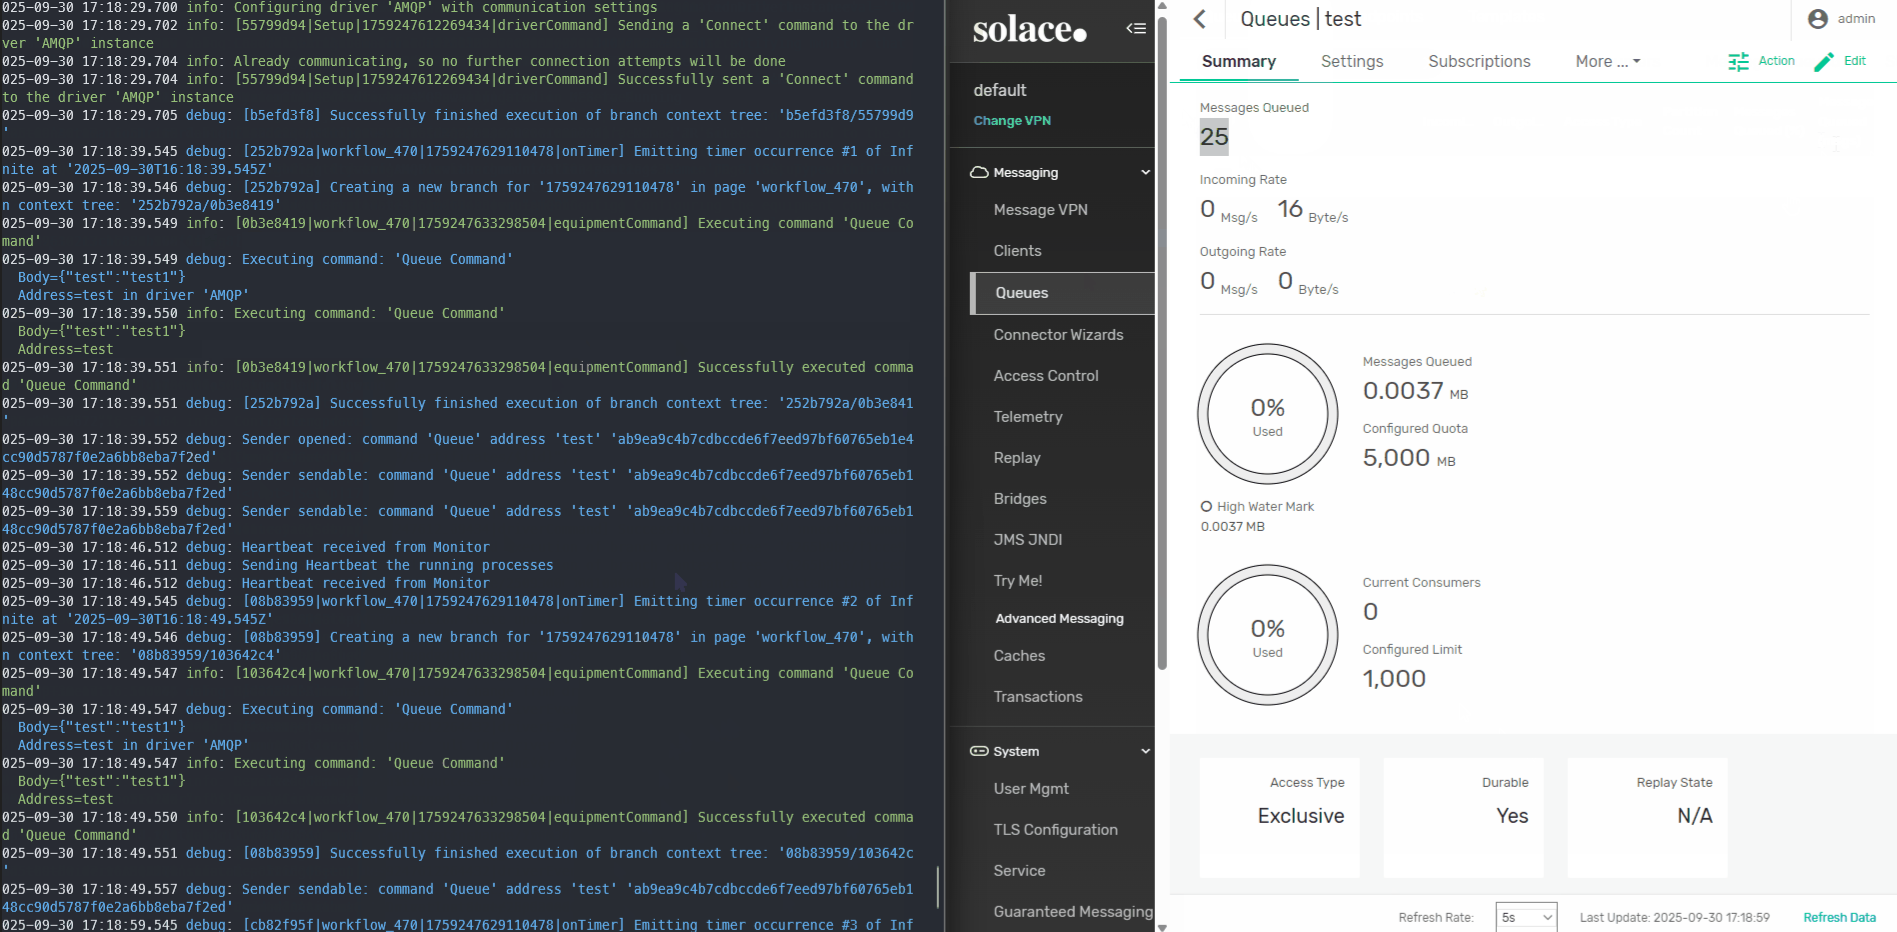
Creating a SECS-GEM Data Collection Workflow#
Business Scenarios are also a good way to tackle harder use cases.
SECS-GEM is a very common equipment integration standard in the world of semiconductors.
A secs-gem integration, even using a low code platform is often seen as something very complex and that may touch in different system entities. Check my post for more insight on this GEM300.
With a Business Scenario we can create at least a template approach so the user can have something to start using and build upon.
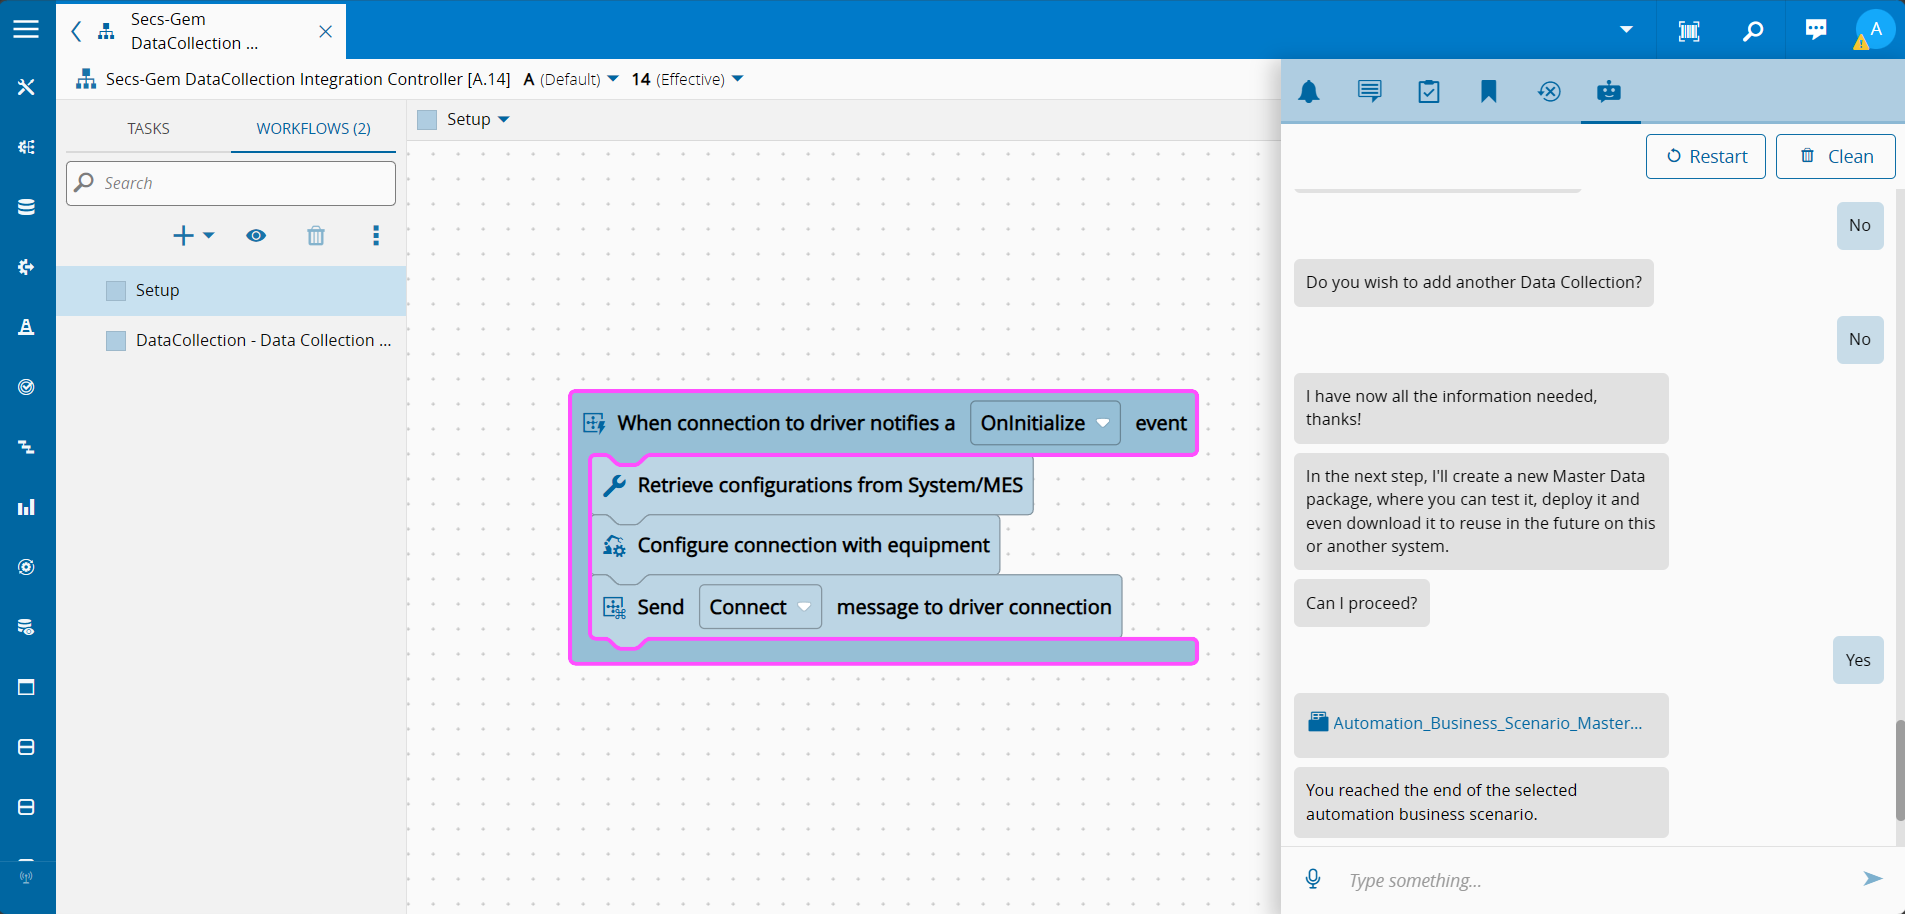
In this scenario the goal was to generate a secs-gem integration that will map secs-gem events to MES data collections.
This scenario serves to show how we can create more complex scenarios, that are very simple for the user to execute, but that can already have some sophistication.
graph TD
    classDef startClass fill:#0074b7,stroke:#005490,color:#ffffff
    classDef finallyClass fill:#2e7d32,stroke:#1b5e20,color:#ffffff
    classDef questionClass fill:#5b9bd5,stroke:#3a78b5,color:#ffffff
    classDef scriptClass fill:#d06b1f,stroke:#a05010,color:#ffffff
    classDef conditionClass fill:#7b4ea0,stroke:#5a3278,color:#ffffff

    StartStep["Start Step"]:::startClass --> NameIntegration

    NameIntegration["Question:
NameIntegration
(integrationName)"]:::questionClass --> ValidateResourceIsConnectIoTEnabled

    ValidateResourceIsConnectIoTEnabled["Script:
ValidateResourceIsConnectIoTEnabled
(iotEnabledEntities)"]:::scriptClass --> AskIpAddressPort

    AskIpAddressPort["Question:
AskIpAddressPort
(ipAddressPort)"]:::questionClass --> AskMode

    AskMode["Question:
AskMode
(mode)"]:::questionClass --> RetrieveProtocolSettings

    RetrieveProtocolSettings["Script:
RetrieveProtocolSettings"]:::scriptClass --> AskMoreCommunicationSettings

    AskMoreCommunicationSettings["Question:
AskMoreCommunicationSettings
(moreCommSettings)"]:::questionClass --> ConditionMoreCommSettings

    ConditionMoreCommSettings["Condition:
ConditionMoreCommSettings"]:::conditionClass -->|moreCommSettings == true| CommunicationSettingsToChange
    ConditionMoreCommSettings -->|moreCommSettings == false| AskCollectMachineEventData

    CommunicationSettingsToChange["Question:
CommunicationSettingsToChange
(settingToChange)"]:::questionClass --> DataTypeRouting

    DataTypeRouting["Script:
DataTypeRouting"]:::scriptClass --> InputTypeCondition

    InputTypeCondition["Condition:
InputTypeCondition"]:::conditionClass -->|paramDatatypeRender == 'datetime'| AskDateTime
    InputTypeCondition -->|paramDatatypeRender == 'number'| AskNumber
    InputTypeCondition -->|paramDatatypeRender == 'enum'| AskEnum
    InputTypeCondition -->|paramDatatypeRender == 'string'| AskString
    InputTypeCondition -->|paramDatatypeRender == 'boolean'| AskBoolean
    InputTypeCondition -->|paramDatatypeRender == 'object'| AskObject

    AskDateTime["Question:
AskDateTime
(settingNewValue)"]:::questionClass --> SetProtocolSetting
    AskNumber["Question:
AskNumber
(settingNewValue)"]:::questionClass --> SetProtocolSetting
    AskString["Question:
AskString
(settingNewValue)"]:::questionClass --> SetProtocolSetting
    AskEnum["Question:
AskEnum
(settingNewValue)"]:::questionClass --> SetProtocolSetting
    AskBoolean["Question:
AskBoolean
(settingNewValue)"]:::questionClass --> SetProtocolSetting
    AskObject["Question:
AskObject
(settingNewValue)"]:::questionClass --> SetProtocolSetting

    SetProtocolSetting["Script:
SetProtocolSetting"]:::scriptClass --> AskMoreSettings

    AskMoreSettings["Question:
AskMoreSettings
(moreSettings)"]:::questionClass --> ConditionMoreSettings

    ConditionMoreSettings["Condition:
ConditionMoreSettings"]:::conditionClass -->|moreSettings == true| CommunicationSettingsToChange
    ConditionMoreSettings -->|moreSettings == false| AskCollectMachineEventData

    AskCollectMachineEventData["Question:
AskCollectMachineEventData
(collectMachineEventData)"]:::questionClass --> ConditionCollectMachineEventData

    ConditionCollectMachineEventData["Condition:
ConditionCollectMachineEventData"]:::conditionClass -->|collectMachineEventData == true| AskDataCollection

    AskDataCollection["Question:
AskDataCollection
(currentDataCollection)"]:::questionClass --> AskDataCollectionMode

    AskDataCollectionMode["Question:
AskDataCollectionMode
(currentDataCollectionMode)"]:::questionClass --> AskEventCEID

    AskEventCEID["Question:
AskEventCEID
(eventCEID)"]:::questionClass --> SetEvent

    SetEvent["Script:
SetEvent"]:::scriptClass --> AskRPTID

    AskRPTID["Question:
AskRPTID
(rptid)"]:::questionClass --> SetRPTID

    SetRPTID["Script:
SetRPTID"]:::scriptClass --> AskSVID

    AskSVID["Question:
AskSVID
(svid)"]:::questionClass --> AskSVIDDataType

    AskSVIDDataType["Question:
AskSVIDDataType
(svidDataType)"]:::questionClass --> SetSVID

    SetSVID["Script:
SetSVID"]:::scriptClass --> AskMapToParameter

    AskMapToParameter["Question:
AskMapToParameter
(mapToParameter)"]:::questionClass --> ConditionMapToParameter

    ConditionMapToParameter["Condition:
ConditionMapToParameter"]:::conditionClass -->|mapToParameter == true| AskChooseDCParameter
    ConditionMapToParameter -->|mapToParameter == false| AskAddAdditionalSVID

    AskChooseDCParameter["Question:
AskChooseDCParameter
(dcParameter)"]:::questionClass --> SetDCParamToSVID

    SetDCParamToSVID["Script:
SetDCParamToSVID"]:::scriptClass --> AskAddAdditionalSVID

    AskAddAdditionalSVID["Question:
AskAddAdditionalSVID
(addAnotherSVID)"]:::questionClass --> ConditionAddSVID

    ConditionAddSVID["Condition:
ConditionAddSVID"]:::conditionClass -->|addAnotherSVID == true| AskSVID
    ConditionAddSVID -->|addAnotherSVID == false| AskAddAdditionalRPTID

    AskAddAdditionalRPTID["Question:
AskAddAdditionalRPTID
(addAnotherRPTID)"]:::questionClass --> ConditionAddRPTID

    ConditionAddRPTID["Condition:
ConditionAddRPTID"]:::conditionClass -->|addAnotherRPTID == true| AskRPTID
    ConditionAddRPTID -->|addAnotherRPTID == false| AskAddAdditionalEvents

    AskAddAdditionalEvents["Question:
AskAddAdditionalEvents
(addAnotherEvent)"]:::questionClass --> ConditionAddEvent

    ConditionAddEvent["Condition:
ConditionAddEvent"]:::conditionClass -->|addAnotherEvent == true| AskEventCEID
    ConditionAddEvent -->|addAnotherEvent == false| AskAddAdditionalDataCollections

    AskAddAdditionalDataCollections["Question:
AskAddAdditionalDataCollections
(addAnotherDC)"]:::questionClass --> ConditionAddDC

    ConditionAddDC["Condition:
ConditionAddDC"]:::conditionClass -->|addAnotherDC == true| AskDataCollection

    GenerateSecsGemIntegration["Script:
GenerateSecsGemIntegration"]:::scriptClass

    FinallyStep["Finally Step"]:::finallyClass --> GenerateSecsGemIntegration
This scenario shows interesting patterns as having the ability to create flows that are continuously reused and how to leverage information from the MES.
Deep diving on this implementation would be somewhat extensive and would defeat the purpose of a blog post. If you are interested to see how this scenario is built feel free to check it at business-scenarios. I will focus on some interesting patterns.
DataType Routing#
We are extracting information on what are the equipment settings for secs-gem from the information in the iot package. Each setting has its own datatype, in other words, some settings may be strings, decimals, integers, booleans, etc. One of the advantages of the questions is the ability to render the input field to the type that the user has to specify, this prevents a lot of human error.
In order to offer this to the user and due to the fact that for this scenario the setting datatype is dynamic depending on the setting, we can create a datatype routing. Depending on the setting type we route it to the correct question datatype.
graph TD
    classDef scriptClass fill:#d06b1f,stroke:#a05010,color:#ffffff
    classDef conditionClass fill:#7b4ea0,stroke:#5a3278,color:#ffffff
    classDef questionClass fill:#5b9bd5,stroke:#3a78b5,color:#ffffff

    DataTypeRouting["Script:
DataTypeRouting"]:::scriptClass --> InputTypeCondition

    InputTypeCondition["Condition:
InputTypeCondition"]:::conditionClass -->|paramDatatypeRender == 'datetime'| AskDateTime
    InputTypeCondition -->|paramDatatypeRender == 'number'| AskNumber
    InputTypeCondition -->|paramDatatypeRender == 'enum'| AskEnum
    InputTypeCondition -->|paramDatatypeRender == 'string'| AskString
    InputTypeCondition -->|paramDatatypeRender == 'boolean'| AskBoolean
    InputTypeCondition -->|paramDatatypeRender == 'object'| AskObject

    AskDateTime["Question:
AskDateTime
(settingNewValue)"]:::questionClass --> SetProtocolSetting
    AskNumber["Question:
AskNumber
(settingNewValue)"]:::questionClass --> SetProtocolSetting
    AskString["Question:
AskString
(settingNewValue)"]:::questionClass --> SetProtocolSetting
    AskEnum["Question:
AskEnum
(settingNewValue)"]:::questionClass --> SetProtocolSetting
    AskBoolean["Question:
AskBoolean
(settingNewValue)"]:::questionClass --> SetProtocolSetting
    AskObject["Question:
AskObject
(settingNewValue)"]:::questionClass --> SetProtocolSetting

    SetProtocolSetting["Script:
SetProtocolSetting"]:::scriptClass
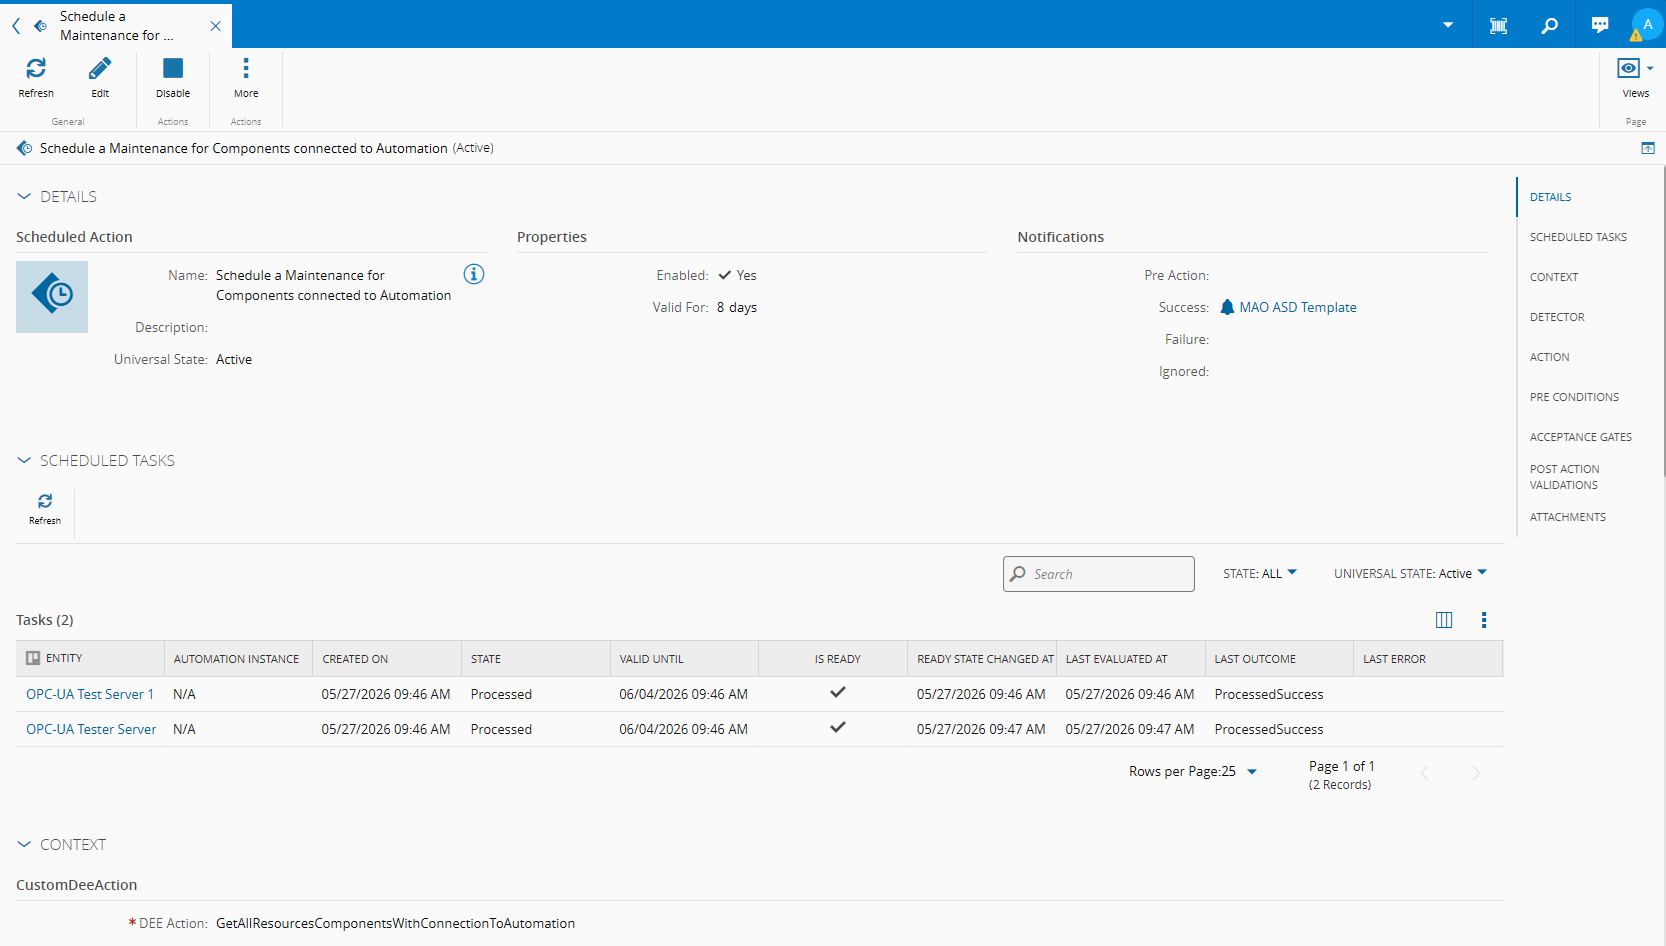
Generating the Master Data#
In this scenario the end goal is to generate a master data package. The system offers a robust set of utilities to help build the master data. It implements a builder pattern, where the user can through the script build the master data.
The director is responsible for supplying a set of utilities in order for the user to add entities to the master data. We can see an example of adding configuration entries to our master data.
(...)
//#region Config
const parentConfig = {
parentPath: "/Cmf/Custom/ConnectIoT",
name: `${this.answers.integrationName}`,
valueType: "",
value: ""
};
await this.masterdataDirector.builder
.addConfig(parentConfig.parentPath, parentConfig.name, parentConfig.value, parentConfig.valueType);
const ipAndAddressConfig = {
parentPath: `${parentConfigPath}`,
name: `ipAndAddress`,
valueType: "string",
value: this.answers.ipAddressPort
};
await this.masterdataDirector.builder
.addConfig(ipAndAddressConfig.parentPath, ipAndAddressConfig.name, ipAndAddressConfig.value, ipAndAddressConfig.valueType);
//#endregion Config
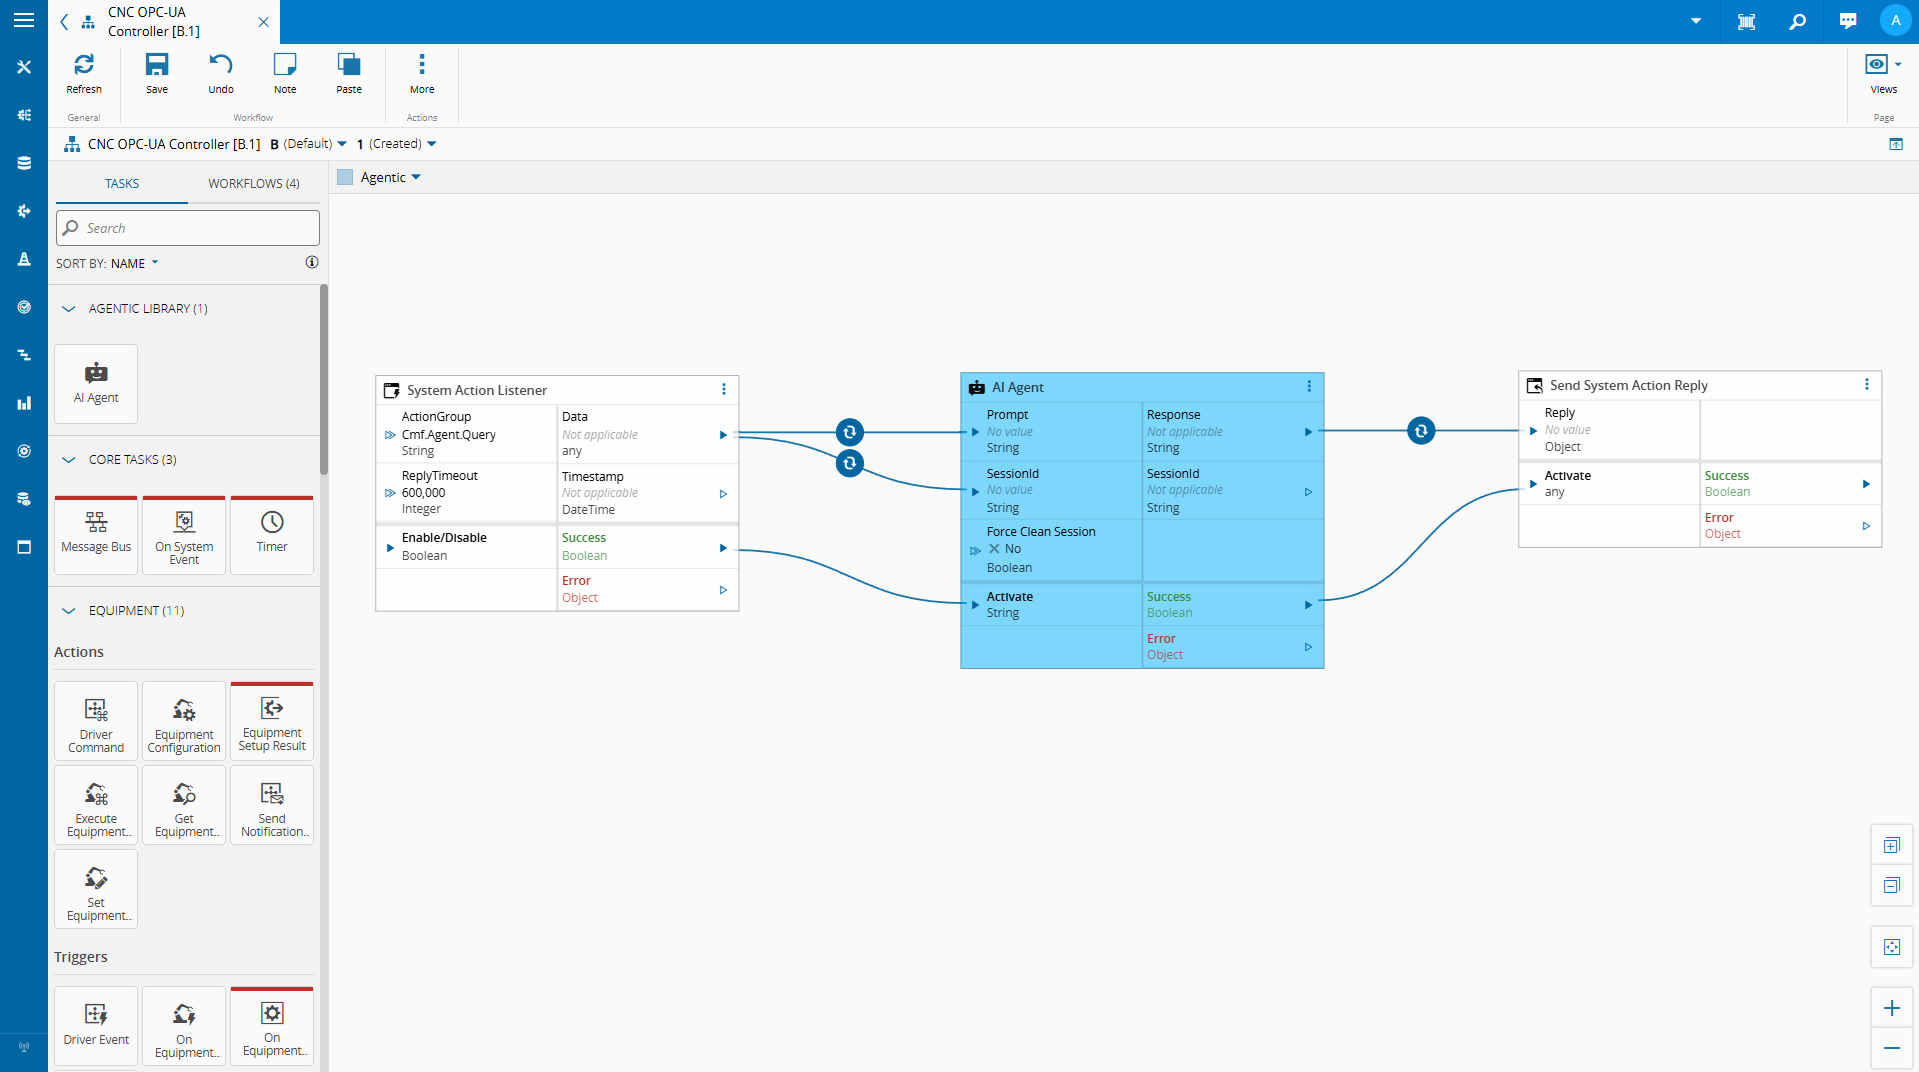
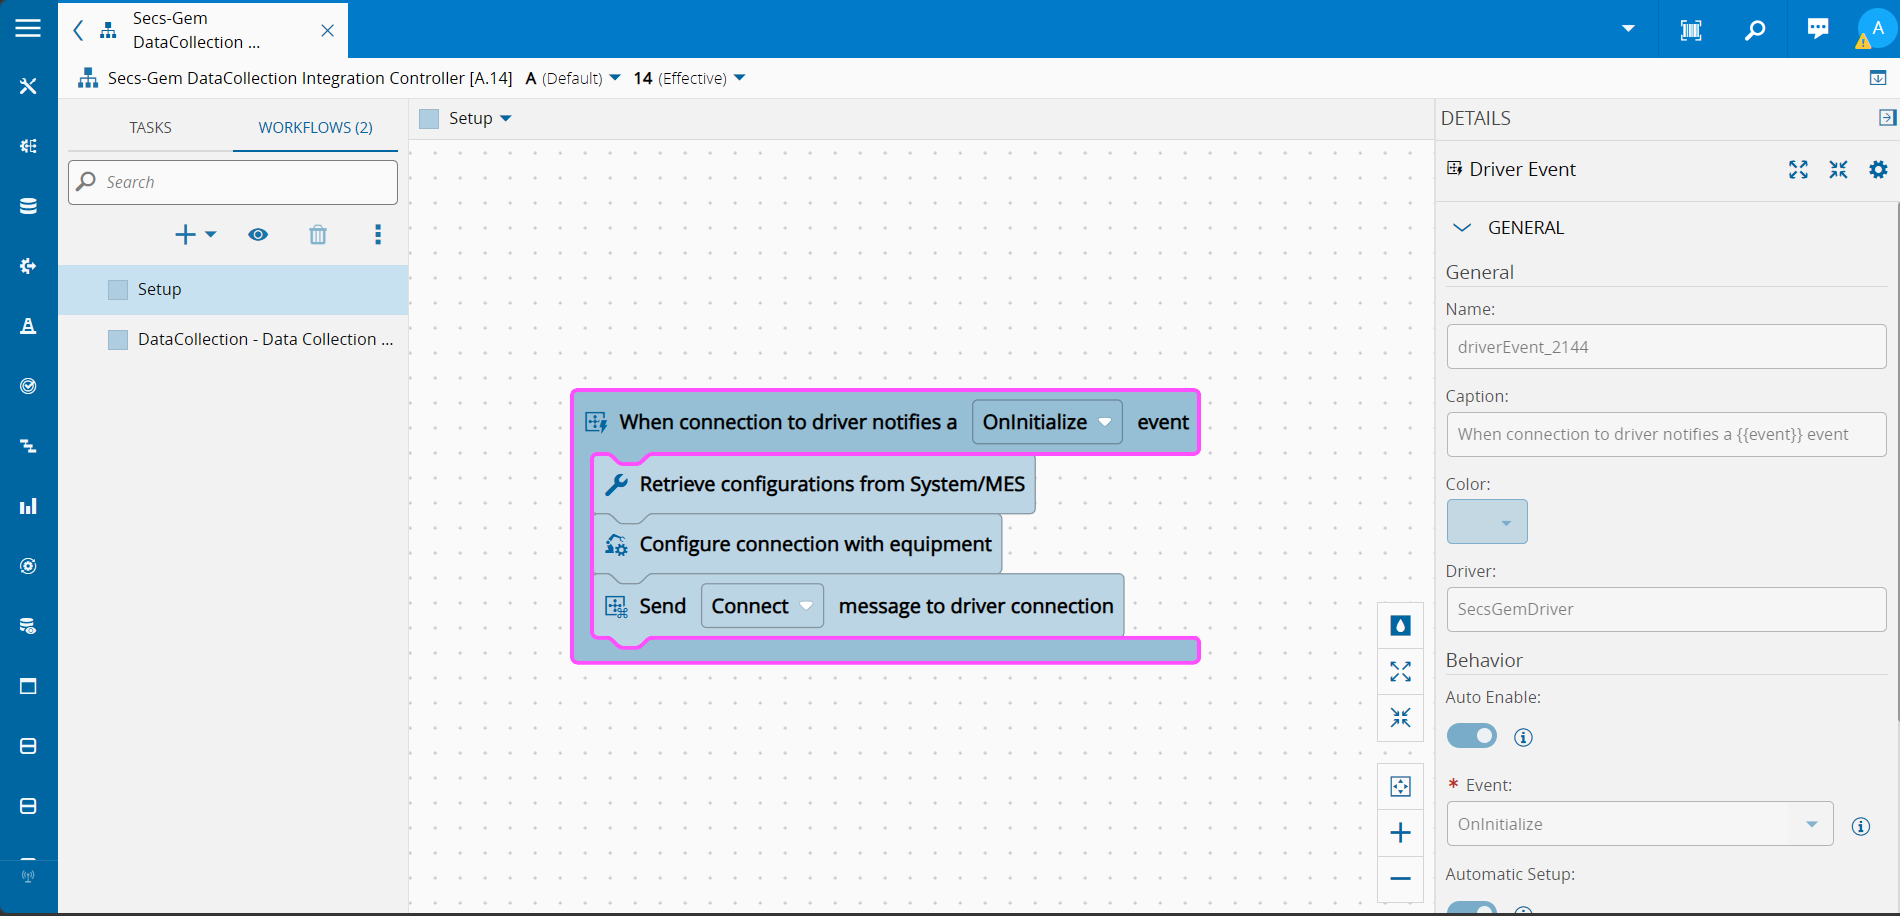
(...)For Connect IoT workflows the director also provides a specific builder for workflows, the workflowBuilder. For the workflow use case the goal is to build the entity automation controller and pass on all the information it requires, to do this the director supplies a .BuildController() method.
(...)
    //#region Setup Workflow
    // Add Driver Event Task
    const rootTaskId = (await this.workflowBuilder.addRootTask(
        "@criticalmanufacturing/connect-iot-controller-engine-core-tasks",
        "driverEvent",
        undefined,
        undefined,
        undefined,
        undefined,
        undefined,
        driverAlias
    )).id;
(...)
    // Add Equipment Config Task
    await this.workflowBuilder.addTask(
        rootTaskId,
        "handler",
        "@criticalmanufacturing/connect-iot-controller-engine-core-tasks",
        "equipmentConfig",
        { _inputs: equipmentConfigInputs },
        [
            {
                "name": "networkAddress",
                "displayName": "networkAddress",
                "value": `{{ $${configTask.name}.ipAddressAndPort.split(':')[0] }}`,
                "dataType": "String"
            },
            {
                "name": "networkPort",
                "displayName": "networkPort",
                "value": `{{ $${configTask.name}.ipAddressAndPort.split(':')[1] }}`,
                "dataType": "Integer"
            }
        ],
        undefined,
        undefined,
        undefined,
        driverAlias,
        undefined,
        expressions
    );
(...)
const workflows: any[] = [];
    const controllerSetupWorkflow = {
        automationController: `${this.answers.integrationName} Controller`,
        name: `Setup`,
        displayName: `Setup`,
        workflow: this.workflowBuilder.getWorkflow(),
        order: 1
    };
(...)
    workflows.push(controllerSetupWorkflow);
(...)
    await this.masterdataDirector.buildController(controller, [controllerDriverDefinition], workflows);
    //#endregion Build Controller
})();
// PackagePacker: End of Script
(...)
Note how the two tasks differ, the first task is the root task. The root task is the task that will trigger the workflow, in order to nest the tasks, we pass on the root id of the task where it should nest under. This is how we create the control flow execution tree.
Final Thoughts#
Build your own simple scenarios and create cleaner workflows for your everyday activities, this is what the Business Scenarios are all about.
Business Scenarios trade LLM expressiveness for guaranteed, auditable outcomes. That trade can be worth making in a regulated production environment.