The Critical Manufacturing MES version 11.3 brought about a set of exciting features. One that grabbed my attention were the Automation Scheduled Actions, not just for the use cases that they solve out-of-the-box but out the ability to extend it to solve additional use-cases.
Overview#
The problem of scale. Solutions that work with dozens may start failing with hundreds and thousands.
When large factories use an MES and start creating integrations with other systems, most of them are 1-1 or 1 to a small subset.
A customer, has one ERP, one PLM, maybe a small subset of QMS systems.
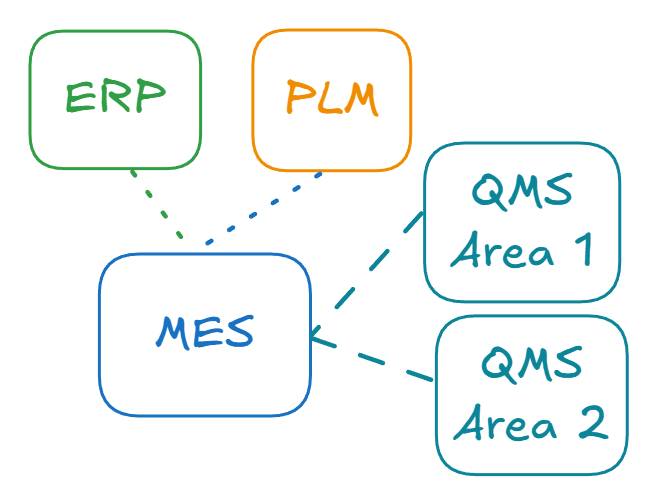
In these scenarios, manual interaction for start/stop operations, updates and roll-outs are fine to do by a button press.
The challenge comes when we factor in the most prolific integration type in the shop-floor, integrations with equipment.
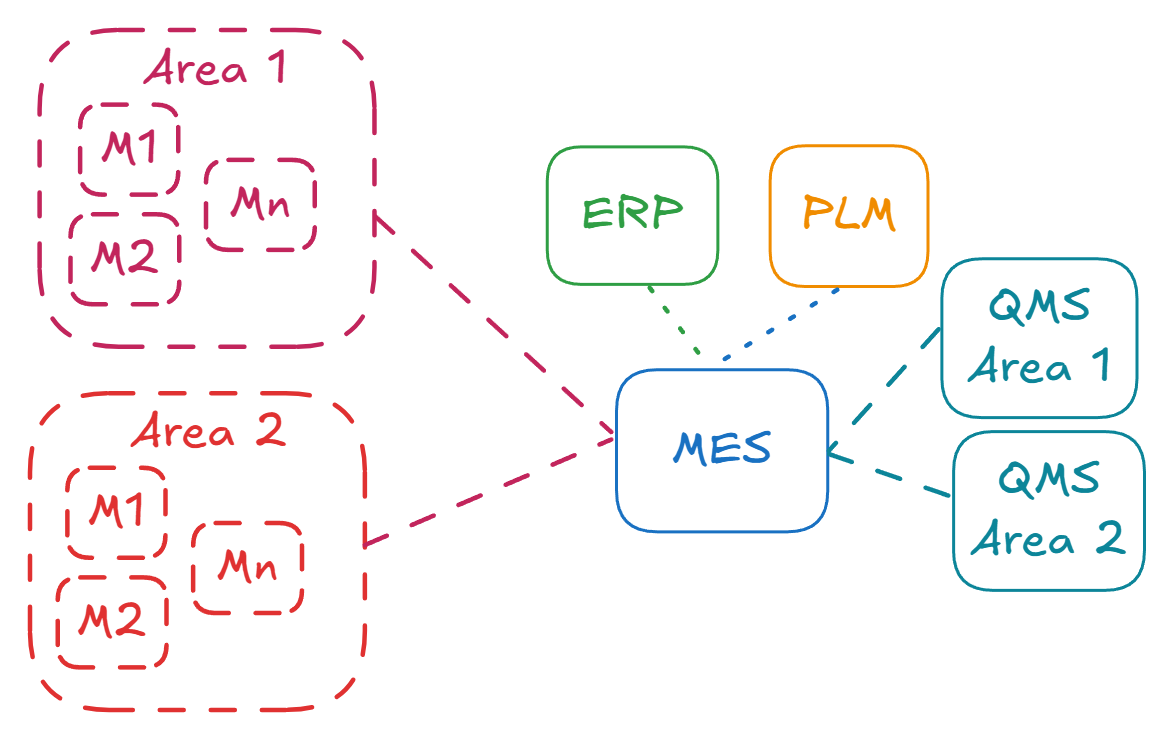
Machines can easily rise to hundreds of integrations in the shopfloor, they are complex, varied and have strict rollout plans. Machine integrations can go from controlling parts of a machine, to controlling areas or machine groups.
This means that even in a simple factory your number of integrations starts piling up.
Our system was already fine-tuned to handle remote start/stop, version control and update/rollback control, but was missing a mechanism for planned roll-outs. Anyone that has ever wanted to do a planned version rollout of a version in a factory knows why. It’s very complex to define when a machine can be updated and how to define if it was a successful rollout or not.
That’s why we built a mechanism that is tailored for the common use case, but also allows for the user to customize it with his own business rules.
Lifecycle of the Automation Scheduled Action#
The scheduled action is broken into two different concepts:
- Definition -
AutomationScheduledActionDefinition - Execution -
AutomationScheduledActionTask
One scheduled action, can trigger several tasks.
A scheduled action definition has a set of steps that we can configure either with pre-defined actions or with custom business rules.
- Context Resolution - Defines the target entity and resolves it to create tasks for each entity instance.
- Detectors - Defines how the system determines whether a target instance is currently in a safe state to act on.
- Actions - Defines the maintenance action to execute when all checks pass.

The main steps of the lifecycle are the Context Resolution which will define what are the entities that will have a pending task, the Detectors which will decide if the task is ready to be executed and finally the Actions which will be the work we want done. Each task will have its own lifecycle and completion rate.

Additionally the user may also configure, notifications and gatekeeping/validation steps.
- Notifications - Defines the optional notification templates an Automation Scheduled Action task can use during its lifecycle.
- Pre-Conditions - Defines the time-based or global constraints that must pass before readiness evaluation continues.
- Acceptance Gates - Defines extra checks that run after the detector reports ready and confirms that it is still safe to proceed.
- Post-Action Validations - Defines the checks performed after the action runs to confirm it completed successfully.
The Standard Use-Cases#
The main uses cases for this feature are:
- Moving the automation to a new automation manager
- Updating an automation controller instance to a new version.
In Connect IoT Structure we already did a deep dive on how Connect IoT is structured and what are its main relations and entities.
In a nutshell, Connect IoT has a definition part (Automation Protocol/Automation Driver Definition/Automation Controller), which is responsible for defining the interface logic and the business logic of the low code workflow:
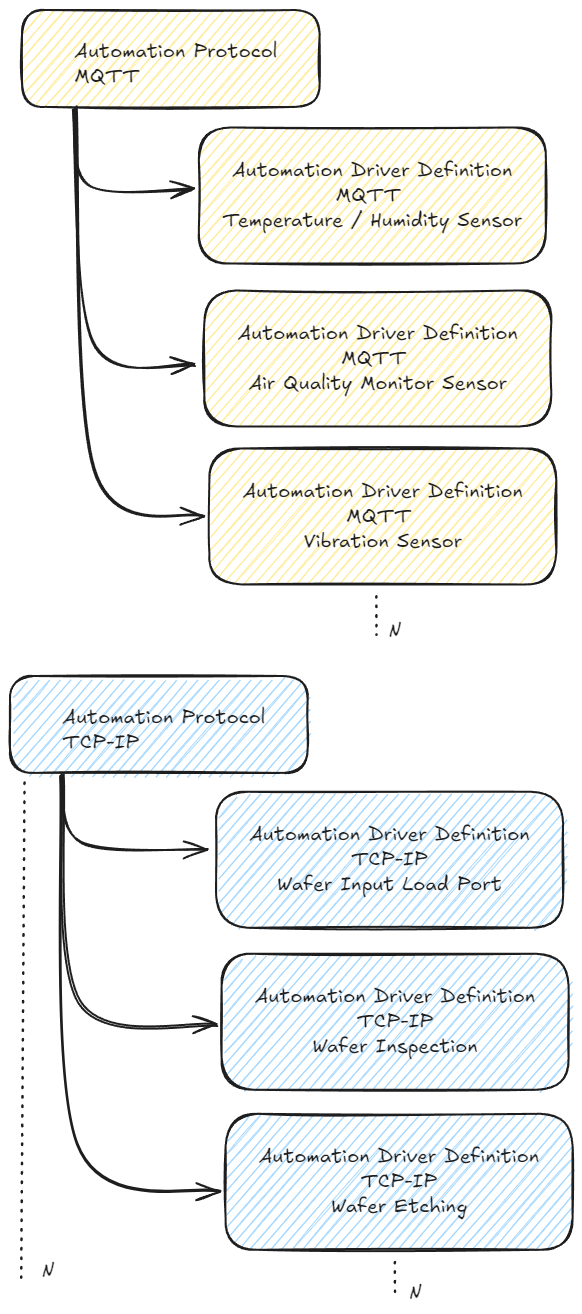
Then it has the execution part that links the drivers and controller to an MES entity, this is called an Automation Controller Instance. The same Automation Controller can be reused across N number of instances, this makes it so a controller created to control a machine type, can be reused across different machine types. The Automation Manager maps to the process that will host the instances.
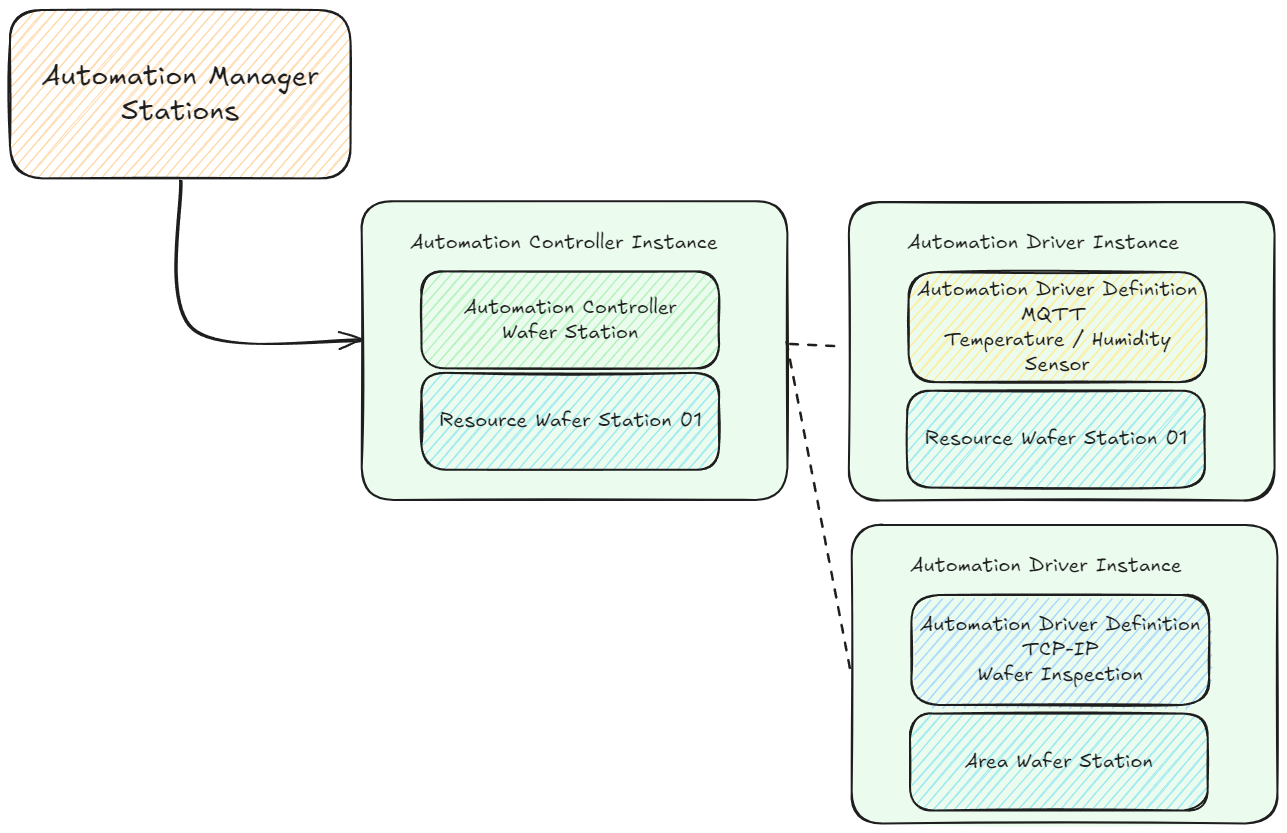
Let’s take a look at what are the main use cases tackled with the new feature.
Changing the Automation Instances to Different Managers#
The manager is the process that is hosting a set number of instances.
This process is running on a particular VM or cluster, imagine that you want to perform some kind of maintenance on the cluster or in the VM.
You can schedule an Automation Scheduled Action to when appropriate (e.g. no materials in resources being controlled by those instances) migrate all the instances to a new manager in a different machine, perform your machine maintenance and then schedule them back to the original machine.
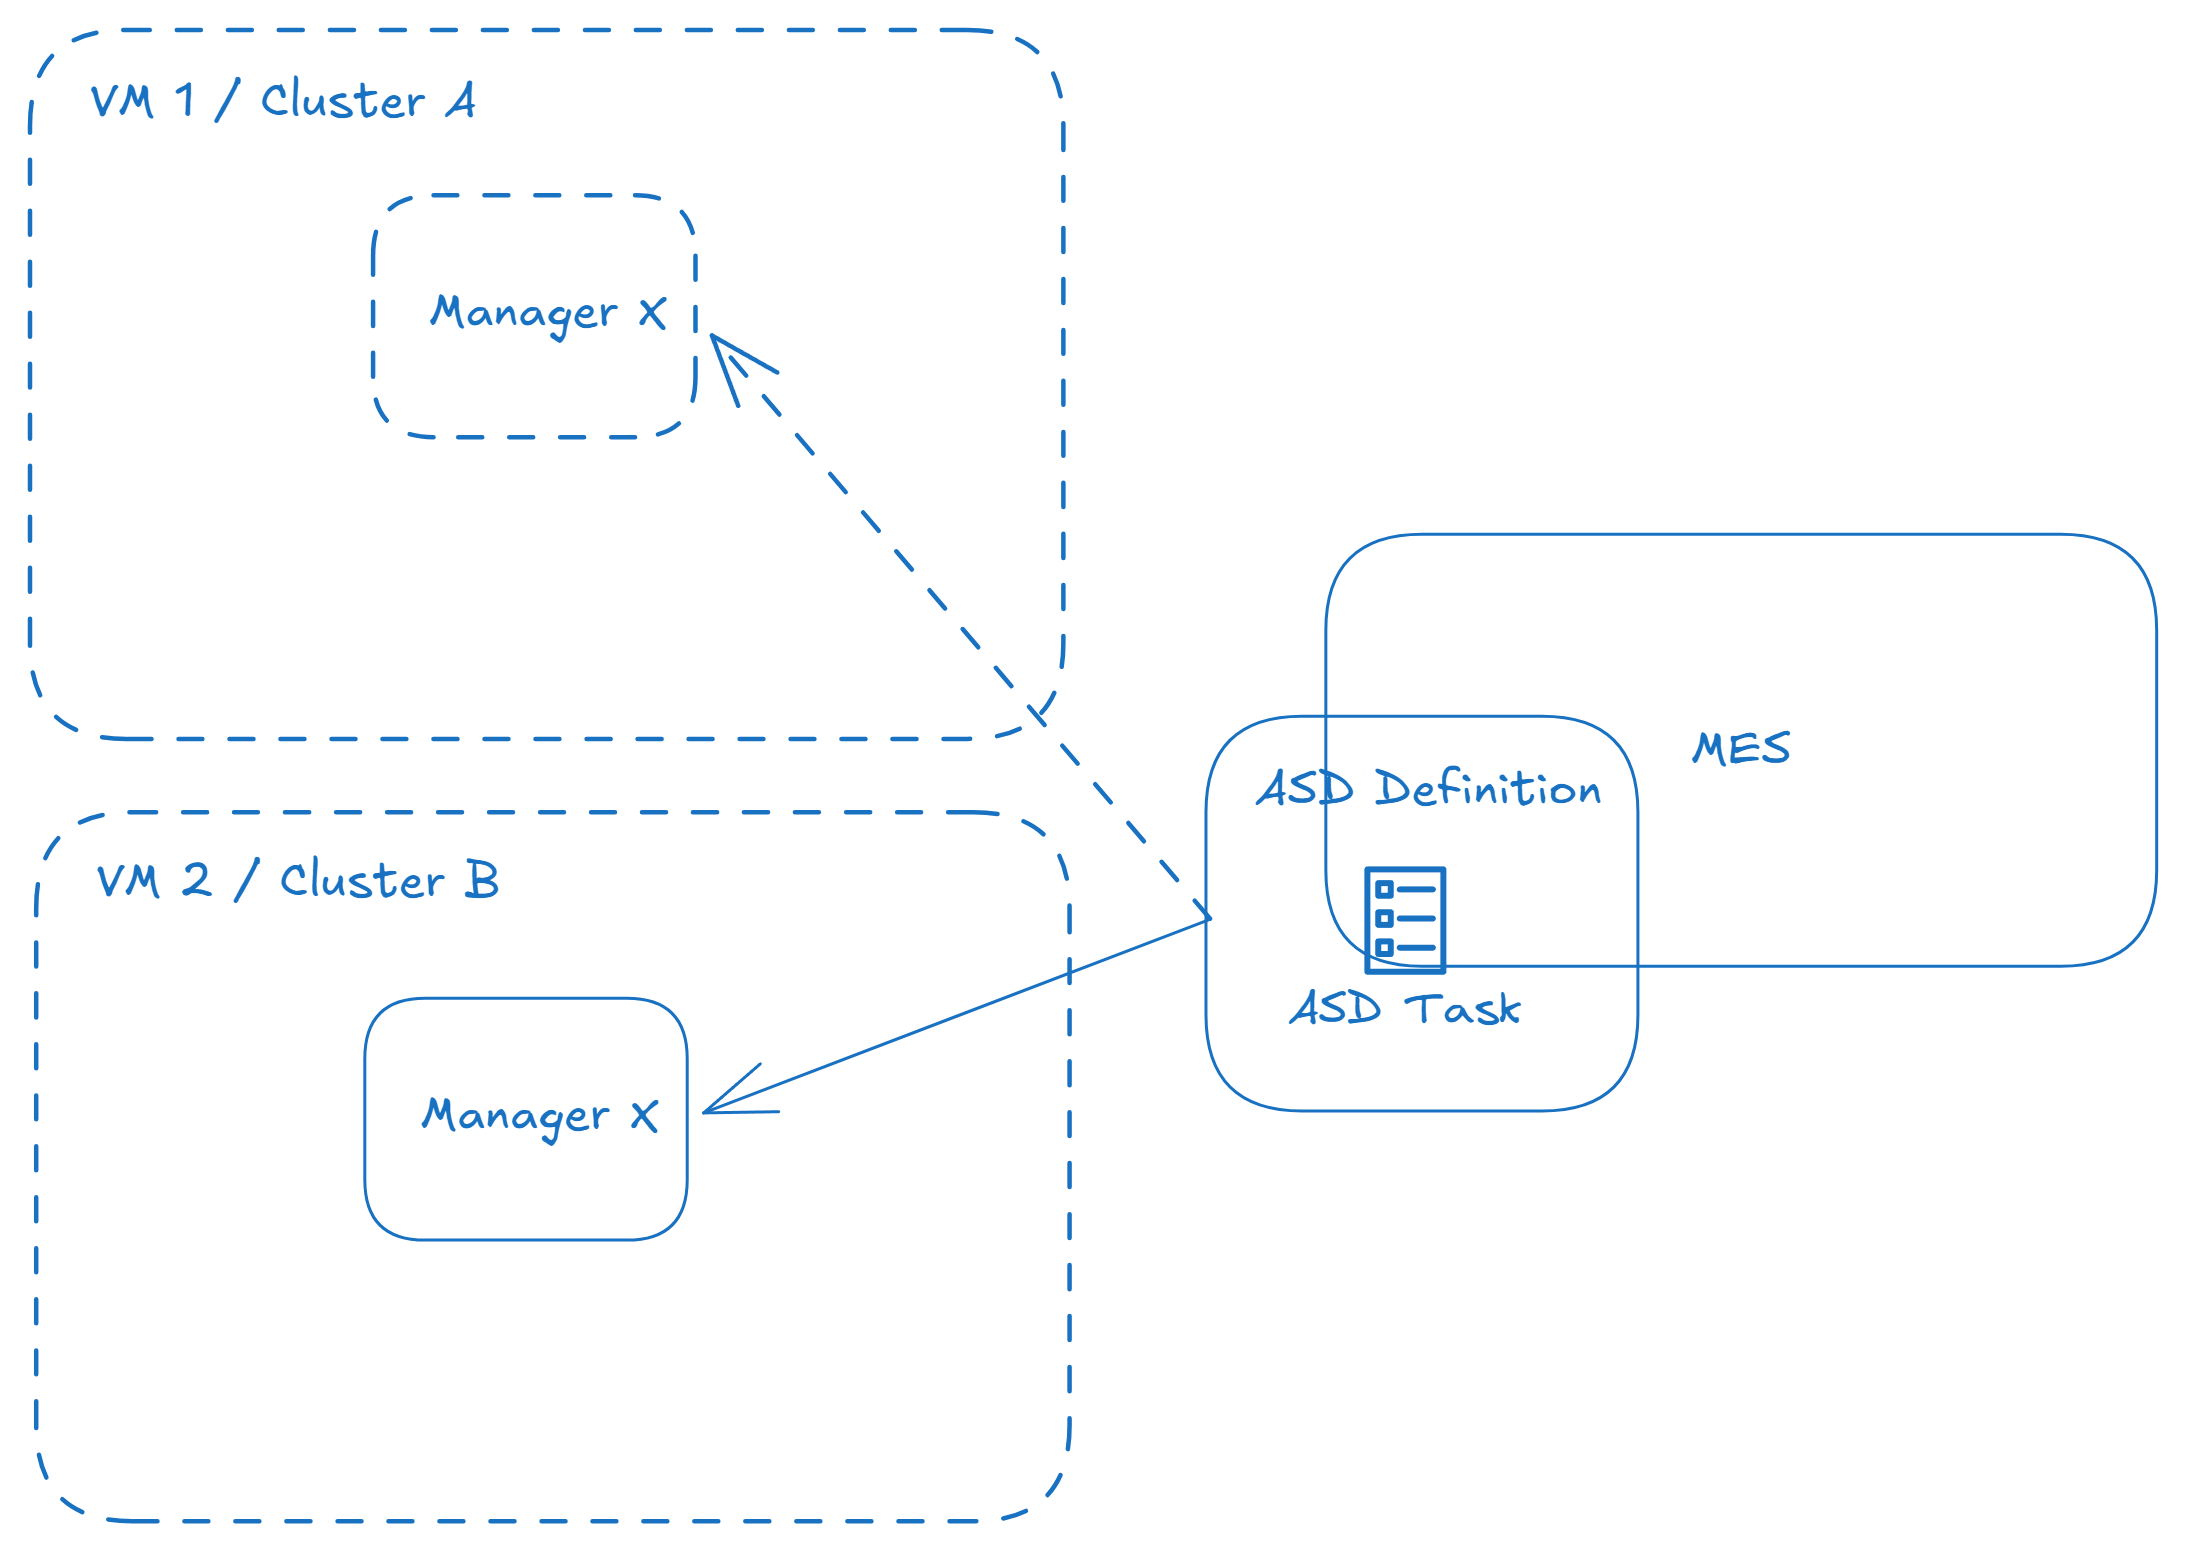
Complete Tutorial:
Updating a Controller version#
The controller version of the instance will dictate what is the definition that is running for a particular automation.
Imagine, you have an Automation Controller Testing Machine A.1, this controller holds the definition for the integration of all your site testing machines.
You did a new development adding a particular feature, rolled out the change for a particular machine and know want to roll out the change for all the testing machines on your shopfloor. Previously, you would have to go one by one and perform the update, now you can define your Automation Scheduled Action, with your particular subset of acceptable criteria for update (e.g no materials in resource) and roll-out the update autonomously for all machines.
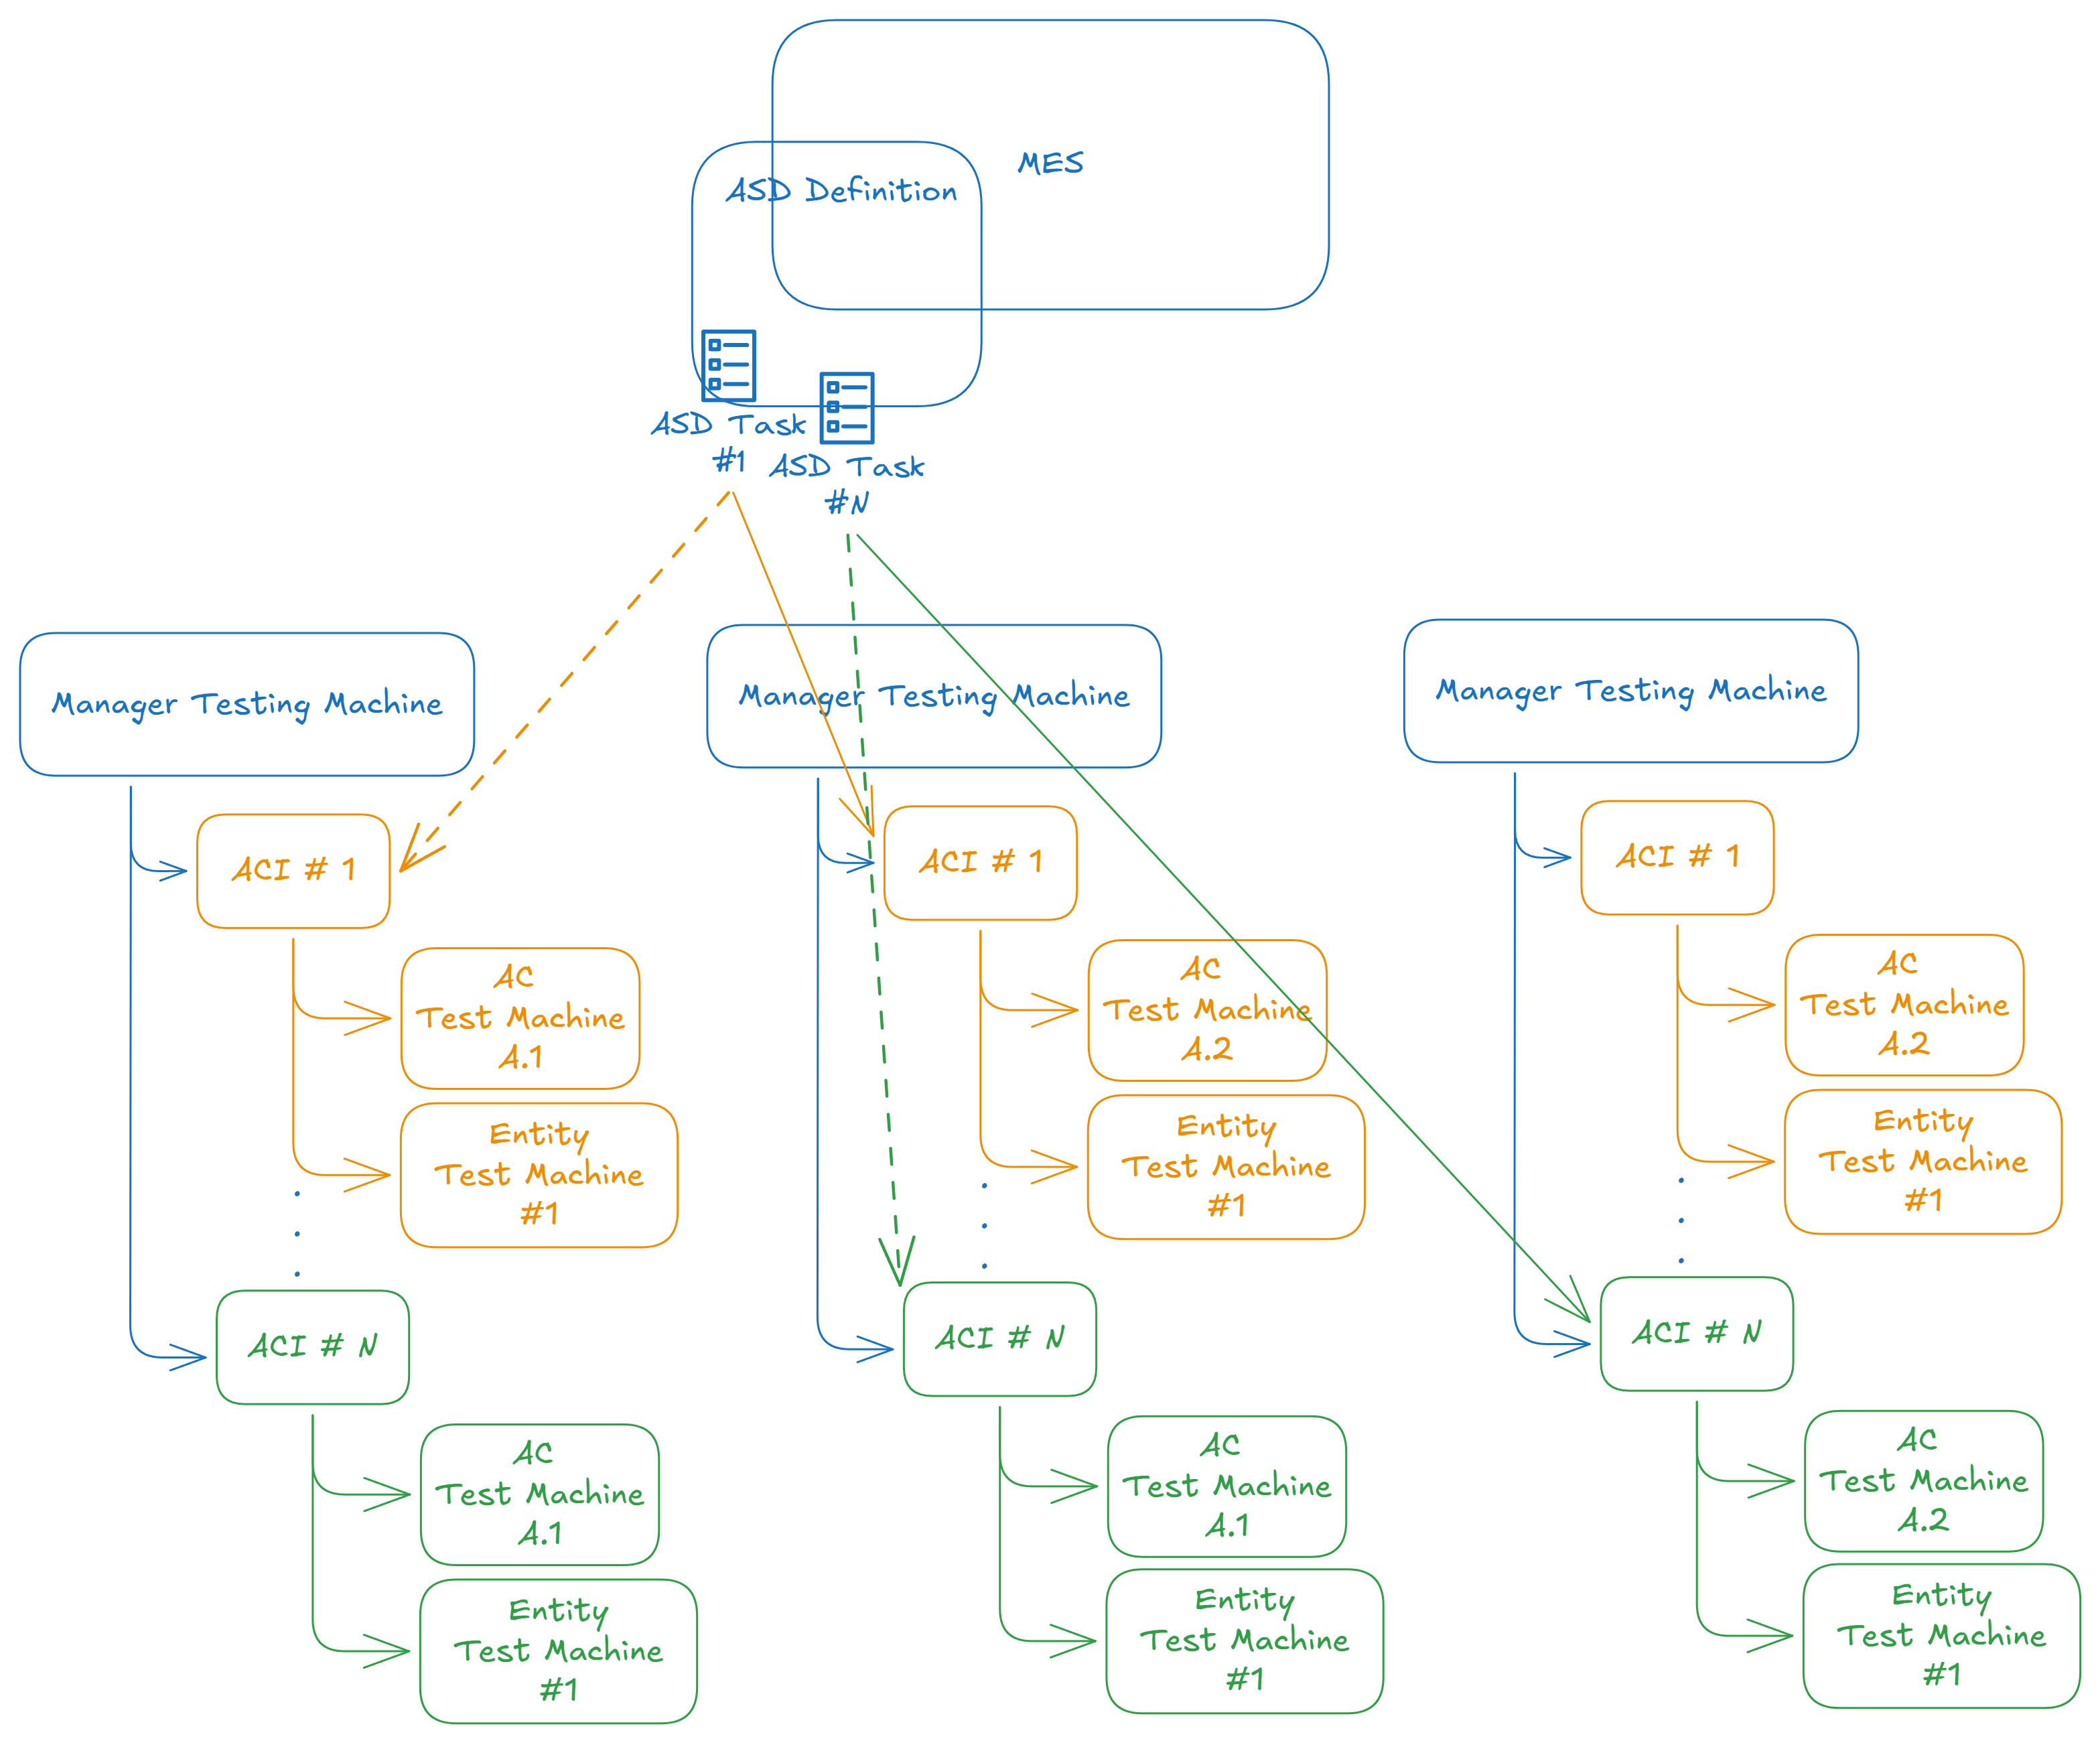
Complete Tutorial:
Using it for Other Entities#
Most of the out-of-the-box features are tailored for the standard use cases but it is still open for customization and for other uses.
We can think of a use case where we want our engineer to be notified when the machine is available to perform maintenance on a PLC. The PLC may be controlling several machines and if it’s available or not may depend on business rules.
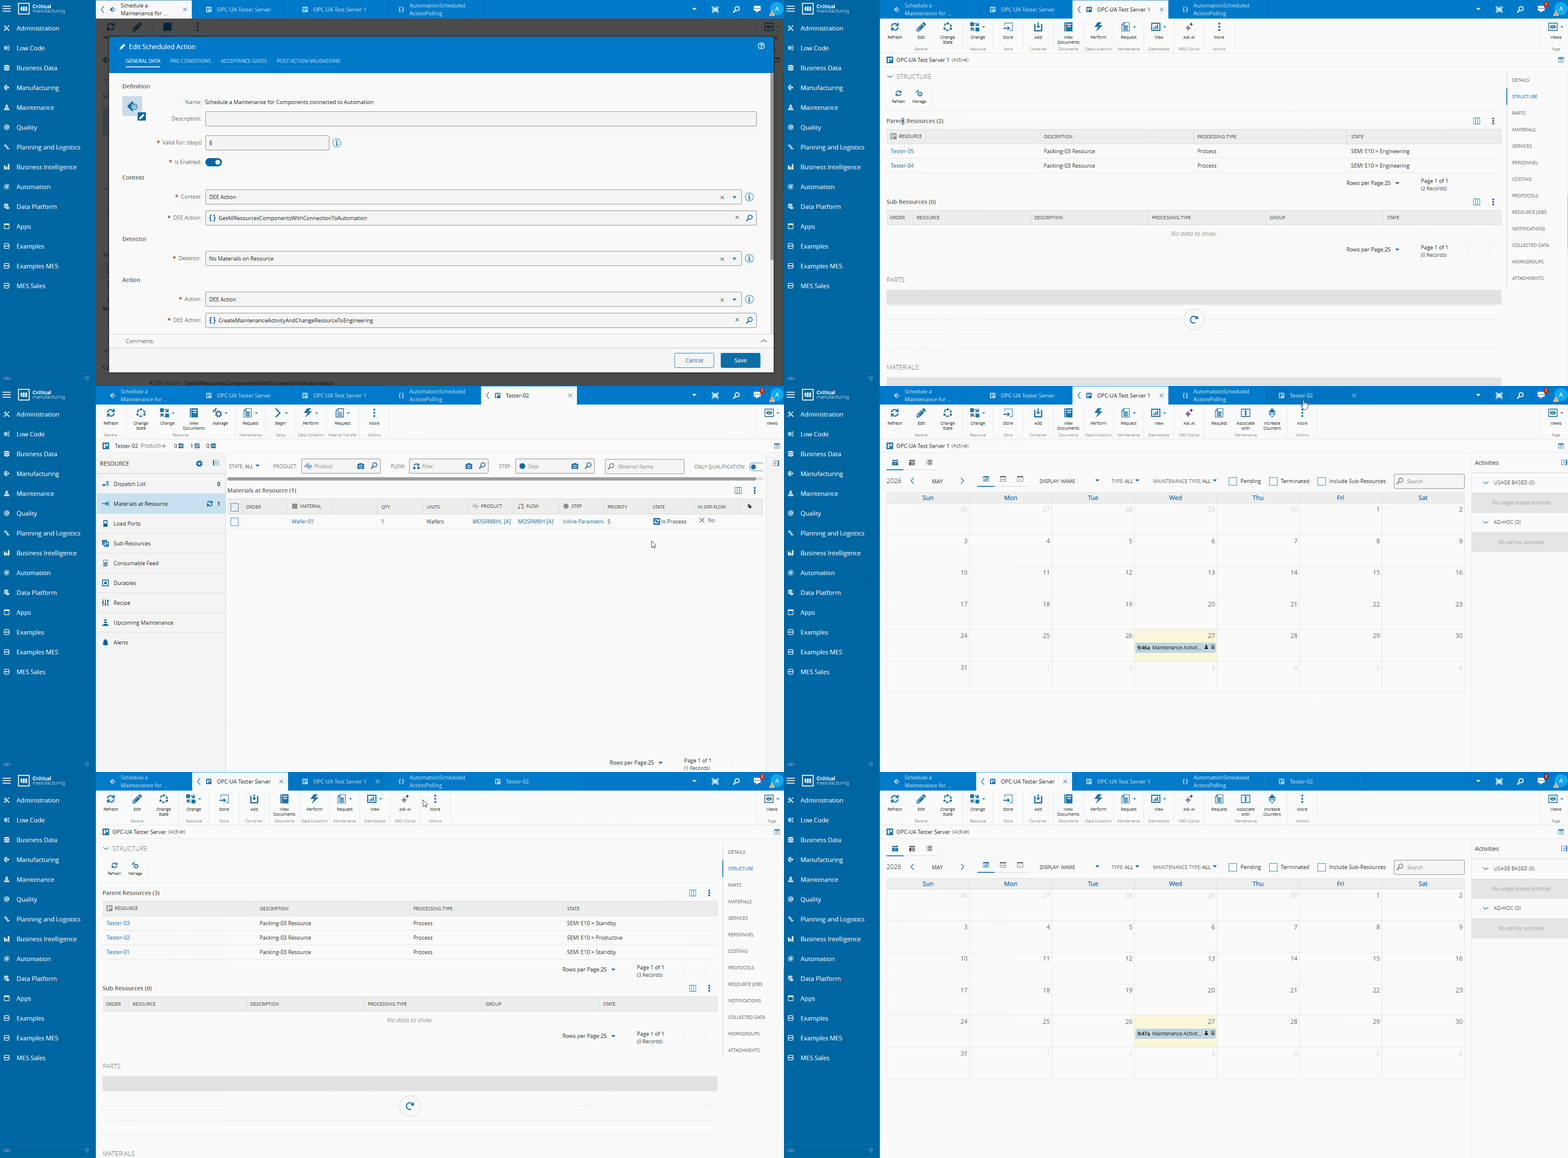
In our use case we have an opc-ua server mapped as an MES Resource Component and then shared between multiple other resources, a classic OPC-UA line case. Our goal now is to open a maintenance activity when the line is not producing (e.g. no materials in resources).
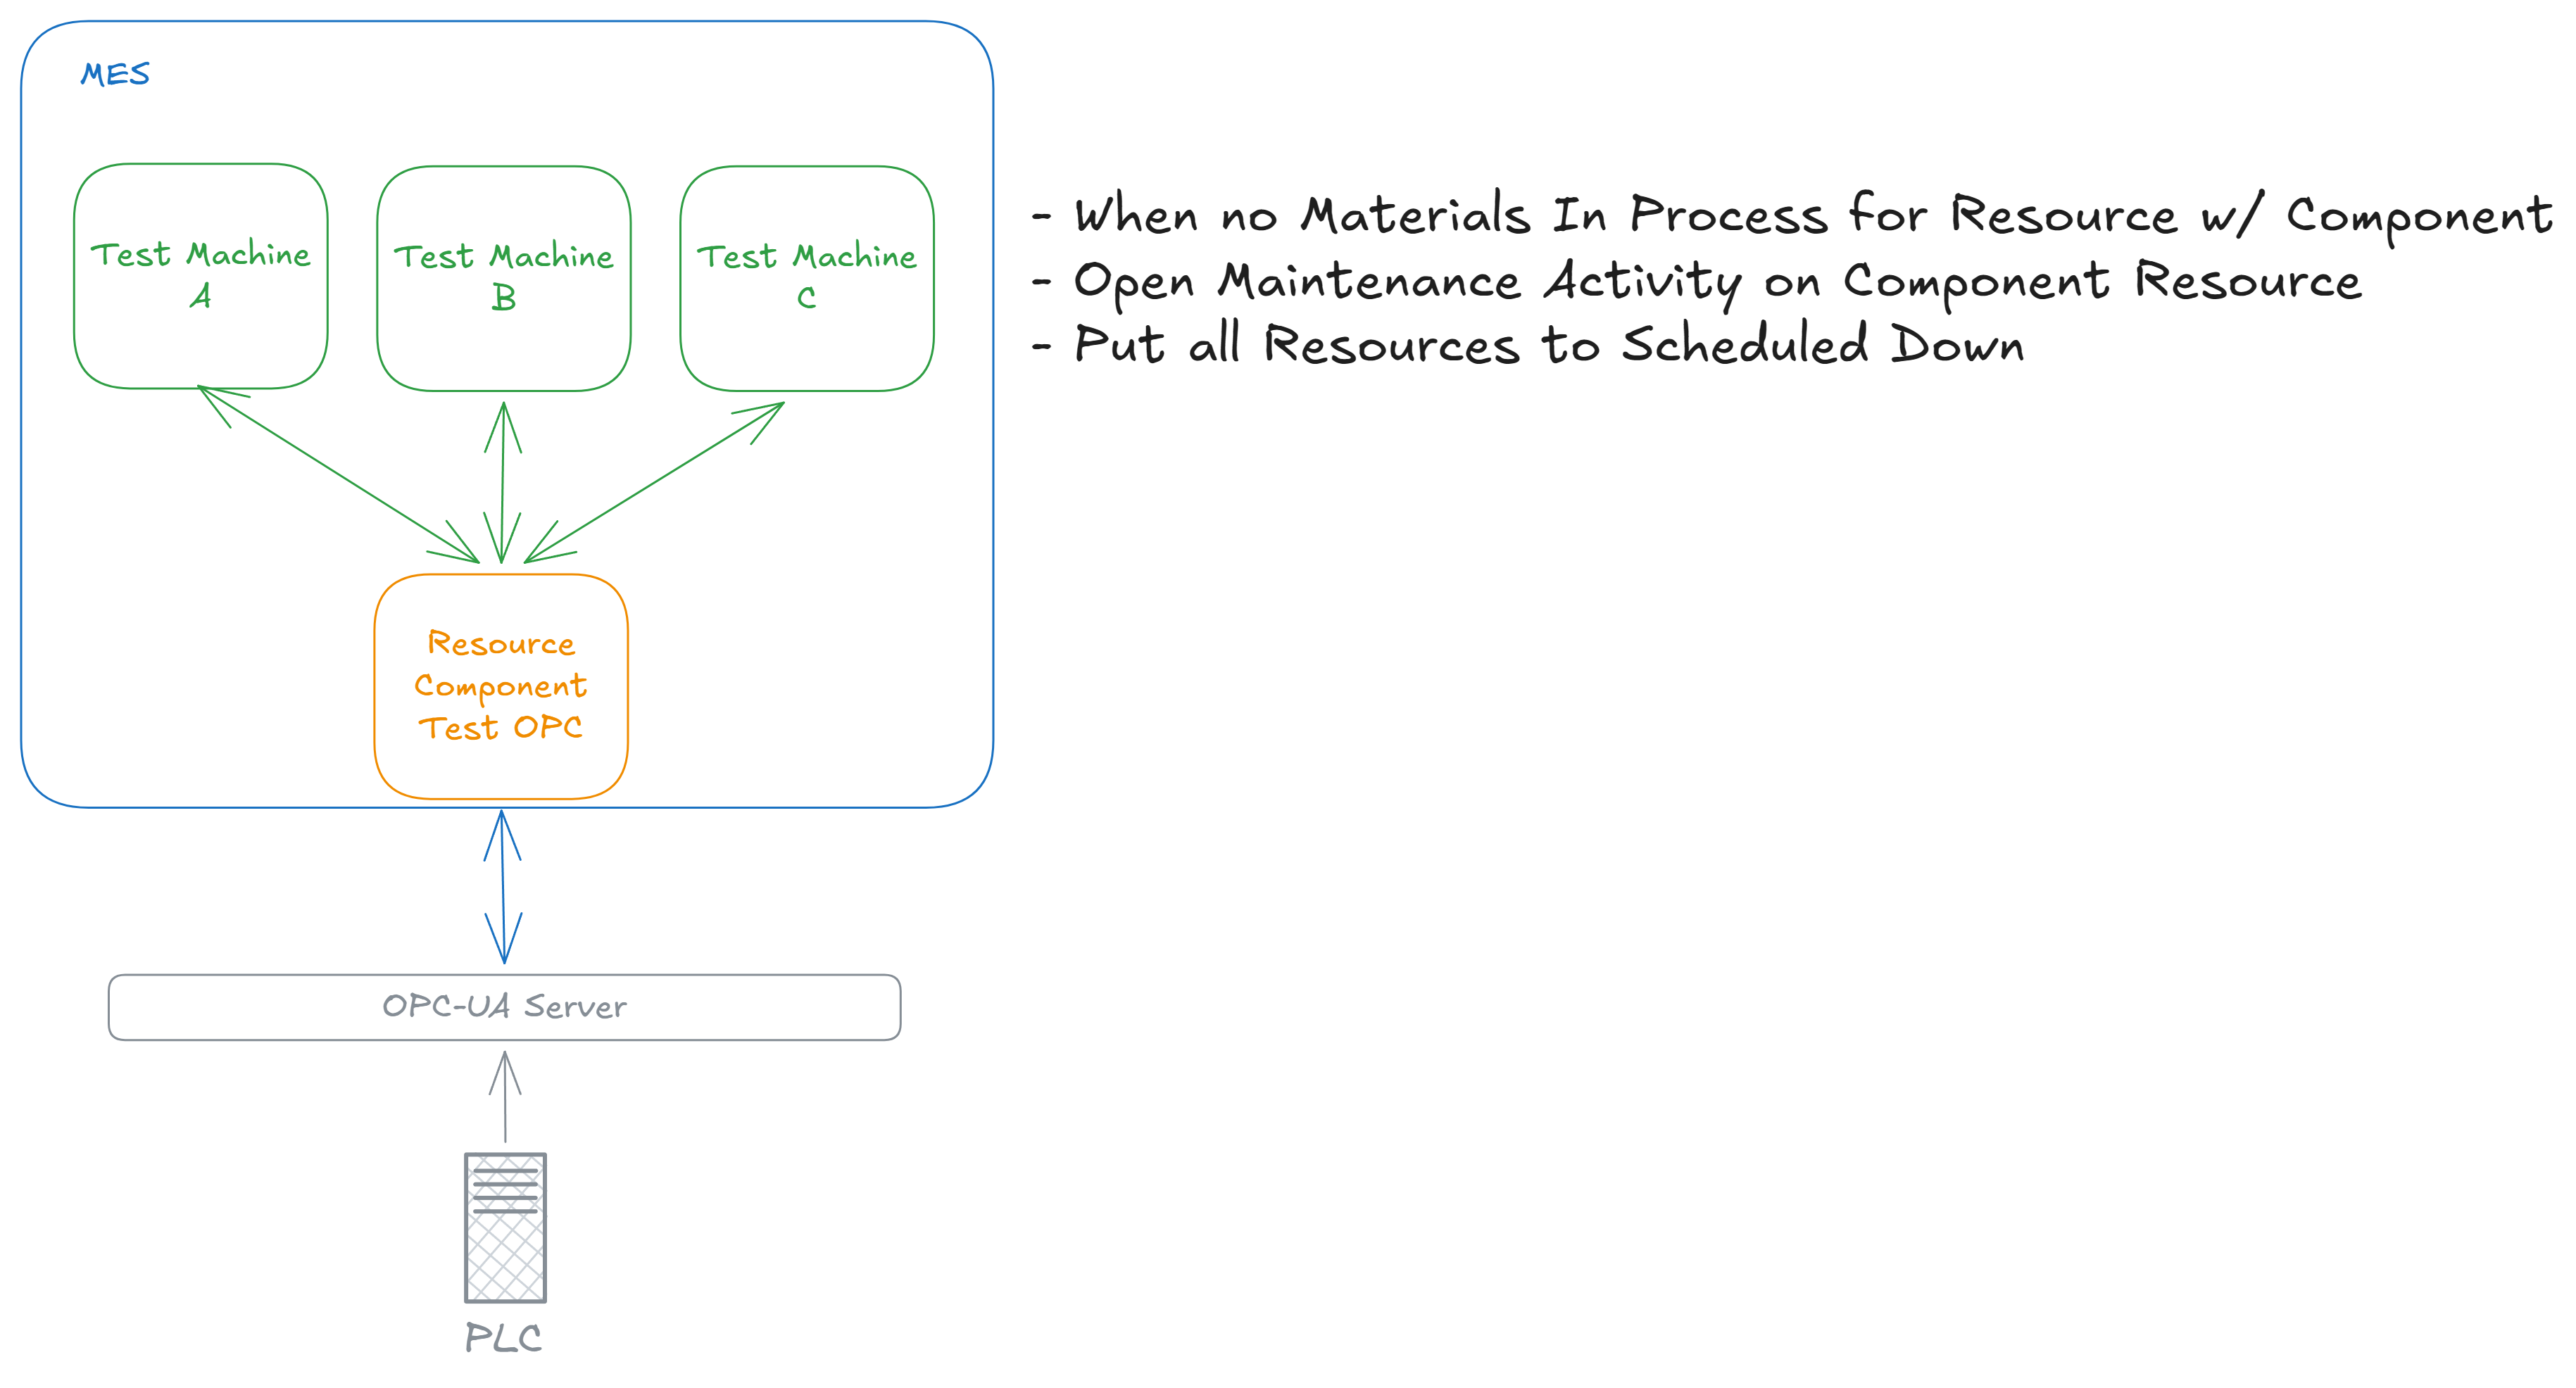
Check out our Custom DEE Action at Every Stage tutorial for a detailed guide of the use of customization this feature
Framing it in the Lifecycle#
First, we need to assert our context. In our use-case the Context will be all the component resources that are connected with automation.
Our Detector will change to ready when there are no materials in each of the resources that are using the component resource.
Finally, our Action is to create the Maintenance Activity Order for the component resource and change the Resources to engineering.
If you are curious about how maintenances work, check out our help and our deep dive
Building It#
We will need to create two simple DEEs.
The first DEE will retrieve all the component resources with a link to automation:
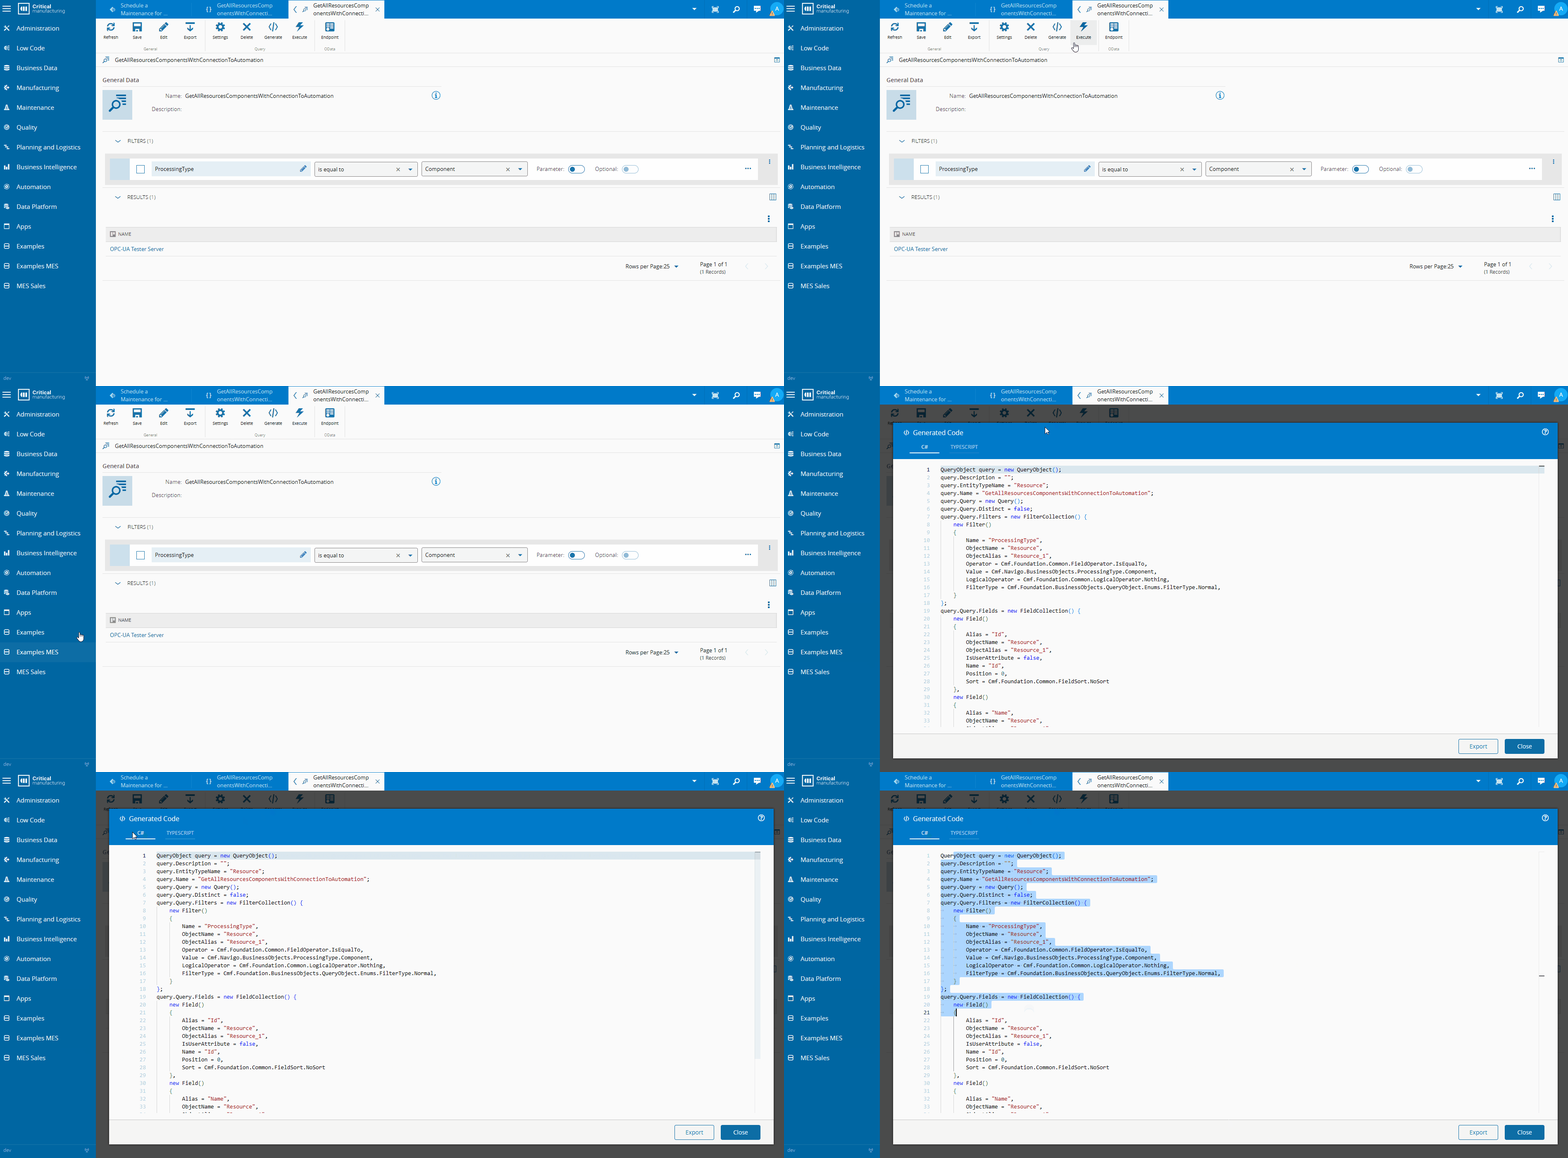
I used our no code query builder to generate a query that will give me all the resources of processing type component.
  // System
  UseReference("", "System.Data");
// Foundation
  UseReference("Cmf.Foundation.BusinessObjects.dll", "Cmf.Foundation.BusinessObjects.QueryObject");
// Navigo
  UseReference("Cmf.Navigo.BusinessObjects.dll", "Cmf.Navigo.BusinessObjects.Abstractions");
var serviceProvider = (IServiceProvider)Input["ServiceProvider"];
  IEntityFactory entityFactory = serviceProvider.GetService<IEntityFactory>();
// Generated Query through the Query Builder
  #region Query GetAllResourcesComponentsWithConnectionToAutomation
IQueryObject query = entityFactory.Create<IQueryObject>();
  query.Description = "";
  query.EntityTypeName = "Resource";
  query.Name = "GetAllResourcesComponentsWithConnectionToAutomation";
  query.Query = new Query();
  query.Query.Distinct = true;
  query.Query.Filters = new FilterCollection()
  {
    new Cmf.Foundation.BusinessObjects.QueryObject.Filter()
    {
      Name = "ProcessingType",
      ObjectName = "Resource",
      ObjectAlias = "Resource_1",
      Operator = Cmf.Foundation.Common.FieldOperator.IsEqualTo,
      Value = Cmf.Navigo.BusinessObjects.ProcessingType.Component,
      LogicalOperator = Cmf.Foundation.Common.LogicalOperator.Nothing,
      FilterType = Cmf.Foundation.BusinessObjects.QueryObject.Enums.FilterType.Normal,
    },
    new Cmf.Foundation.BusinessObjects.QueryObject.Filter()
    {
      Name = "UniversalState",
      ObjectName = "Resource",
      ObjectAlias = "Resource_1",
      Operator = Cmf.Foundation.Common.FieldOperator.IsEqualTo,
      Value = Cmf.Foundation.Common.Base.UniversalState.Active,
      LogicalOperator = Cmf.Foundation.Common.LogicalOperator.Nothing,
      FilterType = Cmf.Foundation.BusinessObjects.QueryObject.Enums.FilterType.Normal,
    }
  };
  query.Query.Fields = new FieldCollection()
  {
    new Field()
    {
      Alias = "Name",
      ObjectName = "Resource",
      ObjectAlias = "Resource_1",
      IsUserAttribute = false,
      Name = "Name",
      Position = 1,
      Sort = Cmf.Foundation.Common.FieldSort.NoSort
    }
  };
DataSet resultDataSet = query.Execute(false, null);
IResourceCollection resourcesOfTypeComponent = entityFactory.CreateCollection<IResourceCollection>();
bool hasData = resultDataSet != null
      && resultDataSet.Tables != null
      && resultDataSet.Tables.Count > 0
      && resultDataSet.Tables[0].Rows != null
      && resultDataSet.Tables[0].Rows.Count > 0;
#endregion Query GetAllResourcesComponentsWithConnectionToAutomation
if (hasData)
  {
      foreach (DataRow row in resultDataSet.Tables[0].Rows)
      {
          IResource resourceComponent = entityFactory.Create<IResource>();
          resourceComponent.Name = row.Field<string>("Name");
          resourcesOfTypeComponent.Add(resourceComponent);
      }
if (resourcesOfTypeComponent.Count > 0)
      {
          resourcesOfTypeComponent.Load();
// Only send Resources with Connections to Automation
          var result = resourcesOfTypeComponent.Where(res => res.GetAutomationControllerInstance() != null);
// Entities that will be received for ASD Task creation
          Input["Result"] = resourcesOfTypeComponent?.ToArray();
      }
  }
Our DEE will run the query and if there are results, it will check if there’s any AutomationControllerInstance linked to the Resource and then add the outcome to the result Input object.
The second DEE will be responsible for opening maintenance activities and change the component resource and the parent resources to SEMI-E10 state engineering.
For this case I created already a Maintenance Plan and Maintenance Plan Instance for my component Resource.
  // Navigo
  UseReference("Cmf.Navigo.BusinessObjects.dll", "Cmf.Navigo.BusinessObjects.Abstractions");
  UseReference("Cmf.Navigo.BusinessObjects.dll", "Cmf.Navigo.BusinessObjects");
  UseReference("Cmf.Navigo.BusinessOrchestration.dll", "Cmf.Navigo.BusinessOrchestration.Abstractions");
  UseReference("Cmf.Navigo.BusinessOrchestration.dll", "Cmf.Navigo.BusinessOrchestration.MaintenanceManagement.InputObjects");
  UseReference("Cmf.Navigo.BusinessOrchestration.dll", "Cmf.Navigo.BusinessOrchestration.ResourceManagement.InputObjects");
// Foundation
  UseReference("Cmf.Foundation.BusinessObjects.dll", "Cmf.Foundation.BusinessObjects.Abstractions");
// System
  UseReference("", "System.Collections.ObjectModel");
if (!Input.TryGetValue("Entity", out object entity) || entity == null)
      throw new ArgumentNullException("Entity", $"Input '{entity}' is required.");
#region Constants
  const string MaintenanceActivityName     = "Perform Maintenance on PLC";
  string MaintenancePlanInstanceName = $"PLC Maintenance-{(entity as IEntity).Name}-001";
  const string OwnerRoleName               = "Administrators";
  const string ResourceStateModelName      = "SEMI E10";
  const string TargetStateName             = "Engineering";
  #endregion Constants
var serviceProvider = (IServiceProvider)Input["ServiceProvider"];
  IEntityFactory entityFactory                       = serviceProvider.GetService<IEntityFactory>();
  IMaintenanceOrchestration maintenanceOrchestration = serviceProvider.GetRequiredService<IMaintenanceOrchestration>();
  IResourceOrchestration resourceOrchestration       = serviceProvider.GetRequiredService<IResourceOrchestration>();
#region Create Maintenance Activity Order
  // Load MaintenanceActivity
  IMaintenanceActivity maintenanceActivity = entityFactory.Create<IMaintenanceActivity>();
  maintenanceActivity.Load(MaintenanceActivityName, null);
// Load MaintenancePlanInstance
  IMaintenancePlanInstance planInstance = entityFactory.Create<IMaintenancePlanInstance>();
  planInstance.Load(MaintenancePlanInstanceName, null);
// Request Maintenance Activity Order
  var requestInput = new RequestMaintenanceActivityOrdersInput
  {
      ScheduleDate        = DateTime.UtcNow,
      RequestApprovalMode = Cmf.Navigo.BusinessObjects.ApprovalMode.ManualApproval,
      OrderReleaseMode    = Cmf.Navigo.BusinessObjects.ReleaseMode.AutoRelease,
      OwnerRole           = OwnerRoleName,
      RequestMaintenanceActivityOrderInput = new Collection<RequestMaintenanceActivityOrderInput>
      {
          new RequestMaintenanceActivityOrderInput
          {
              MaintenanceActivity     = maintenanceActivity,
              MaintenancePlanInstance = planInstance
          }
      }
  };
var requestOutput = maintenanceOrchestration.RequestMaintenanceActivityOrders(requestInput);
  Input["RequestMaintenanceActivityOrdersOutput"] = requestOutput;
  IResource resource = planInstance.Resource;
#endregion Create Maintenance Activity Order
#region Change Resource States to Engineering
  // Load the resource fully, then retrieve its ascendent resources (depth 1 = direct parents)
  resource.Load(resource.Name, null);
  resource.GetAscendentResources(1);
IResourceCollection resourceList = resource.ParentResources;
  resourceList.Add(resource);
if (resourceList != null && resourceList.Count > 0)
  {
      IStateModel stateModel = serviceProvider.GetService<IStateModel>();
      stateModel.Load(ResourceStateModelName);
var adjustInput = new AdjustResourcesStateInput
      {
          Resources                   = resourceList,
          StateModel                  = stateModel,
          StateModelStateName         = TargetStateName,
          IsToAdjustSubResourcesState = false
      };
var adjustOutput = resourceOrchestration.AdjustResourcesState(adjustInput);
      Input["AdjustResourcesStateOutput"] = adjustOutput;
  }
  #endregion Change Resource States to Engineering
Input["Result"] = true;
For the Detector of no materials in resource, we can leverage the DEE that the product ships out of the box AutomationScheduledActionNoMaterialsOnResource and tweak it to also consider parent resources. This way we can use the out of the box option of No Materials On Resource.
  UseReference("", "Cmf.Foundation.Common.Exceptions");
var output = new Dictionary<string, object>();
if (Input.ContainsKey("Resource"))
  {
      if (Input["Resource"] is IResource resource)
      {
          resource.Load();
resource.GetAscendentResources(1);
IResourceCollection resourceList = resource.ParentResources;
          resourceList.Add(resource);
if (resourceList != null && resourceList.Count > 0)
          {
              foreach(var resourceInList in resourceList) {
                  resourceInList.Load(resource);
                  resourceInList.LoadRelations(Cmf.Foundation.Common.Constants.MaterialResource);
if(resourceInList.ResourceMaterials != null && resourceInList.ResourceMaterials.Any()) {
                      output.Add("Result", false);
                      return output;
                  }
              }
          }
      }
  }
  output.Add("Result", true);
  return output;
Finally, we will also want to notify our employees that the task was run successfully and they can now execute the maintenance.
For that we can create a new Notification Template.
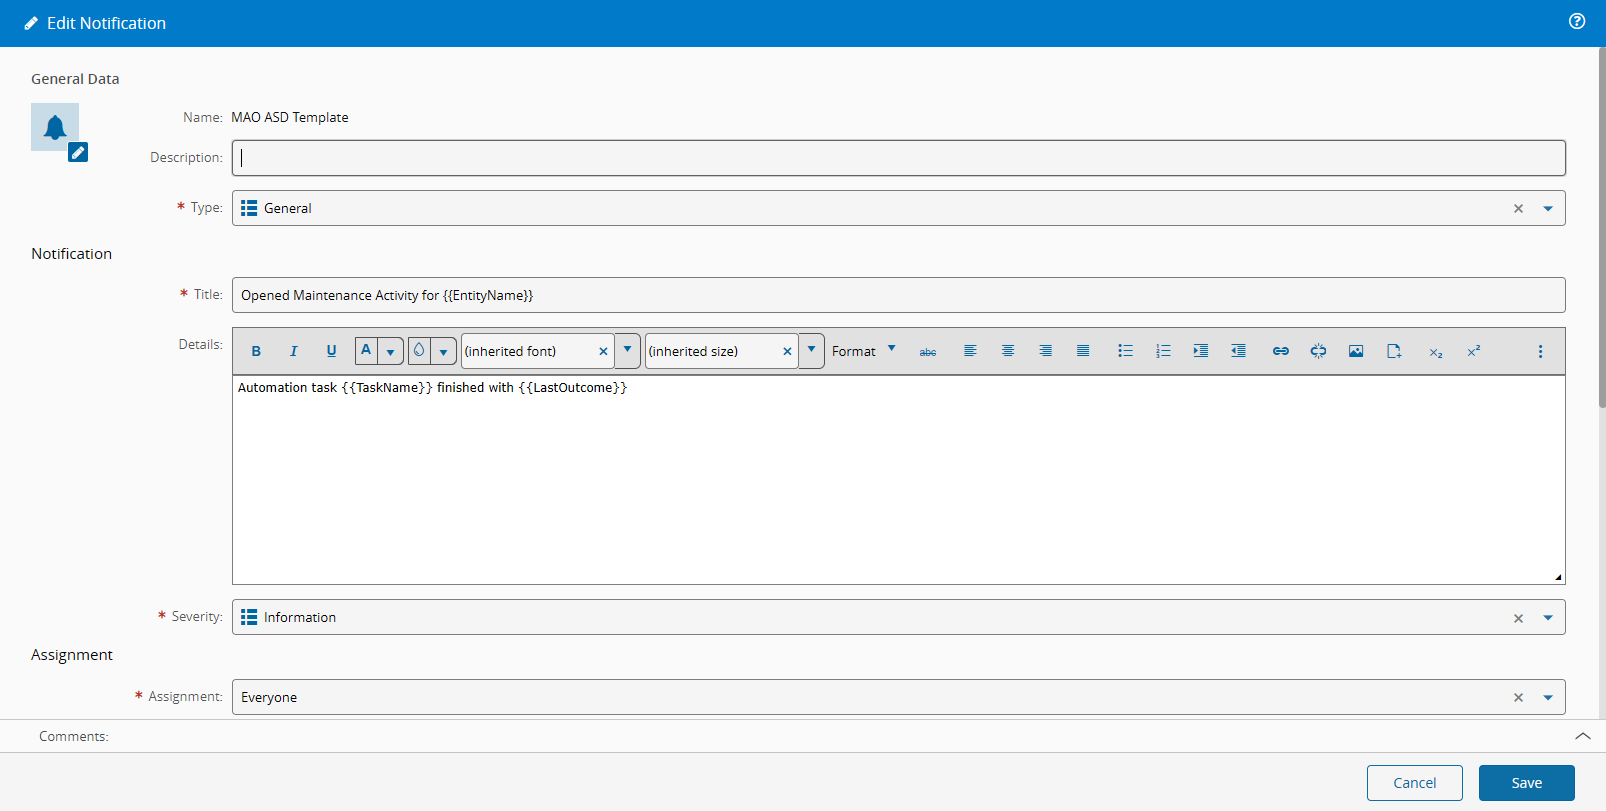
An interesting feature is the ability of the use of tokens to construct our notification. Notice how we have some elements between double curly braces. They will be replaced in runtime with the correct values.
The system supports adding a notification in several task hooks Pre-Action, Success, Failure, and Ignored. For our use-case we will just hook it on the Success.
Running It#
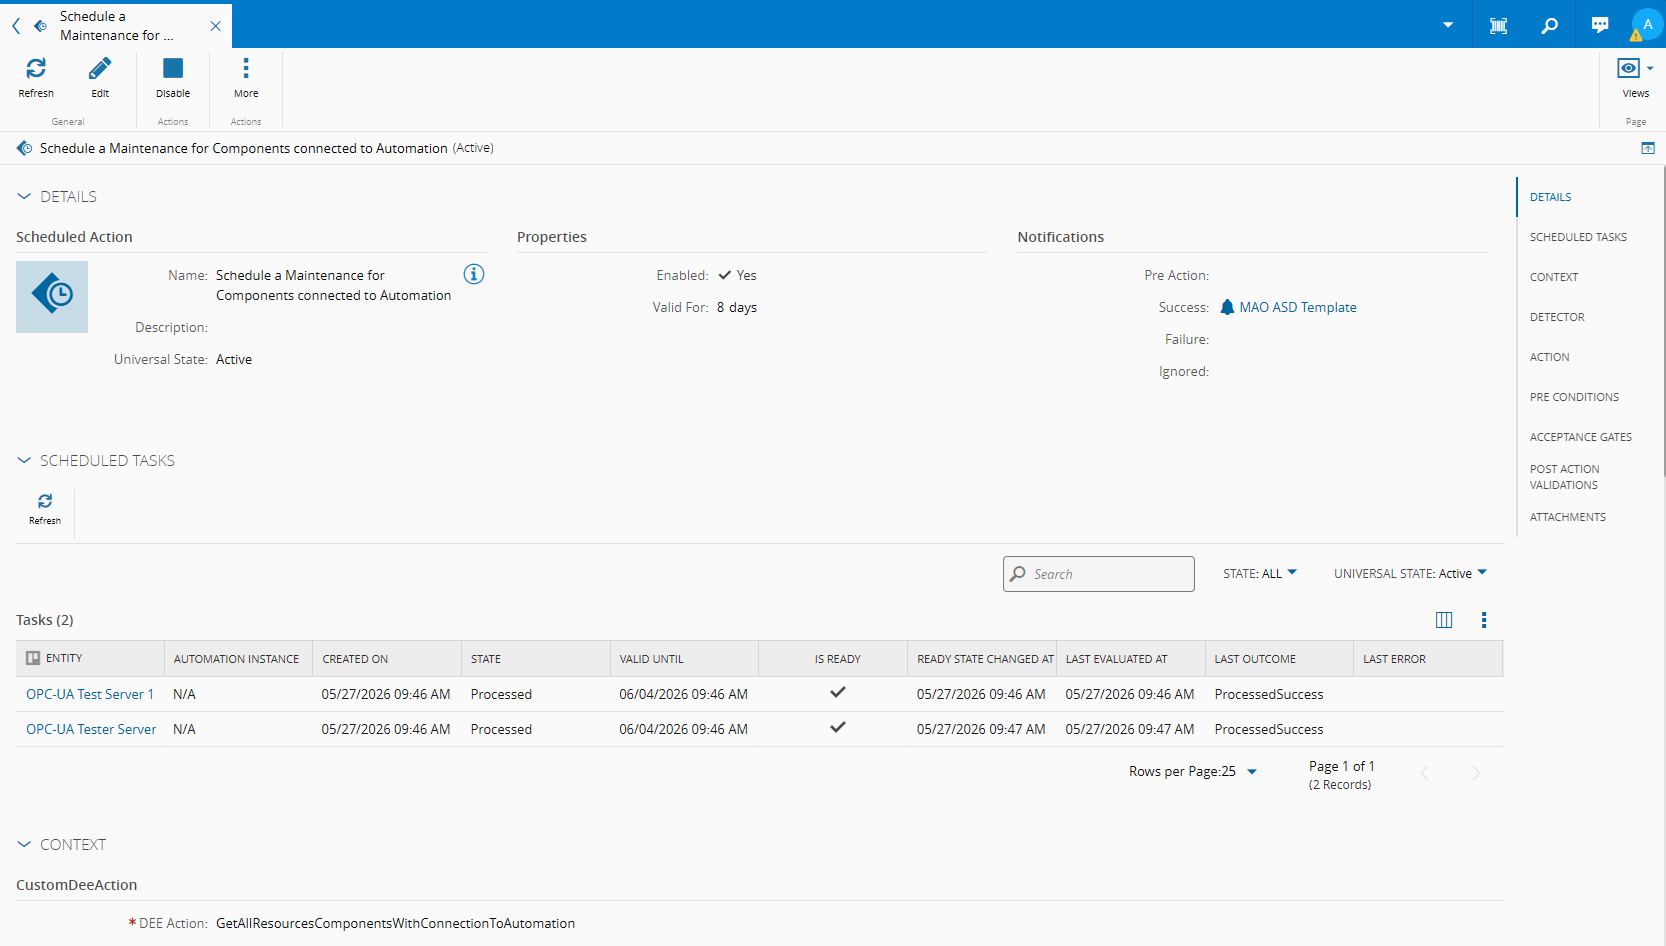
I created a simple use case.
I have two component resources OPC-UA Tester Server and OPC-UA Tester Server 1 connected to test resources. Tester-02 is a parent resource of the component resource OPC-UA Tester Server and has a material in-process.
The only one that is ready to run the scheduled action of creating a maintenance activity will be OPC-UA Tester Server 1, due to the detector No material on Resource.
If we abort the material in Tester-02, in the next run, it will now be ready and will open a maintenance for OPC-UA Tester Server.
Final Thoughts#
11.3 brought a feature with a lot of flexibility and that opens the door to new and exciting use cases. Hope to see people tinker with it and solving problems in creative ways.