All the code presented here is available at github and github.
What is OData?#
Every analytics team building an API reinvents the same query language. OData solved this in 2014. Your BI tools already speak it.
OData (Open Data Protocol) is a standardized REST-based protocol for building and consuming queryable, interoperable APIs. It allows clients to query, filter, sort, paginate, and navigate data, without the API developer having to manually implement each of those capabilities.
It essentially works as SQL (Structured Query Language) over HTTP.
OData was created by Microsoft and it was later standardized by OASIS in 2014 and is now an ISO/IEC International Standard. The core problem it was solving was that every team building a data API was reinventing the same wheel. Clients then had to learn each API’s custom conventions. OData proposed a single, universal convention.
Microsoft’s decision to embed it as the native protocol for Power BI, Excel Power Query, and the entire Power Platform created a massive installed base. When a business analyst can point Excel at an OData endpoint and get a live, filterable, refreshable dataset with zero code, that is a genuinely compelling proposition for enterprises.
This gave OData a self-reinforcing network effect: BI tools support it because the data sources expose it, and data sources expose it because the BI tools consume it. It became the standard for analytics as the consumer applications have mature native support.
Core Concepts
| Concept | Description |
|---|---|
| Entity Sets | Collections of typed entities, like a database table |
| $filter | WHERE clause equivalent |
| $select | Column projection, like SELECT in SQL |
| $expand | JOIN/eager-loading of related entities |
| $orderby | Sorting |
| $top / $skip | Pagination |
| $count | Returns the total record count |
| $metadata | Returns the full schema in EDMX (XML) format |
Example#
Let’s take a look at an example:
GET /Products?$filter=Price gt 20 and Category eq 'Electronics'
              &$select=Name,Price
              &$orderby=Price desc
              &$top=10
              &$skip=20
              &$expand=Supplier
GET /Products
The base resource, targeting the Products entity set. Equivalent to FROM Products in SQL.
$filter=Price gt 20 and Category eq 'Electronics'
The WHERE clause. Filters which records are returned.
gt - means greater than (>) eq - means equals (=) String values use single quotes
SQL equivalent:
WHERE Price > 20 AND Category = 'Electronics'Other comparison operators you’ll see: lt (less than), ge (greater than or equal), le (less than or equal), ne (not equal).
$select=Name,Price
Column projection, only return those two fields instead of the full object. Reduces payload size, important for performance.
SQL equivalent:
SELECT Name, Price$orderby=Price desc
Results are ordered by Price descending, so the most expensive products come first. Use asc for ascending, which is also the default if omitted.
SQL equivalent:
ORDER BY Price DESC$top=10
Limits the number of records returned to 10. Equivalent to LIMIT in SQL or FETCH NEXT 10 ROWS ONLY.
SQL equivalent:
FETCH NEXT 10 ROWS ONLY -- or: LIMIT 10$skip=20
Offsets the result set, skipping the first 20 records. Combined with $top, this gives you page-based pagination.
SQL equivalent:
OFFSET 20 ROWSSo $top=10&$skip=20 means “give me page 3, assuming 10 items per page” (items 21 to 30).
$expand=Supplier
Eager-loads a related entity, joining and embedding the Supplier object inside each product in the response. Without this, you’d only get a reference or nothing at all.
SQL equivalent:
JOIN Suppliers ON Products.SupplierId = Suppliers.IdThe response would look something like:
{
  "Name": "Laptop Pro",
  "Price": 999.99,
  "Supplier": {
    "Id": 5,
    "Name": "Acme Corp",
    "Country": "Portugal"
  }
}
Putting it all together, this OData query translates roughly to:
SELECT p.Name, p.Price, s.*
FROM Products p
JOIN Suppliers s ON p.SupplierId = s.Id
WHERE p.Price > 20
  AND p.Category = 'Electronics'
ORDER BY p.Price DESC
OFFSET 20 ROWS
FETCH NEXT 10 ROWS ONLY
All of that expressed as a single URL, with no custom endpoint code needed on the server side.
OData in Critical Manufacturing#
Critical Manufacturing with it’s IoT Data Platform created a platform for massive data ingestion and aggregation. This of course opened the problem of what would be the best way to interact with the data.
That’s why one of the key features of IoT Data Platform is leveraging the experience of the MES ontology and create a Canonical Data Model (CDM). The MES user will have out-of-the-box cross-industry unified schemas that are continuously being populated by every MES transaction. These schemas are open, so every other data producer, even competing MES systems can publish CDM events. All of this, with a discoverable REST OData API, makes it so you are able to have a the same datasets and data semantics across all your sites.
With the use of ClickHouse, a high-performance columnar database management system, as the data storage backbone we were able to solve not just the data structure problem, but also store it in a way that is blazing fast.
When starting to build all our reporting and dashboards leveraging Data Platform, we had a decision to make. How should we query the data?
This is when the concept of dogfooding becomes important and is really a cornerstone of the Critical mindset. By using OData, we use the same tool our customers and partners will use create their own reports. Creating a performant, bullet-proof and standard way to interact with the system.
Data Manager#
The Data Manager is a core component of the Data Platform architecture that serves as the primary gateway for accessing data stored across the MES system. The Data Manager will service and expose all OData API’s and manage dataset permissions. This is key to make sure that the user is only accessing information for which he has access.
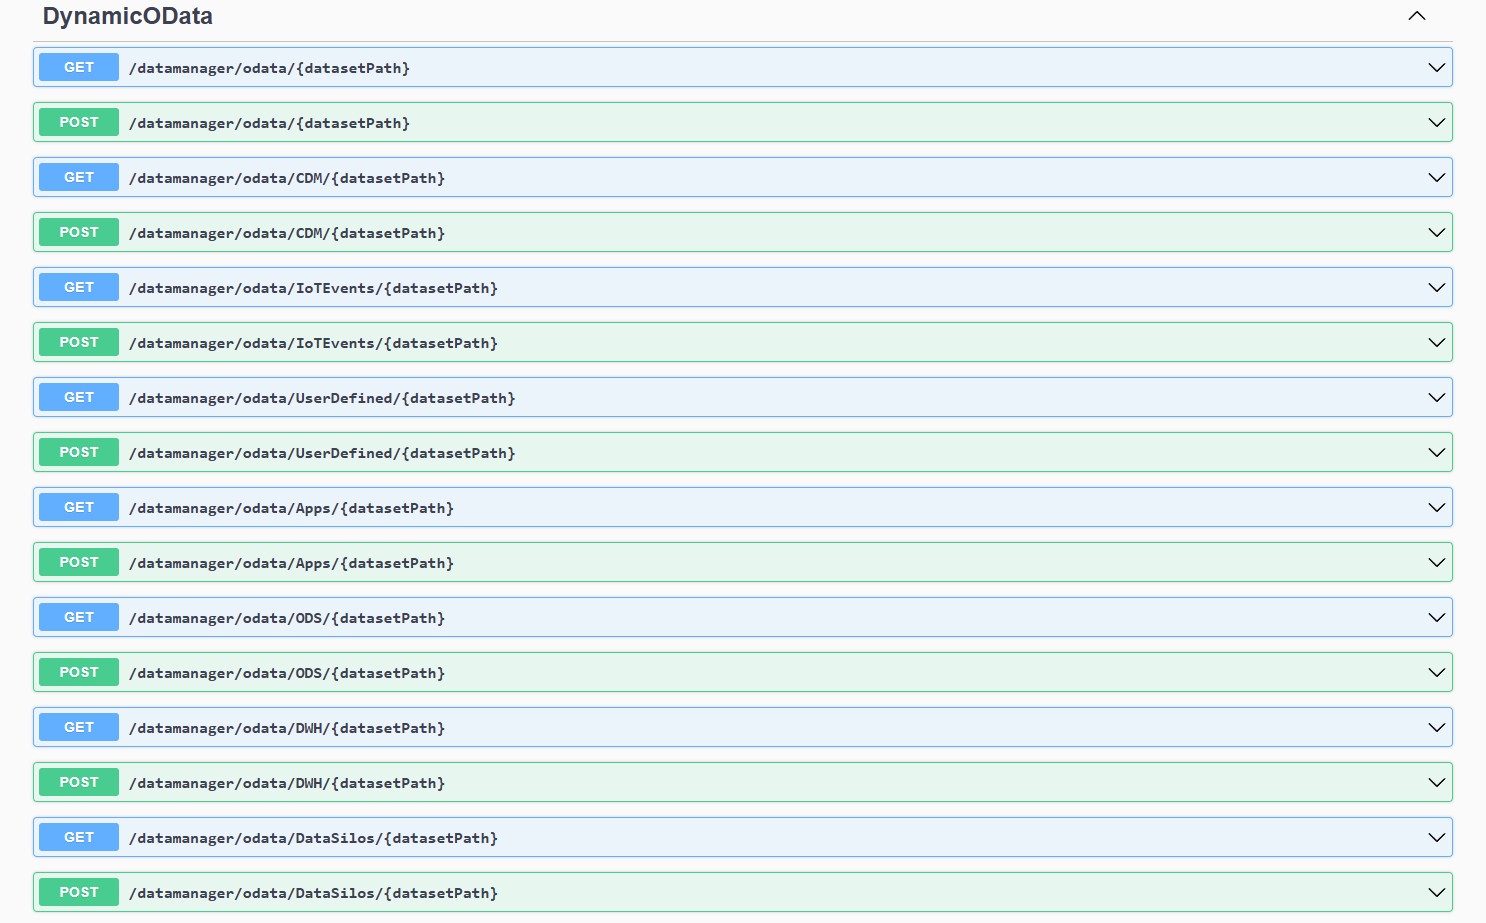
The Data Manager api is available at https://< host url >/datamanager/swagger/index.html and all datasets are accessible via: https://< host url >/datamanager/odata.
Bringing OData to Low Code#
The first challenge is create a low code task to be able to perform OData queries. We will create the normal CLI scaffolding with cmf new iot and cmf new iot taskLibrary. Then I generated a task called simply queryOData with cmf new iot task. All the available scaffolding commands can be found here.
When building my OData query I decided to go with a known library to handle the query making odata-query.
Understanding the Settings#
A query to the data manager is split into several components:
- System Url - where the system is running - https://< host url >/
- Data Manager Entrypoint - the route that the data manager is expecting - /datamanager/odata
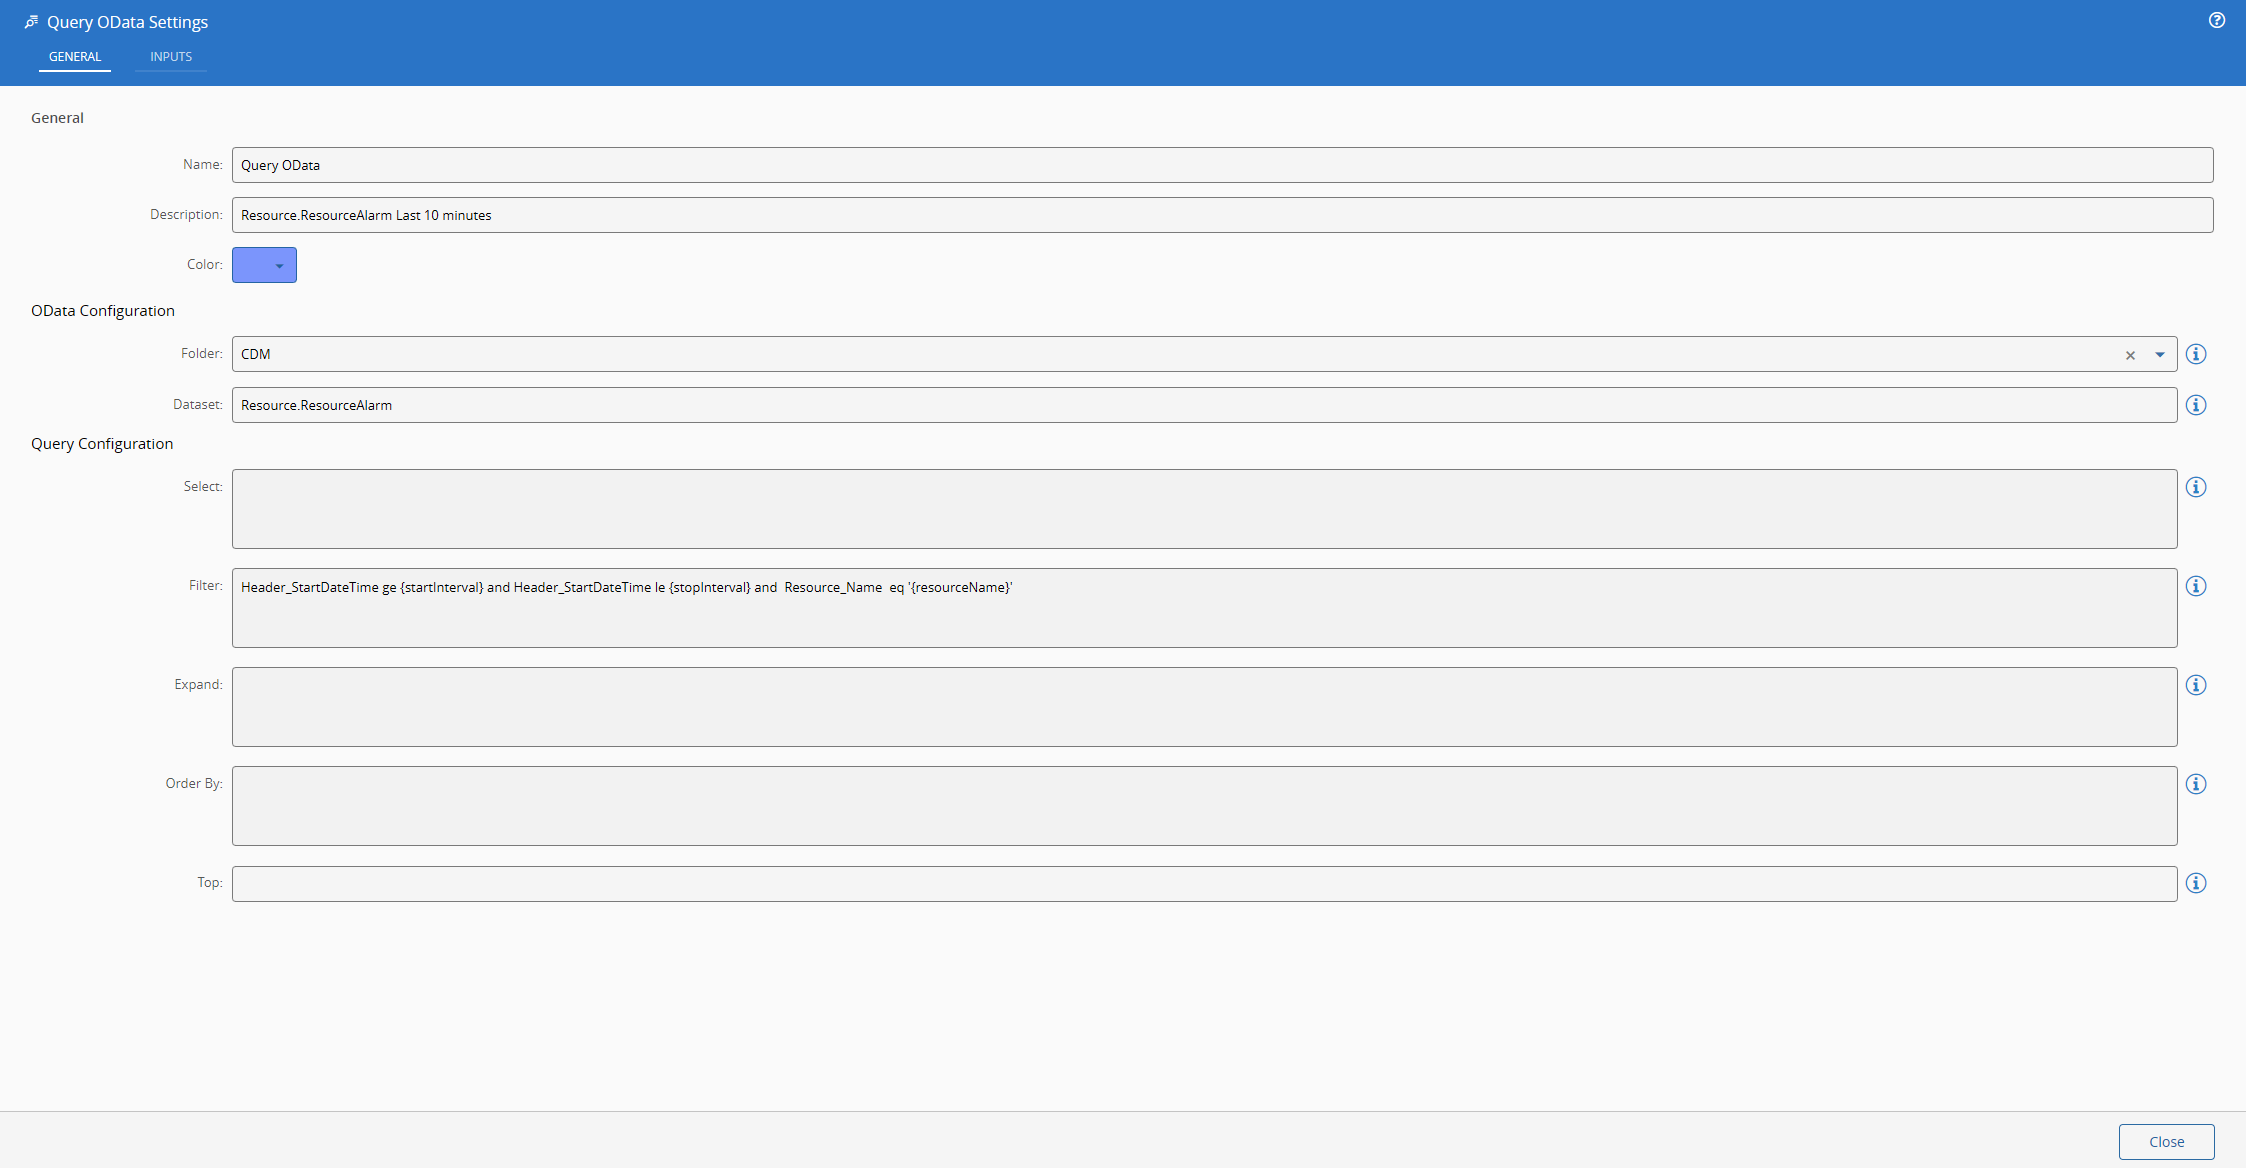
- Folder - the datasets are split into folders - e.g. CDM
- Dataset - the dataset will be the entity set that we are querying - e.g. Resource.ResourceAlarm
All of the components required to build the url must be known by the task. The system url is already known by ConnectIoT and the entrypoint is a static value, the folder and the dataset will be settings of our task.
We will also allow for the user to have the components of the OData query specified as settings, that way he can build defaults. We will see later how can these be very helpful.
If we take a look at what our automation task library (the metadata responsible for UI rendering) looks like, our settings look like:
"settings": {
  "General": {
    "OData Configuration": [
      {
        "name": "Folder",
        "displayName": "Folder",
        "settingKey": "folder",
        "dataType": "Enum",
        "settings": {
          "enumValues": [
            "Apps",
            "CDM",
            "DWH",
            "IoTEvents",
            "ODS",
            "UserDefined"
          ]
        },
        "infoMessage": "Information about the folder that contains the dataset"
      },
      {
        "name": "Dataset",
        "displayName": "Dataset",
        "settingKey": "dataset",
        "dataType": "string",
        "infoMessage": "Information about the dataset to query"
      }
    ],
    "Query Configuration": [
      {
        "name": "Select",
        "displayName": "Select",
        "settingKey": "defaultSelect",
        "dataType": "Text",
        "infoMessage": "Default select fields for the OData query"
      },
      {
        "name": "Filter",
        "displayName": "Filter",
        "settingKey": "defaultFilter",
        "dataType": "Text",
        "infoMessage": "Default filter for the OData query"
      },
      {
        "name": "Expand",
        "displayName": "Expand",
        "settingKey": "defaultExpand",
        "dataType": "Text",
        "infoMessage": "Default expand fields for the OData query"
      },
      {
        "name": "Order By",
        "displayName": "Order By",
        "settingKey": "defaultOrderBy",
        "dataType": "Text",
        "infoMessage": "Default order by for the OData query"
      },
      {
        "name": "Top",
        "displayName": "Top",
        "settingKey": "defaultTop",
        "dataType": "number",
        "infoMessage": "Maximum number of records to return"
      }
    ]
  }
}
Inputs and Outputs#
The inputs will address all the OData defaults, in order for the user to be able to override them in runtime. It will also allow the user to create his own raw query and bypass our query builder, so we will provide a raw query and raw method input.
Another feature that I thought was interesting was the ability to add dynamically new inputs and then use them to replace tokens in the settings.
The idea is I kind build write that my filter is - Header_StartDateTime ge {startInterval} and Header_StartDateTime le {stopInterval} and Resource_Name eq ‘{resourceName}’. Then I can dynamically add the input resourceName to my task. In runtime it will replace the resourceName with the correct value. This is very helpful for query building where you want most of the query to be static and then just replace the value fields. In this case we do it for time calculation and for specifying the resource.
Let’s take a look at the snippet of our automation task library that refers to the inputs.
"inputs": {
  "rawQuery": {
    "type": "Static",
    "dataType": "String",
    "displayName": "Raw Query"
  },
  "select": {
    "type": "Static",
    "dataType": "Object",
    "displayName": "Select"
  },
  "filter": {
    "type": "Static",
    "dataType": "String",
    "displayName": "Filter"
  },
  "expand": {
    "type": "Static",
    "dataType": "String",
    "displayName": "Expand"
  },
  "orderBy": {
    "type": "Static",
    "dataType": "String",
    "displayName": "Order By"
  },
  "top": {
    "type": "Static",
    "dataType": "Integer",
    "displayName": "Top"
  },
  "skip": {
    "type": "Static",
    "dataType": "Integer",
    "displayName": "Skip"
  },
  "count": {
    "type": "Static",
    "dataType": "Boolean",
    "displayName": "Count"
  },
  "search": {
    "type": "Static",
    "dataType": "String",
    "displayName": "Search"
  },
  "_inputs": {
    "type": "AutoPort",
    "dataType": "String",
    "displayName": "Link here to add new",
    "settings": {
      "settingKey": "inputs",
      "destination": "Input",
      "excludeSuffix": true
    }
  },
  "activate": {
    "type": "Activate",
    "dataType": "String",
    "displayName": "Activate",
    "defaultValue": ""
  }
}
Most of them are similar, they are static values with different primitive values. The AutoPort entry will map that there is a input that acts as an auto port where the user can just drag links to it and it will create a new input.
The AutoPort can be in the inputs side, outputs side or can be inputs/outputs if you want to have it create a matching output when you link an input. If you can have inputs with the same names as outputs you should put the excludeSuffix as false, in order to avoid name collision.
For the outputs we will have what OData provides, the raw response with the full payload and then the value, count and next link.
"outputs": {
  "value": {
    "type": "Static",
    "dataType": "Any",
    "displayName": "Value"
  },
  "countResponse": {
    "type": "Static",
    "dataType": "Integer",
    "displayName": "Count Response"
  },
  "nextLink": {
    "type": "Static",
    "dataType": "String",
    "displayName": "Next Link"
  },
  "rawResponse": {
    "type": "Static",
    "dataType": "Any",
    "displayName": "Raw Response"
  },
  "success": {
    "type": "Success",
    "displayName": "Success"
  },
  "error": {
    "type": "Error",
    "displayName": "Error"
  }
}
Understanding the Runtime#
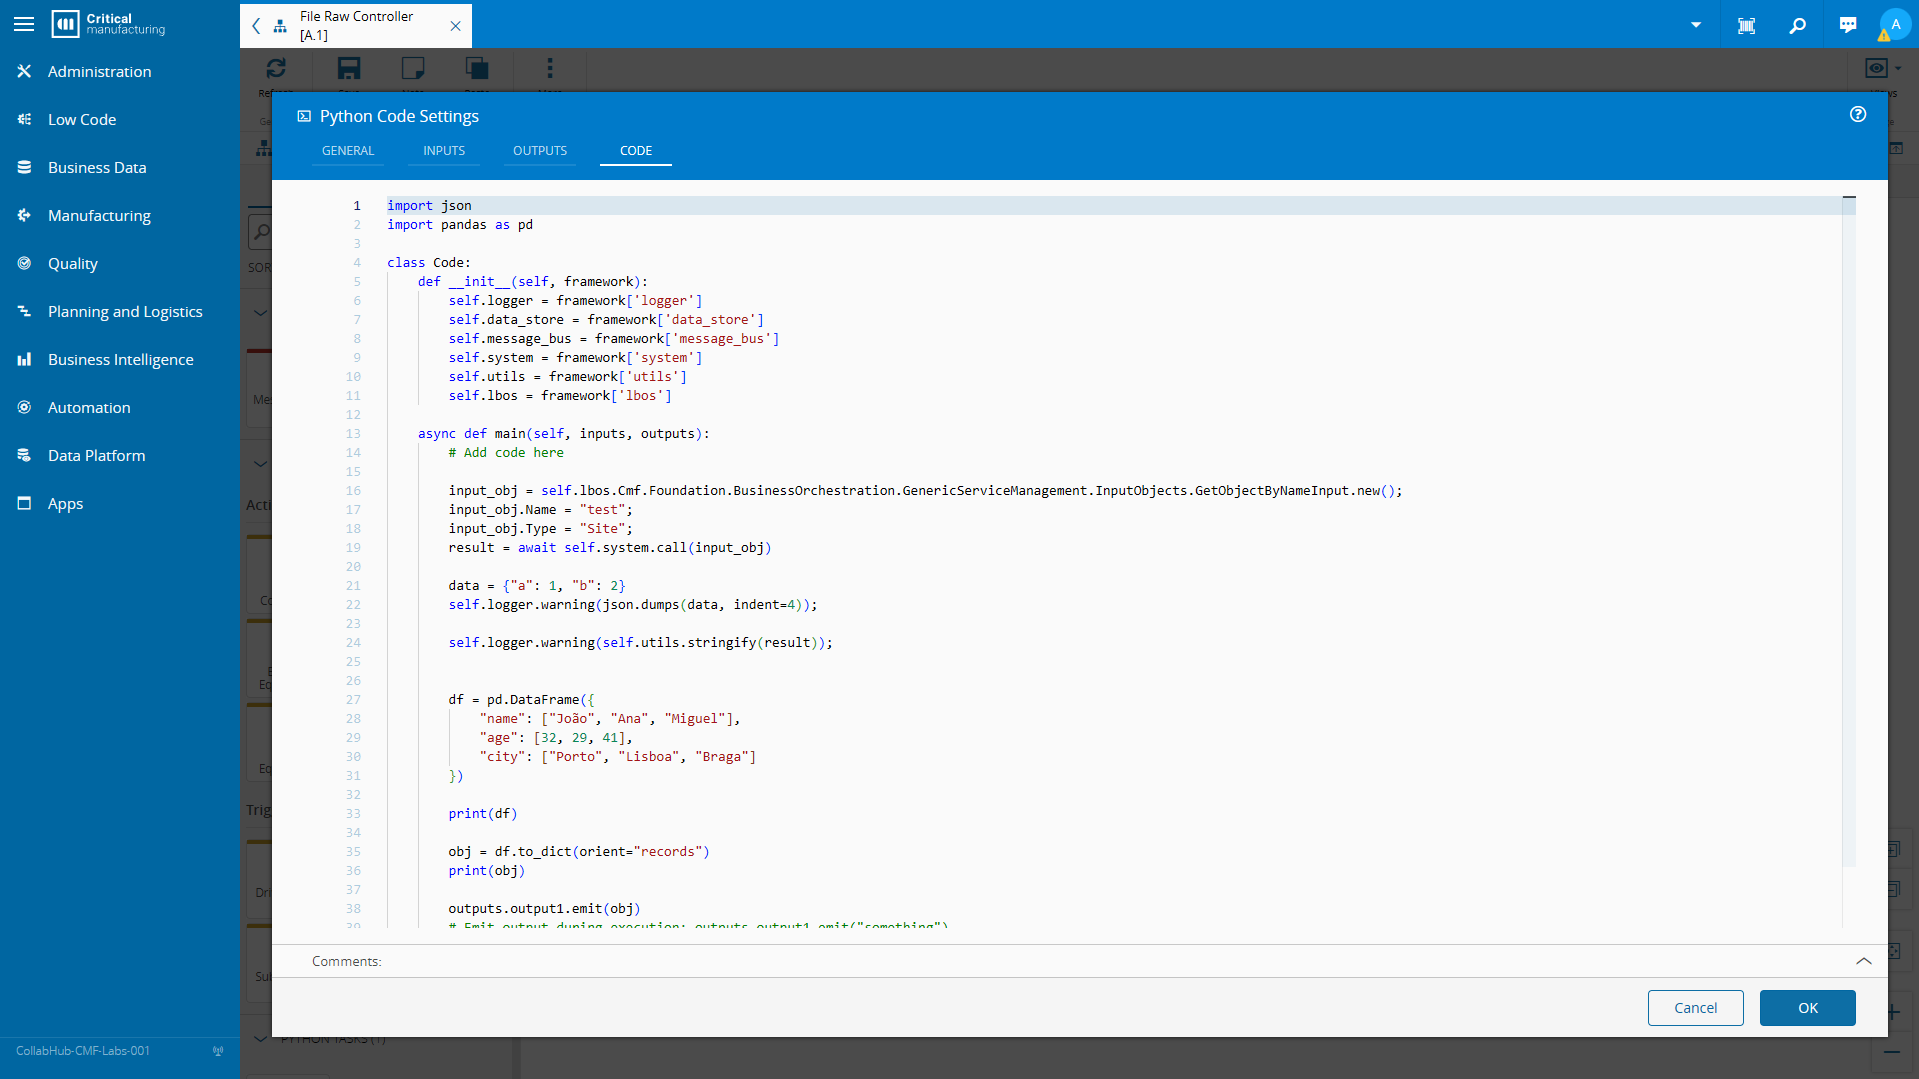
Now that we defined our task contract which are its inputs/outputs and settings, we can move on to the runtime code.
Our code will focus on the onChanges method this is the method that will be triggered when a task is activated.
The first goal of our onChanges is to construct the url. There is a nuance, we want our task to be able to query our Data Manager inside and outside the MES stack as data platform workflows run inside the MES stack. We could just add a setting for the user to specify the system url and always make requests as if we were outside the MES stack, but we can also try to infer that setting.
If the manager is running outside the task the system url will always be specified in the process.env[“HOSTURL”], the issue is that inside the MES stack the HOSTURL will resolve to http://host:8080 which is correct but not what we want. We need to change to the known data manager address inside the MES stack.
  public override async onChanges(changes: Task.Changes): Promise<void> {
    if (changes["activate"]) {
        // It is advised to reset the activate to allow being reactivated without the value being different
        this.activate = undefined;
let datamanagerAddress = process.env["HOSTURL"];
// This means we are running inside the MES stack and we need to query the data-manager directly
        if (datamanagerAddress == "http://host:8080") {
            datamanagerAddress = "http://data-manager:8080";
        }
let url = `${datamanagerAddress}/datamanager/odata/`;
        if (this.rawQuery) {
            url = `${url}${this.rawQuery}`;
        } else {
            url = `${url}${this.folder}/${this.dataset}`;
Now that we have our Url sorted out we can do the input token replacement. We will check if there’s any default with tokens and replace them with the correct matching input.
  for (const key in changes) {
      if (this.isInput(key)) {
          // the defaults may contain references to inputs, so we need to build the query with the current values of the inputs
          // i.e. defaultFilter could be "Severity eq {severityInput}" and we need to replace {severityInput} with the current value of severityInput
if (this.defaultSelect != null && this.defaultSelect.includes(`{${key}}`)) {
              this.defaultSelect = this.defaultSelect.replace(new RegExp(`{${key}}`, 'g'), changes[key].currentValue);
          }
          if (this.defaultFilter != null && this.defaultFilter.includes(`{${key}}`)) {
              this.defaultFilter = this.defaultFilter.replace(new RegExp(`{${key}}`, 'g'), changes[key].currentValue);
          }
          if (this.defaultExpand != null && this.defaultExpand.includes(`{${key}}`)) {
              this.defaultExpand = this.defaultExpand.replace(new RegExp(`{${key}}`, 'g'), changes[key].currentValue);
          }
          if (this.defaultOrderBy != null && this.defaultOrderBy.includes(`{${key}}`)) {
              this.defaultOrderBy = this.defaultOrderBy.replace(new RegExp(`{${key}}`, 'g'), changes[key].currentValue);
          }
this[key] = undefined;
      }
  }
We can now call our library to build the query. We always give priority to our inputs, if they are not defined we use the default values. Here is where odata-query shines and really does some heavy lifting on making sure we are creating correct OData queries.
  const query = buildQuery({
      select: this.select ?? this.defaultSelect,
      filter: this.filter ?? this.defaultFilter,
      expand: this.expand ?? this.defaultExpand,
      orderBy: this.orderBy ?? this.defaultOrderBy,
      top: this.top ?? this.defaultTop,
      skip: this.skip,
      count: this.count,
      search: this.search,
  });
url = `${url}${query}`;
Finally, we make the http request and emit the json response.
  const opts = {
      headers: {
          'Accept': 'application/json; odata.metadata=minimal; odata.streaming=true; charset=utf-8',
          'Authorization': `Bearer ${process.env["SYSTEMACCESSTOKEN"]}`,
      },
      method: this.rawMethod || "GET"
  };
const response = await fetch(url, opts);
  const data = await response.json();
this.rawResponse.emit(data);
  this.value.emit(data.value);
  this.countResponse.emit(data['@odata.count'] ?? null);
  this.nextLink.emit(data['@odata.nextLink'] ?? null);
this.success.emit(true);
Seeing it Run#
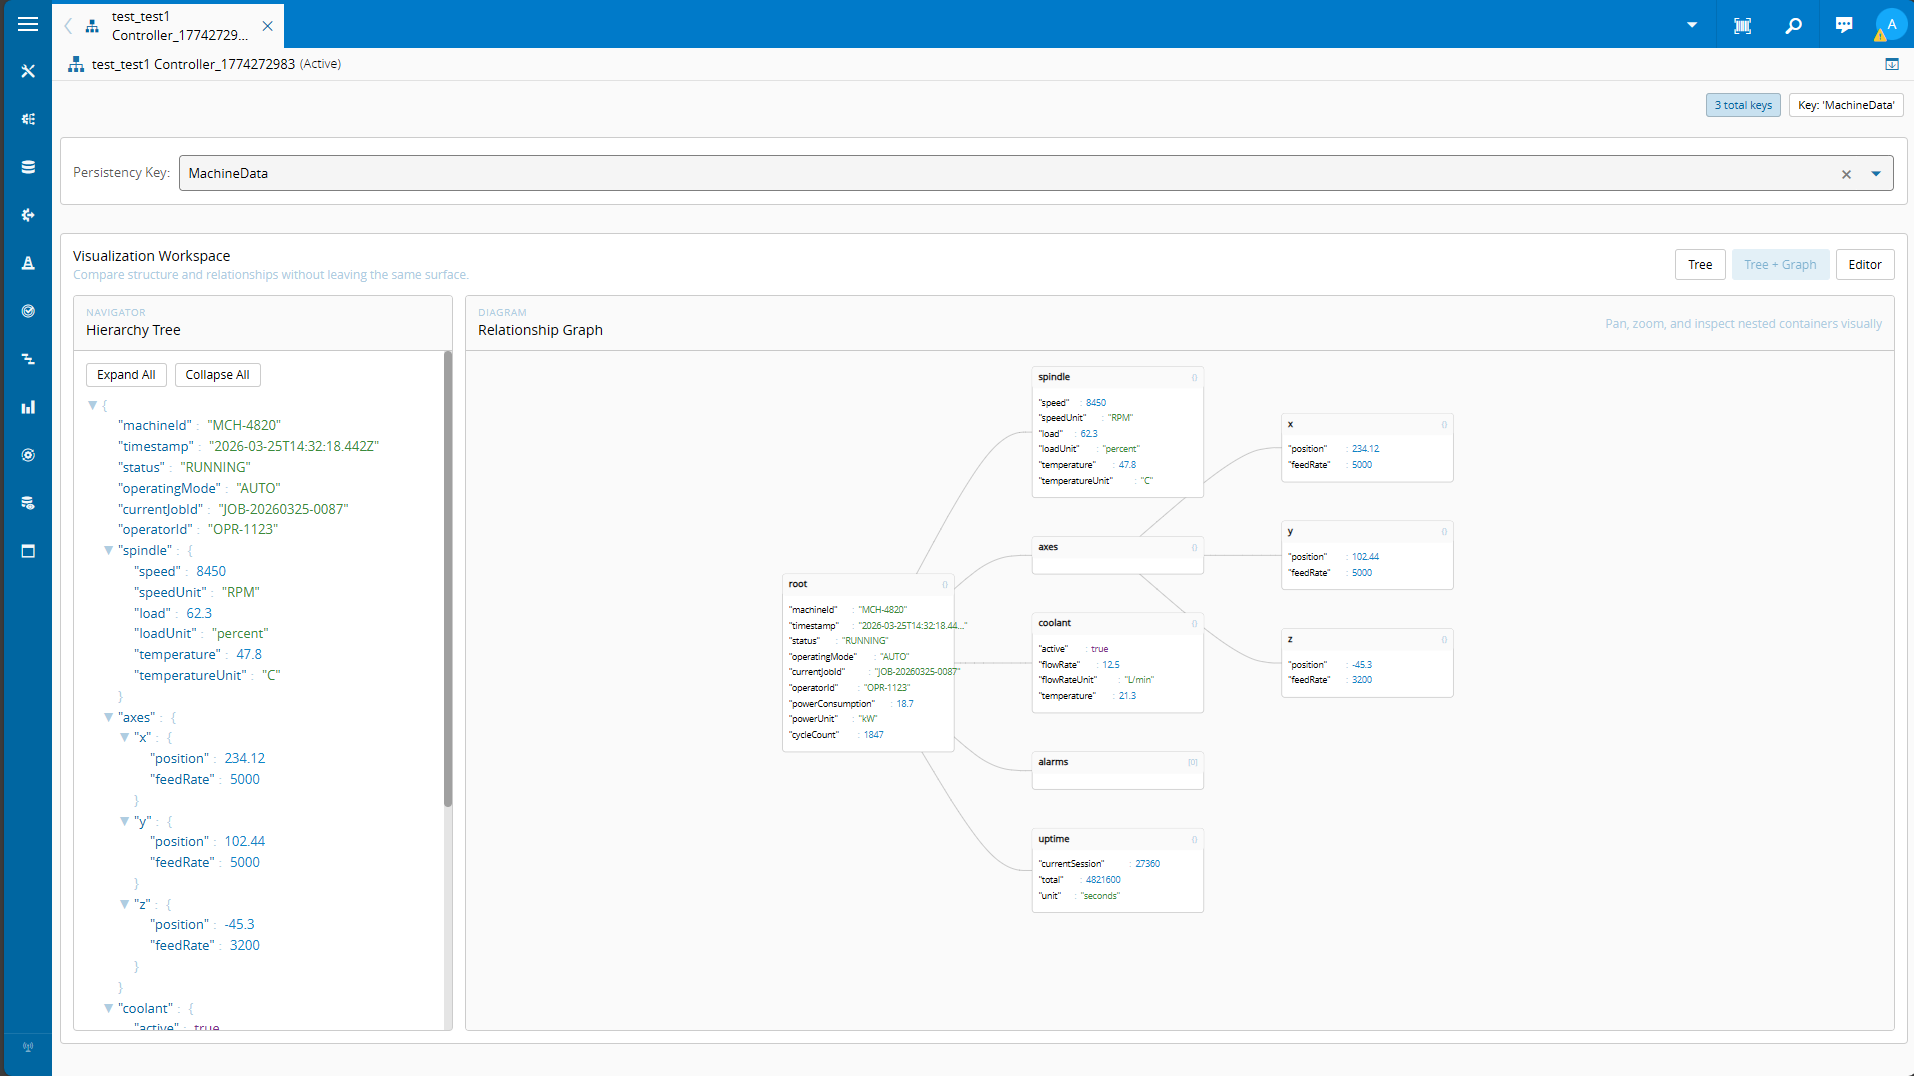
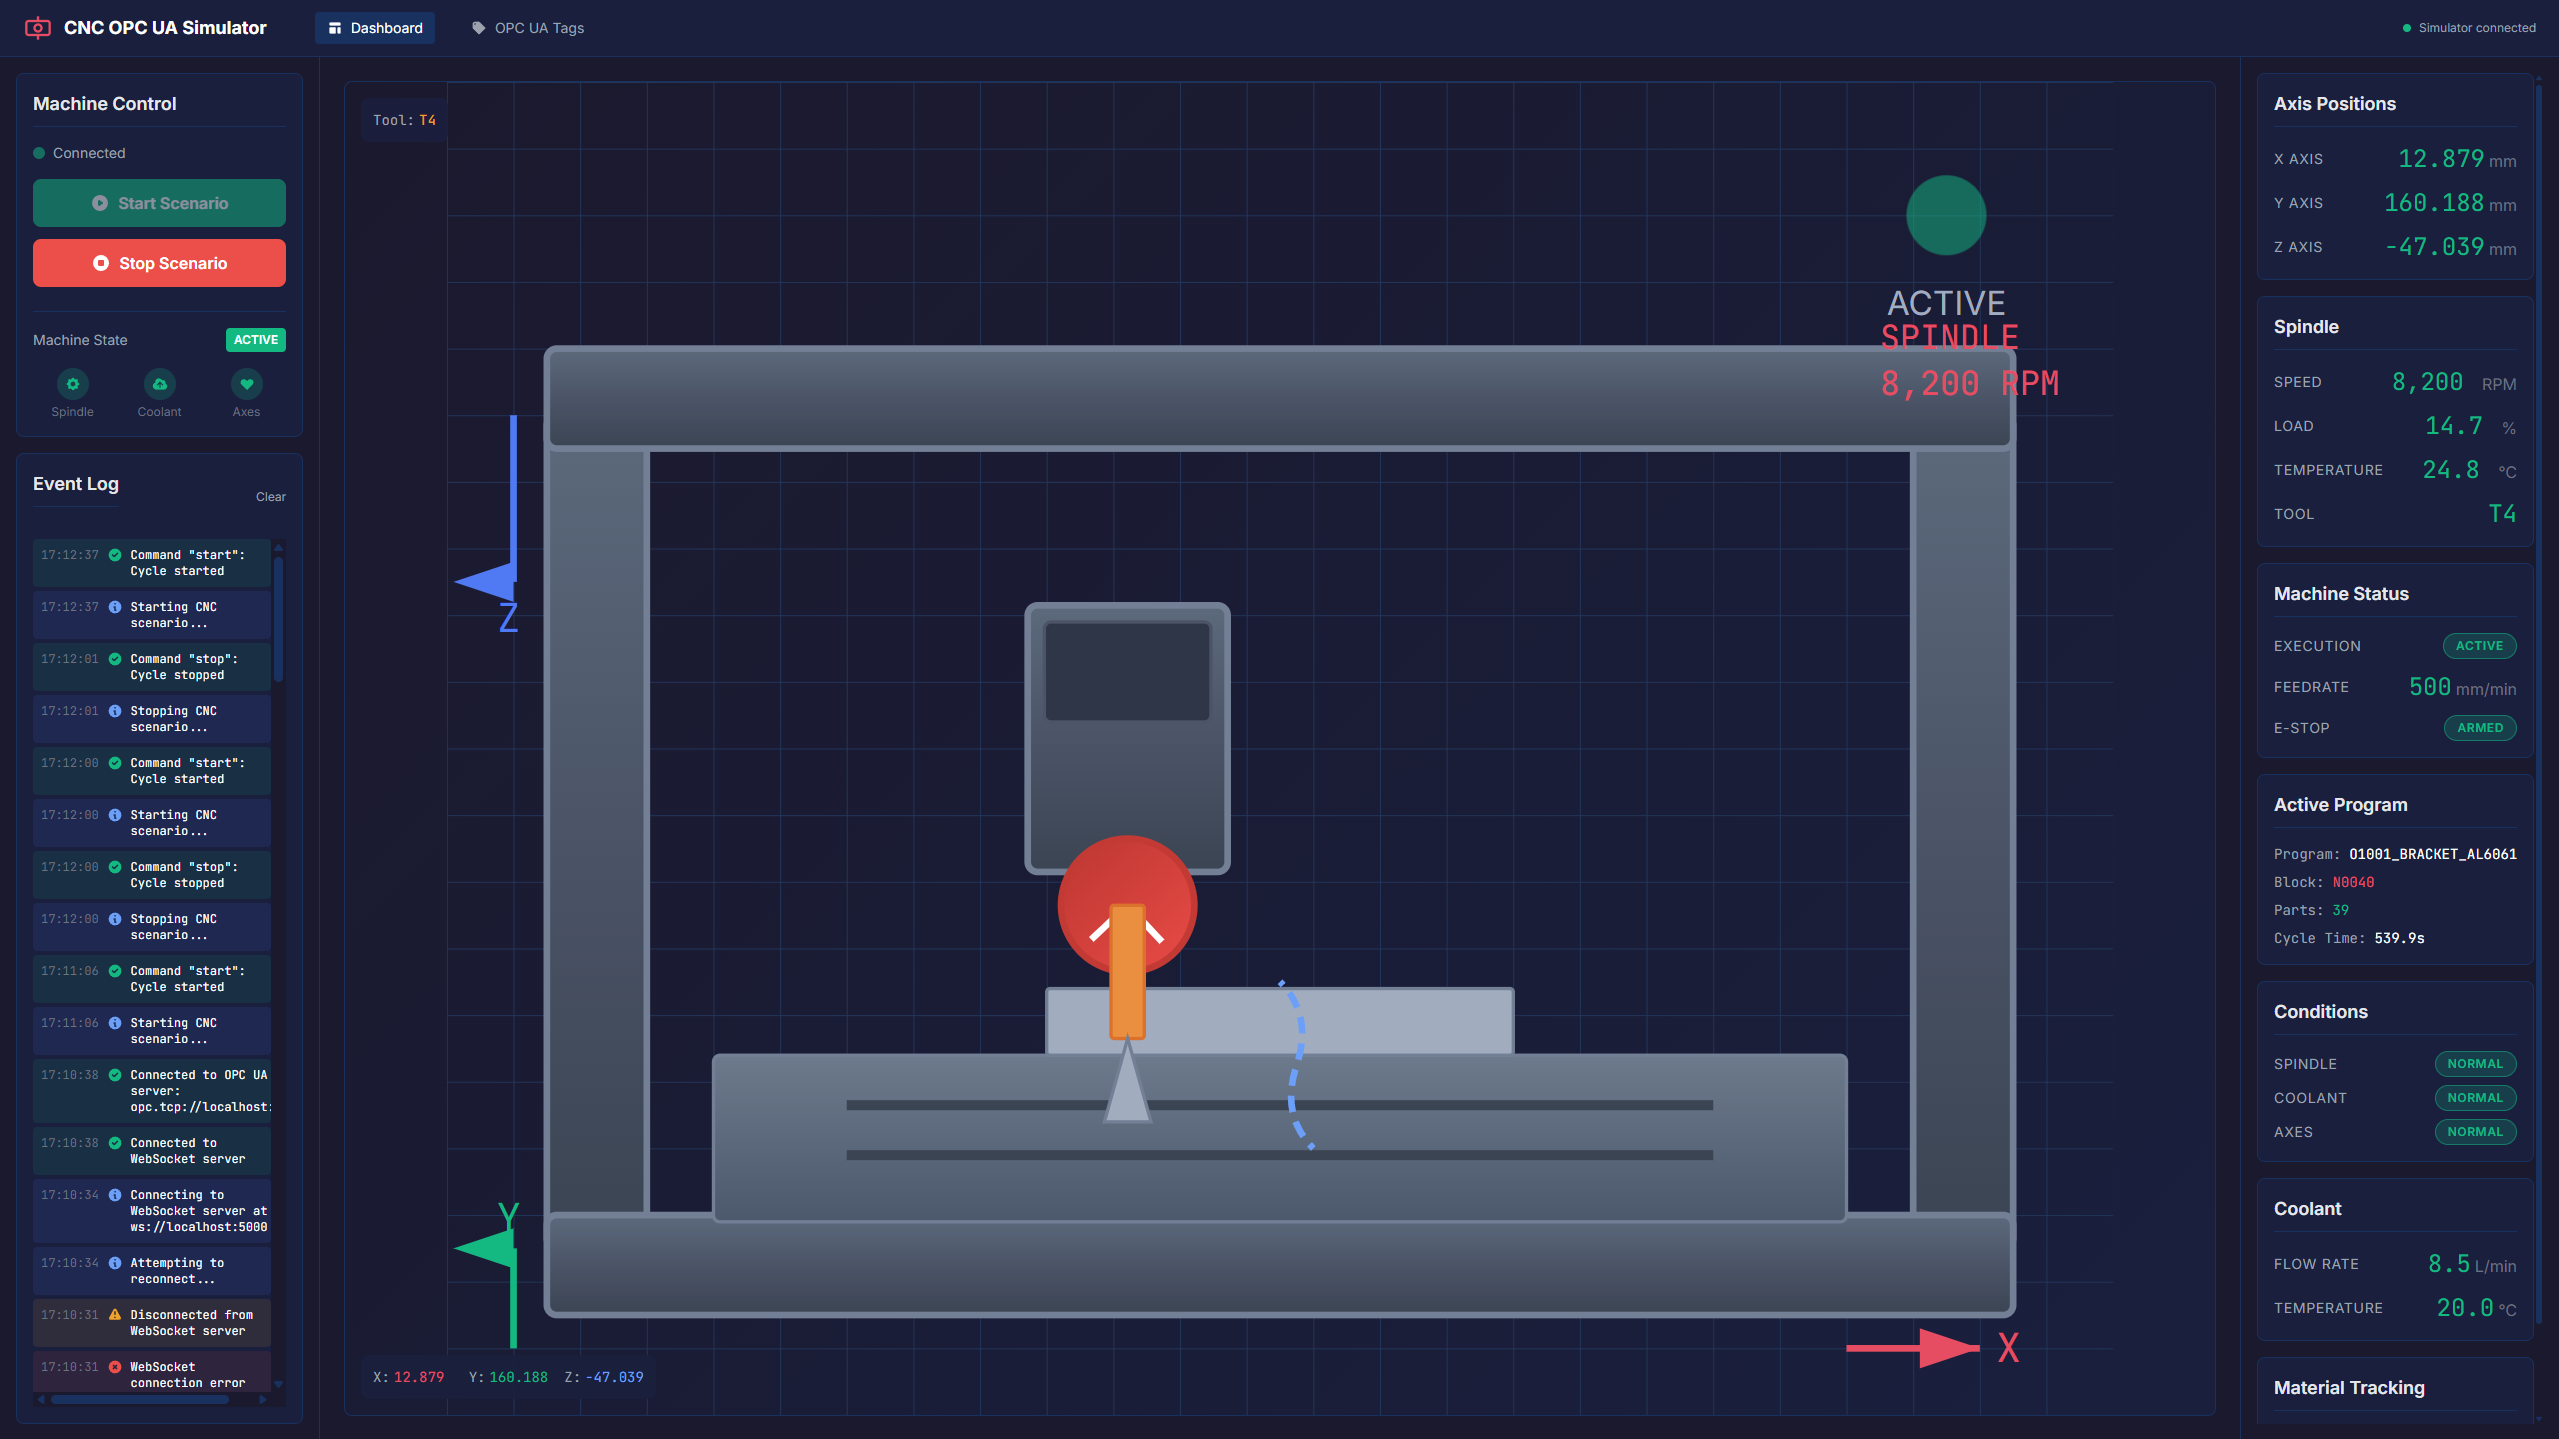
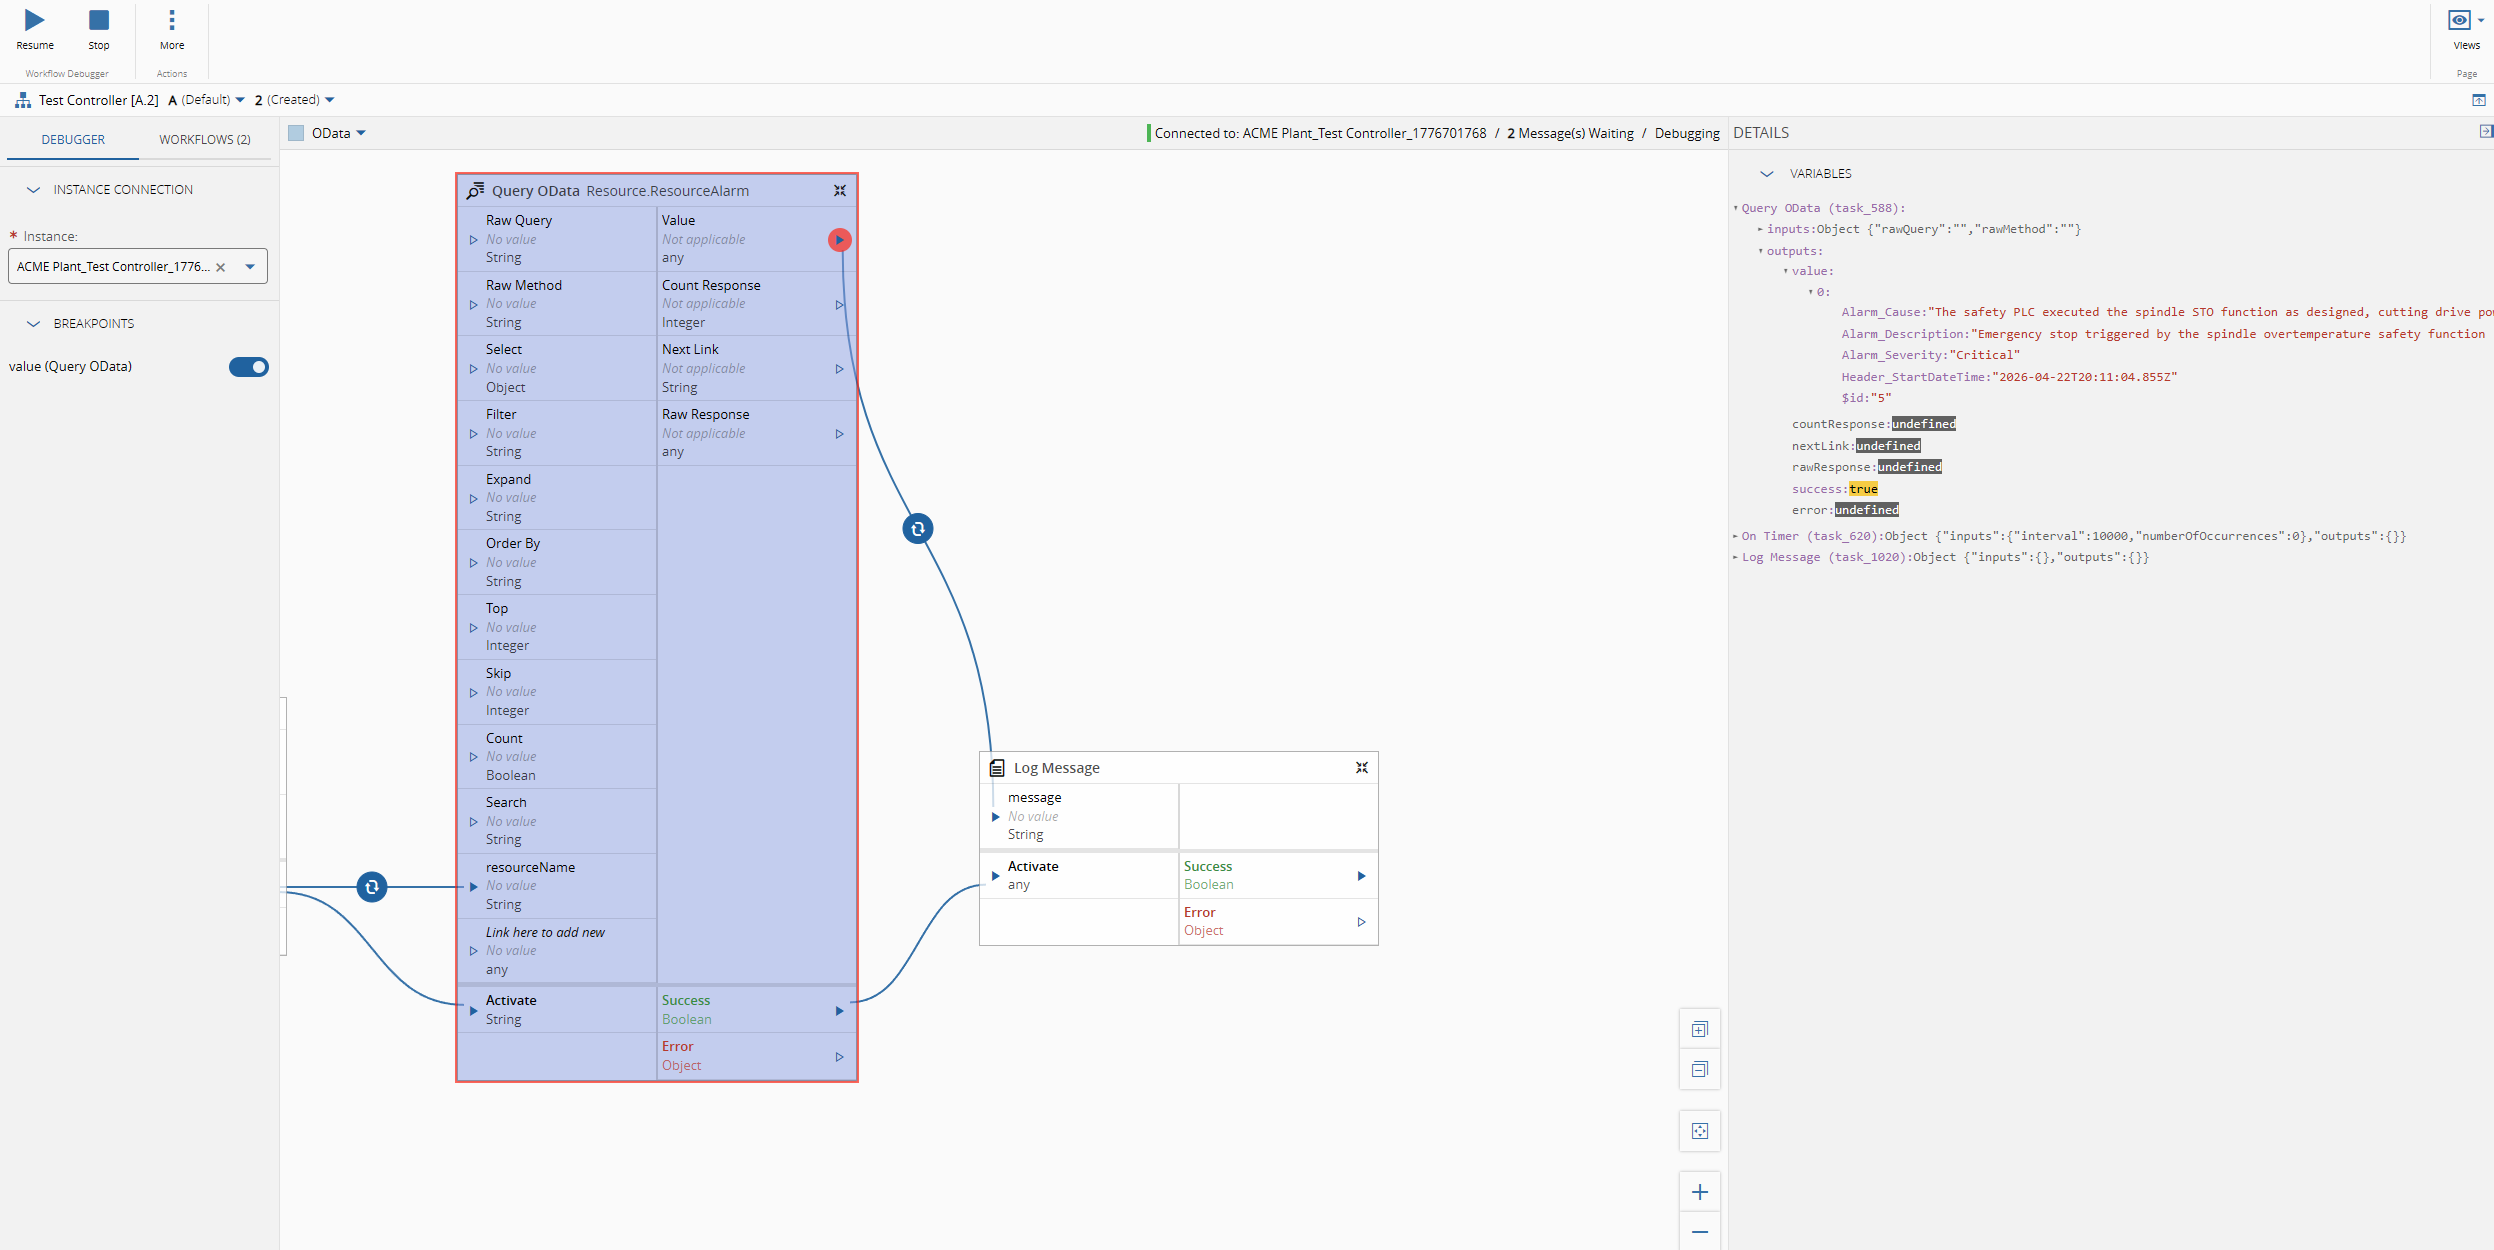
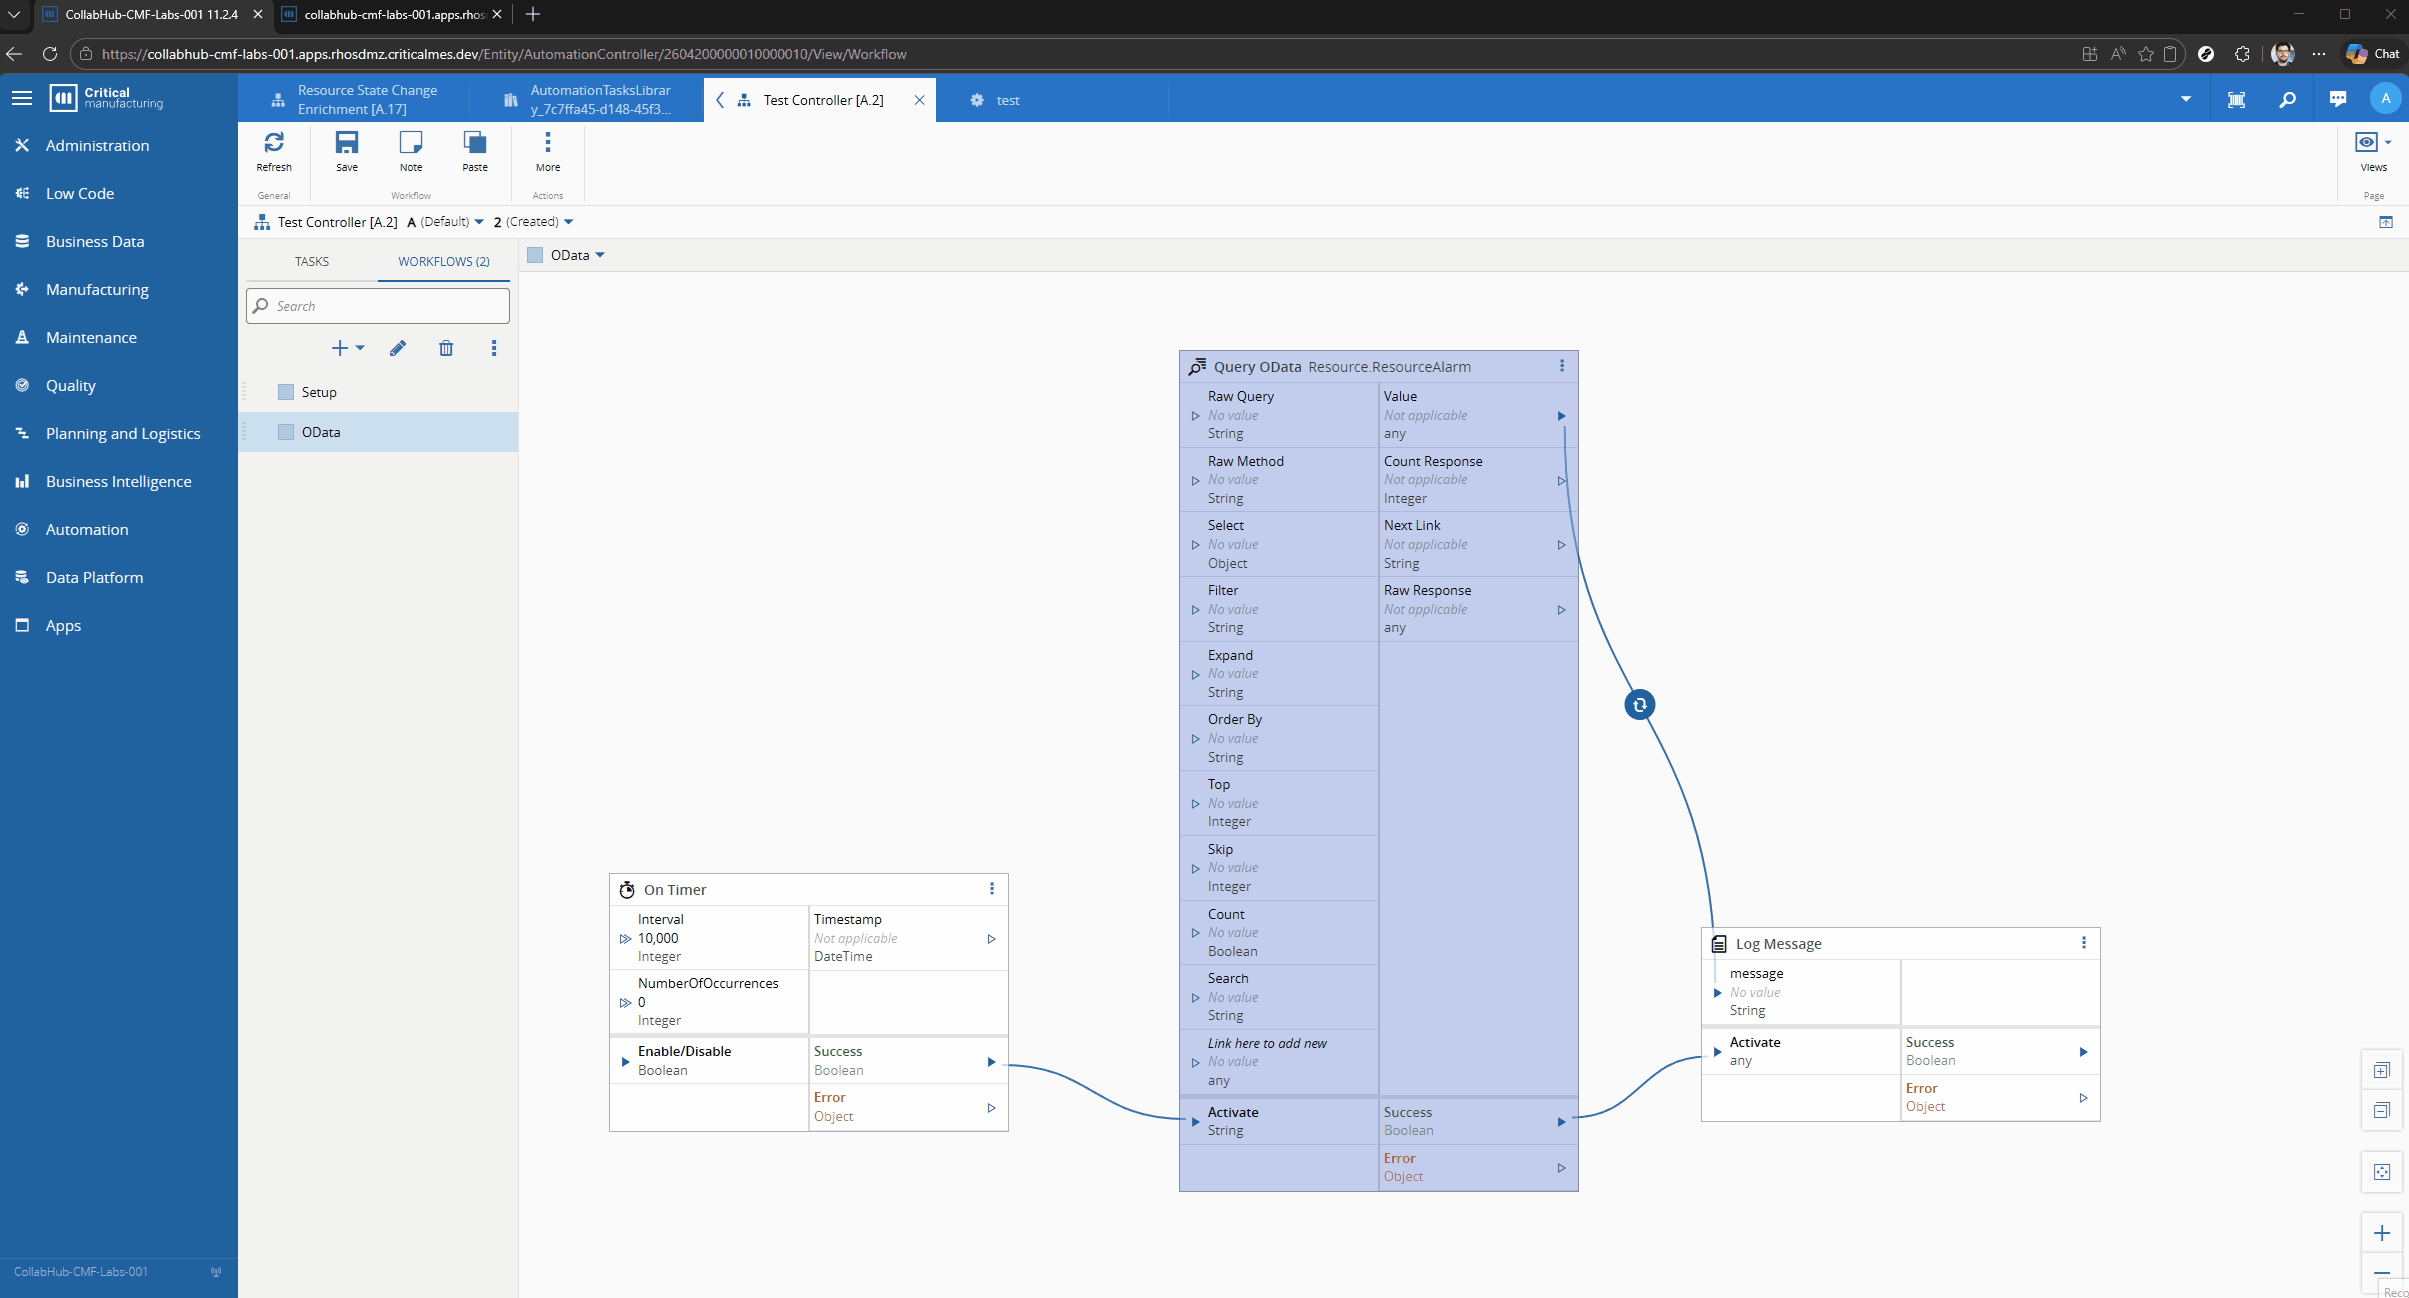
Let’s imagine the scenario where we want to have the latest Resource Alarms for a particular Resource. We will just a simple timer and then logging the output, to showcase the OData call.
We can defined what are the fields we are interested in, for example Alarm_Cause, Alarm_Description and Alarm_Severity.
We can define the filter - Resource_Name eq ‘{resourceName}’ and the order by - Header_StartDateTime desc
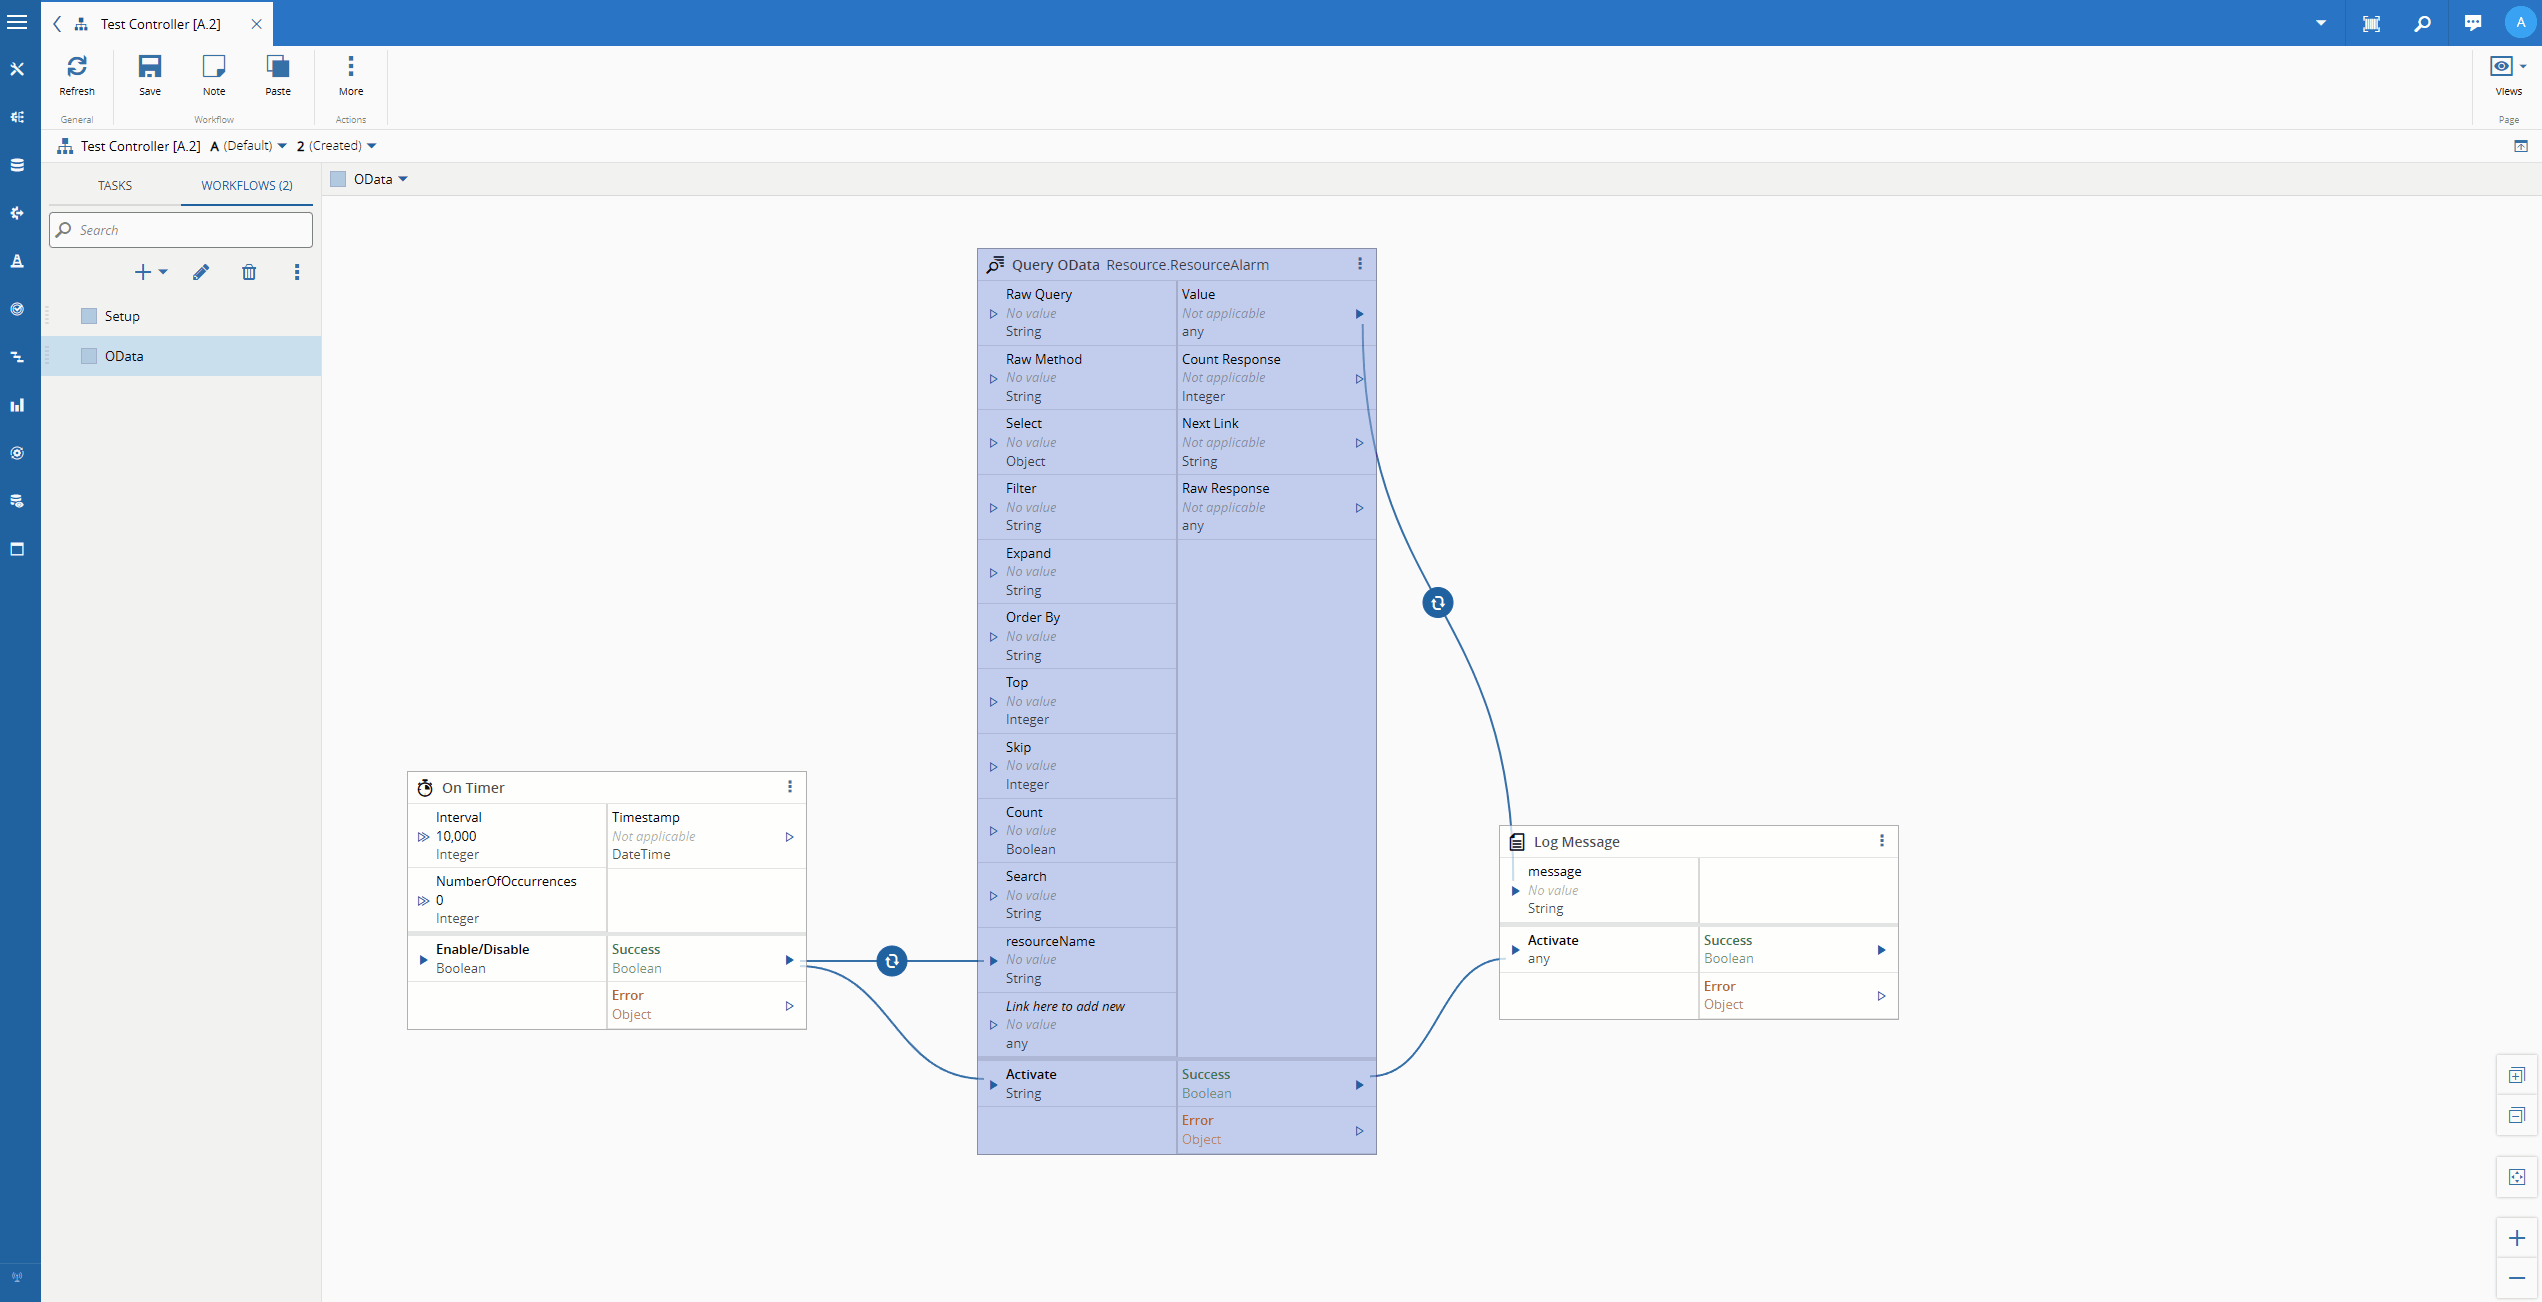
The OData url: https://collabhub-cmf-labs-001.apps.rhosdmz.criticalmes.dev/datamanager/odata/CDM/Resource.ResourceAlarm?$select=Alarm_Cause,Alarm_Description,Alarm_Severity,Header_StartDateTime&$filter=Resource_Name%20%20eq%20%27COIL%20BEND%2301%27&$orderby=Header_StartDateTime%20desc&$top=1.
{
  "@odata.context": "http://collabhub-cmf-labs-001.apps.rhosdmz.criticalmes.dev/datamanager/odata/CDM/$metadata#Resource.ResourceAlarm(Alarm_Cause,Alarm_Description,Alarm_Severity,Header_StartDateTime)",
  "value": [
    {
      "Alarm_Cause": "The safety PLC executed the spindle STO function as designed, cutting drive power to the spindle motor while maintaining axis position locks. The coolant pump was halted by the same safety routine to prevent pump seal damage from cavitation. The fractured coolant line must be replaced, the sump refilled to the correct level, and the system bled of air before restart. A full spindle thermal soak test (30-minute run at 20% load) is required before returning to production.",
      "Alarm_Description": "Emergency stop triggered by the spindle overtemperature safety function (STO — Safe Torque Off) after spindle bearing temperature exceeded the 65°C trip threshold defined in the machine safety parameters. Spindle decelerated from 4,200 RPM to rest in 3.1 seconds via the active braking resistor. Coolant pump P1 has been shut down to prevent dry-running damage.",
      "Alarm_Severity": "Critical",
      "Header_StartDateTime": "2026-04-22T20:11:04.855Z"
    }
  ]
}
The task will then output all of this information, so it can be used by other tasks and perform whatever action the user wants.
Final Thoughts#
This is a very simple use case, but this opens the door to a lot of flexibility on how we are able to interact and query data. An enterprise data analytics platform is now here, a first grade toolset is here, what are you waiting for to start being a data driven organization?