All the code presented here is available at github.
Overview#
In Critical Manufacturing we’ve invested a lot of time and effort in making sure most use cases are covered with the use of configuration and metadata. From an extensive low code platform, to master data, our product is highly configurable and dynamic.
In this blog post we are going to delve into a more complex scenario, where we build a low code task that has a UI component that can’t be described with just metadata.
Currently, Connect IoT offers a task with a typescript code sandbox. As our analytics use cases grow more complex, python becomes the defacto standard for data orchestration and transformation. Luckily with tools like Pyodide it’s relatively simple to incorporate it into Connect IoT.
The goal is then to build a Connect IoT task which offers a UI with Python code sandbox and is able to run python code and import python libraries.
Scaffolding#
The CM CLI is the entrypoint for all customization scaffolding. For most iot implementations where we don’t require any UI customization we would just run:
cmf new iot
In our scenario, we want to create a customization task that is a hybrid between nodejs for the execution code and an Angular component for the rendering in the low code designer. Therefore, the scaffolding is slightly different as we are not just creating a nodejs project, but also an angular one CM CLI IoT Scaffolding.
In version 10 upwards, when creating a ask with a full on angular customization, there’s a dependency between the HTML customization package and the IoT customization package. Therefore, before you scaffold, make sure you have an HTML package already scaffolded.
In order to generate a new package we need to specify the html package location and if it’s an angular package:
cmf new iot --isAngularPackage --htmlPackageLocation ./Cmf.Custom.MESProject.HTML
We can now generate our angular library that will hold all our tasks and converters.
npx @angular/cli generate library @criticalmanufacturing/connect-iot-controller-engine-python-tasks
The library will come with a template task, but let’s create our own by running:
npx @angular/cli generate @criticalmanufacturing/ngx-iot-schematics:task
In our HTML package we can now finish up by adding our custom package and adding it in the related packages:
npm i ../Cmf.Custom.MESProject.IoT.Packages/dist/connect-iot-controller-engine-python-tasks
and in the cmfpackage.json of the HTML package:
{
  "packageId": "Cmf.Custom.MESProject.HTML",
  "version": "1.0.0",
  "description": "Cmf Custom CMFLabs Cmf.Custom.MESProject.HTML Package",
  "packageType": "Html",
  "isInstallable": true,
  "isUniqueInstall": false,
  "contentToPack": [
    {
      "source": "dist/cmf.custom.mesproject.html/**",
      "target": "",
      "ignoreFiles": [
        ".npmignore"
      ]
    }
  ],
  "relatedPackages": [
    {
      "path": "../Cmf.Custom.MESProject.IoT/Cmf.Custom.MESProject.IoT.Packages",
      "preBuild": true,
      "postBuild": false,
      "prePack": false,
      "postPack": false
    }
  ]
}
Finally we can import it by adding in the app.config.ts:
(...)
import { Metadata as CustomTasks } from '@criticalmanufacturing/connect-iot-controller-engine-python-tasks/metadata';

export const appConfig: ApplicationConfig = {
    providers: [provideRouter(routes), provideServiceWorker('ngsw-loader-worker.js', {
        enabled: !isDevMode(),
        registrationStrategy: 'registerWhenStable:30000'
    }),
    provideMesUI(
        {
            tasks: [
                CustomTasks
            ]
        }
    ),
    provideMetadataRouter()]
};
Now run cmf build and you will have both the HTML package and the IoT Package compiled and ready to go.
Developing#
With this scaffolding we can now start the local environment. Using the vscode task stack-up and running npm serve in the html package. We are able to import our task in the UI and are to build our customization.
Project Folder Structure#
connect-iot-controller-engine-python-tasks/
├── .eslintrc.json                                  # ESLint rules for linting TypeScript/Angular code.
├── .gitignore                                      # Git ignore patterns for this project.
├── README.md                                       # Project-level documentation (this file).
│                                                   # Packed npm artifact produced by packaging.
├── ng-package.json                                 # ng-packagr config for the designer bundle output.
├── packConfig.json                                 # CMF package type definition (TasksPackage).
├── package.json                                    # npm metadata, dependencies, and build/test scripts.
├── tsconfig.lib.json                               # TypeScript config for Angular library build.
├── tsconfig.lib.prod.json                          # Production variant of library TypeScript config.
├── tsconfig.lib.runtime.json                       # Runtime (CommonJS) TypeScript build config.
├── tsconfig.spec.json                              # TypeScript config used by Angular test tooling.
│
├── metadata/
│   ├── ng-package.json                             # ng-packagr config for metadata package output.
│   └── src/
│       ├── public-api.ts                           # Public exports for metadata package.
│       └── lib/
│           └── metadata.ts                         # Connect IoT package metadata (name, load, tasks list).
│
├── src/
│   ├── public-api-designer.ts                      # Designer-time entry point exports (module/designer/settings).
│   ├── public-api-runtime.ts                       # Runtime entry point exports (module only).
│   ├── public-api-runtime.js                       # Compiled JS for runtime entry point.
│   ├── public-api-runtime.d.ts                     # Type declarations for runtime entry point.
│   ├── public-api-runtime.js.map                   # Source map for runtime entry point JS.
│   └── lib/
│       └── tasks/
│           └── python-code/
│               ├── README.md                       # Detailed documentation for python-code task folder.
│               ├── python-code.task.ts             # Main runtime task implementation and lifecycle.
│               ├── python-code.task-module.ts      # Task module registration that references PythonCodeTask.
│               ├── python-code.task-designer.ts    # Design-time task metadata and dynamic I/O resolver logic.
│               ├── python-code-settings.component.ts
│               │                                   # Angular settings component for task configuration.
│               ├── python-code-settings.component.html
│               │                                   # Settings UI template displayed in Connect IoT designer.
│               └── python-code-settings.component.less
│                                                   # Styles for settings component (currently empty).
│
└── test/
	└── unit/
		├── tsconfig.json                           # TypeScript config for unit-test compilation.
		└── tasks/
			└── python-code/
				└── python-code.task.test.ts        # Unit test source for PythonCode task behavior.
Task Folder Structure#
python-code.task.tsdefines runtime behavior.python-code.task-module.tsregisters that task with the engine module system.python-code.task-designer.tsexposes task metadata and input/output behavior at design time.python-code-settings.component.tsprovide the task settings UI used in the designer.python-code-settings.component.htmlprovide the task settings UI.python-code-settings.component.lessprovide the task settings UI css.
The task.ts file will focus on describing the runtime behavior, the other elements are all describing the UI behavior.
Designer#
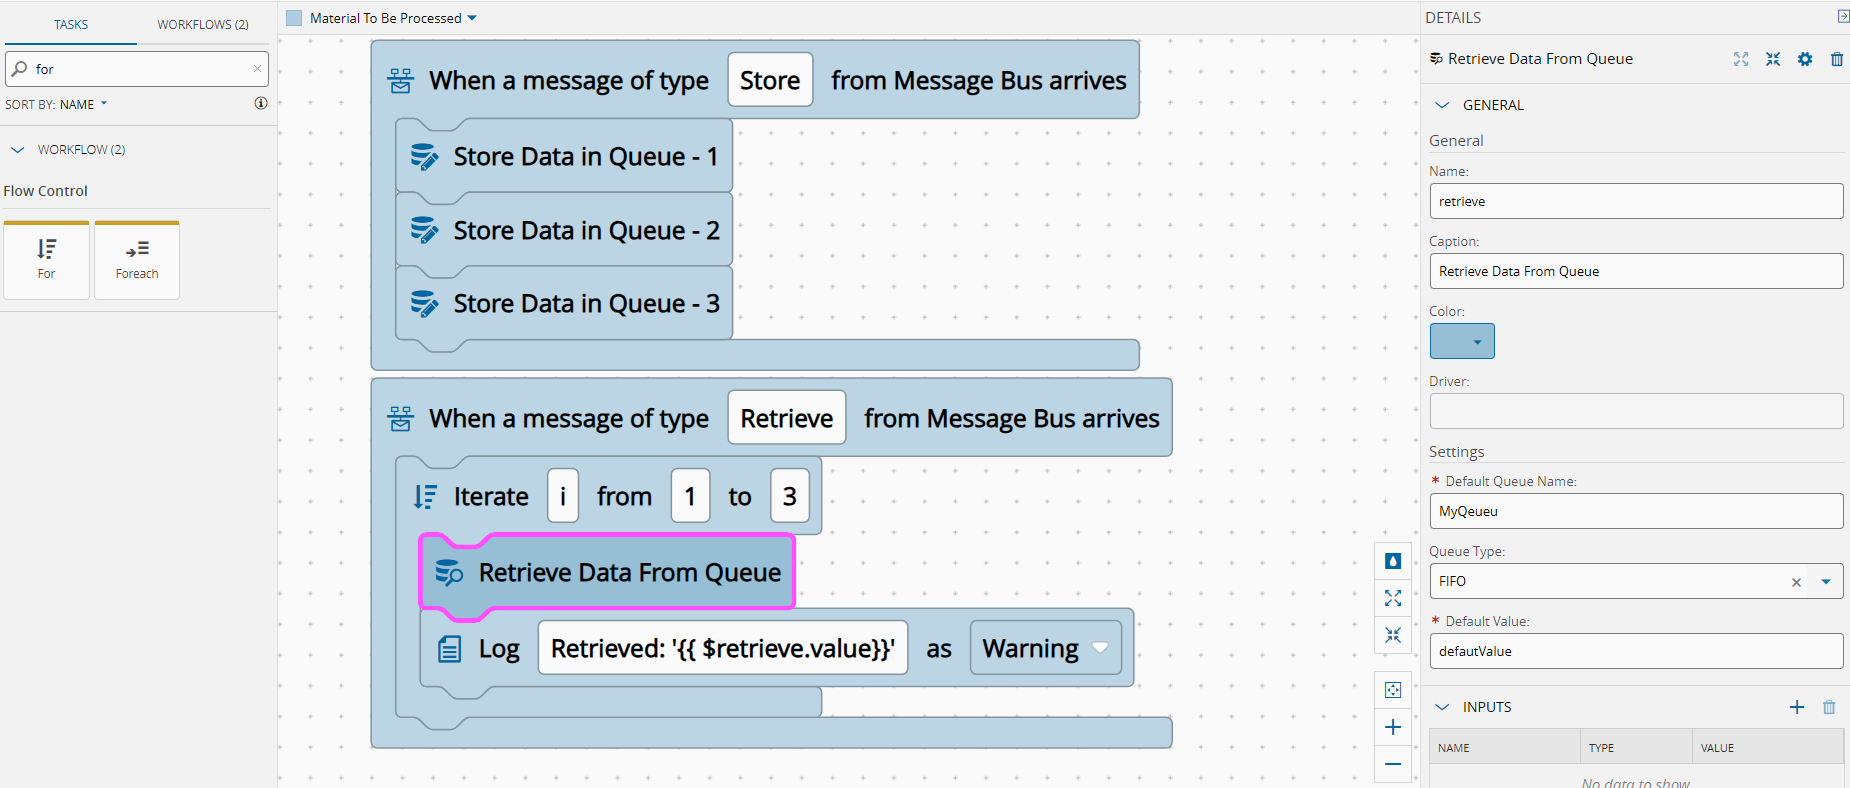
In the task designer we can start by defining what our task inputs and outputs look like. For this task we want to use autoports, inputs and outputs that by dragging and dropping links we can create a connection.
Let’s start by the task designer metadata:
(...)
@TaskDesigner({
    name: $localize`:@@@criticalmanufacturing/connect-iot-controller-engine-python-tasks/pythonCode#TITLE:Python Code`,
    iconClass: "icon-core-tasks-connect-iot-lg-codeexecution",
    inputs: {
        autoIn: <Task.TaskType>{
            friendlyName: $localize`:@@@criticalmanufacturing/connect-iot-controller-engine-python-tasks/pythonCode#AUTO_INPUT_PORT_TEXT:Link here to add new`,
            type: Task.AUTO
        },
        activate: Task.INPUT_ACTIVATE
    },
    outputs: {
        autoOut: <Task.TaskType>{
            friendlyName: $localize`:@@@criticalmanufacturing/connect-iot-controller-engine-python-tasks/pythonCode#AUTO_OUTPUT_PORT_TEXT:Link from here to add new`,
            type: Task.AUTO
        },
        success: Task.OUTPUT_SUCCESS,
        error: Task.OUTPUT_ERROR
    },
    protocol: TaskProtocol.All,
    driverOptional: true
})
(...)
We start by giving it a better icon and by referencing an autoIn input and an autoOut output. The driverOptional is also important as it will query the user if it wishes to associate the task to a driver, and if so which driver.
We start by creating our settings and inputs and outputs.
export class PythonCodeDesigner implements TaskDesignerInstance, PythonCodeSettings {
    // Settings
    pyCode: string[];
    pyCodeBase64: string;
    packages: string[];
    contextExpirationInMilliseconds: number;
    executionTimeoutMs: number;

    // Inputs & Outputs
    inputs: Task.TaskInput[];
    outputs: Task.TaskOutput[];
We also add some code to manage the injection of the autoports into the context. This code is more or less boiler plate, you can check it here.
HTML#
In ours task settings we will have static settings and a python code sandbox.
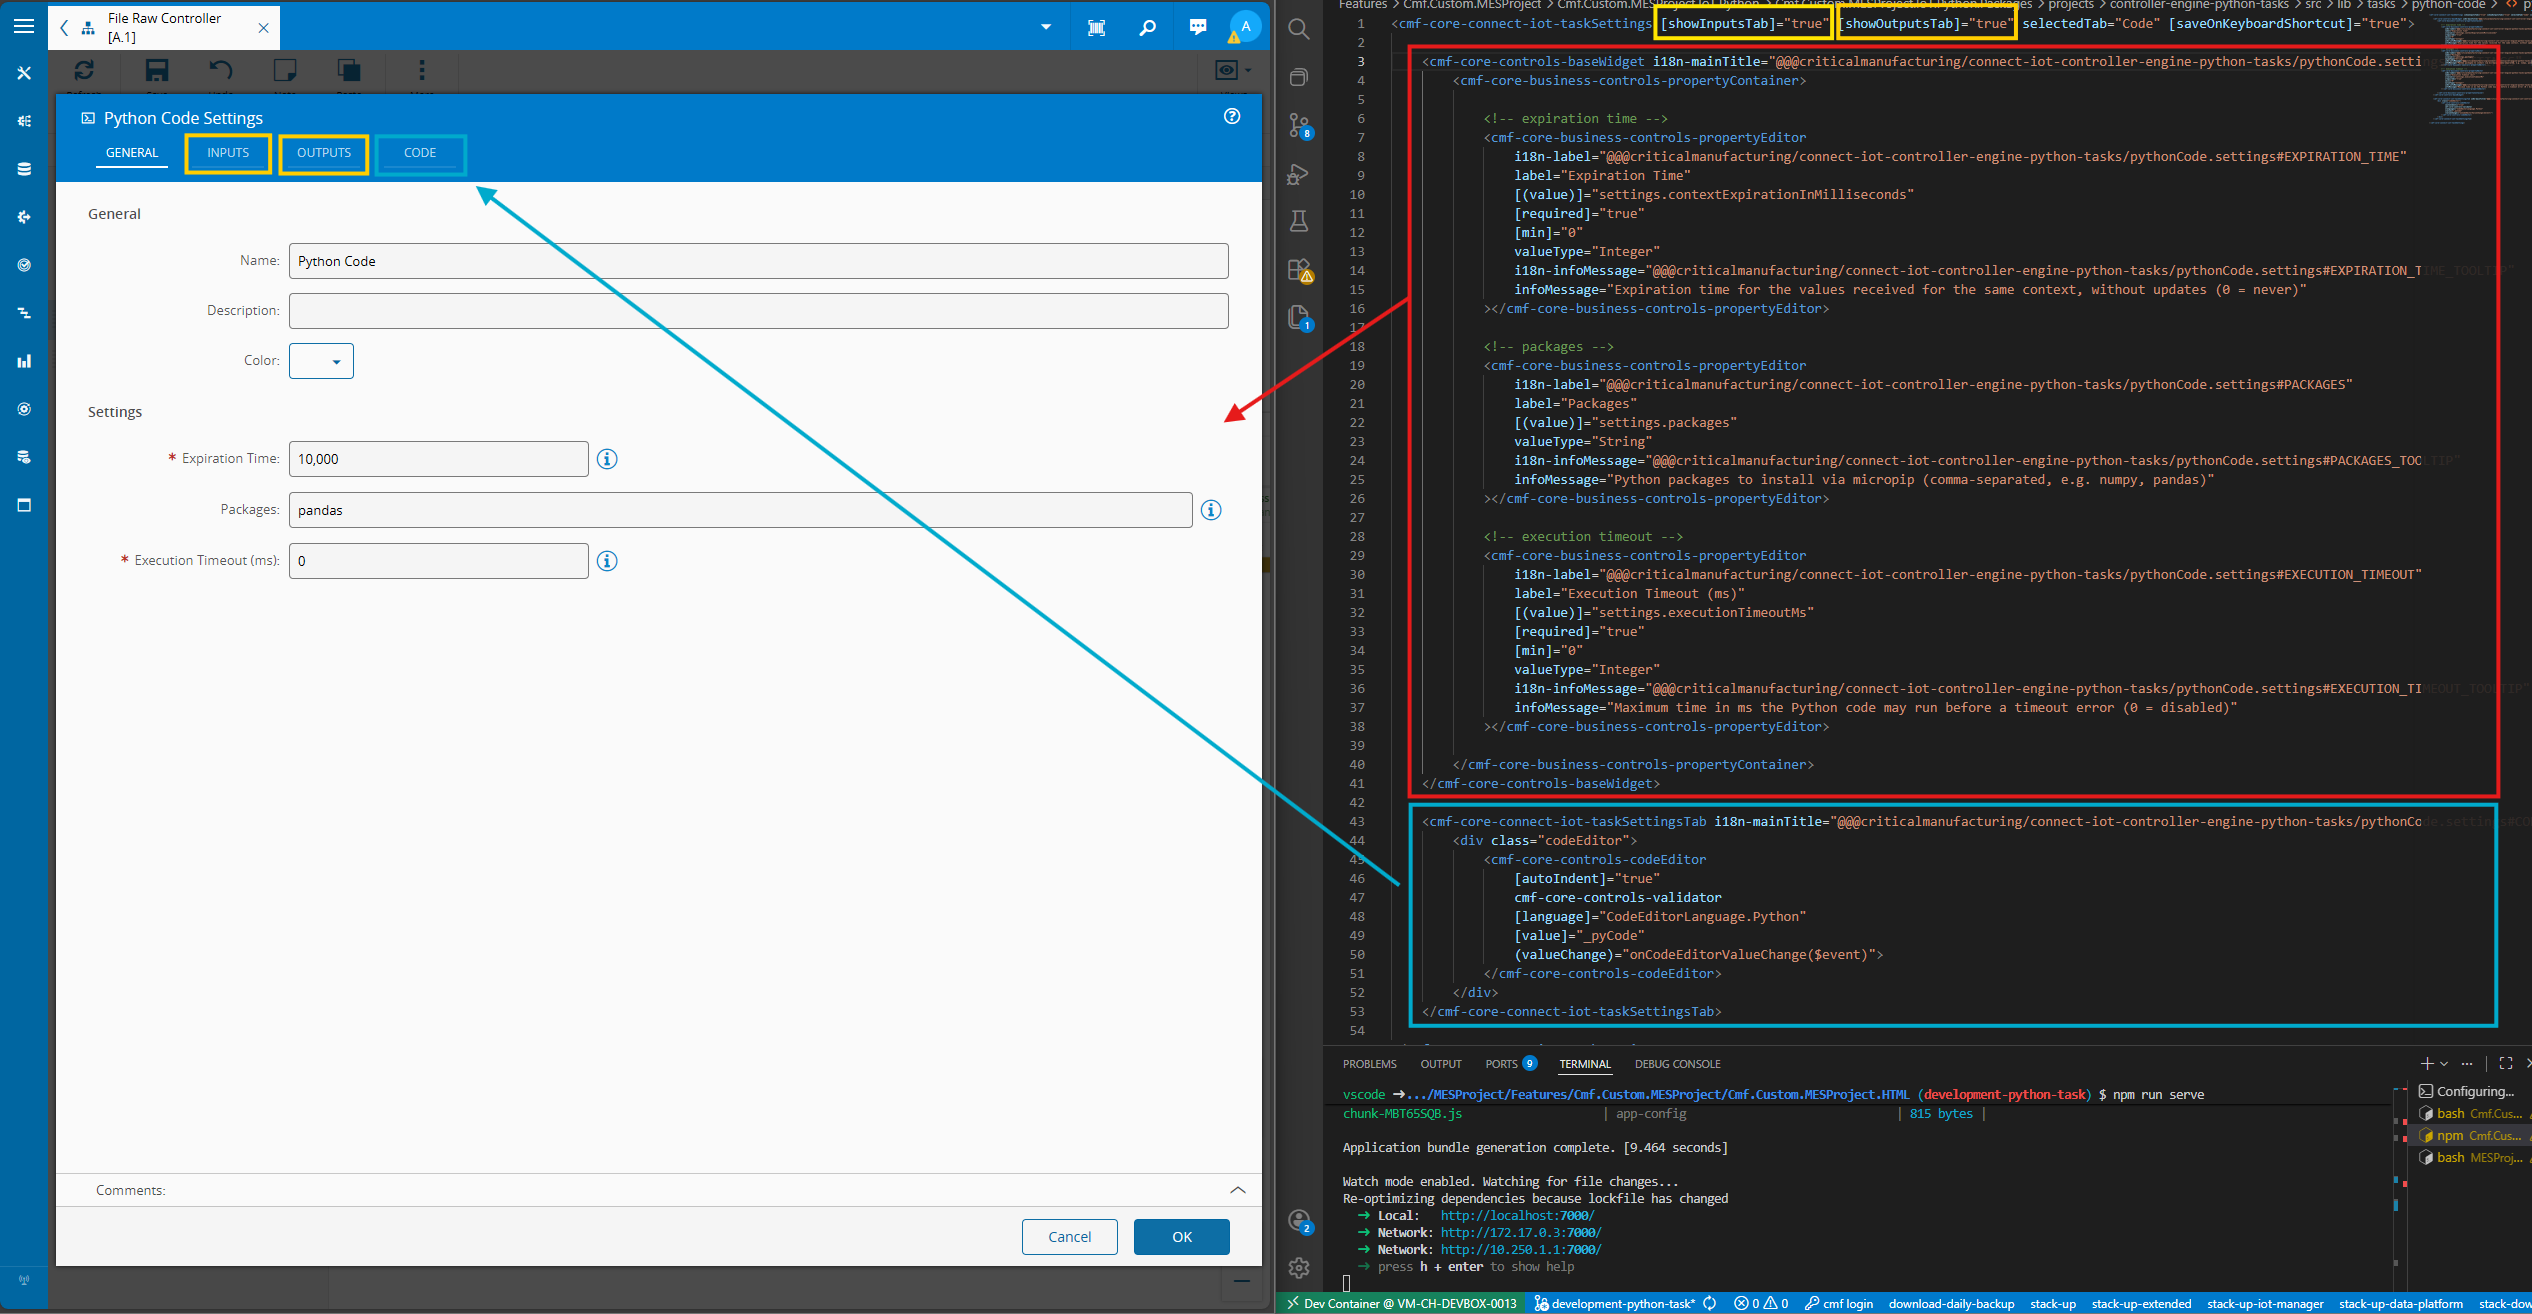
In our html we can start by defining our static settings.
These settings will exist in the Settings tab of the settings page.
As you can see CM already provides a lot of different components we can use, if you are curious about them, feel free to take a look here.
<cmf-core-connect-iot-taskSettings [showInputsTab]="true" [showOutputsTab]="true" selectedTab="Code" [saveOnKeyboardShortcut]="true">
  <cmf-core-controls-baseWidget i18n-mainTitle="@@@criticalmanufacturing/connect-iot-controller-engine-python-tasks/pythonCode.settings#SETTINGS" mainTitle="Settings">
      <cmf-core-business-controls-propertyContainer>
          <!-- expiration time -->
          <cmf-core-business-controls-propertyEditor
              i18n-label="@@@criticalmanufacturing/connect-iot-controller-engine-python-tasks/pythonCode.settings#EXPIRATION_TIME"
              label="Expiration Time"
              [(value)]="settings.contextExpirationInMilliseconds"
              [required]="true"
              [min]="0"
              valueType="Integer"
              i18n-infoMessage="@@@criticalmanufacturing/connect-iot-controller-engine-python-tasks/pythonCode.settings#EXPIRATION_TIME_TOOLTIP"
              infoMessage="Expiration time for the values received for the same context, without updates (0 = never)"
          ></cmf-core-business-controls-propertyEditor>

          <!-- packages -->
          <cmf-core-business-controls-propertyEditor
              i18n-label="@@@criticalmanufacturing/connect-iot-controller-engine-python-tasks/pythonCode.settings#PACKAGES"
              label="Packages"
              [(value)]="settings.packages"
              valueType="String"
              i18n-infoMessage="@@@criticalmanufacturing/connect-iot-controller-engine-python-tasks/pythonCode.settings#PACKAGES_TOOLTIP"
              infoMessage="Python packages to install via micropip (comma-separated, e.g. numpy, pandas)"
          ></cmf-core-business-controls-propertyEditor>

          <!-- execution timeout -->
          <cmf-core-business-controls-propertyEditor
              i18n-label="@@@criticalmanufacturing/connect-iot-controller-engine-python-tasks/pythonCode.settings#EXECUTION_TIMEOUT"
              label="Execution Timeout (ms)"
              [(value)]="settings.executionTimeoutMs"
              [required]="true"
              [min]="0"
              valueType="Integer"
              i18n-infoMessage="@@@criticalmanufacturing/connect-iot-controller-engine-python-tasks/pythonCode.settings#EXECUTION_TIMEOUT_TOOLTIP"
              infoMessage="Maximum time in ms the Python code may run before a timeout error (0 = disabled)"
          ></cmf-core-business-controls-propertyEditor>

      </cmf-core-business-controls-propertyContainer>
  </cmf-core-controls-baseWidget>
  (...)
We can also declare our python code sandbox.
  (...)
    <cmf-core-connect-iot-taskSettingsTab i18n-mainTitle="@@@criticalmanufacturing/connect-iot-controller-engine-python-tasks/pythonCode.settings#CODE" mainTitle="Code" [fullHeight]="true" tab-id="Code">
        <div class="codeEditor">
            <cmf-core-controls-codeEditor
                [autoIndent]="true"
                cmf-core-controls-validator
                [language]="CodeEditorLanguage.Python"
                [value]="_pyCode"
                (valueChange)="onCodeEditorValueChange($event)">
            </cmf-core-controls-codeEditor>
        </div>
    </cmf-core-connect-iot-taskSettingsTab>
</cmf-core-connect-iot-taskSettings>
Component#
The component is where we will define the logic controlling our UI.
It will focus on two main segments, the first is storing the values provided in the settings, the second is providing a template and a custom intelisense to the python code sandbox.
In the ngOnInit we will load the values for the settings, with the defaults or with the previously defined values.
  /** Triggered when the task is created — applies default values */
  public ngOnInit(): void {
      const currentSettings = Object.assign({}, this.settings);
      Object.assign(this.settings, SETTINGS_DEFAULTS, currentSettings);

      this._pyCode = decode(this.settings.pyCodeBase64 || "") || this.fromMultilineArray(this.settings.pyCode) || PYTHON_TEMPLATE_CONTENT;

      this.registerFrameworkCompletions();
  }
For our python code sandbox we have defined a template to start with the PYTHON_TEMPLATE_CONTENT.
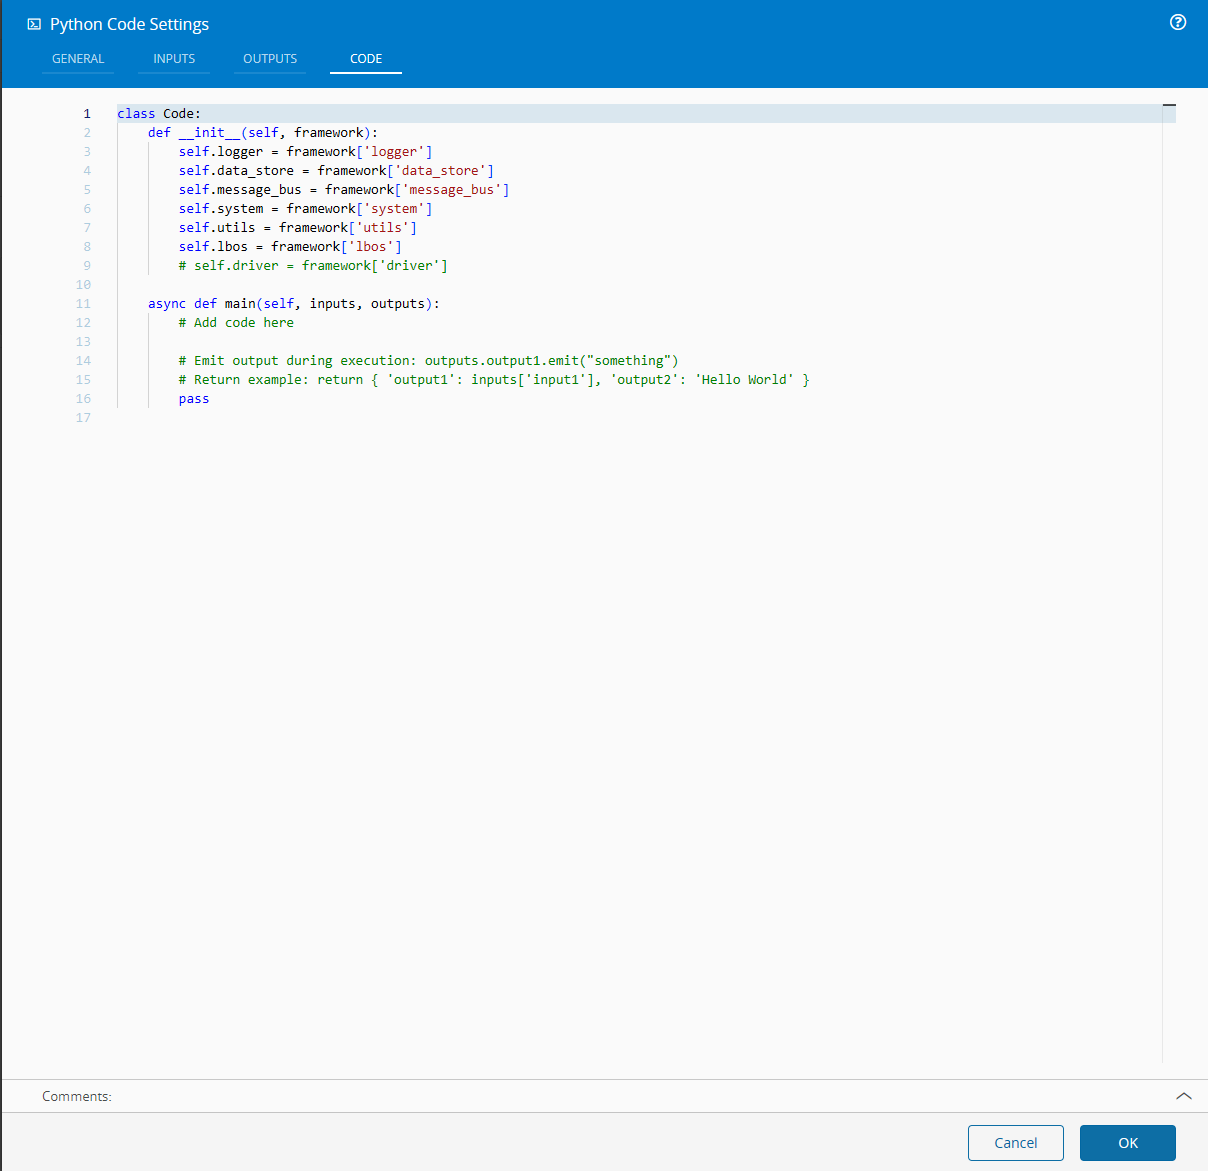
/** Python code template shown in the editor by default */
export const PYTHON_TEMPLATE_CONTENT: string =
    `class Code:
    def __init__(self, framework):
        self.logger = framework['logger']
        self.data_store = framework['data_store']
        self.message_bus = framework['message_bus']
        self.system = framework['system']
        self.utils = framework['utils']
        self.lbos = framework['lbos']
        # self.driver = framework['driver']

    async def main(self, inputs, outputs):
        # Add code here

        # Emit output during execution: outputs.output1.emit("something")
        # Return example: return { 'output1': inputs['input1'], 'output2': 'Hello World' }
        pass
`;
The registerFrameworkCompletions method is where we will handle all the provided intelisense for the sandbox. Feel free to check it in detail here
Task#
The task will be a wrapper for the pyodide provided dependency injection container.
The task onInit will retrieve the code saved in the settings of the task, intialize the pyodideManager and compile the code.
  override async onInit(): Promise<void> {
      if (!this.pyCodeBase64) {
          return;
      }

      const pythonCode = decode(this.pyCodeBase64);

      try {
          const settings: PyodideSettings = {
              packages: this.packages ?? [],
              executionTimeoutMs: this.executionTimeoutMs
          };

          // Initialize the shared Pyodide runtime (no-op if already initialized by another task)
          await this._pyodideManager.initialize(settings);

          // Compile the Python code into a sandboxed NodeVM function — store it for reuse,
          // same as _sandBoxedCode in the TS code-execution task
          this._sandboxedCode = await this._pyodideManager.compile(pythonCode);
      } catch (err) {
          this._logger.error(`Failed to compile Python script: ${(err as Error).message}`);
      }
  }
The pyodideManager will on initialize, start pyodide and import all the declared python libraries using micropip. After initializing it will block the sandbox from injecting and retrieving information from the node process, to stop unexpected code injections.
  public async initialize(settings: PyodideSettings): Promise<void> {
      if (this._initialized) {
          this._logger.warning("PyodideManager already initialized — skipping.");
          return;
      }

      this._logger.debug("Initializing Pyodide runtime...");

      try {
          const { loadPyodide } = require("pyodide") as { loadPyodide: (options?: Record<string, unknown>) => Promise<PyodideRuntime> };
          this._pyodide = await loadPyodide();

          if (settings.packages?.length > 0) {
              this._logger.info(`Installing Python packages: ${settings.packages.join(", ")}`);
              await this._pyodide.loadPackage("micropip");
              const micropip = this._pyodide.pyimport("micropip");

              await micropip.install(settings.packages);
              this._logger.info("Python packages installed.");
          }

          // Replace `js` and `pyodide_js` with empty namespaces so user Python
          // code cannot access the Node.js global scope (globalThis) via either
          // `import js` or `import pyodide_js` (both map to globalThis in Pyodide).
          // This must happen AFTER micropip package installation because micropip's
          // compat layer imports from `pyodide_js` at module load time.
          await this._pyodide.runPythonAsync(`
import sys, types
_blocked = types.SimpleNamespace()
sys.modules['js'] = _blocked
sys.modules['pyodide_js'] = _blocked
`);

          this._initialized = true;
          this._logger.info("Pyodide runtime ready.");
      } catch (err) {
          this._logger.error(`Failed to initialize Pyodide: ${(err as Error).message}`);
          throw err;
      }
  }
When the task activate input is set, the task onChanges is triggered. In the onChanges we prepare all the inputs and outputs and called the sandboxed callback generated in the onInit.
  override async onChanges(changes: Task.Changes): Promise<void> {
    (...)
    for (const key in changes) {
        if (this.isInput(key)) {
            const propertyName = Utilities.inputToProperty(key);
            const previousValue = syncContext.values[propertyName];
            if (previousValue != null) {
                this._logger.debug(`Property '${propertyName}' was already defined for context '${syncContext.name}'. Value lost: ${previousValue}`);
            }
            syncContext.values[propertyName] = changes[key].currentValue;
            this[key] = undefined;
        }
    }
    (...)
    const runtimeOutputs: PyodideOutputsProxy = {};
    for (const output of this.outputs) {
        runtimeOutputs[output.name] = {
            emit: (value: unknown) => {
                currentContext.run(() => {
                    this[Utilities.propertyToOutput(output.name)].emit(value);
                });
            }
        };
    }

    (...)
    result = await this._sandboxedCode(syncContext.values, runtimeOutputs);
Module Export#
When dealing with node packages we need to separate what is going to be provided to the UI and what is going to be provided to the nodejs runtime.
In our case we are using a nodejs library pyodide which can only be provided to nodejs.
We can control that by changing the public-api-designer.ts which controls what the UI ingests and the public-api-runtime.ts which controls what nodejs uses.
For that in our public api designer, we will define it as depending on a different module python-code.task-browser.module
/*
 * Public API Surface of @criticalmanufacturing/connect-iot-controller-engine-python-tasks for design
 */

// PythonCode
export { PythonCodeModule } from './lib/tasks/python-code/python-code.task-browser.module';
export { PythonCodeDesigner } from './lib/tasks/python-code/python-code.task-designer';
export { PythonCodeSettings } from './lib/tasks/python-code/python-code-settings.component';
In this module we are importing the class PyodideManagerBrowser.
@Task.TaskModule({
    task: PythonCodeTask,
    providers: [
        {
            class: PyodideManagerBrowser,
            isSingleton: true,
            symbol: PYODIDE_MANAGER_SYMBOL,
            scope: Task.ProviderScope.Local,
        }
    ]
})
export class PythonCodeModule { }
For the public-api-runtime.ts we will now define for a different provided class PyodideManagerHandler.
/*
 * Public API Surface of @criticalmanufacturing/connect-iot-controller-engine-python-tasks for runtime
 */

// PythonCode
export { PythonCodeModule } from './lib/tasks/python-code/python-code.task-node.module';
@Task.TaskModule({
    task: PythonCodeTask,
    providers: [
        {
            class: PyodideManagerHandler,
            isSingleton: true,
            symbol: PYODIDE_MANAGER_SYMBOL,
            scope: Task.ProviderScope.Local,
        }
    ]
})
export class PythonCodeModule { }
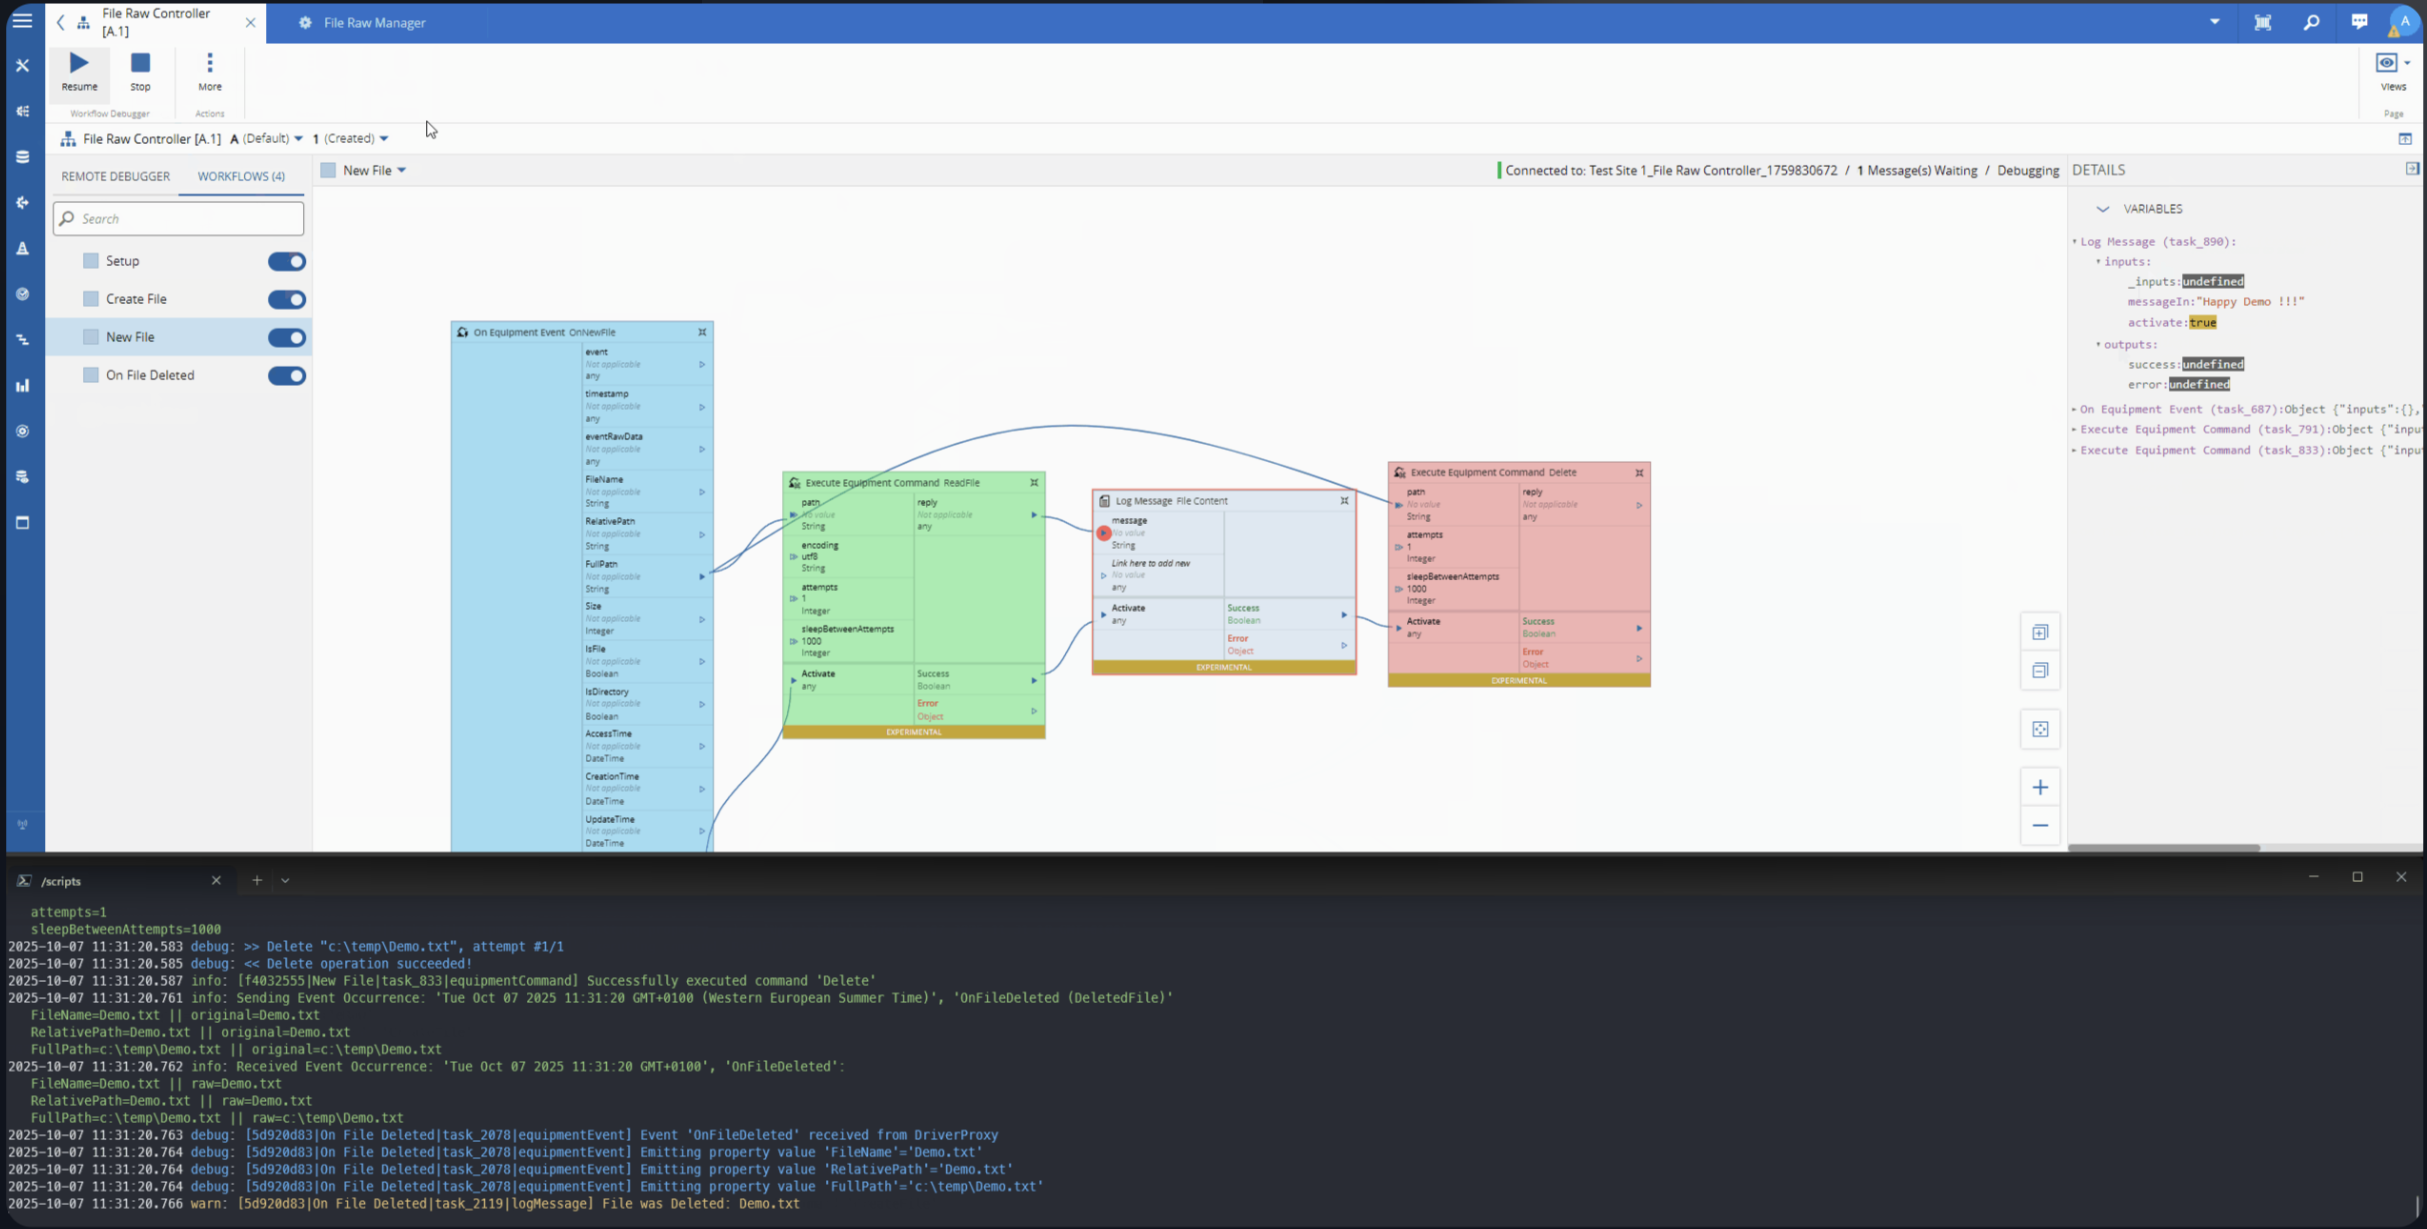
Running and Debugging#
First, let’s open the vscode in the scope of the IoT package, then we can run the vscode task Setup Start Manager, then we can just run the launch for the Start Manager.

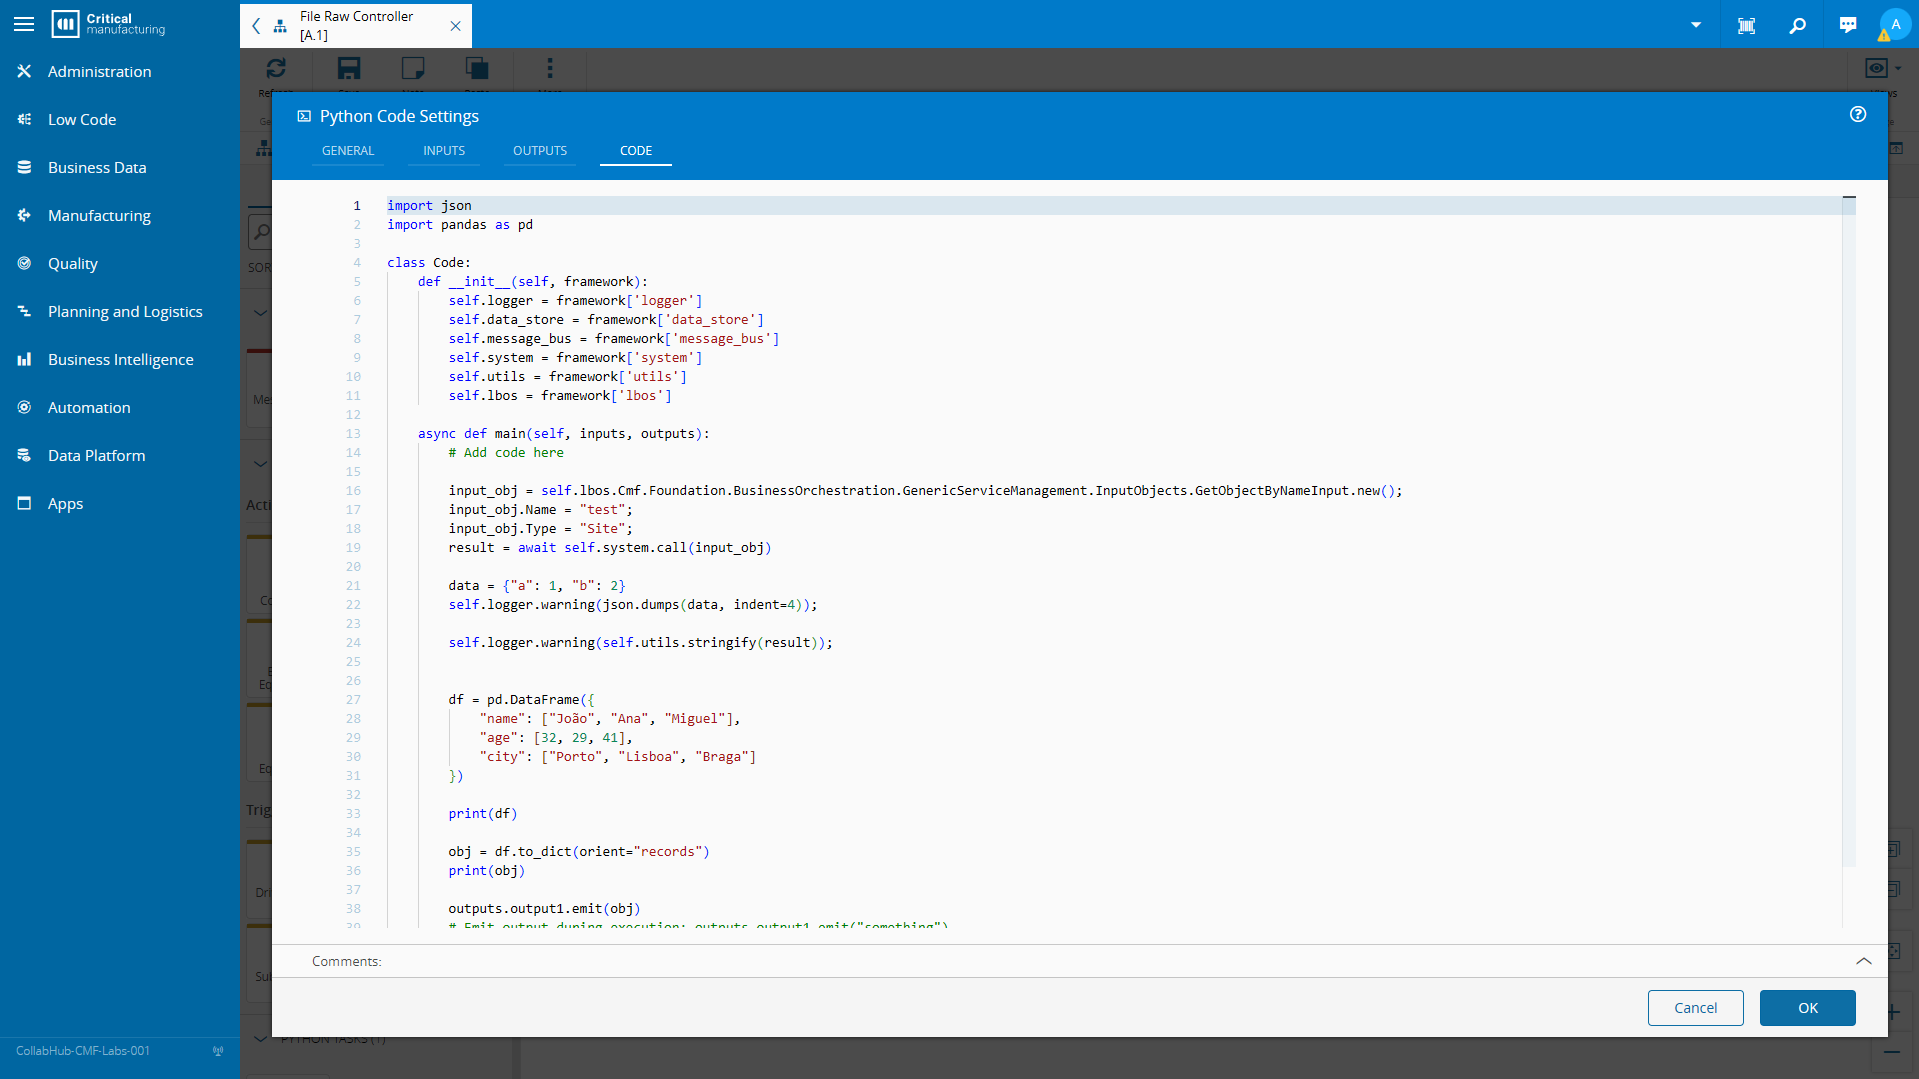
I prepared a simple example of a python code task that will call an MES service and use a common python library pandas to perform some data manipulation and emit values.
import json
import pandas as pd

class Code:
    def __init__(self, framework):
        self.logger = framework['logger']
        self.data_store = framework['data_store']
        self.message_bus = framework['message_bus']
        self.system = framework['system']
        self.utils = framework['utils']
        self.lbos = framework['lbos']

    async def main(self, inputs, outputs):
        # Add code here

        input_obj = self.lbos.Cmf.Foundation.BusinessOrchestration.GenericServiceManagement.InputObjects.GetObjectByNameInput.new();
        input_obj.Name = "test";
        input_obj.Type = "Site";
        result = await self.system.call(input_obj)

        data = {"a": 1, "b": 2}
        self.logger.warning(json.dumps(data, indent=4));

        self.logger.warning(self.utils.stringify(result));


        df = pd.DataFrame({
            "name": ["João", "Ana", "Miguel"],
            "age": [32, 29, 41],
            "city": ["Porto", "Lisboa", "Braga"]
        })

        print(df)

        obj = df.to_dict(orient="records")
        print(obj)

        outputs.output1.emit(obj)
        pass
With just this snippet we open the door to deep integrations with the MES and all the third-party ecosystem python offers.
Adding it to our Repository#
If you want to run it outside of debug. Remember that the runtime process is retrieving the information from the repository so if you want to make it available in the repository. You can either run cmf pack and add the .tgz via the Automation Repository or you can run the command:
cd <your iot project>
npx yo @criticalmanufacturing/iot:packagePacker -o .
cp <your customization project>/Cmf.Custom.MESProject.IoT/Cmf.Custom.MESProject.IoT.Packages/projects/connect-iot-controller-engine-python-tasks/criticalmanufacturing-connect-iot-controller-engine-python-tasks-0.0.0.tgz <your customization project>.localenv/packages/IoT/repo

# Will recompile the iot repository
sudo cmf dev iot rebuildDatabase <your customization project>/.localenv/packages/IoT/repo
Final Thoughts#
Having to make everything is a bit tough. Normally, when using Connect IoT we build all most everything with just metadata, but sometimes you want to make that really cool feature, that has to have a full on DIY component. The goal is to show it’s possible and even if it has some more steps, after getting it all setup it’s not that hard.