Overview#
This blog post will try to explain the different layers of an integration and what is the correct level to store information.
We will also see new improvements in version 11.2 to the persistency API.
Layers#
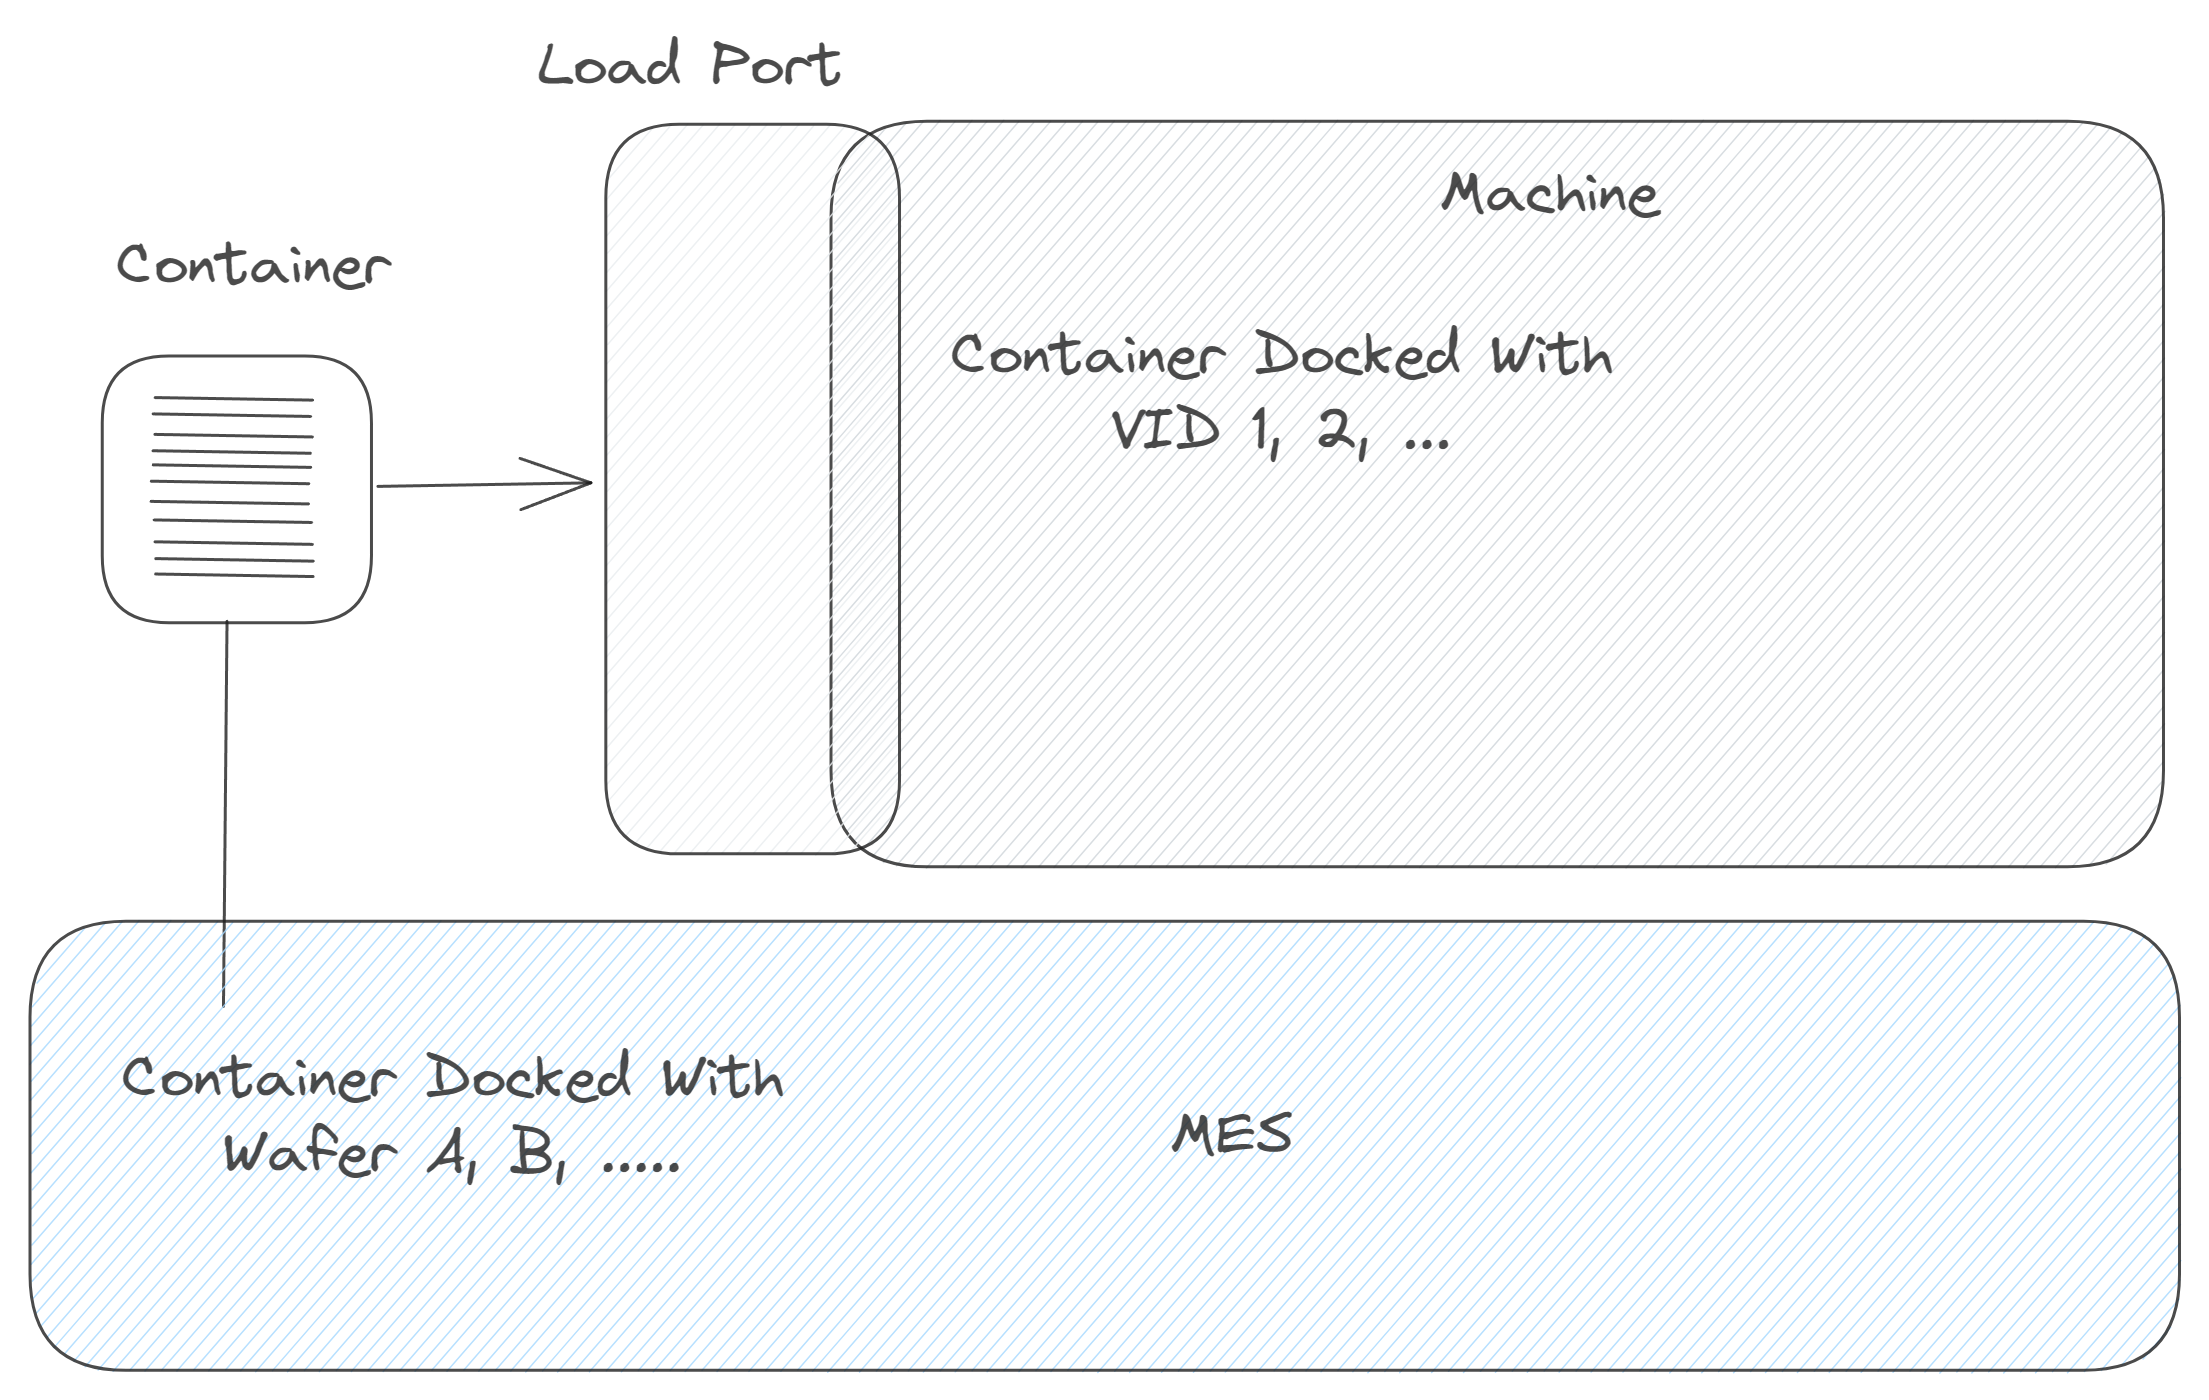
The MES is great at keeping all the information regarding what is happening in the shop floor. Nevertheless, there are different levels of information required for each of the shopfloor applications.
An ERP, from a manufacturing perspective, is focused on information that will have financial impact. It focuses on material losses, raw materials spent and materials produced. It is focused on storing information that will be helpful in assessing the financial health of the organization. The MES is harder to pinpoint, it holds information about multiple facets of the shop floor, from production to quality to machine recipes.
The integration layer also requires a particular subset of information that may be only relevant for its layer. It is important for the integration layer to have the ability to be somewhat stateful. This can be due to performance or simply to keep machine logic in the integration layer, separate from the business layer.
Connect IoT often leverages the MES in order to infer and provide information and context.
If for a particular resource, with a particular product, the recipe is Recipe A, the MES is the owner of this context, as the inference cannot be done just by the context of the integration layer. This tight link between Connect IoT and the MES, enables us to simplify what would otherwise be very complex problems. Where the integration layer would have to integrate with third party systems to try and understand in what context it is at and what is the proper response.
Connect IoT is nevertheless an on edge application and storing information in the MES and retrieving it has a performance penalty. This can be meaningless or can be vital to have a viable integration strategy.
There is information that is relevant both for MES and IoT, but we can think of examples where that information is only relevant for the integration.
One common example is, some machines use the concept of virtual ids, they receive materials from load ports and then attribute them a virtual id. This virtual id has no meaning outside of the integration. It is common for virtual ids to be stored in the integration layer, kept as a mapping between the material name, known to the MES, and the virtual id, known to the machine.
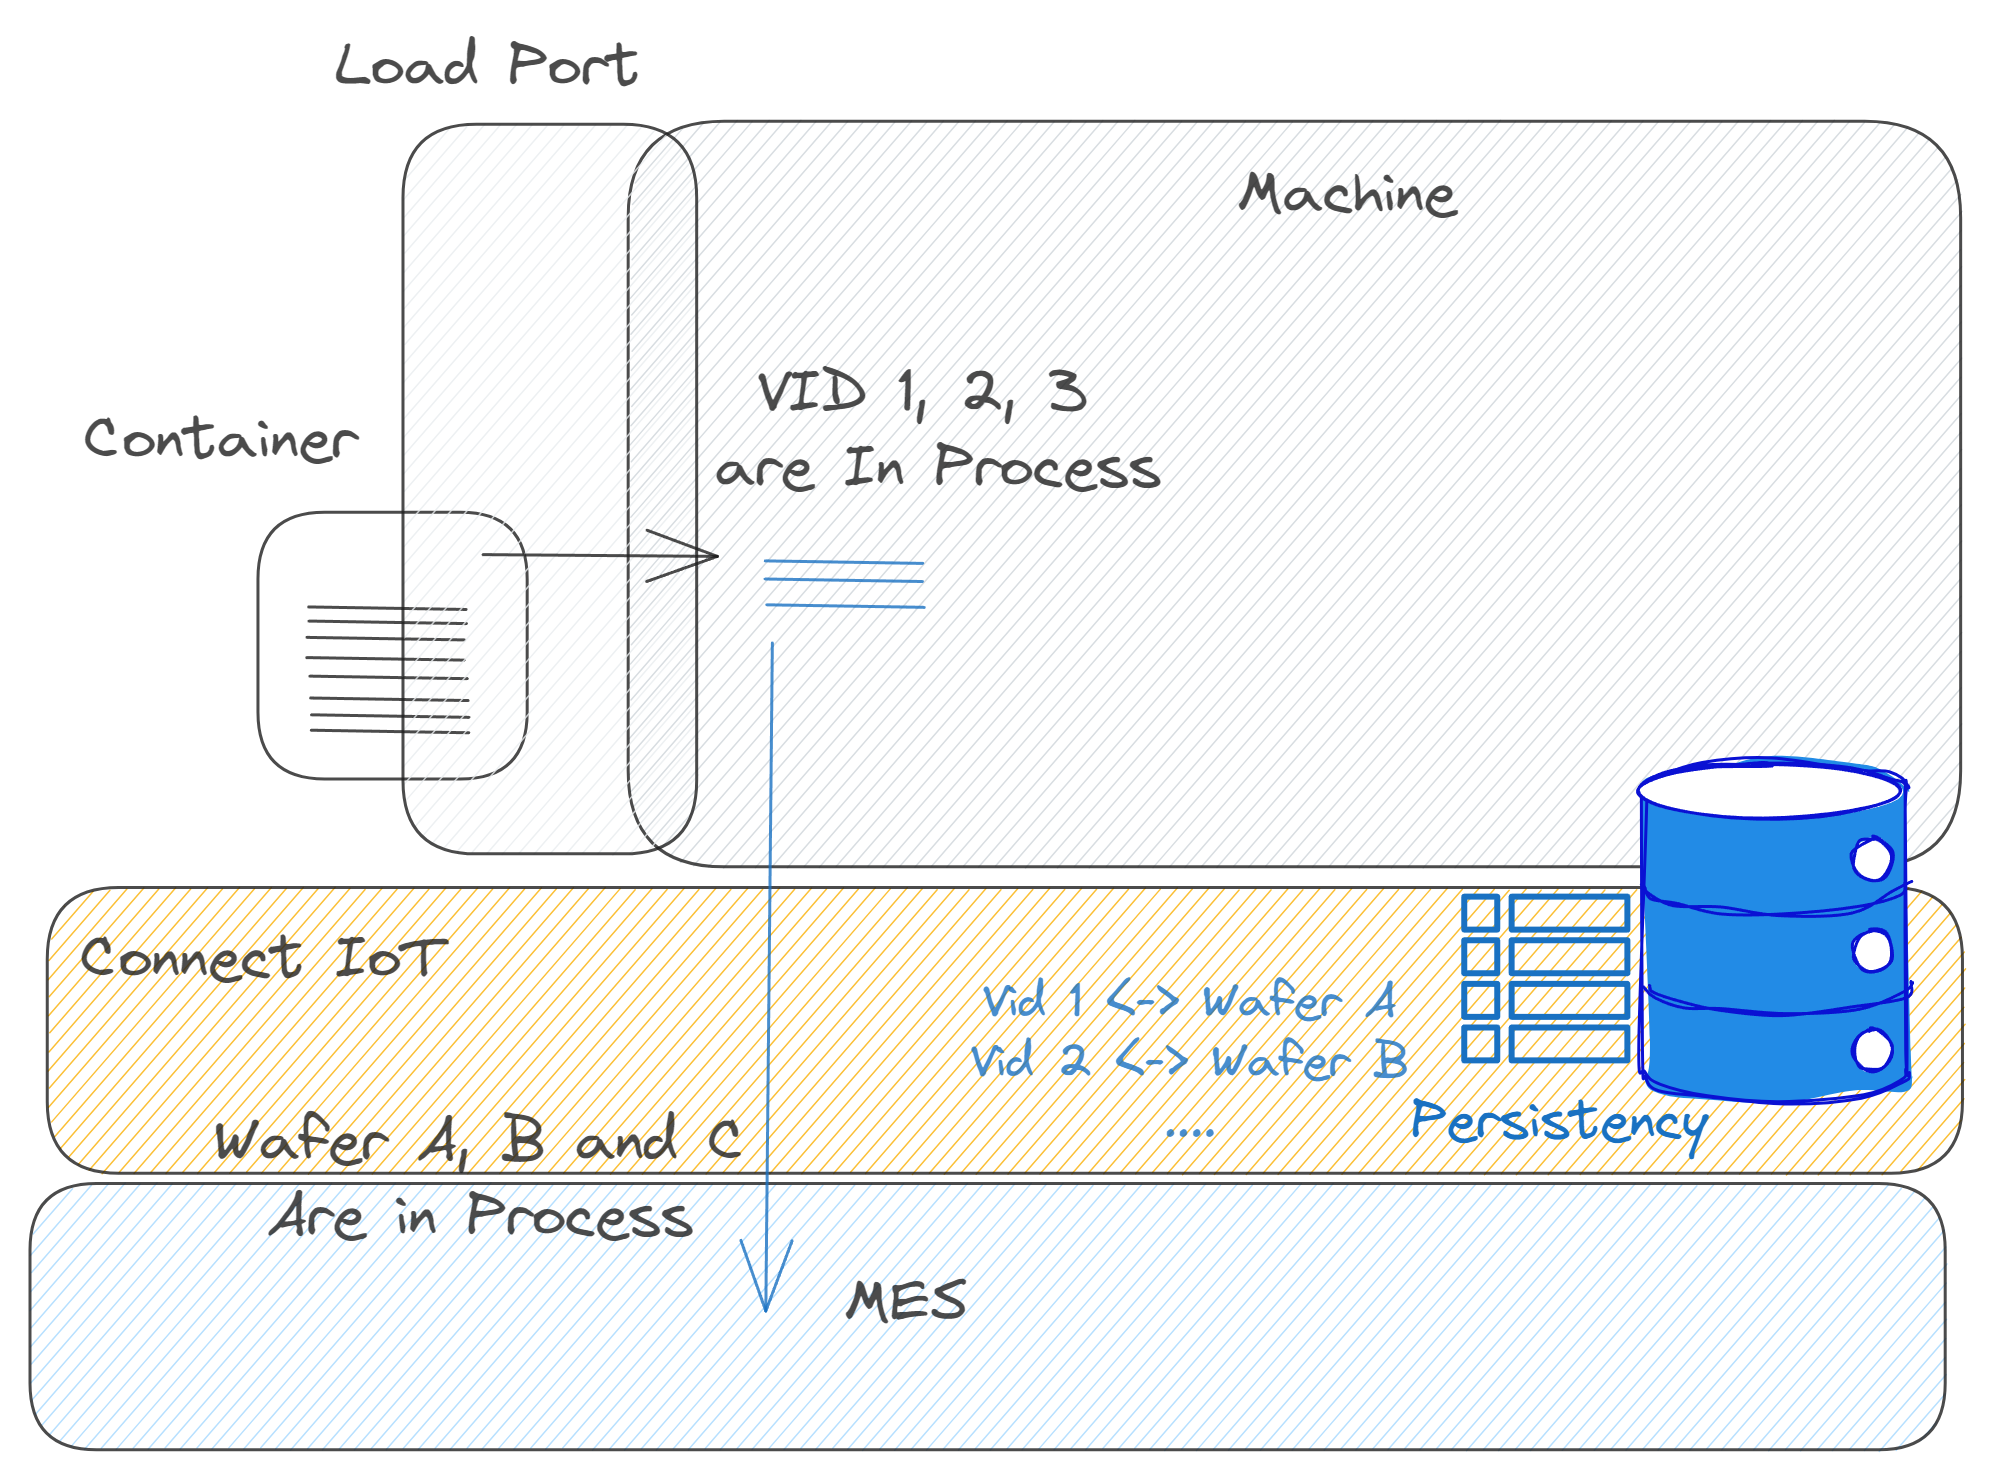
Storing Information in Connect IoT#
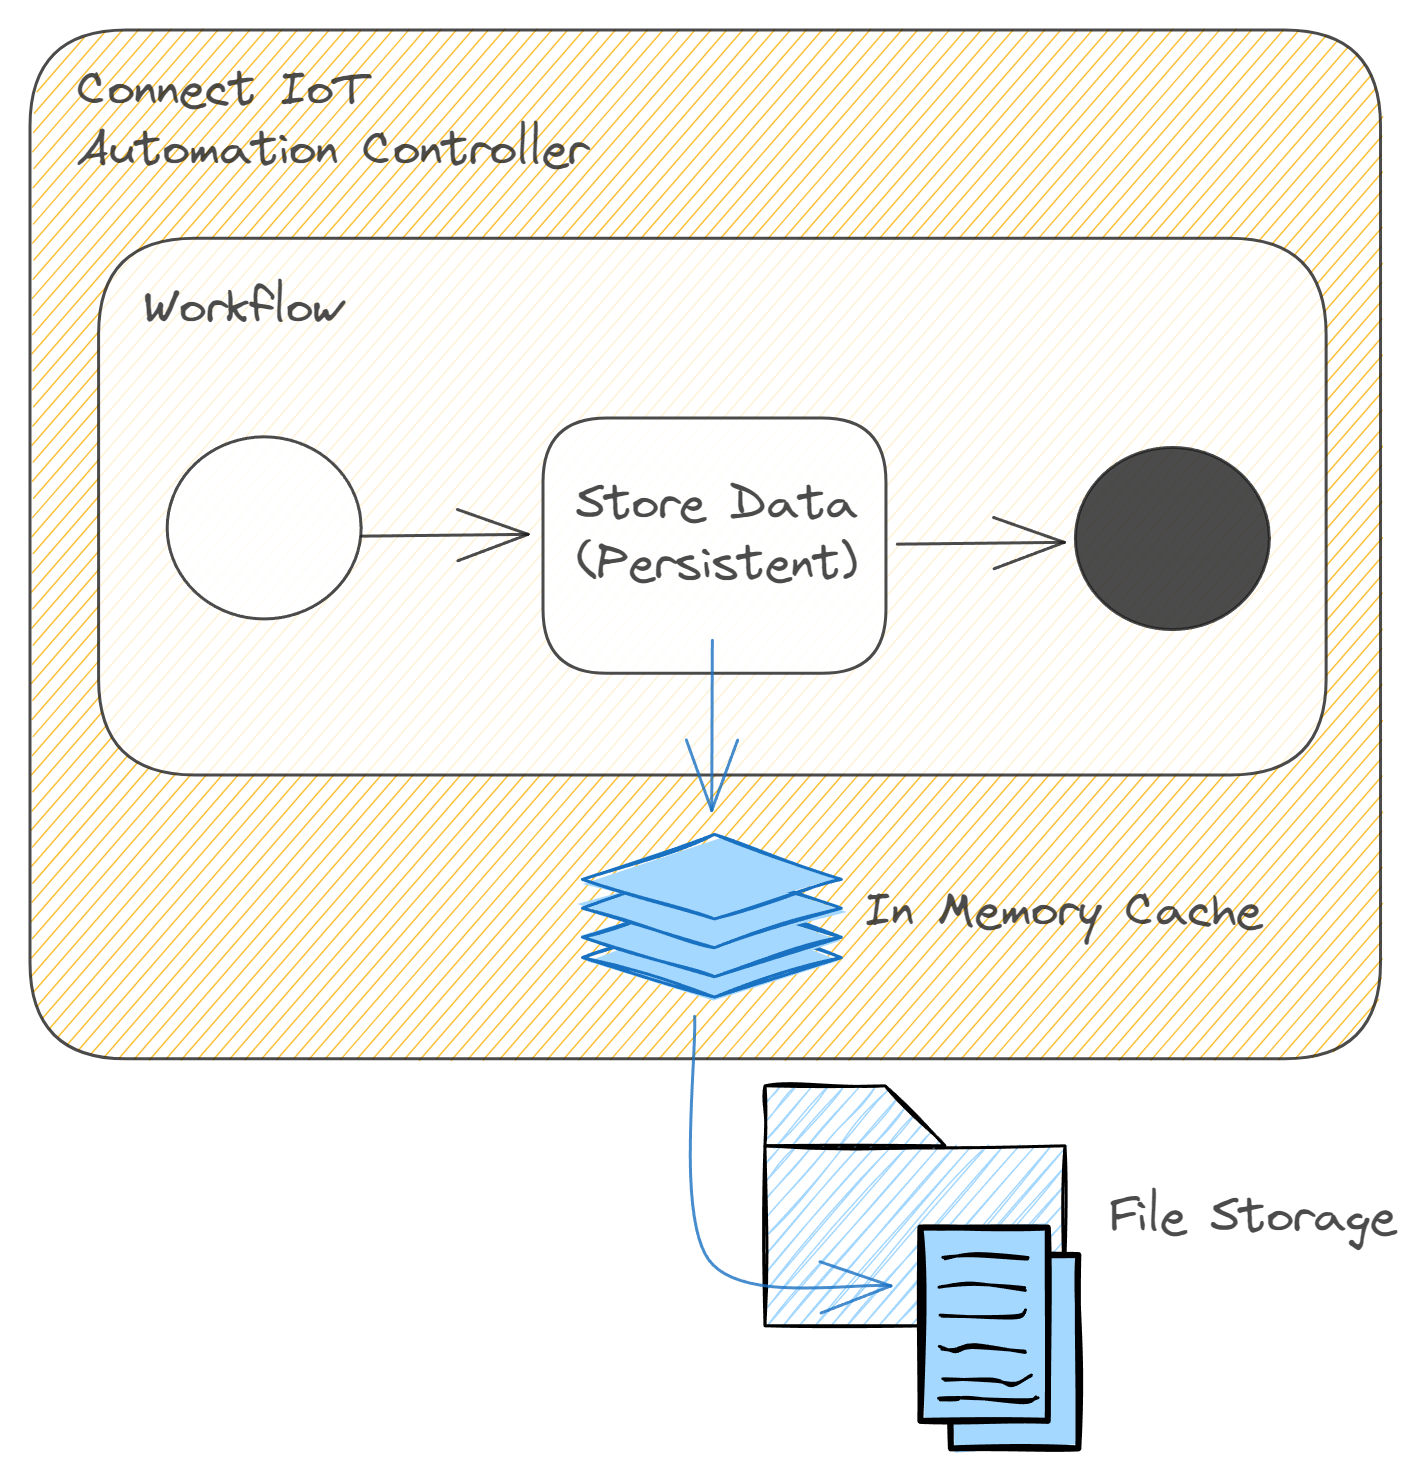
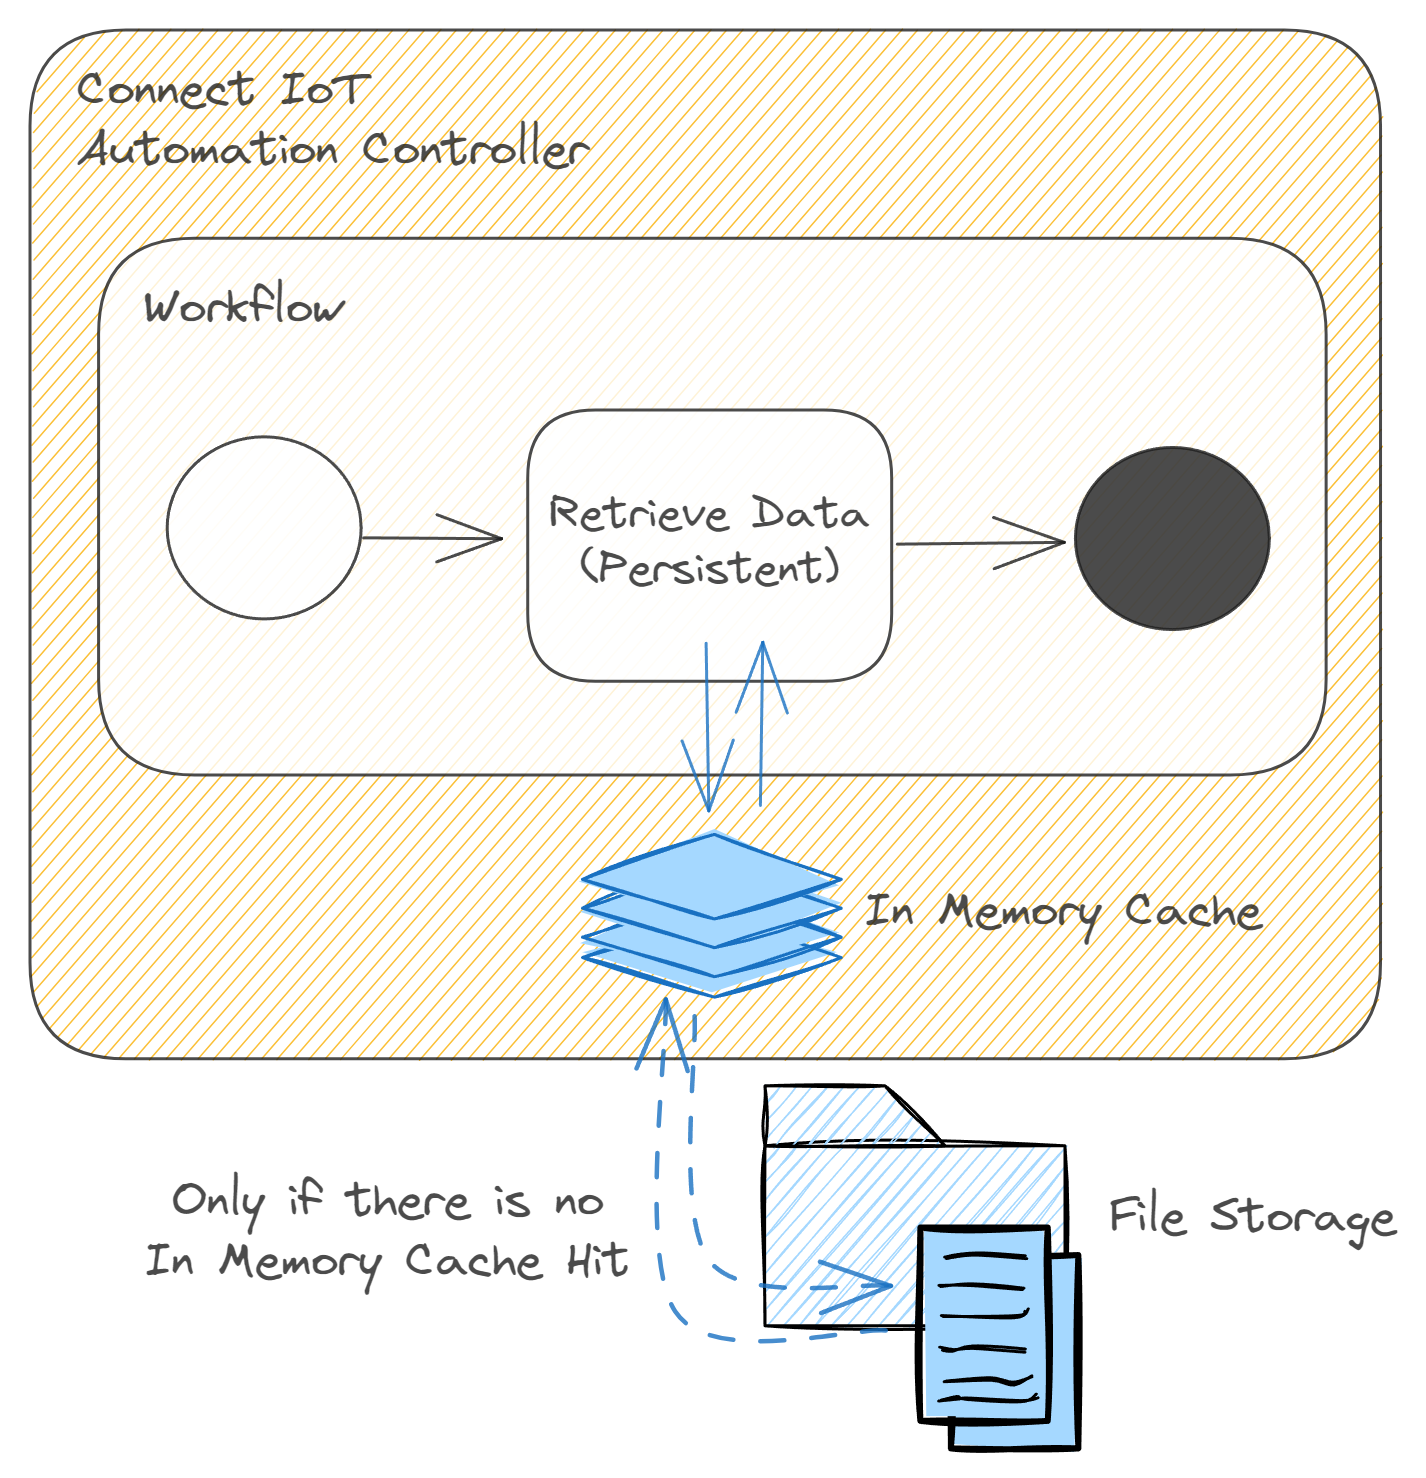
Connect IoT has out of the box support for storing data. Data can either be stored in memory or in file.
The file persistency consists of two layers, a memory cache and a file persistency. This allows the user to have very fast data access and resiliency. In case of an application crash, the system is able to load the information stored in the file, loading the file to memory.
Temporary Storage#
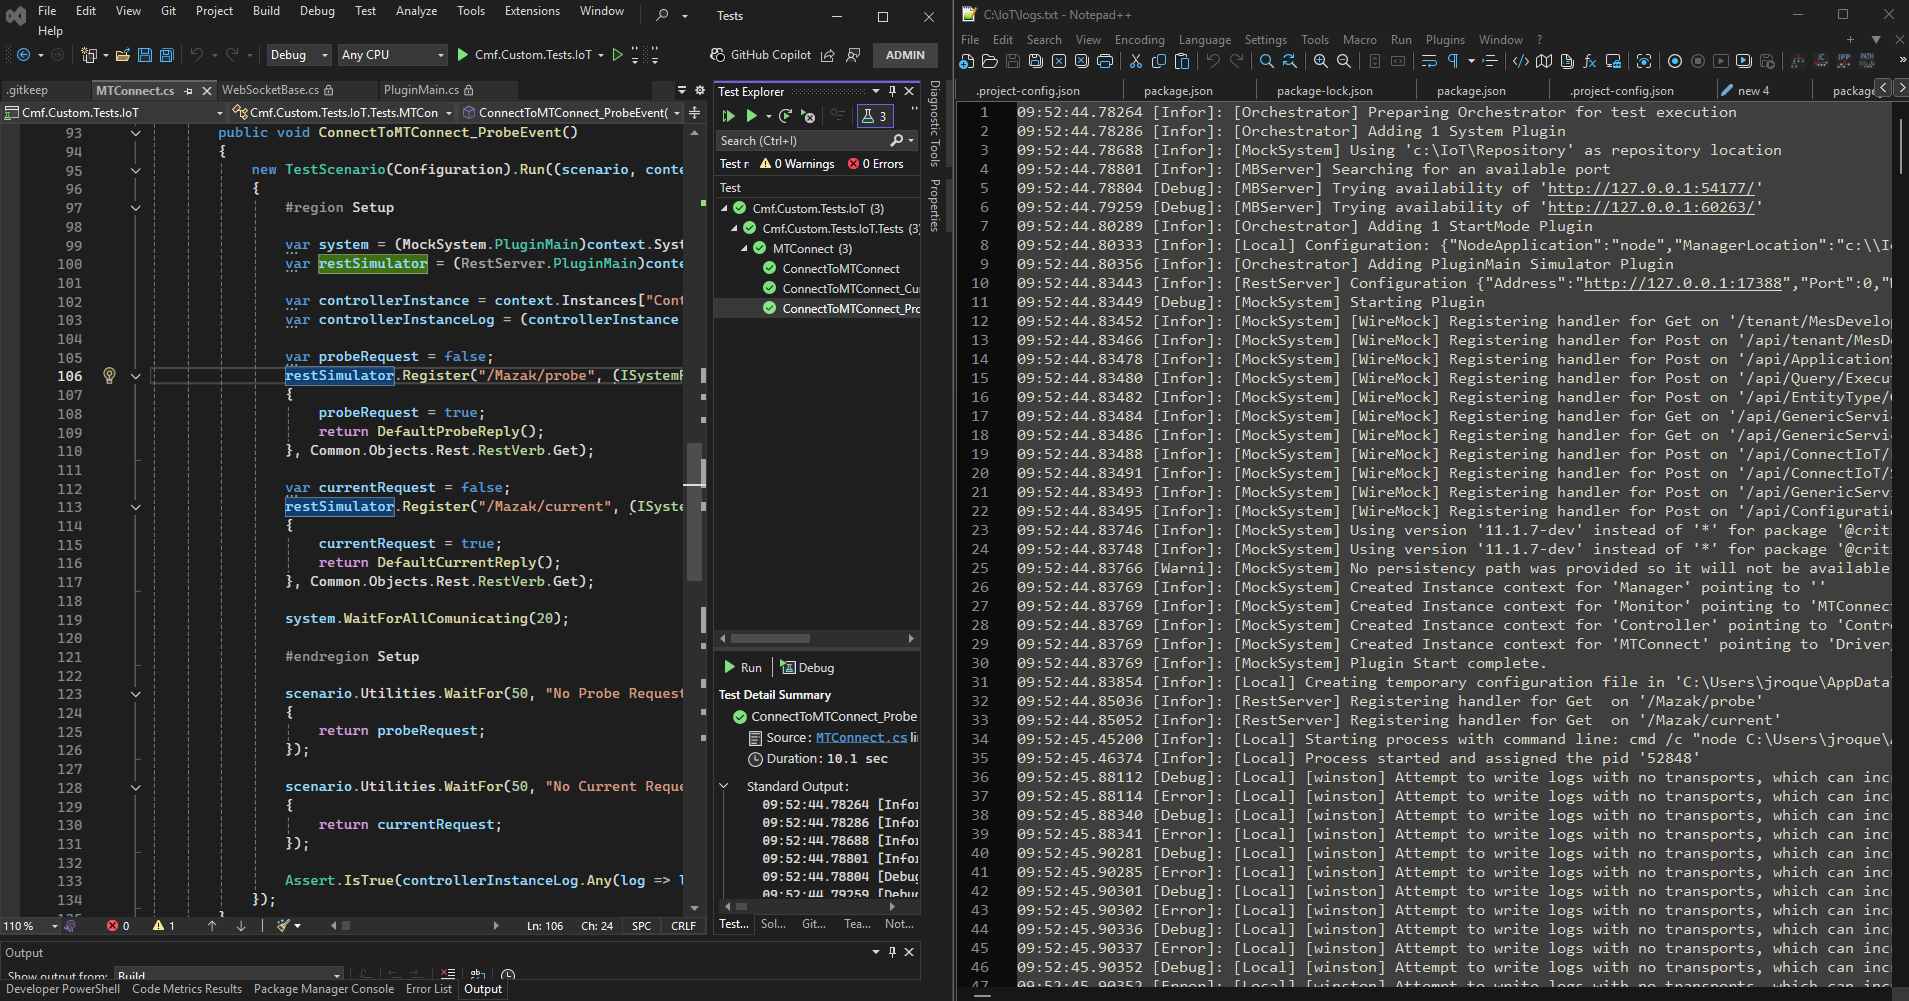
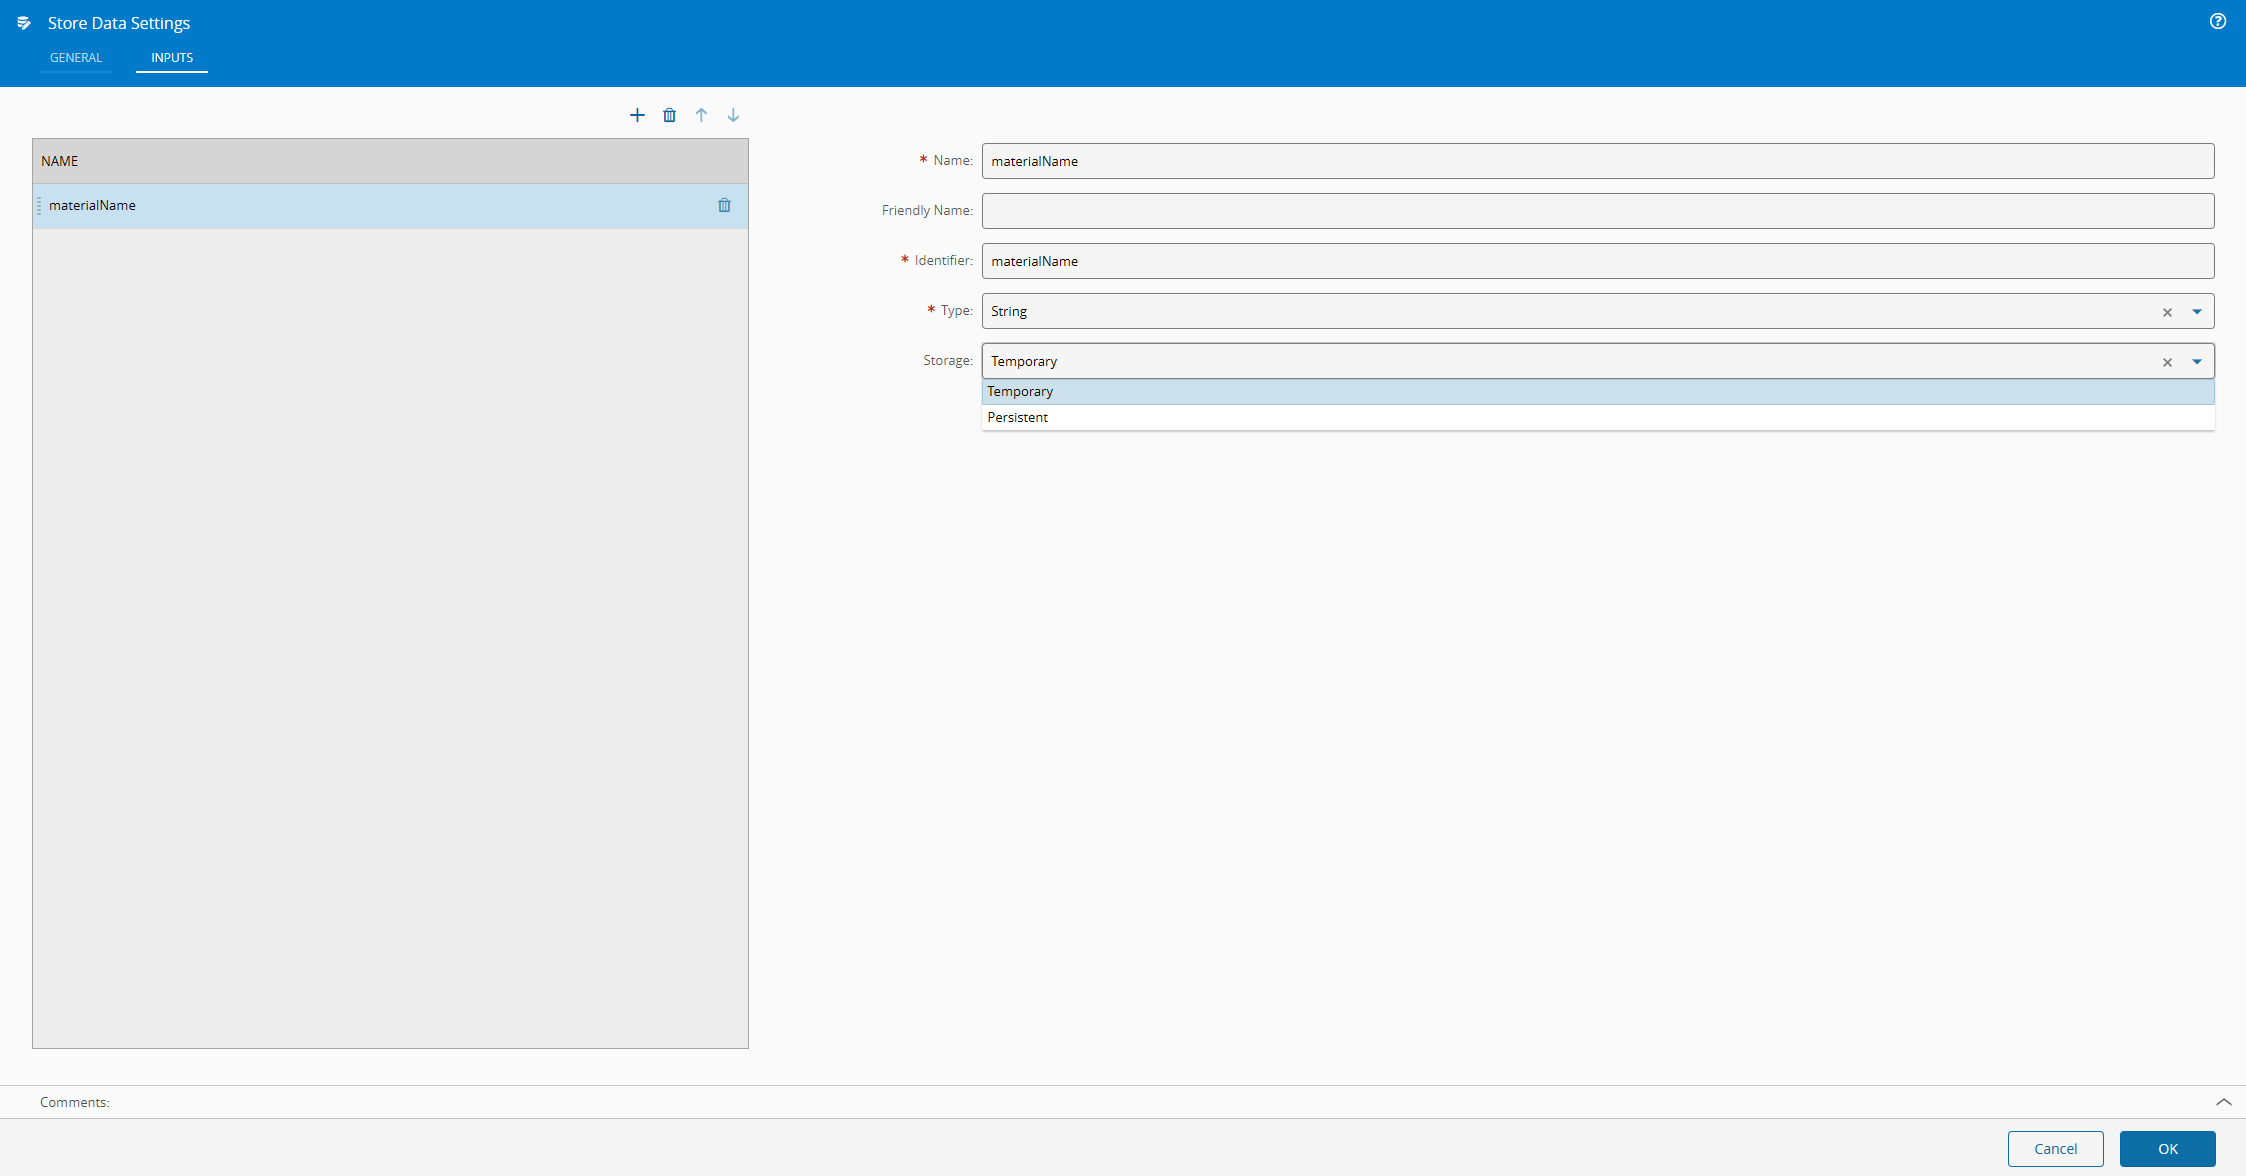
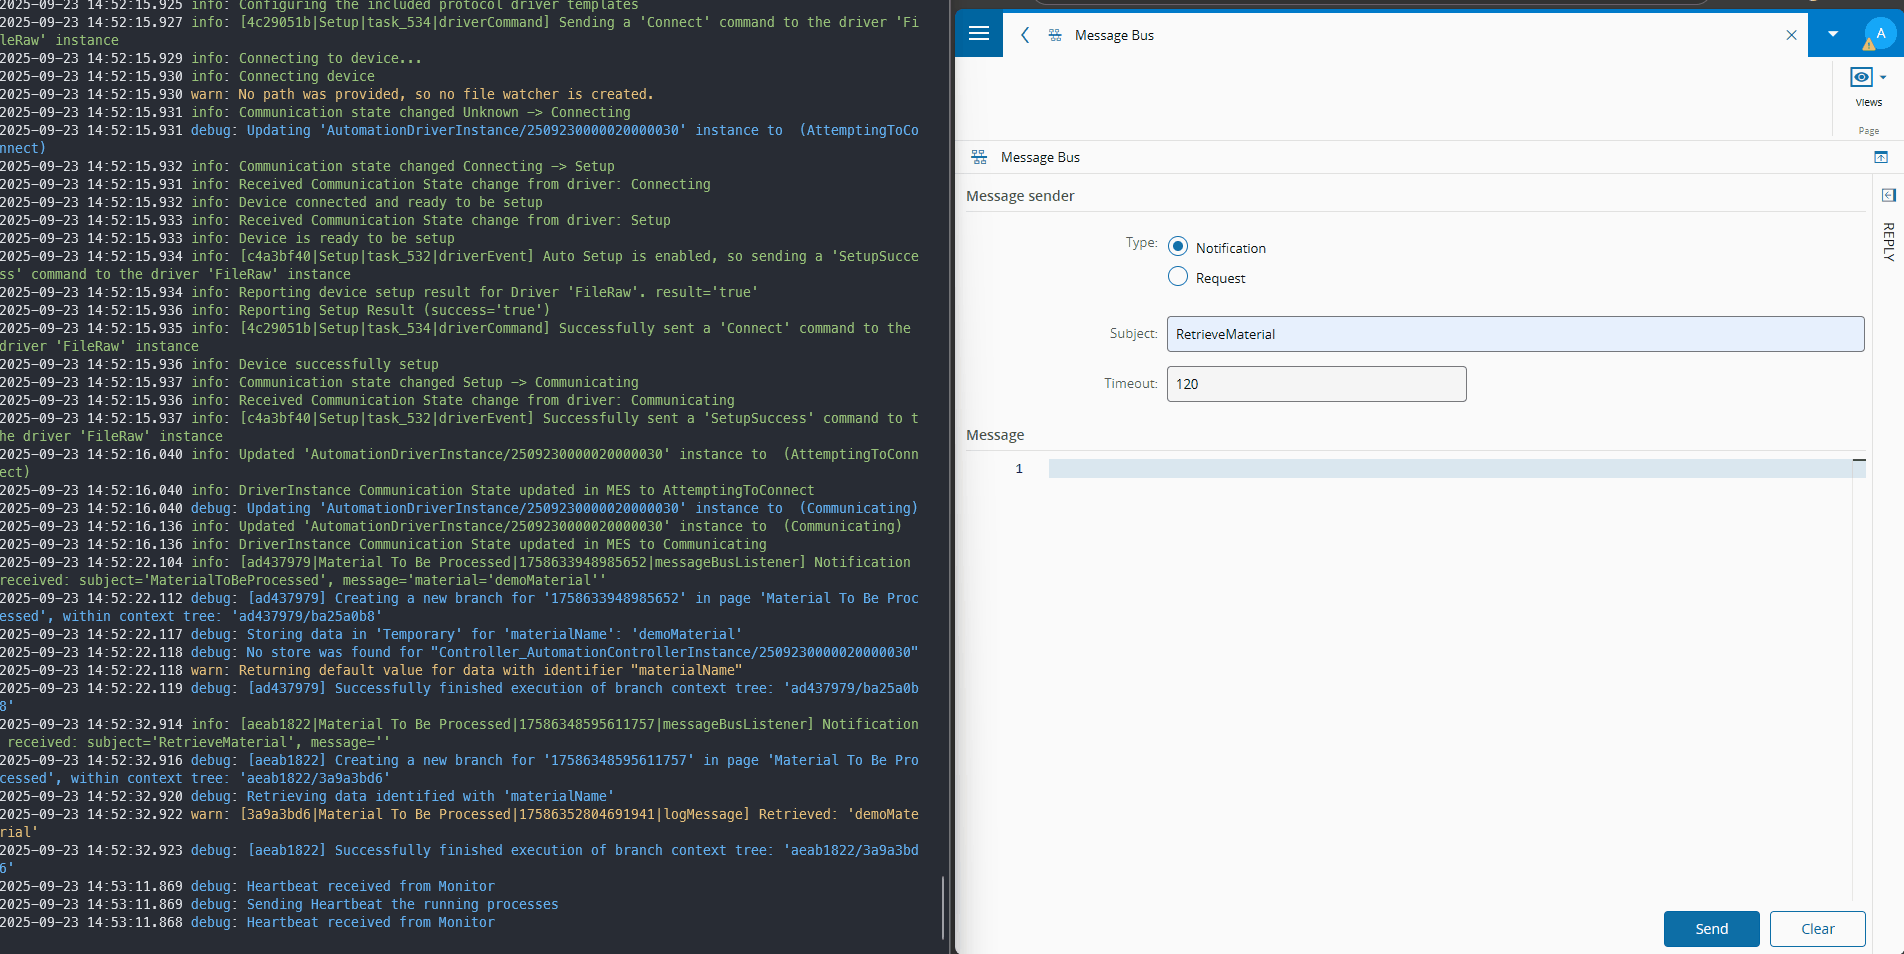
Let’s see a simple example. In this example the user wants to store the current material being processed, provided via a message bus message. We will also have a mirror message to retrieve the stored value.
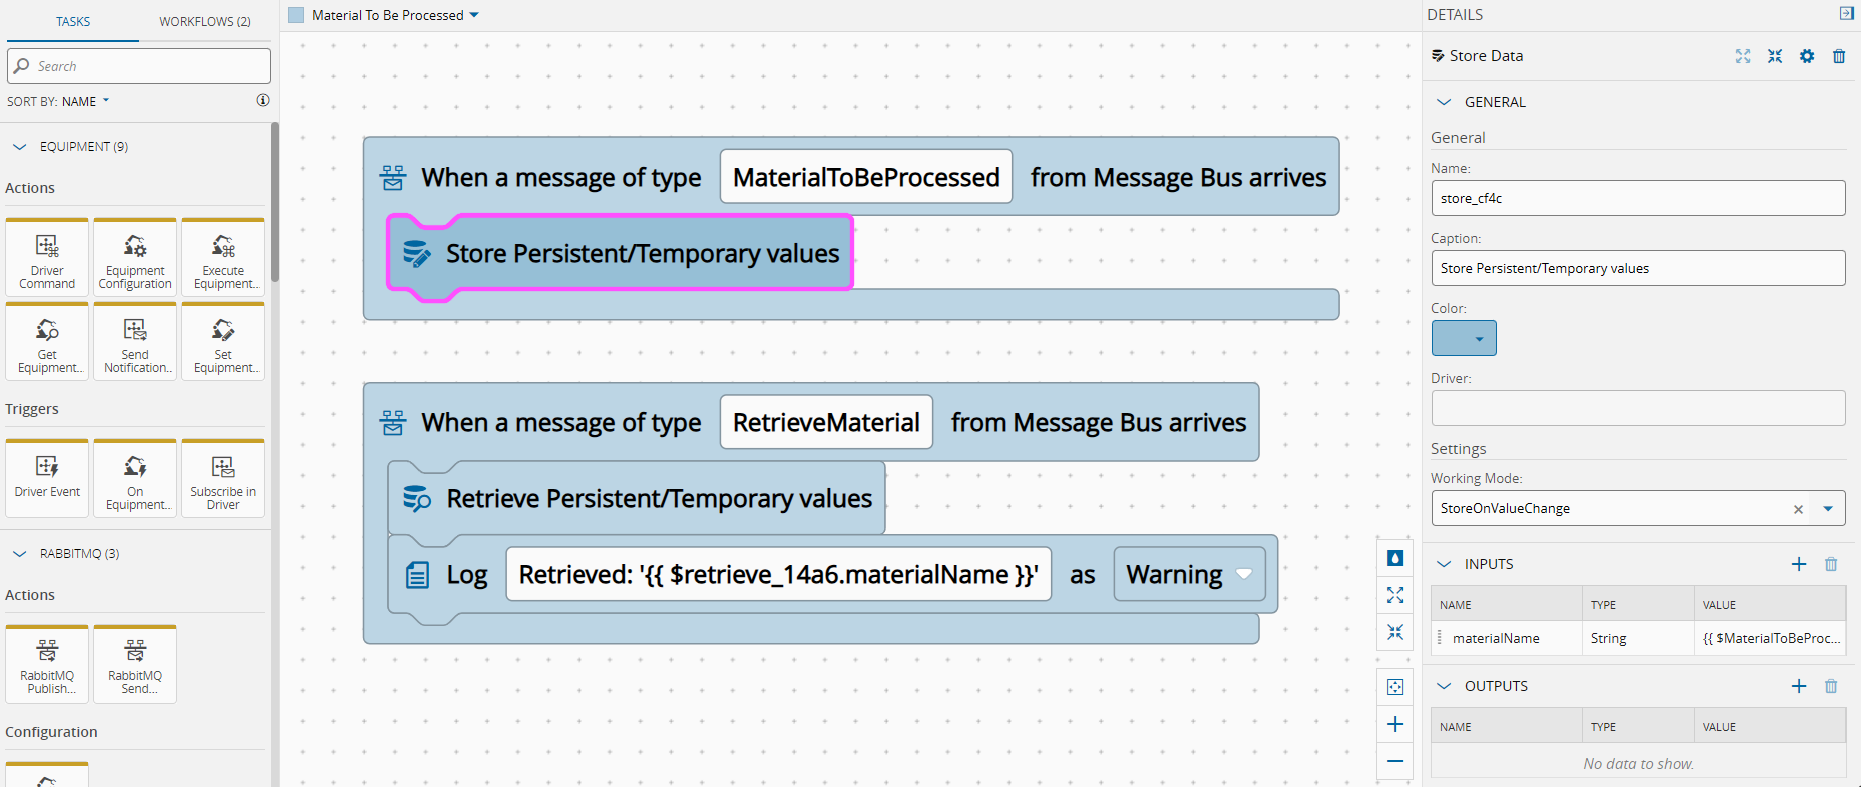
We will store this information as Temporary.
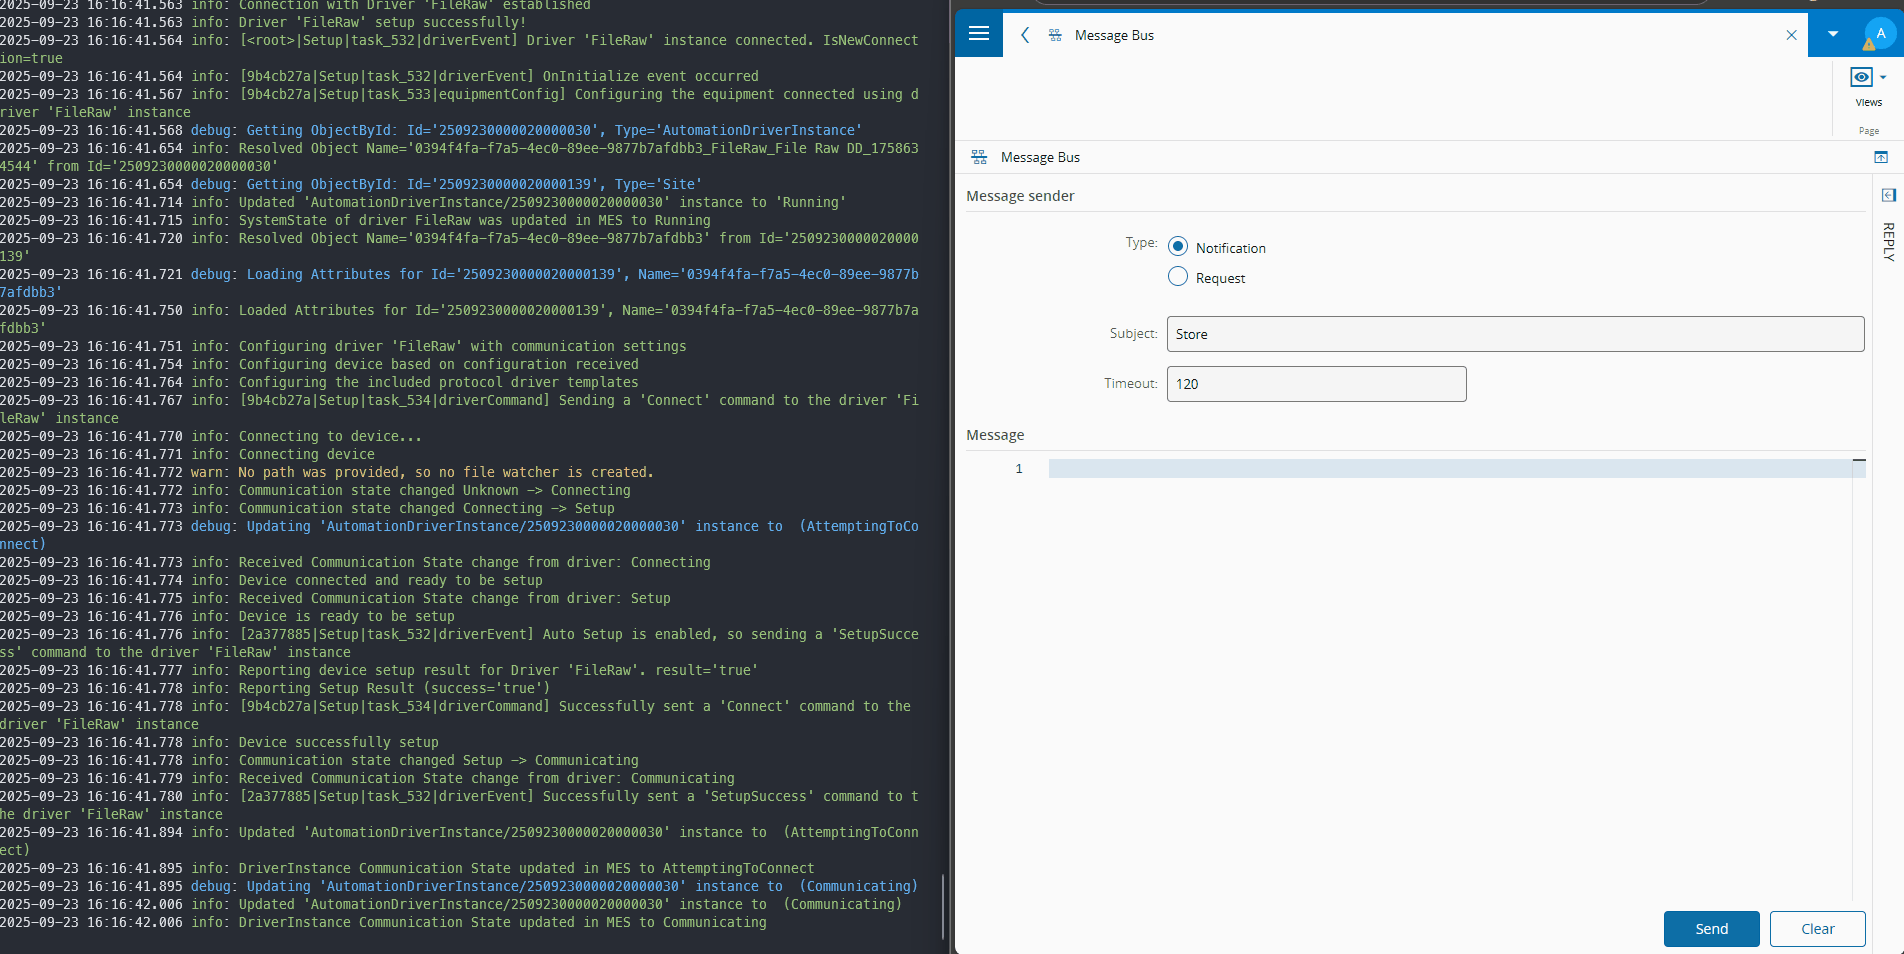
Let’s do a small experiment where we will perform a store and a retrieve.

Note that this is stored in the volatile cache. If the manager is restarted the stored information is lost.
Persistent Storage#
Let’s now go back and use the Persistent option. Now if we restart the manager the information is still available.

Well, it does seem magical, but looking a bit under the hood, we can understand how this mechanism works.
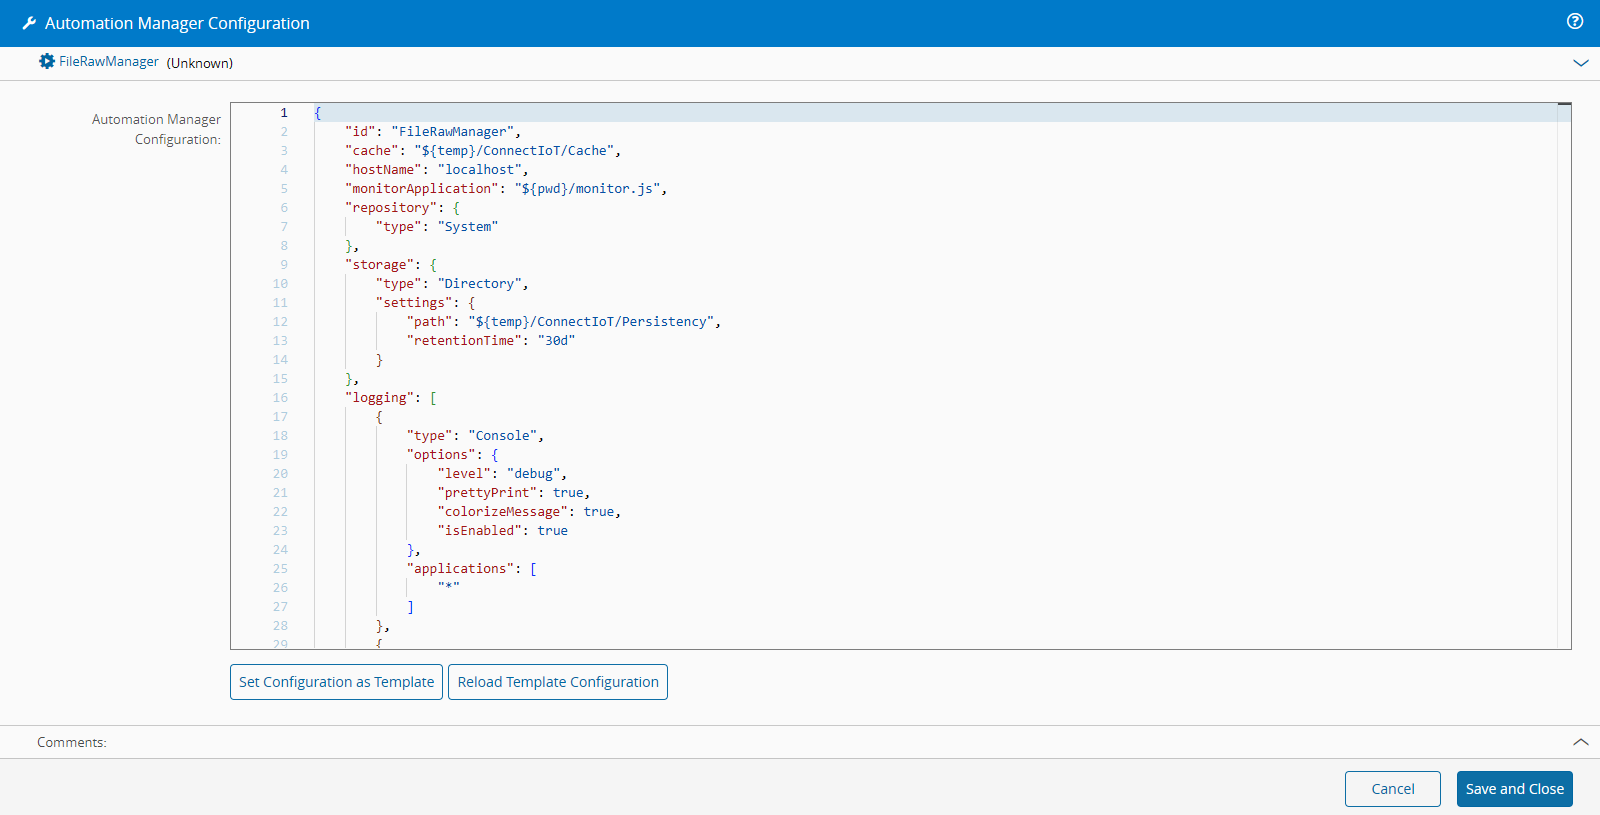
In the Automation Manager configuration tab we provide a set of settings that control the storage, this information is detailed here.
If we take a look at our manager persistency in the temp folder:
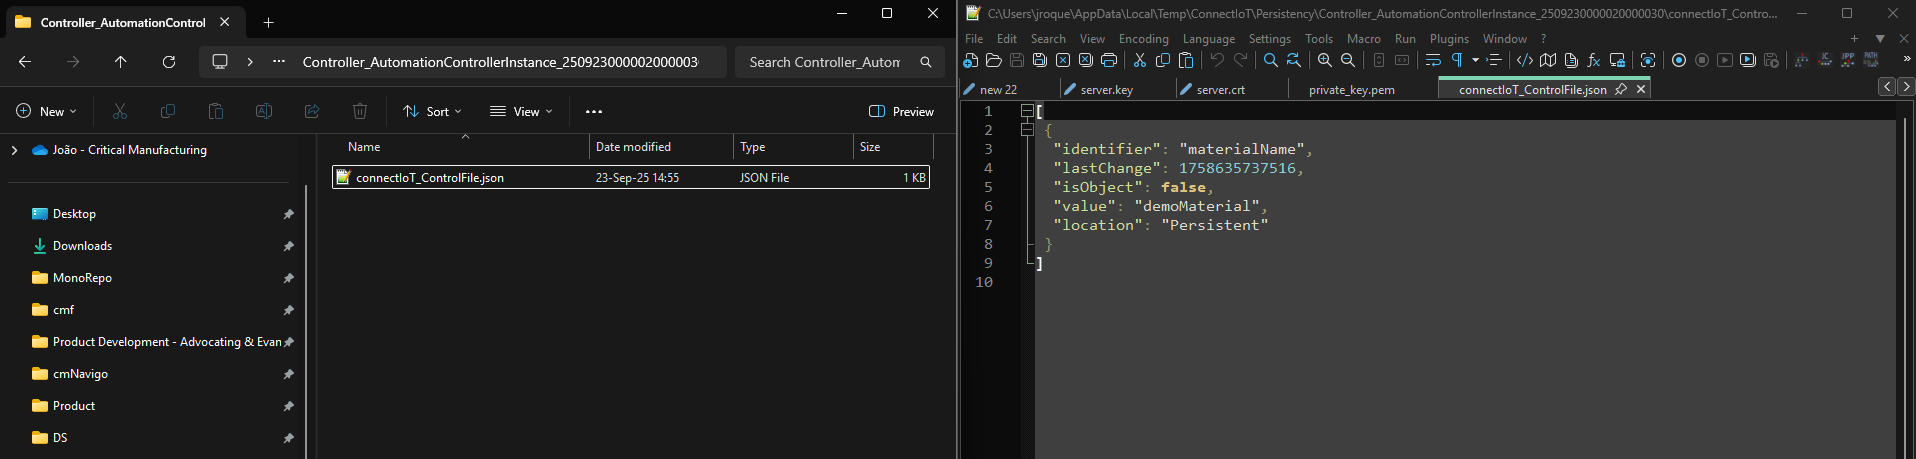
Here we see some metadata and the value stored.
connectIoT_ControlFile.json.It is important to understand that the file storage will only be used if the in memory cache does not have the value and needs to be recreated from the file persistency. In a normal running scenario the in memory cache will be used in order to be more performant.
Persistent Storage - Code Task & Custom Task#
The persistency API is also available either in the Code Task or with the use of customization.
In the Code Task we can access it in the framework object.
import { Framework } from 'framework';

export default class {

    /** Allows accessing external functions */
    private framework: Framework;

    constructor(framework: Framework) {
        this.framework = framework;
    }

    /*
     * Entry point of the class (IMPORTANT: don't change the signature of this method)
     * Should return an object containing the values for each output to emit
     * If necessary, use the parameter "outputs" to emit data while running the code.
     */
    public async main(inputs: any, outputs: any): Promise<any> {

        await this.framework.dataStore.store("materialName", inputs.materialName, "Temporary");

        const retrievedValue = await this.framework.dataStore.retrieve("materialName", "");

    }
}
In a Custom Task we can access the storage by accessing the this._datastore object.
public override async onChanges(changes: Task.Changes): Promise<void> {
    if (changes["activate"]) {
        this.activate = undefined;

        this._dataStore.store("materialName", this.materialName, DataStoreLocation.Persistent);

        const retrievedValue = this._dataStore.retrieve("materialName", "");

        this.success.emit(true);
    }
}
These apis provide the groundwork for more complex implementations and manipulations of stored objects.
Even Better#
In 11.2 the persistency API was one of the main focus of improvement.
There were two main focus:
- Queues
- Expiration
Now the apis have native support for queueing and dequeueing data and for storing data that has a time to live.
Queues#
Queues open a whole range of use cases. For now the supported types of queues are FIFO (First in First Out), LIFO (Last in First Out) and FEFO (First Expired First Out).
Starting with the classical case, we will store values 1, 2 and 3 and we will retrieve them in FIFO order.
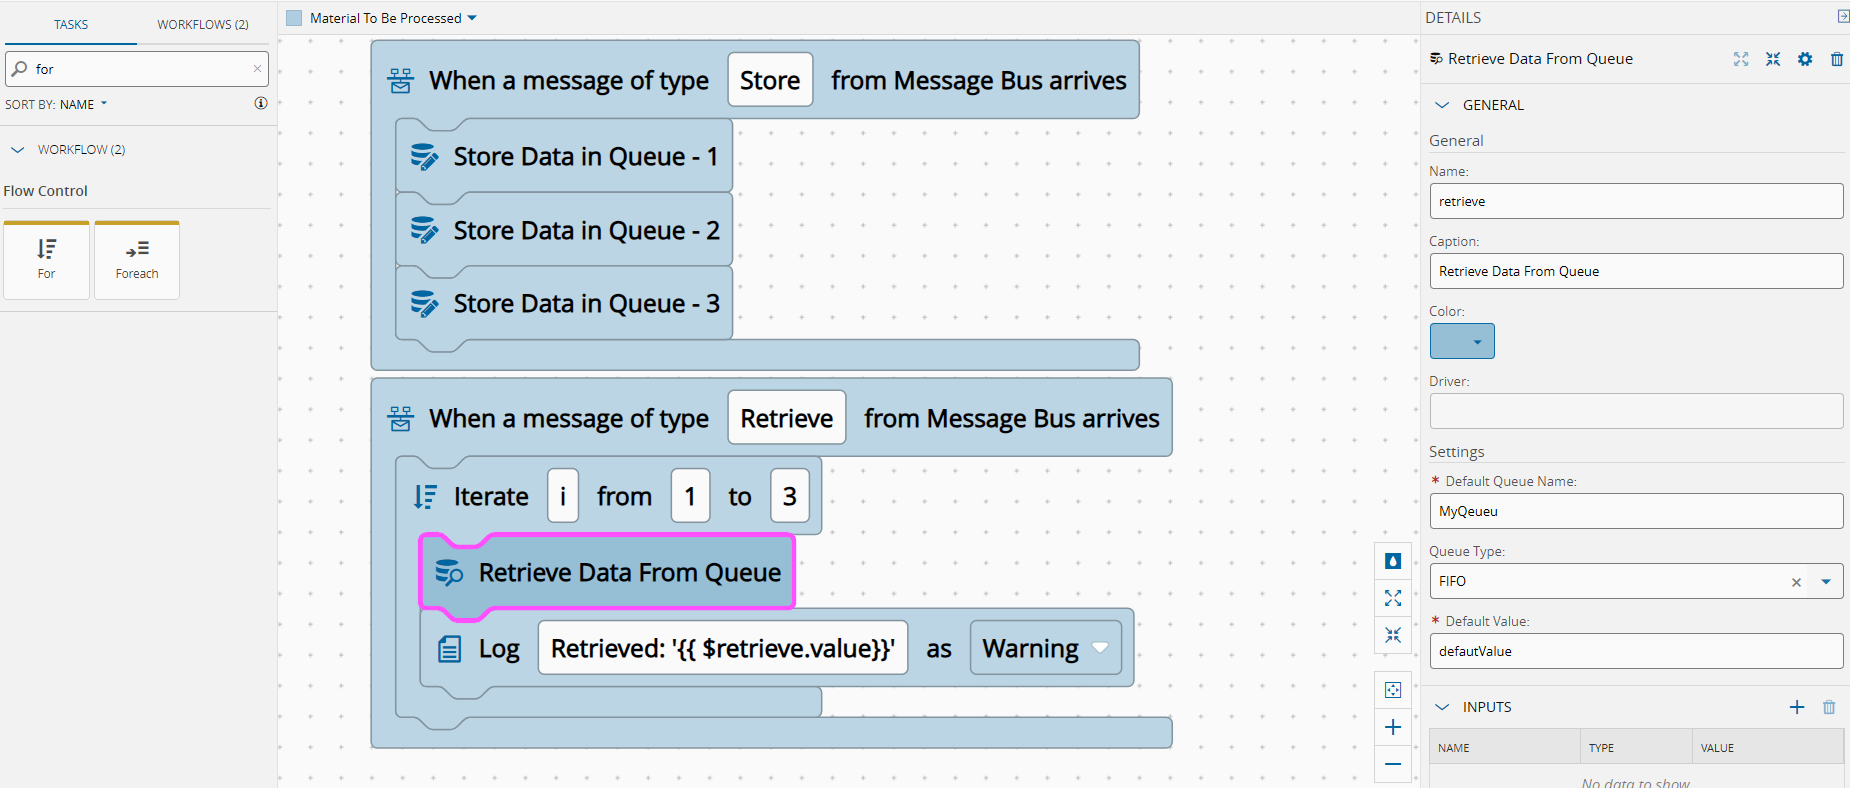
Now seeing it run, we can see that we are doing a consecutive storage of 1, 2 and 3. Then we are using a loop to retrieve the values of the queue, in the order they entered the queue.
Doing the same but changing the order, we will now retrieve them with a LIFO:
Expiration#
Some values are no longer useful if they are stale. This is where expiration can help us. We can store elements and at the same time provide more information of the time where they are still valid or can still be used. After the time threshold is reached the value will be discarded.
We can try and create a simple scenario to demonstrate this behavior.
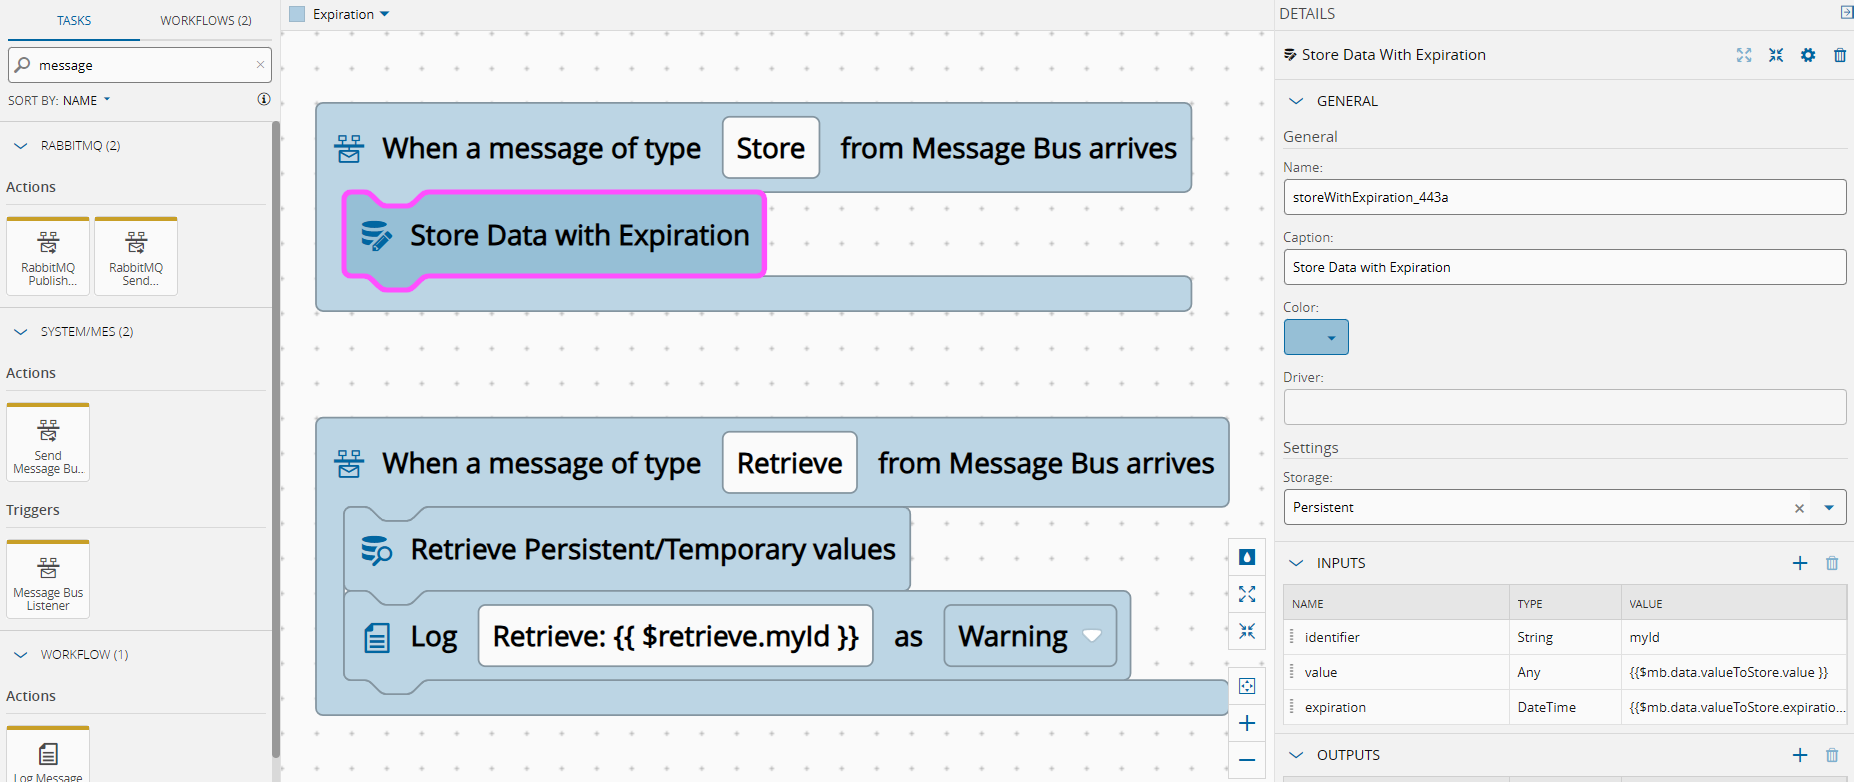
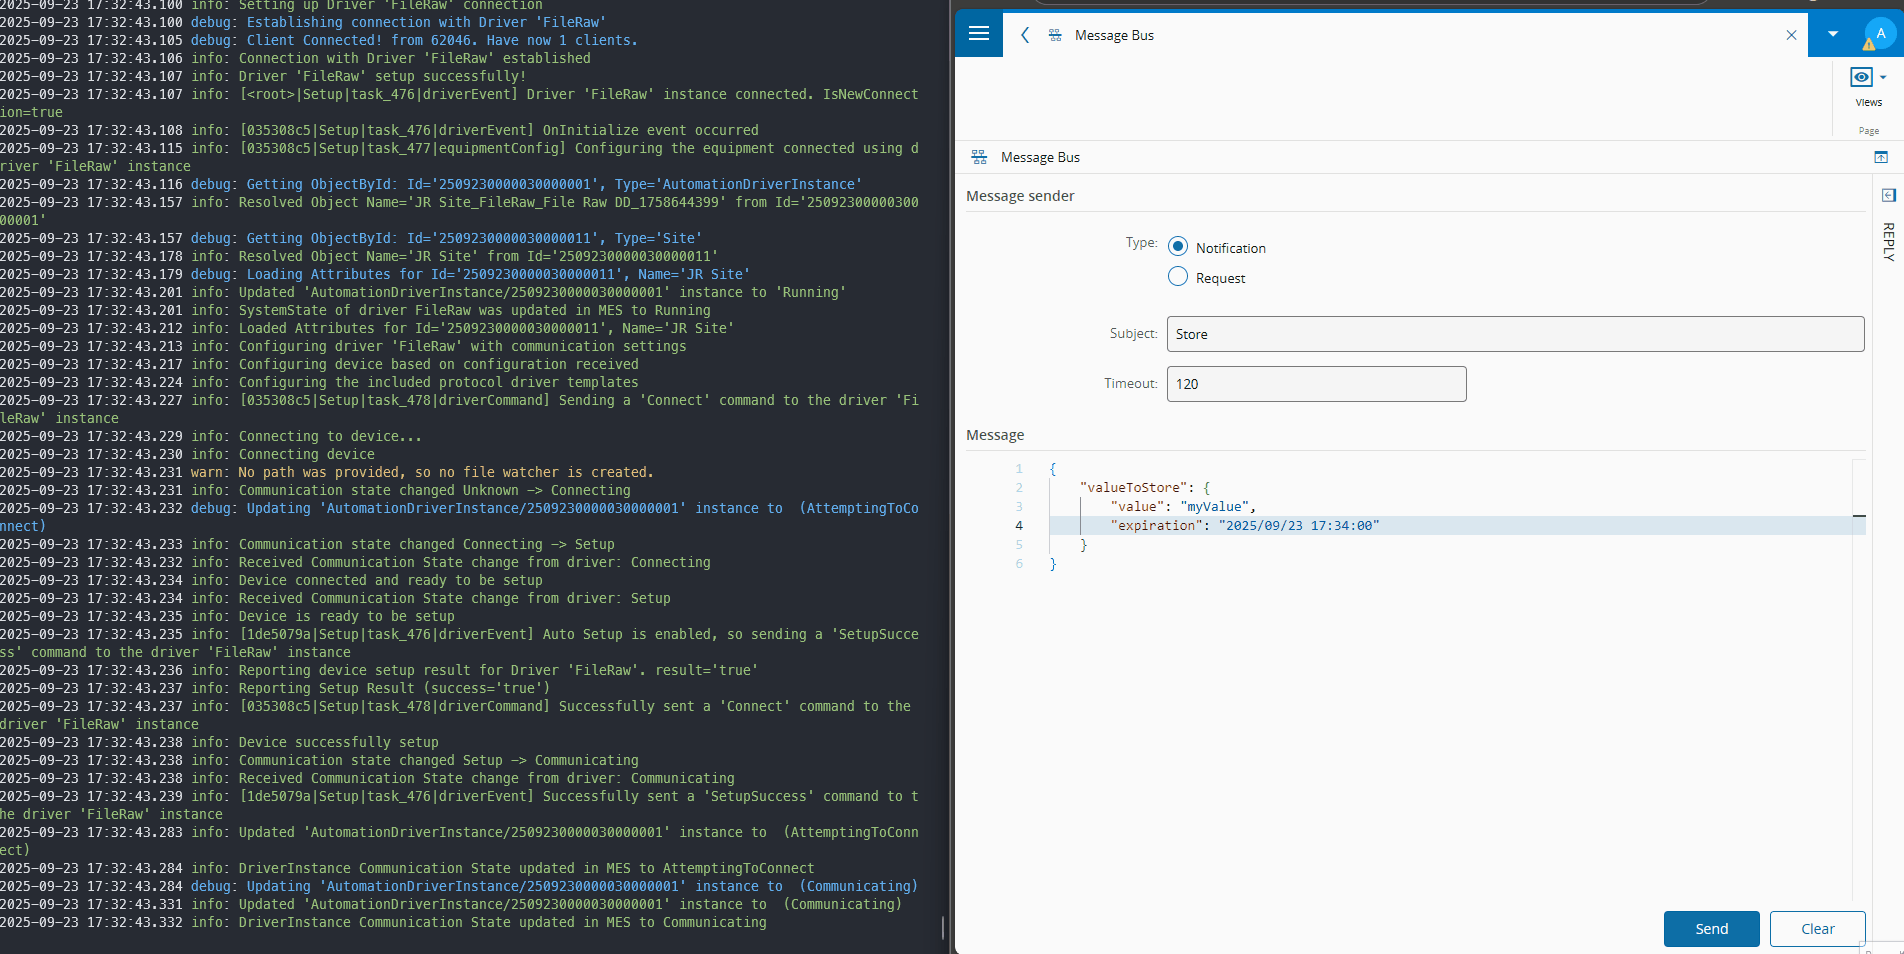
The value can be continuously updated to update its expiration.
11.2 - Code Task & Custom Task#
The api has been expanded for version 11.2, from queues and expirations to additional helper methods, like delete (deletes a stored value), clear (clears all values) and listKeys (Lists all identifiers for stored values).
For queues we now have the storeInQueue (stores an element in a queue), retrieveFromQueue (retrieves an element from a queue) and the peekFromQueue (retrieves the first valid element from a queue without removing it from the queue).
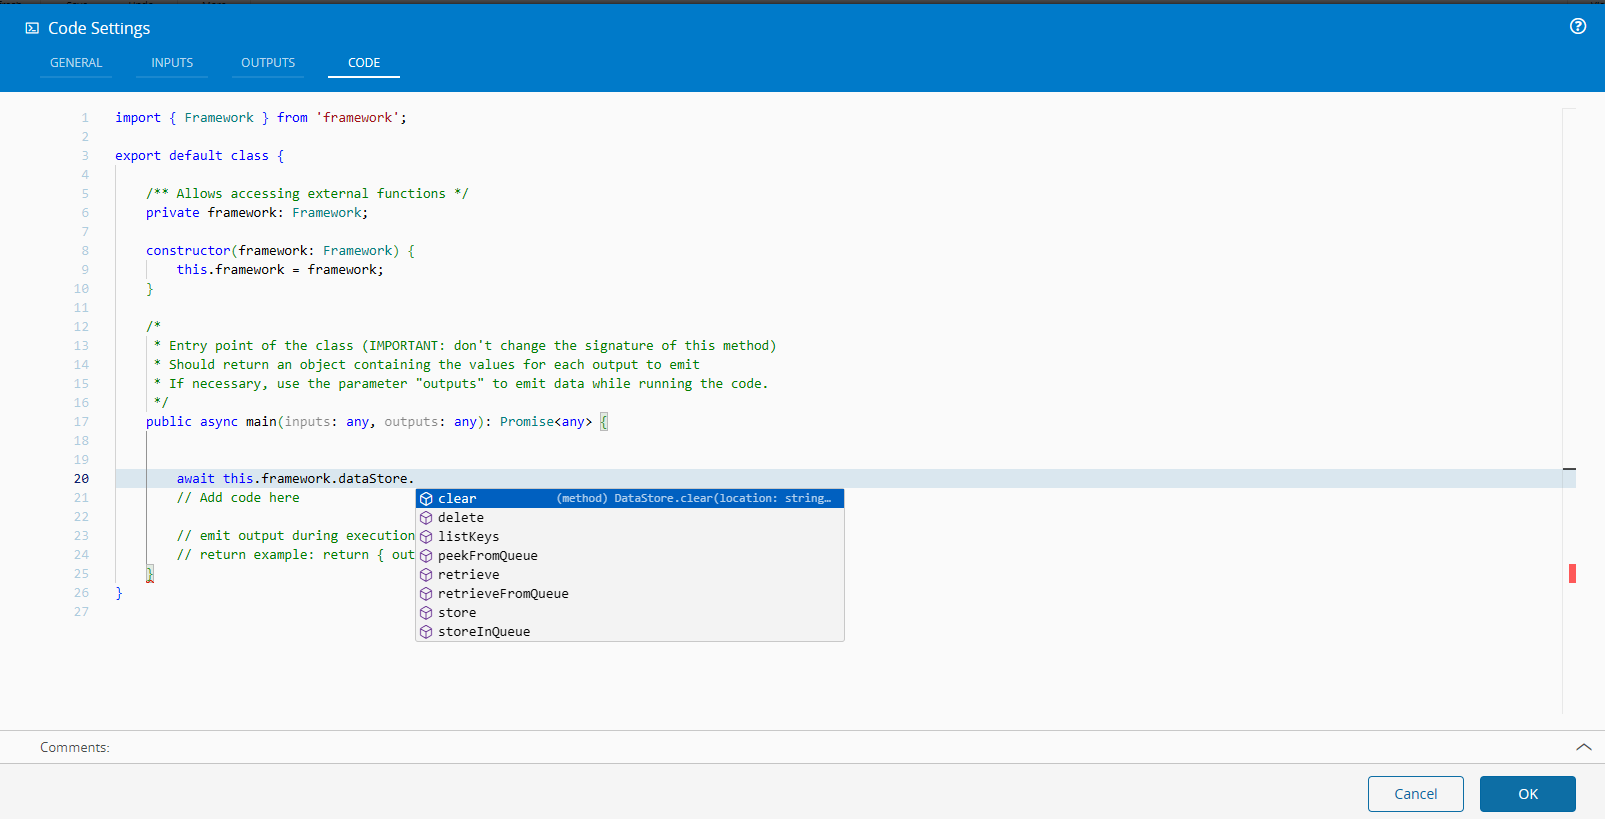
Expiration is part of the options of the storeInQueue and the store.
Using the code task, we now have a StoreOptions type that allows us to configure the expiration and the queue settings.
import { Framework, StoreOptions } from 'framework';

export default class {

    /** Allows accessing external functions */
    private framework: Framework;

    constructor(framework: Framework) {
        this.framework = framework;
    }

    /*
     * Entry point of the class (IMPORTANT: don't change the signature of this method)
     * Should return an object containing the values for each output to emit
     * If necessary, use the parameter "outputs" to emit data while running the code.
     */
    public async main(inputs: any, outputs: any): Promise<any> {
        // Get Next Day counting from this moment
        var nextDay = new Date();
        nextDay.setDate(nextDay.getDate() + 1);

        await this.framework.dataStore.store("materialName", inputs.materialName, "Temporary", {
            validUntil: nextDay.getUTCMilliseconds()
        } as StoreOptions);

        await this.framework.dataStore.storeInQueue("myqueue", inputs.materialName, {
            location: "Temporary",
            validUntil: nextDay.getUTCMilliseconds()
        } as StoreOptions);
    }
}
For a Custom Task it will be similar.
public override async onChanges(changes: Task.Changes): Promise<void> {
    if (changes["activate"]) {
        this.activate = undefined;

        this._dataStore.store("materialName", this.materialName, DataStoreLocation.Persistent, {
            validUntil: nextDay.getUTCMilliseconds()
        } as StoreOptions);

        this._dataStore.store("myqueue", this.materialName, DataStoreLocation.Persistent, {
            location: "Temporary",
            validUntil: nextDay.getUTCMilliseconds()
        } as StoreOptions);

        this.success.emit(true);
    }
}
Now when building your customization you are able to easily manipulate the persistency, from creating queues, managing expirations and having all the create, delete and clear commands.
Final Thoughts#
Storing data on edge is an essential consideration when building on edge integrations. Either as a separation of concerns, storing information only where it is needed, or as a performance consideration. Being able to have a simple and easy way to persist information in a resilient way is a must have for any IoT Platform. In this blog post we mentioned out of the box approaches, in a previous blog post we mentioned the use of SQL Lite as an alternative to be able to perform SQL queries, here.