An example of how to build a driver using CM Connect IoT, for a very popular driver. All the source code of this driver is available here.
Overview#
MTConnect is a very common standard in the world of CNC (Computer Numerical Control) machines. These are machines that have very long life cycles and typically have had very disparate interface support. Some are very capable, able to have full control and recipe management but most being quite limited.
MTConnect is an open standard that tries to mitigate this gap, by having an easy and standard way to make information available. It is vendor agnostic and is read only. It is part of the push of Industry 4.0 to surface machine information that was until now being ignored or discarded.
It uses an XML based format to provide machine information through HTTP. It allows for machines that were, until know, black boxes to easily start servicing information.
The MES is a common consumer of this type of machine data, for process control and material tracking. Therefore an MTConnect driver for Connect IoT makes a lot of sense.
The standard is maintained by the MTConnect Institute, and it’s widely adopted for CNC machines, robots, sensors, and other shop floor equipment.
Architecture#
Let’s take some time understanding how the protocols works. MTConnect follows a client–agent–adapter model.
Device → Adapter → Agent → Client Applications
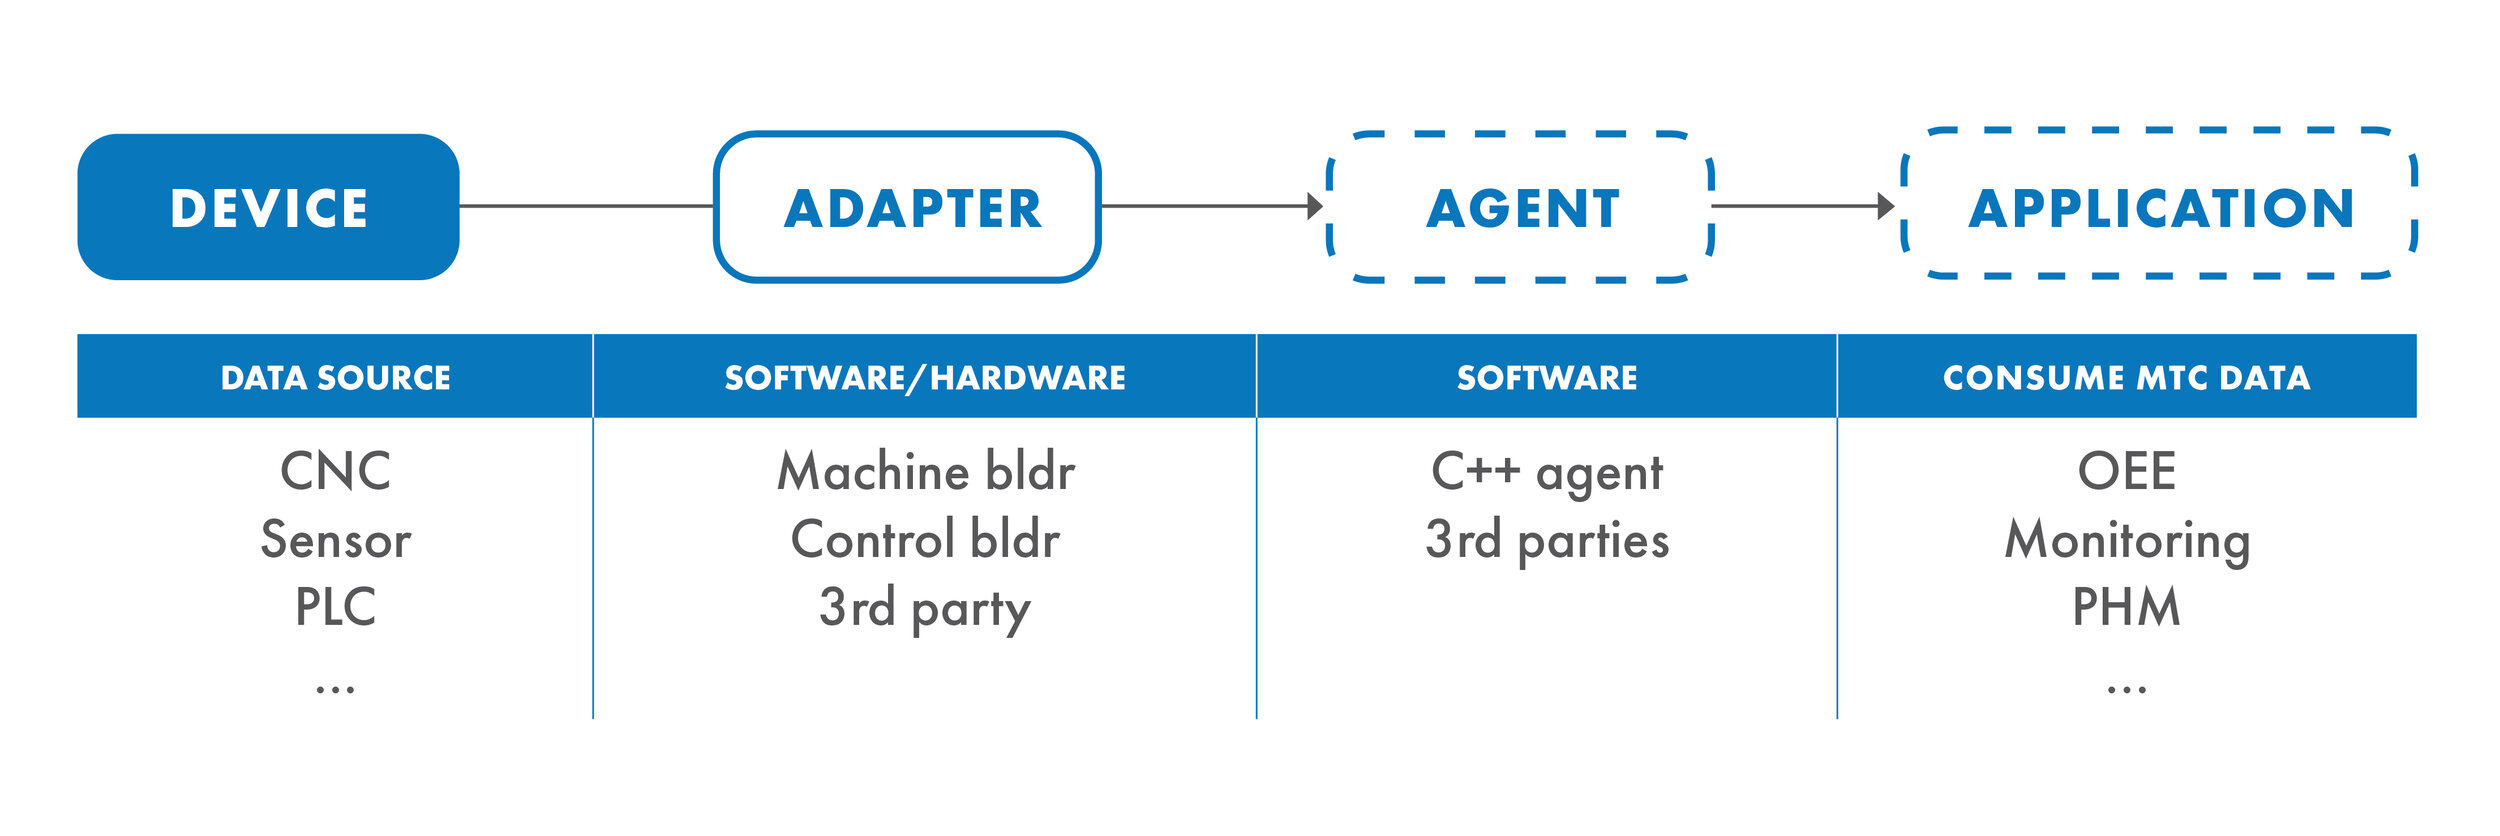
The Device will be the equipment that we want to gather information from.
The Adapter is a translation layer that is able to convert the machine data into MTConnect’s Observation format. This can be a piece of software or a hardware adapter running the needed software. It turns the machine data into very simple key/value text lines.
spindle_speed|1250
feedrate|300
The Agent is agnostic to the machine and transforms the key/values into standardized MTConnect XML format. It also is responsible for:
- hosting an HTTP Rest server, that services the MTConnect endpoints
- implementing caching
- multiplexer mechanisms.
It acts as the data cache and historical snapshot point.
The Client will be the data consumer. It is the application that will be making requests to the Agent to extract device information. The MES is a Client, so our driver will be the creation of an MTConnect Client.
MTConnect Endpoints#
In MTConnect the agent provides a set of endpoints.
/probe        → device discovery
/current      → latest values
/sample       → historical time-series data
/assets       → tooling or program assets
/asset        → tooling or program asset
/probe – Device Discovery
Returns the device model — a hierarchical description of all components, data items, and capabilities of the connected machines.
Usage:
- Called at the start of a client session to understand what the agent can provide.
- Defines available DataItems (e.g., spindle speed, feed rate, temperature).
Output: XML or JSON that matches the Devices schema.
Example:
Request
GET http://<agent>/probe
Response
<Device name="CM_VF2" uuid="12345">
  <Component id="c1" name="spindle">
    <DataItem category="SAMPLE" id="d1" type="SPINDLE_SPEED" units="REVOLUTION/MINUTE"/>
  </Component>
</Device>
It exists to be called when configuration changes or at client initialization.
/current – Latest Values
Returns the most recent value for each DataItem.
Usage:
- Quick “snapshot” of the machine’s current state.
- Useful for dashboards that don’t need time-series history.
Output: XML or JSON with a timestamp for each DataItem.
Example:
Request
GET http://<agent>/current
Response
<SpindleSpeed timestamp="2025-08-13T12:45:30Z" sequence="1523">1250</SpindleSpeed>
Can be called every few seconds if you want near-real-time monitoring, or on demand.
/sample – Time-Series Data
Returns a sequence of observations for each DataItem between a from and to sequence number.
Usage:
- Historical analysis.
- Incremental polling: clients track the last sequence number and request new data since then.
Query Parameters:
- from – starting sequence number.
- count – max number of samples to return.
Output: XML or JSON with a timestamp for each DataItem.
Example:
Request
GET http://<agent>/sample?from=1523&count=100
Response
<SpindleSpeed timestamp="2025-08-13T12:45:30Z" sequence="1523">1250</SpindleSpeed>
<SpindleSpeed timestamp="2025-08-13T12:45:31Z" sequence="1524">1260</SpindleSpeed>
Can be called continuously in a loop for streaming-like updates.
/assets – Non-Time-Series Data
Provides static or semi-static information such as tool data, part programs, or maintenance logs.
Usage:
- Retrieve tool offsets, part program code, or serialized asset metadata.
- Often updated manually on the device or on events (e.g., tool change).
Query Parameters:
- type – filter assets by type (e.g., CuttingTool).
- count – limit results.
Output: XML or JSON with a timestamp for each DataItem.
Example:
Request
GET http://<agent>/assets?type=CuttingTool&count=10
Response
<CuttingTool assetId="T123">
  <Description>1/2 inch End Mill</Description>
  <Measurements>
    <Length value="50.0" units="MILLIMETER"/>
  </Measurements>
</CuttingTool>
<CuttingTool assetId="T456">
  <Description>1/2 inch End Mill</Description>
  <Measurements>
    <Length value="55.0" units="MILLIMETER"/>
  </Measurements>
</CuttingTool>
/asset/
Retrieves a single asset by ID.
Usage:
- Fetch the latest details about a specific tool or part.
Output: XML with a timestamp for each DataItem.
Example:
Request
GET http://<agent>/asset/T123
Response
<CuttingTool assetId="T123">
  <Description>1/2 inch End Mill</Description>
  <Measurements>
    <Length value="50.0" units="MILLIMETER"/>
  </Measurements>
</CuttingTool>
Building a Connect IoT Driver#
One of the first decisions in any driver is what tools do you require to build driver support. For most drivers the starting point is made easy by the availability of SDKs or other tools made available by vendors or foundations.
For this particular example, we could simply use nodejs packages in order to perform http requests and implement all the xml parsers and validations. Fortunately, there are already a set of available and open source tools that do that work for us.
After some state of the art evaluation of the SDKs and tools for MTConnect we noticed that the .Net SDK MTConnect.NET had much more support and activity than other in .Net and in nodeJs. Also, very conveniently TrackHound provides a simple agent that we can use to start testing our driver against.
Even if Connect IoT is a nodeJs application, this is not an issue as it has full support for using .Net. Let’s see how.
Building a Connect IoT Driver#
The full process is described in our developer portal. We will use the CM CLI to create our driver project.
Scaffolding a .Net Driver#
The Connect IoT Driver is a component of a customization package for Connect IoT. In a CM customization project workspace, let’s create a new iot package.
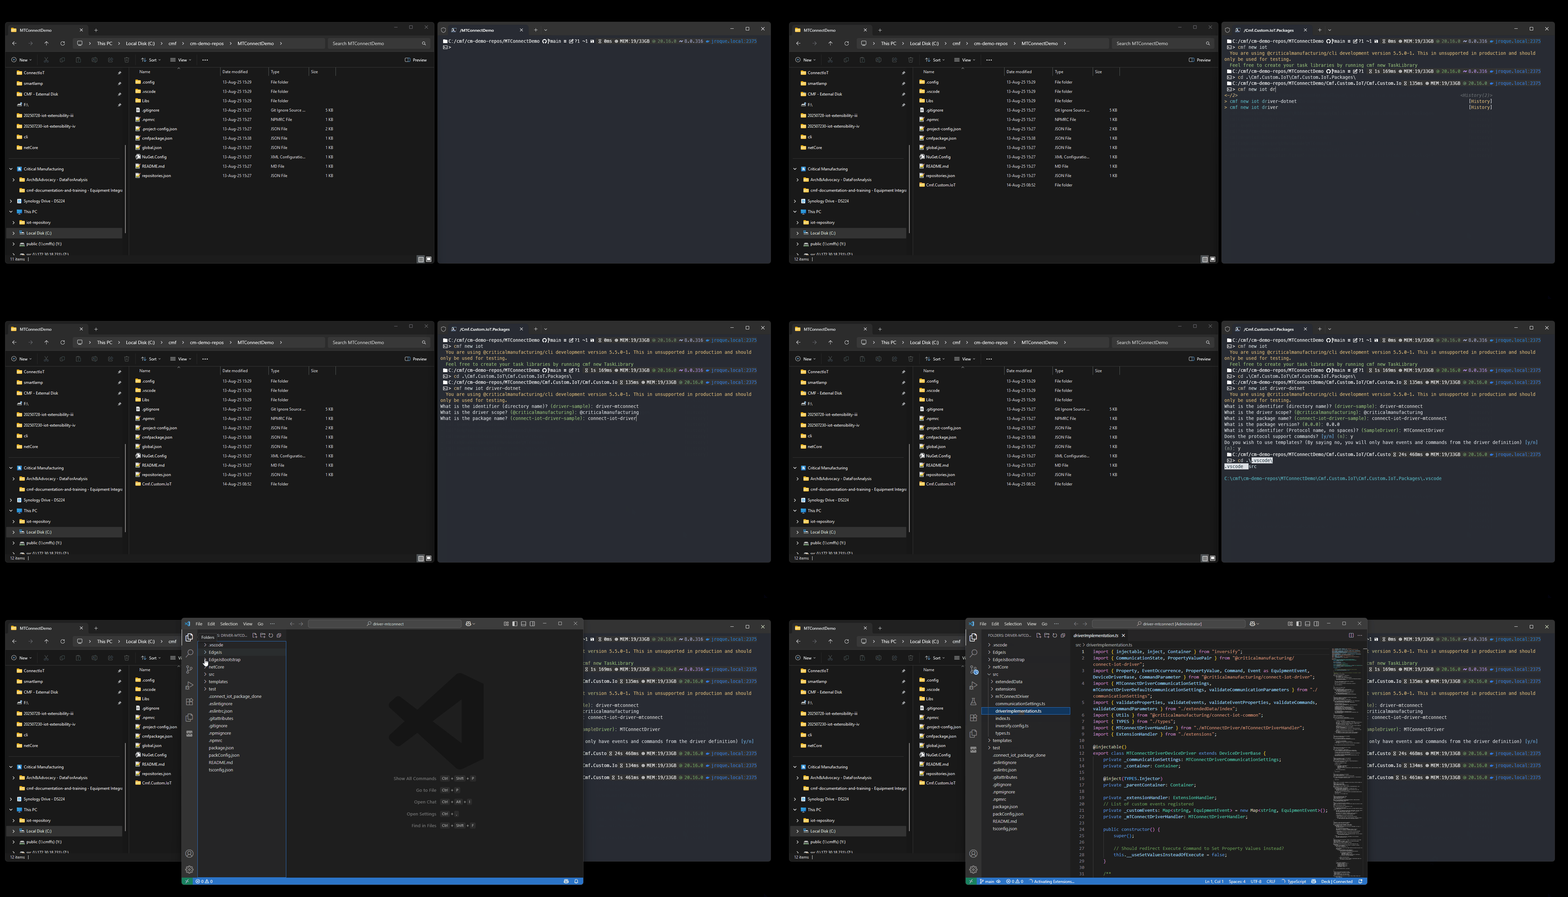
Right away the scaffolding helps us a lot, by giving us a .Net solution where we can create our interface with MTConnect and a nodeJs workspace for the rest of the driver.
The scaffolding already provides a full on buildable and packable solution. In order to interact with the driver we can use the same commands that will be used by the pipeline to create a package with cmf build and cmf pack.
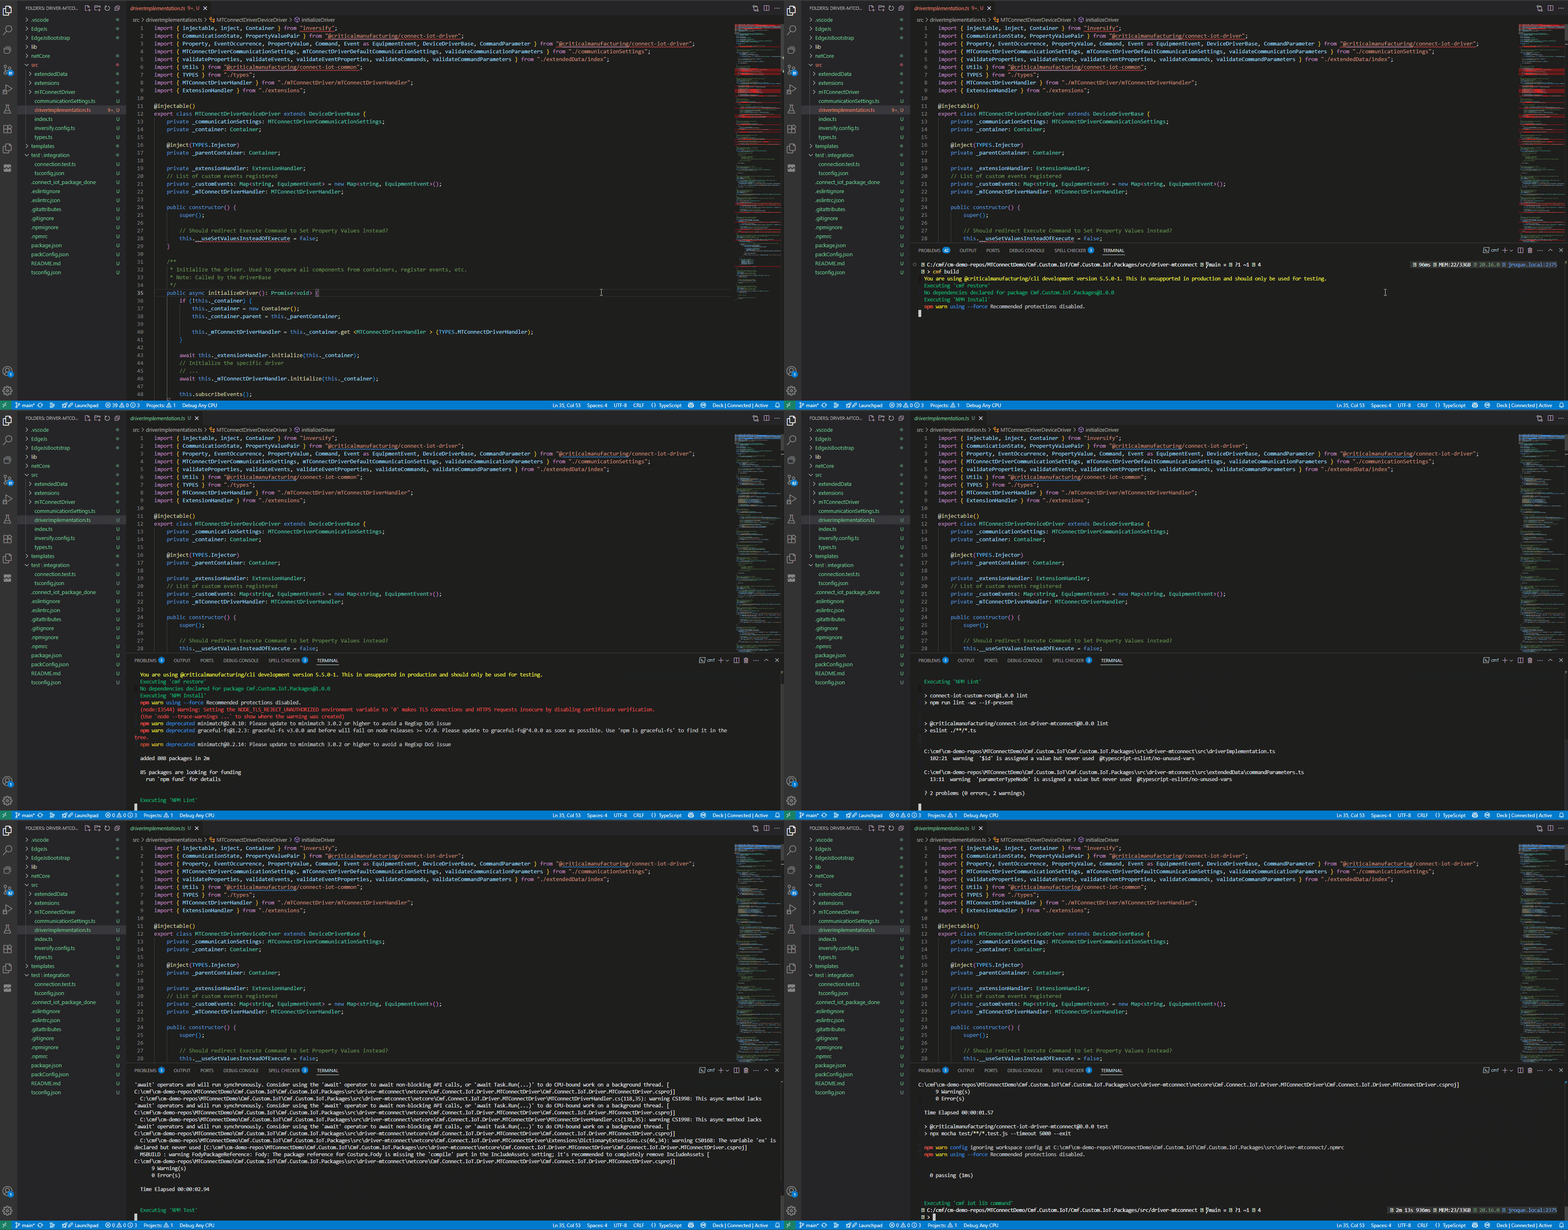
We can also decompose them into their subcommands.
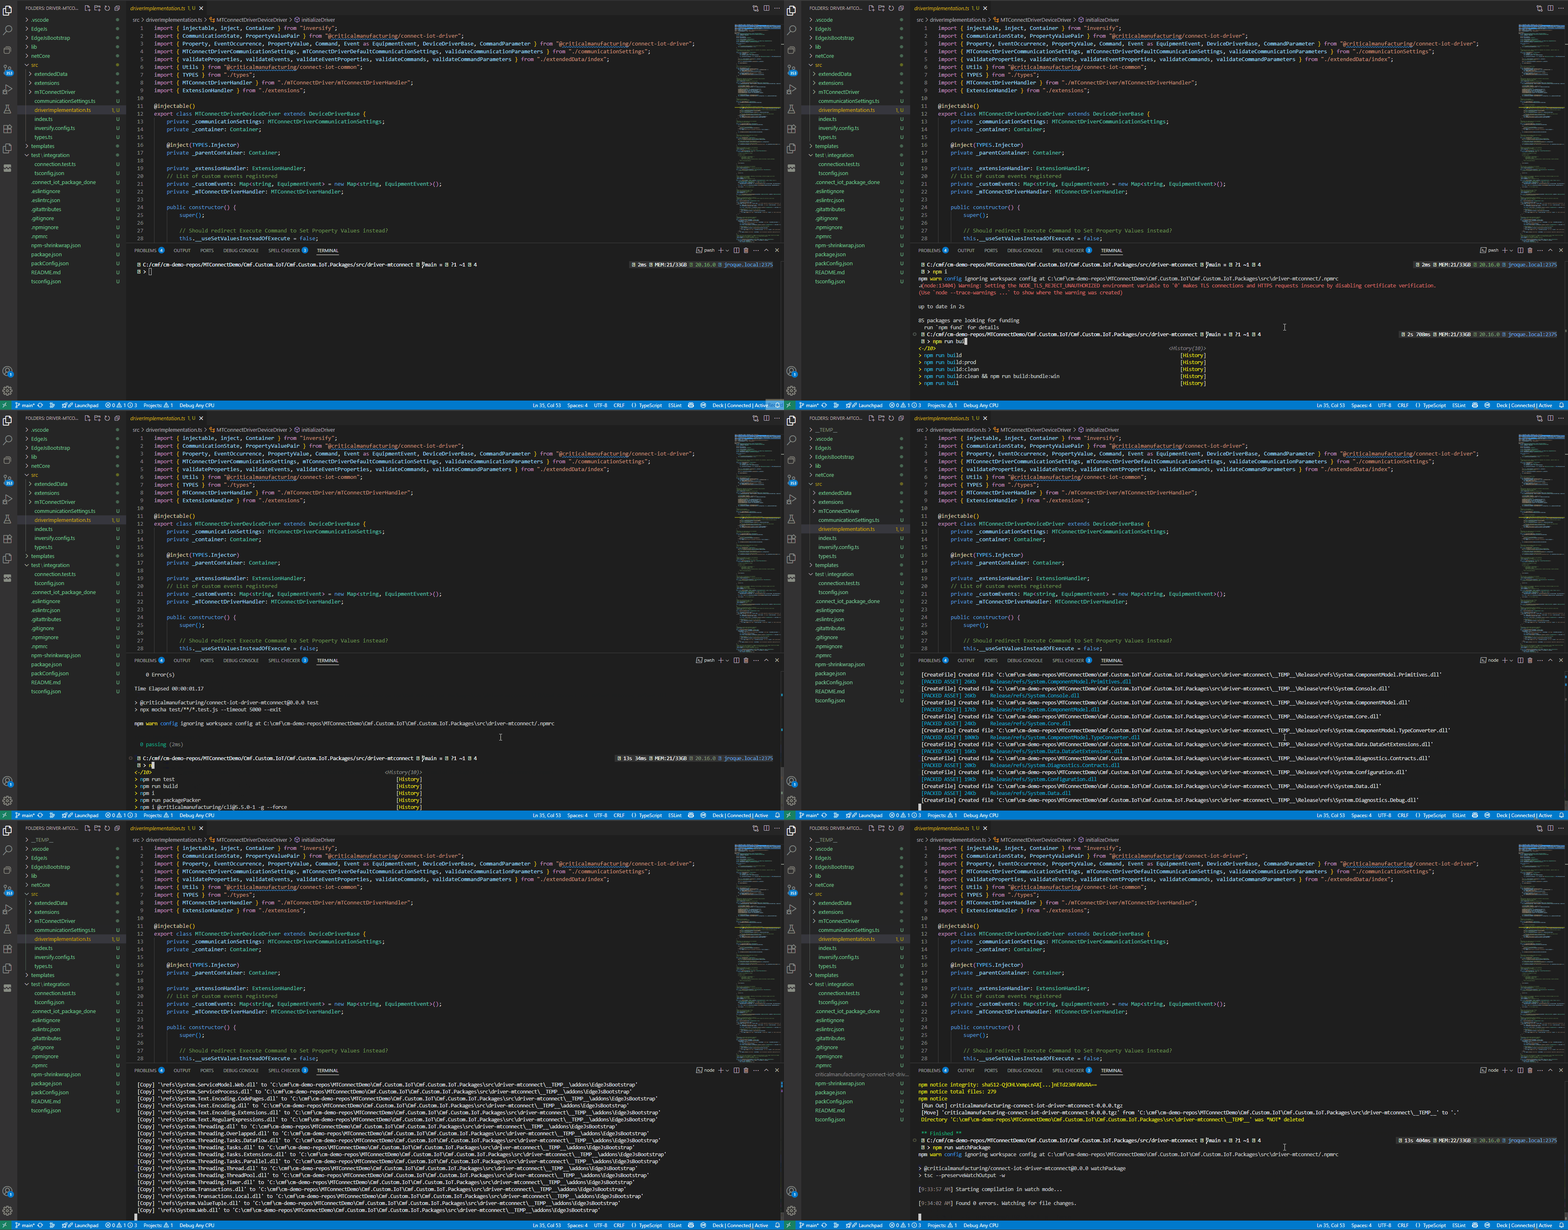
With npm i to install the npm packages, npm run build to build the code, npm run test to test the code and npm run packagePacker to create a .tgz file with the driver bundled. Additionally, we also have support for the use of watchers that continuously build the code on changes, like npm run watchPackage, with this after every change to your source code, the code will automatically compile.
Defining our Settings for the UI#
A good place to start the driver development is to start defining what are the settings the user will need to interact with.
For the driver, we will need:
- address - ip or hostname of the MTConnect Agent
- port - port of the Agent
- device - we can hook our whole implementation to a particular device and then have this as a wrapper for all requests
The Device is very helpful as it can help us tie in with MES Resources, or MES durable materials, etc. If the MTConnect agent is servicing a lot of resources a filter by device may make it easier to interact with the data. Our client will only connect to one MTConnect Adapter.
In order for these settings to be available in the UI, we will need them to be part of our driver package.json.
"parameters": [
  {
    "name": "netCoreSdkVersion",
    "label": ".Net Core SDK Version",
    "description": "Set the .net core SDK version to use, when multiple are installed in the system where the driver is running. Leave empty to ignore this setting.",
    "type": "string",
    "defaultValue": ""
  },
  {
    "name": "address",
    "label": "MTConnect Agent Address",
    "description": "Ip or Hostname of the MTConnect Agent",
    "type": "string",
    "defaultValue": ""
  },
  {
    "name": "port",
    "label": "MTConnect Agent port",
    "description": "Port of the MTConnect Agent (leave as -1 for it to not be added)",
    "type": "integer",
    "defaultValue": -1
  },
  {
    "name": "device",
    "label": "MTConnect Device",
    "description": "When specifying a device, all MTConnect interactions will filter by device.",
    "type": "string",
    "defaultValue": ""
  }
],
From analyzing the Protocol, we already know that we have a predefined set of possible endpoints, we can map those as available command types.
"command": [
  {
    "name": "mtConnectCommandType",
    "label": "Command Type",
    "description": "Types of MTConnect commands that we are able to use.",
    "type": "enum",
    "values": [
      "Probe",
      "Current",
      "Sample",
      "Assets",
      "Asset"
    ],
    "defaultValue": "Probe"
  }
],
The MTConnect.NET library that we are using on start, already emits information about the probe data, current data and starts a sampling process. We will see this in detail later, but for now we can create the metadata for our events.
"event": [
  {
    "name": "mtConnectEventType",
    "label": "Event Type",
    "description": "Types of MTConnect events that we are able to use.",
    "type": "enum",
    "values": [
      "Probe",
      "Current",
      "Sample",
      "Assets"
    ],
    "defaultValue": "Probe"
  }
],
Lastly, the MTConnect responses have two big fields, one which has Header information and another that has Device information, but they also have a lot of other fields inside the Device and the Header. So, let’s add a notion of expression to our event properties. With expressions our users can create their own JSONata expression, to retrieve the information from the JSON, that they wish. In order to achieve this parsing, we will later on use JSONata, for now, bear in mind this concept of expressions.
"property": [
  {
    "name": "expression",
    "label": "Expression",
    "description": "JSONata Expression to extract property from the JSON structure",
    "type": "string",
    "defaultValue": ""
  }
]
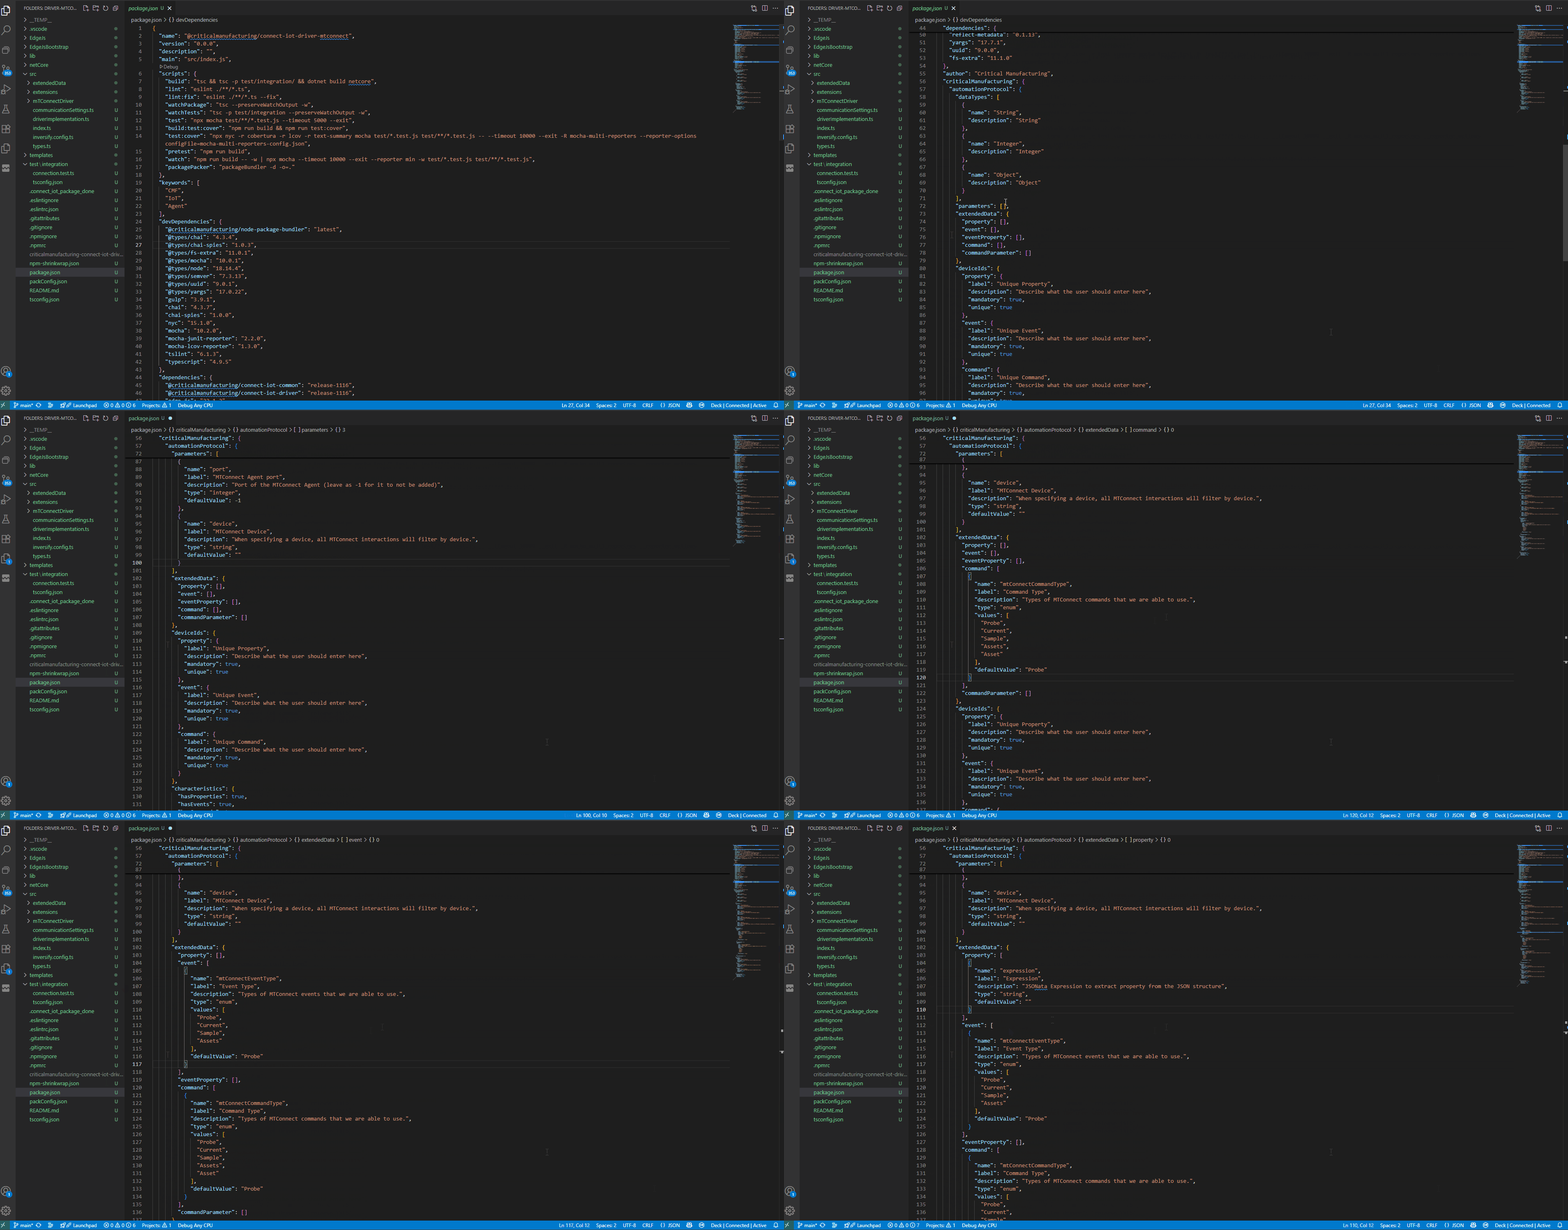
Right now we can already create a package with this skeleton and uploaded it to the MES UI.
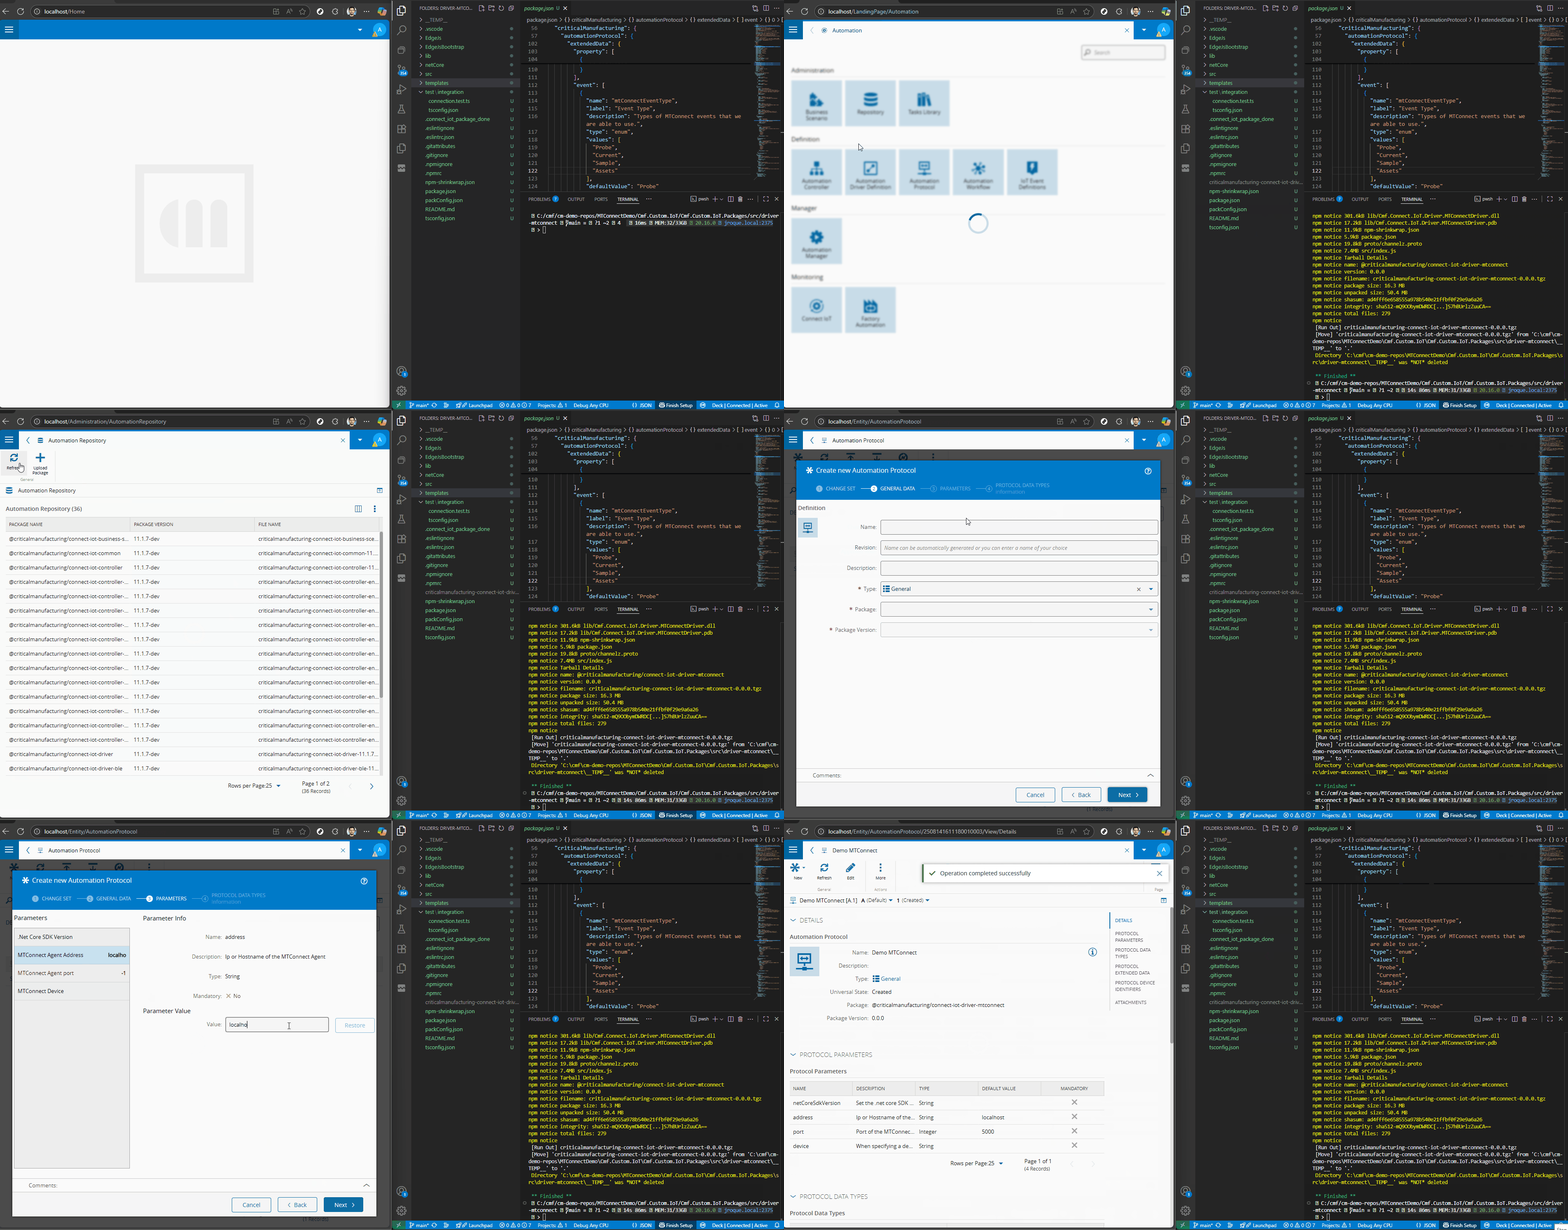
In the UI we are able to create an Automation Protocol with all our communication settings.
Defining our Settings for the Driver#
The package.json will describe the visualization settings for the UI, we can now define them for our driver.
In the communicationSettings.ts we can now declare our settings.
export interface MTConnectCommunicationSettings {
    // Add driver specific settings here
    /** Set the .net core SDK version to use, when multiple are installed in the system where the driver is running. Leave empty to ignore this setting. */
    netCoreSdkVersion: string;

    // MTConnect Address
    address: string;
    // MTConnect Address Port
    port: number;
    // MTConnect Device
    device: string;

    // Common/driver WS settings
    heartbeatInterval: number;
    setupTimeout: number;
    intervalBeforeReconnect: number;
    connectingTimeout: number;
};

/** Default Communication Settings */
export const mTConnectDefaultCommunicationSettings: MTConnectCommunicationSettings = {
    // Add driver specific default settings here
    /** Set the .net core SDK version to use, when multiple are installed in the system where the driver is running. Leave empty to ignore this setting. */
    netCoreSdkVersion: "",

    // Default MTConnect Address
    address: "localhost",
    // Default MTConnect Address Port
    port: 5000,
    // Default MTConnect Device
    device: "",

    // Common/driver WS settings
    heartbeatInterval: 30000,
    setupTimeout: 10000,
    intervalBeforeReconnect: 5000,
    connectingTimeout: 30000,
};
When the setCommunicationConfiguration is invoked in the lifecycle of the driver it will reconcile what was defined in the task Equipment Configuration, the package.json and the communication settings.
/**
 * Notification regarding the communication parameters being available.
 * Validate the integrity of the values
 * Note: Called by the driverBase
 * @param communication Communication settings object
 */
public async setCommunicationConfiguration(communication: any): Promise<void> {
    this._communicationSettings = Object.assign({}, mTConnectDefaultCommunicationSettings, communication);

    // eslint-disable-next-line
    const pJson = require("../package.json");
    validateCommunicationParameters(pJson, this._communicationSettings);

    // Prepare the extended data
    validateProperties(pJson, this.configuration.properties);
    validateEvents(pJson, this.configuration.events);
    validateEventProperties(pJson, this.configuration.events);
    validateCommands(pJson, this.configuration.commands);
    validateCommandParameters(pJson, this.configuration.commands);

    // Initialize assembly
    this._mTConnectHandler.setPackageJson(pJson);
    this._mTConnectHandler.setConfiguration(this.configuration, this._communicationSettings);
}
MTConnect .Net Logic#
In the driver dotnet project, we can now import our dependency to MTConnect.NET-HTTP, to communicate with the MTConnect Agent and to MTConnect.NET-XML to parse the messages.
Costura.Fody#
In the visual studio project our scaffolding creates there’s a file called FodyWeavers.xml, Costura.Fody allows us to merge all our dependencies into a single .dll file. This is not mandatory, but it allows us to simplify and better manage our bundles. There are some downsides, particularly if the there’s some of these dlls that is trying to load by reflection, example here was due to this issue.
<Weavers xmlns:xsi="http://www.w3.org/2001/XMLSchema-instance" xsi:noNamespaceSchemaLocation="FodyWeavers.xsd">
  <Costura IncludeAssemblies="Newtonsoft.Json | MTConnect.NET-HTTP | MTConnect.NET-XML | MTConnect.NET-Common" />
</Weavers>
Costura Fody file, to include our dependencies.
Communication Settings#
In the dotnet layer we will also need to have a match to the communication settings. The template generates the CommunicationSettings class at /DriverObjects/CommunicationSettings.cs.
We will add the settings:
/// <summary>IP address of the MTConnect Agent</summary>
public string Address { get; set; } = "";

/// <summary>Port of the MTConnect Agent</summary>
public int Port { get; set; } = 5000;

/// <summary>Device</summary>
public string Device { get; set; } = null;
And the loaders from the settings received from the nodejs layer:
public void Load(IDictionary<string, object> settings)
{
    NetCoreSdkVersion = settings.Get("netCoreSdkVersion", NetCoreSdkVersion);
    Address = settings.Get("address", Address);
    Port = settings.Get("port", Port);
    Device = settings.Get("device", Device);
    ConnectingTimeout = settings.Get("connectingTimeout", ConnectingTimeout);
}
MTConnectHandler .NET#
In the MTConnectHandler.cs is where we will have our main logic, interacting with all the hooks provided by the mTConnectHandler.ts.
There are 2 main entrypoints related with the driver lifecycle:
- Connect
- Disconnect
There are 3 entrypoints related with the driver events:
- RegisterEvent - Register event to register in the Server
- UnregisterEvent - Unregister event from the Server
- RegisterEventHandler - Register a handler to receive the event occurrence, mostly used for log, connect, disconnect
There are 3 additional entrypoints:
- ExecuteCommand - Register event to register in the Server
- GetValues - Perform a get of property values
- SetValues - Perform a set of property values
For this use case we will have events and commands and we will not need get property values or set property values.
Connect#
Here is where we will handle all that is needed to connect to the MTConnect Agent.
The first action is loading the settings and destroying any previous connections.
public async Task<object> Connect(dynamic inputValues)
{
    IDictionary<string, object> input = (IDictionary<string, object>)inputValues;

    Shared.Settings.Load(input);
    // Dump configuration for debug purposes
    Shared.Log.Debug("Communication parameters: {0}", Shared.Settings.Dump());

    // Destroy all previous connections
    this.DestroyConnection();

    #region Connect

    var address = Shared.Settings.Address ?? "127.0.0.1";
    var port = Shared.Settings.Port;
    var device = Shared.Settings.Device;

    this.client = port != -1
        ? new MTConnectHttpClient(address, port, device, DocumentFormat.XML)
        : new MTConnectHttpClient(address, device, DocumentFormat.XML);

    var isClientStarted = false;
(...)
Notice that here we are already instantiating the MTConnectHttpClient with the provided settings.
The second action is to create the handlers for all the events being surfaced by the MTConnect library.
We have lifecycle events.
#region lifecycle events

this.client.ClientStarted += (s, response) =>
{
    isClientStarted = true;
    Shared.Log.Info("MTConnect Client has Started");
};

this.client.ClientStopped += (s, response) =>
{
    Shared.Log.Warning("Client has stopped");
    this.Disconnect(null);
};

#endregion
Then error handling events:
#region error handling events

this.client.MTConnectError += (s, response) =>
{
    Shared.Log.Warning($"MTConnect error {response.Errors.FirstOrDefault()}");
};

this.client.ConnectionError += (s, response) =>
{
    Shared.Log.Warning("Client connection error");
    this.Disconnect(null);
};

this.client.InternalError += (s, response) =>
{
    Shared.Log.Warning($"Internal Error: {response.Message}");
};

this.client.FormatError += (s, response) =>
{
    Shared.Log.Warning($"Format Error: {response.Messages?.FirstOrDefault()}");
};

#endregion
Finally, we have events related with the start of the MTConnect client. First, we need to understand what is happening when we do a Start. In the MTConnect library that we are using when we do a start we will perform a set of commands, that will surface as events.
Let’s take a look at the start cycle:
flowchart TD
    A[Start Worker] --> B[Probe Request: GetProbeAsync]
    B -->|Probe == null| Z[Delay & Retry]

    B -->|Probe != null| C[Process Probe Endpoint]

    C --> D{Assets Available?}
    D -- Yes --> E[Assets Request: GetAssetsAsync]
    E --> F[AssetsReceived Event]
    D -- No --> G[Continue]

    F --> G
    G --> H[Current Request: GetCurrentAsync]
    H -->|Current != null| I[Process Current Endpoint]
    I --> J[Start Sample Stream]
    J --> K[Process Sample Endpoint Continuously]
Now let’s look at the event handlers:
#region events

this.client.ProbeReceived += (s, response) =>
{
    Shared.Log.Debug($"Probe Received Event {response.Header.InstanceId}");
    Shared.EventDispatcher.TriggerEvent(new EventOccurrence(EventType.Probe, response.Header, response.Devices));
};

this.client.CurrentReceived += (s, response) =>
{
    Shared.Log.Debug($"Current Received Event {response.Header.InstanceId}");
    Shared.EventDispatcher.TriggerEvent(new EventOccurrence(EventType.Current, response.Header, response.Streams, response.GetObservations()));
};

this.client.SampleReceived += (s, response) =>
{
    Shared.Log.Debug($"Sample Received Event {response.Header.InstanceId}");
    Shared.EventDispatcher.TriggerEvent(new EventOccurrence(EventType.Sample, response.Header, response.Streams, response.GetObservations()));
};

this.client.AssetsReceived += (s, response) =>
{
    Shared.Log.Debug($"Assets Received Event {response.Header.InstanceId}");
    Shared.EventDispatcher.TriggerEvent(new EventOccurrence(EventType.Assets, response.Header, response.Assets));
};

#endregion events
We can see a match between the event handlers and the requests done on the start cycle. The Sample Received, will be the only one being continually streamed.
The EventOccurrence class will be responsible for transforming the driver information and types into the structure the nodejs driver is able to parse and understand. Note that this is the first translation between the machine and Connect IoT, so we need to create a structure that avoids data loss, but has all the helpful information and format for our Connect IoT Equipment Events. Sometimes this is not a simple decision as we may not know what our user will require.
public EventOccurrence(EventType eventId, dynamic header, dynamic body, dynamic observations = null)
{
    this.EventId = eventId;
    this.Header = header;
    this.Devices = body;
    this.Observations = observations;
    this.OccurrenceTimeStamp = DateTime.UtcNow;
}

public dynamic ToJson()
{
    Newtonsoft.Json.Formatting format = Newtonsoft.Json.Formatting.None;
    var settings = new Newtonsoft.Json.JsonSerializerSettings();
    settings.TypeNameHandling = Newtonsoft.Json.TypeNameHandling.None;
    settings.ReferenceLoopHandling = Newtonsoft.Json.ReferenceLoopHandling.Ignore;

    return (new
    {
        messageId = this.MessageId,
        eventId = this.EventId.ToString(),
        values = new
        {
            values = new
            {
                header = Newtonsoft.Json.JsonConvert.SerializeObject(this.Header, format, settings),
                devices = Newtonsoft.Json.JsonConvert.SerializeObject(this.Devices, format, settings),
                observations = Newtonsoft.Json.JsonConvert.SerializeObject(this.Observations, format, settings),
            }
        },
        occurrenceTimeStamp = this.OccurrenceTimeStamp,
    });
}
Lastly, we have the start of the MTConnect Client.
Shared.Log.Debug("Starting MTConnect Client");

try
{
    this.client.Start();
    Utilities.WaitFor(Shared.Settings.ConnectingTimeout, "MTConnect Client didn't start", () => isClientStarted);
}
catch (Exception ex)
{
    this.Disconnect(null);
}
For the MTConnect driver only these boot up events and the sampling event, will be handled as events, everything else will be commands.
Disconnect#
The disconnect will make sure to clean all the elements of the driver that were instantiated in th start cycle.
/// <summary>Disconnect from the equipment</summary>
/// <param name="inputValues">Not used</param>
/// <returns>Boolean indicating result</returns>
public async Task<object> Disconnect(dynamic inputValues)
{
    IDictionary<string, object> input = (IDictionary<string, object>)inputValues;

    this.DestroyConnection();

    m_DisconnectedHandler?.Invoke(new { });
    return true;
}

private void DestroyConnection()
{
    if (this.client != null)
    {
        Shared.Log.Info("Destroying (possible) previously connection and unsubscribing all events...");

        try
        {
            Shared.EventDispatcher.DestroyEventHandlers();
            this.client.Stop();
        }
        catch (Exception e)
        {
            Shared.Log.Error($"Exception while disconnecting previous MTConnect client: {e.Message}");
        }
    }
}
Each driver may have different connect and disconnect routines. For MTConnect, we will destroy all the event listeners and stop the client.
ExecuteCommand#
Commands are the fundamental piece of MTConnect. They will be how the user through Connect IoT is able to perform HTTP Requests to the Agent.
We will support, the following commands:
- Probe
- Assets
- Asset
- Current
public async Task<object> ExecuteCommand(dynamic inputValues)
{
  IDictionary<string, object> input = (IDictionary<string, object>)inputValues;

  Newtonsoft.Json.Formatting format = Newtonsoft.Json.Formatting.None;
  var settings = new Newtonsoft.Json.JsonSerializerSettings
  {
      TypeNameHandling = Newtonsoft.Json.TypeNameHandling.None,
      ReferenceLoopHandling = Newtonsoft.Json.ReferenceLoopHandling.Ignore
  };

  return Newtonsoft.Json.JsonConvert.SerializeObject(mtConnectCommand(input), format, settings);

  object mtConnectCommand(IDictionary<string, object> input)
  {
      CommandReceived commandReceived = new(input);

      switch (commandReceived.CommandType)
      {
          case CommandType.Probe:
              {
                  if (commandReceived.Device != null && Shared.Settings.Device != commandReceived.Device)
                  {
                      var probeClient = new MTConnectHttpProbeClient(this.client.Authority, commandReceived.Device)
                      {
                          Timeout = this.client.Timeout,
                          ContentEncodings = this.client.ContentEncodings,
                          ContentType = this.client.ContentType
                      };
                      return probeClient.GetAsync(CancellationToken.None).Result;
                  }
                  return this.client.GetProbeAsync().Result;
              }
          case CommandType.Assets:
              {
                  return this.client.GetAssetsAsync().Result;
              }
          case CommandType.Asset:
              {
                  return this.client.GetAssetAsync(commandReceived.Asset).Result;
              }
          case CommandType.Current:
              {
                  if (commandReceived.Device != null && Shared.Settings.Device != commandReceived.Device)
                  {
                      var currentClient = new MTConnectHttpCurrentClient(this.client.Authority, commandReceived.Device, path: commandReceived.Path, at: commandReceived.At)
                      {
                          Timeout = this.client.Timeout,
                          ContentEncodings = this.client.ContentEncodings,
                          ContentType = this.client.ContentType
                      };
                      return currentClient.GetAsync(CancellationToken.None).Result;
                  }
                  return this.client.GetCurrentAsync(commandReceived.At, commandReceived.Path).Result;
              }
            case CommandType.Sample:
                {
                    if (commandReceived.Device != null && Shared.Settings.Device != commandReceived.Device)
                    {
                        var sampleClient = new MTConnectHttpSampleClient(this.client.Authority, commandReceived.Device, path: commandReceived.Path, from: commandReceived.From, to: commandReceived.To, count: commandReceived.Count)
                        {
                            Timeout = this.client.Timeout,
                            ContentEncodings = this.client.ContentEncodings,
                            ContentType = this.client.ContentType
                        };
                        return sampleClient.GetAsync(CancellationToken.None).Result;
                    }
                    return this.client.GetSampleAsync(from: commandReceived.From, to: commandReceived.To, count: commandReceived.Count, path: commandReceived.Path).Result;
                }
          default: throw new Exception("Unknown Command Type");
      }
  }
}
Note that our code is split into three parts, serializing our inputs, executing a command and serializing the command output.
The CommandReceived class was a class created to parse the command into a known structure. The output of a command in Connect IoT is not really contract bound, so we don’t need to translate into a common structure.
Driver Implementation#
The driver implementation is a key part of our driver nodejs layer. In the driver implementation we will focus on some key methods.
initializeDriver#
One of the features that we will implement, due to the complex structures the MTConnect is able to provide, is a way to be able create and define properties that are subsets of this data.
In order to do that we will use JSONata expressions.
JSONata is a lightweight query and transformation language designed specifically for JSON data. It allows you to filter, map, and reshape JSON with a simple yet expressive syntax, similar to how XPath works for XML. With JSONata, you can extract values, perform calculations, apply conditional logic, and restructure data without writing verbose code. Because it is declarative, JSONata expressions are concise, readable, and reusable, making them a powerful tool to handle complex JSON transformations efficiently.
In our initialize method we will import our jsonata dependency.
public async initializeDriver(): Promise<void> {
  // JSONata is an ESM package so we need to loaded it
  this._jsonata = await import("jsonata");
  (...)
onEventOccurrence#
In the onEventOccurrence method we will handle our event and emit it to the controller if there are any matching event registrations. The controller will then provide the event to all the subscribed tasks.
private async onEventOccurrence(
    eventId: string,
    eventOccurrence: {
        values: { values: object };
        occurrenceTimeStamp: Date
    }): Promise<void> {

    let evtOccurValue = new Map<string, any>(Object.entries(eventOccurrence.values.values));

    const registeredEvents = Array.from(this._customEvents.values()).filter((evt: EquipmentEvent) => evt.deviceId === eventId && evt.isEnabled === true);
    if (registeredEvents.length > 0) {
        if (evtOccurValue) {
            for (const evt of registeredEvents) {
                this._extensionHandler.handleEventOccurrence(
                    evt.name,
                    eventOccurrence.occurrenceTimeStamp,
                    await this.parseEventProperties(evt, evtOccurValue));
            }
        }
    }

    const event = this.configuration.events.find(e => e.systemId === eventId);
    if (event && event.isEnabled) {
        const results: PropertyValue[] = [];
        evtOccurValue = await this.parseEventProperties(event, evtOccurValue);

        // Fill results and check if the trigger properties have been the cause of the event occurrence
        if (evtOccurValue) {
            for (const eventProperty of event.properties) {
                if (evtOccurValue.has(eventProperty.deviceId)) {
                    const value: any = evtOccurValue.get(eventProperty.deviceId);

                    const propertyValue: PropertyValue = {
                        propertyName: eventProperty.name,
                        originalValue: value,
                        value: this.convertValueFromDevice(value, eventProperty.deviceType, eventProperty.dataType),
                    };

                    results.push(propertyValue);
                } else {
                    throw new Error(`Value for property '${eventProperty.name}' was not received in the event data`);
                }
            }
        }

        // Raise event to controller
        const occurrence: EventOccurrence = {
            timestamp: new Date(),
            eventDeviceId: event.deviceId,
            eventName: event.name,
            eventSystemId: event.systemId,
            propertyValues: results
        };

        this.emit("eventOccurrence", occurrence);
    }
}
There are two major branches in the code, the first handles template events and the second handles driver definition events.
Template Events
Are events that are defined by the driver. In other words they are events that the user does not need to define but the driver itself will come with them defined out of the box.
The extensions layer will hold all that is required for the driver to be able to have template events. In the driver implementation we must route the events to the templates, the driver definition or both.
The templates folder will hold all the template commands, events and properties.
In this driver example, we will retrieve the values of the event occurrence, check if there is any template event and call the extension handler to emit the event occurrence:
let evtOccurValue = new Map<string, any>(Object.entries(eventOccurrence.values.values));

const registeredEvents = Array.from(this._customEvents.values()).filter((evt: EquipmentEvent) => evt.deviceId === eventId && evt.isEnabled === true);
if (registeredEvents.length > 0) {
    if (evtOccurValue) {
        for (const evt of registeredEvents) {
            this._extensionHandler.handleEventOccurrence(
                evt.name,
                eventOccurrence.occurrenceTimeStamp,
                await this.parseEventProperties(evt, evtOccurValue));
        }
    }
}
Driver Definition
Are events that are defined by the user. These are events that are not provided by the driver itself but are declared and constructed by the user using the MES entity Automation Driver Definition.
In this driver example, we will retrieve the values of the event occurrence, check if there is any driver definition event and emit the event occurrence:
const event = this.configuration.events.find(e => e.systemId === eventId);
if (event && event.isEnabled) {
    const results: PropertyValue[] = [];
    evtOccurValue = await this.parseEventProperties(event, evtOccurValue);

    // Fill results and check if the trigger properties have been the cause of the event occurrence
    if (evtOccurValue) {
        for (const eventProperty of event.properties) {
            if (evtOccurValue.has(eventProperty.deviceId)) {
                const value: any = evtOccurValue.get(eventProperty.deviceId);

                const propertyValue: PropertyValue = {
                    propertyName: eventProperty.name,
                    originalValue: value,
                    value: this.convertValueFromDevice(value, eventProperty.deviceType, eventProperty.dataType),
                };

                results.push(propertyValue);
            } else {
                throw new Error(`Value for property '${eventProperty.name}' was not received in the event data`);
            }
        }
    }

    // Raise event to controller
    const occurrence: EventOccurrence = {
        timestamp: new Date(),
        eventDeviceId: event.deviceId,
        eventName: event.name,
        eventSystemId: event.systemId,
        propertyValues: results
    };

    this.emit("eventOccurrence", occurrence);
}
Note that both code paths call a method parseEventProperties. This method is responsible for calculating the JSONata expression from each property and extracting the value.
/**
 * Using jsonata expression construct the event occurrence
 * @param evt Event definition
 * @param evtOccurValue Event Occurrence
 * @param values
 * @returns
 */
private async parseEventProperties(evt: EquipmentEvent, evtOccurValue: Map<string, any>): Promise<Map<string, any>> {
  const values = new Map<string, any>();
  for (const prop of evt.properties) {
      if (prop.extendedData.expression != null && prop.extendedData.expression != "") {

          function mapToParsedObject(map: Map<string, string>): Record<string, any> {
              return Object.fromEntries(
                  Array.from(map.entries()).map(([key, value]) => {
                      try {
                          return [key, JSON.parse(value)];
                      } catch {
                          return [key, value]; // fallback if it's not valid JSON
                      }
                  })
              );
          }

          await (this._jsonata(prop.extendedData.expression) as Expression).evaluate(mapToParsedObject(evtOccurValue), undefined, (error, result) => {
              if (error != null) {
                  this.logger.error(`JSONata evaluation failed for property '${prop.name}' on event '${evt.name}': ${error.message}`);
              } else {
                  values.set(prop.deviceId, result);
              }
          });
      }
  }
  return values;
}
Templates#
The final part of our driver is to create template events, so our users start already with a set of events and commands they can use.
First, let’s create our properties.
{
  "property": [
    {
      "Name": "header",
      "Description": "Header Data",
      "DevicePropertyId": "header",
      "DataType": "Object",
      "IsWritable": true,
      "IsReadable": true,
      "AutomationProtocolDataType": "Object",
      "ExtendedData": {
        "expression": "header"
      }
    },
    {
      "Name": "devices",
      "Description": "Devices Data",
      "DevicePropertyId": "devices",
      "DataType": "Object",
      "IsWritable": true,
      "IsReadable": true,
      "AutomationProtocolDataType": "Object",
      "ExtendedData": {
        "expression": "devices"
      }
    },
    {
      "Name": "assets",
      "Description": "Assets Data",
      "DevicePropertyId": "devices",
      "DataType": "Object",
      "IsWritable": true,
      "IsReadable": true,
      "AutomationProtocolDataType": "Object",
      "ExtendedData": {
        "expression": "assets"
      }
    },
    {
      "Name": "observations",
      "Description": "Observations Data",
      "DevicePropertyId": "observations",
      "DataType": "Object",
      "IsWritable": true,
      "IsReadable": true,
      "AutomationProtocolDataType": "Object",
      "ExtendedData": {
        "expression": "observations"
      }
    }
  ]
}
Each property will have particular names and datatypes. One characteristic that we added in this driver is the extended data for the expression.
We can now also add our events, let’s provide one as an example:
{
  "event": [
    {
      "Name": "SampleReceived",
      "Description": "SampleReceived will start producing sample results",
      "DeviceEventId": "Sample",
      "IsEnabled": true,
      "ExtendedData": {},
      "EventProperties": [
        {
          "Property": "header",
          "Order": 1,
          "ExtendedData": {}
        },
        {
          "Property": "devices",
          "Order": 2,
          "ExtendedData": {}
        },
        {
          "Property": "observations",
          "Order": 3,
          "ExtendedData": {}
        }
      ]
    }
  ]
}
Finally, we can also provide the commands. Let’s see a probe command as an example.
{
  "command": [
    {
      "Name": "Probe Command",
      "Description": "Probe Command",
      "DeviceCommandId": "ProbeCommand",
      "ExtendedData": {
        "commandType": "Probe"
      },
      "CommandParameters": [
        {
          "Name": "device",
          "DataType": "String",
          "AutomationProtocolDataType": "String"
        }
      ]
    }
  ]
}
Note that for commands, the command type is very important as it will be what is matched in the MTConnectHandler.cs class in the ExecuteCommand method.
Running It#
Now that we finished our MTConnect driver we can see it working.
Download and Run#
First, let’s generate a new package driver and create a driver definition and an automation controller.
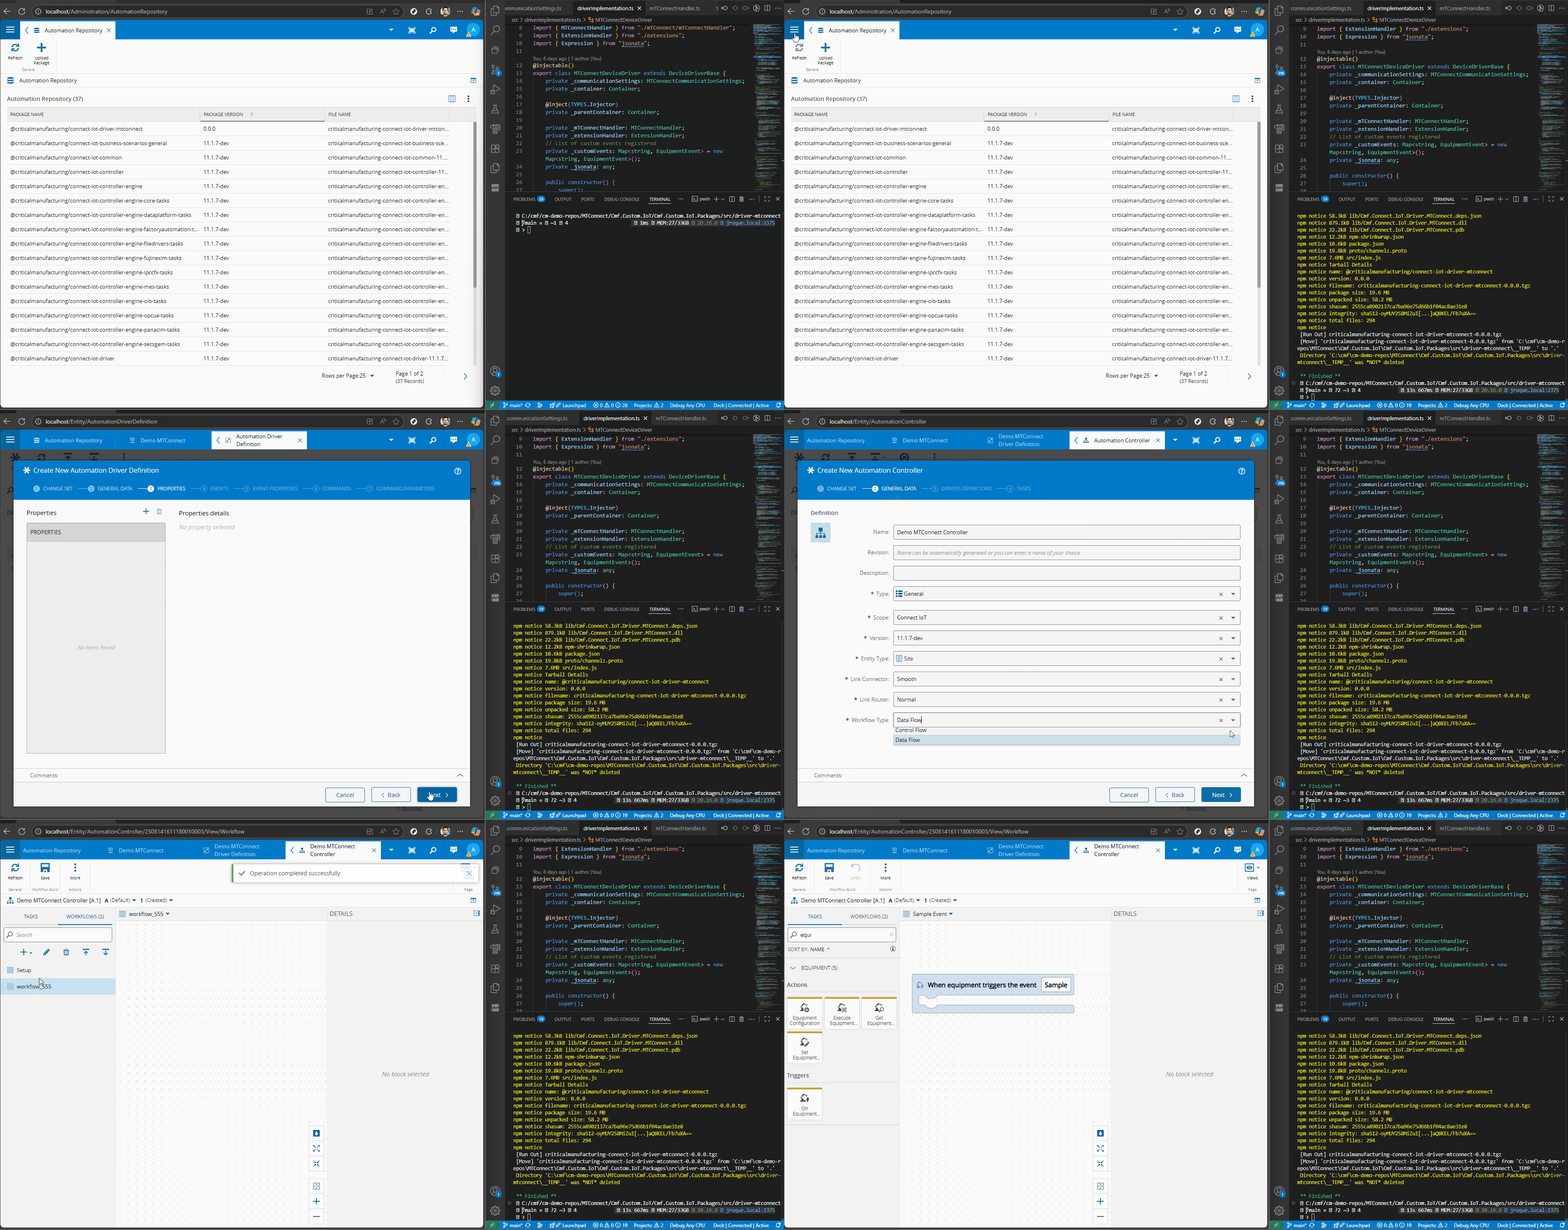
Here we can see how we are able to override packages of the same version, creating a very fast development lifecycle. Also, another important detail is that without providing any driver definition I am able to drag and drop an On Equipment Event task and have right away events available. These events come from the templates defined in the driver.
Now let’s connect the controller to an Automation Manager.
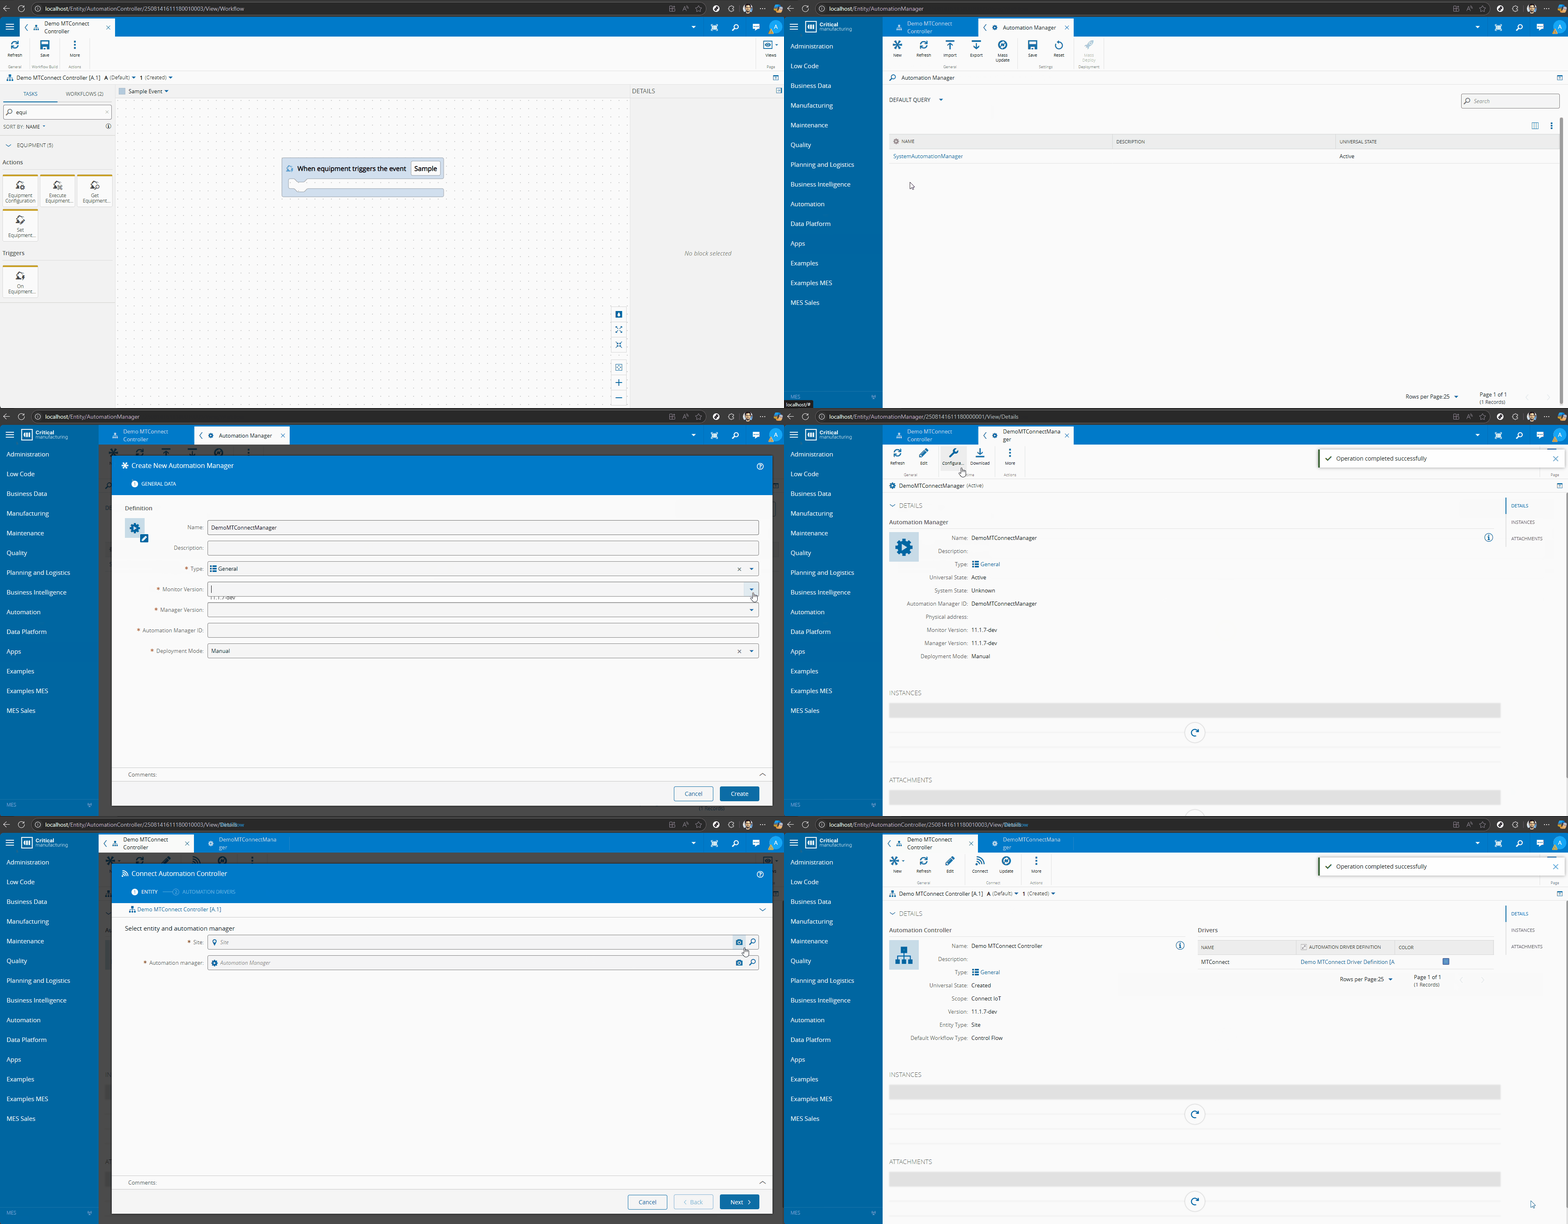
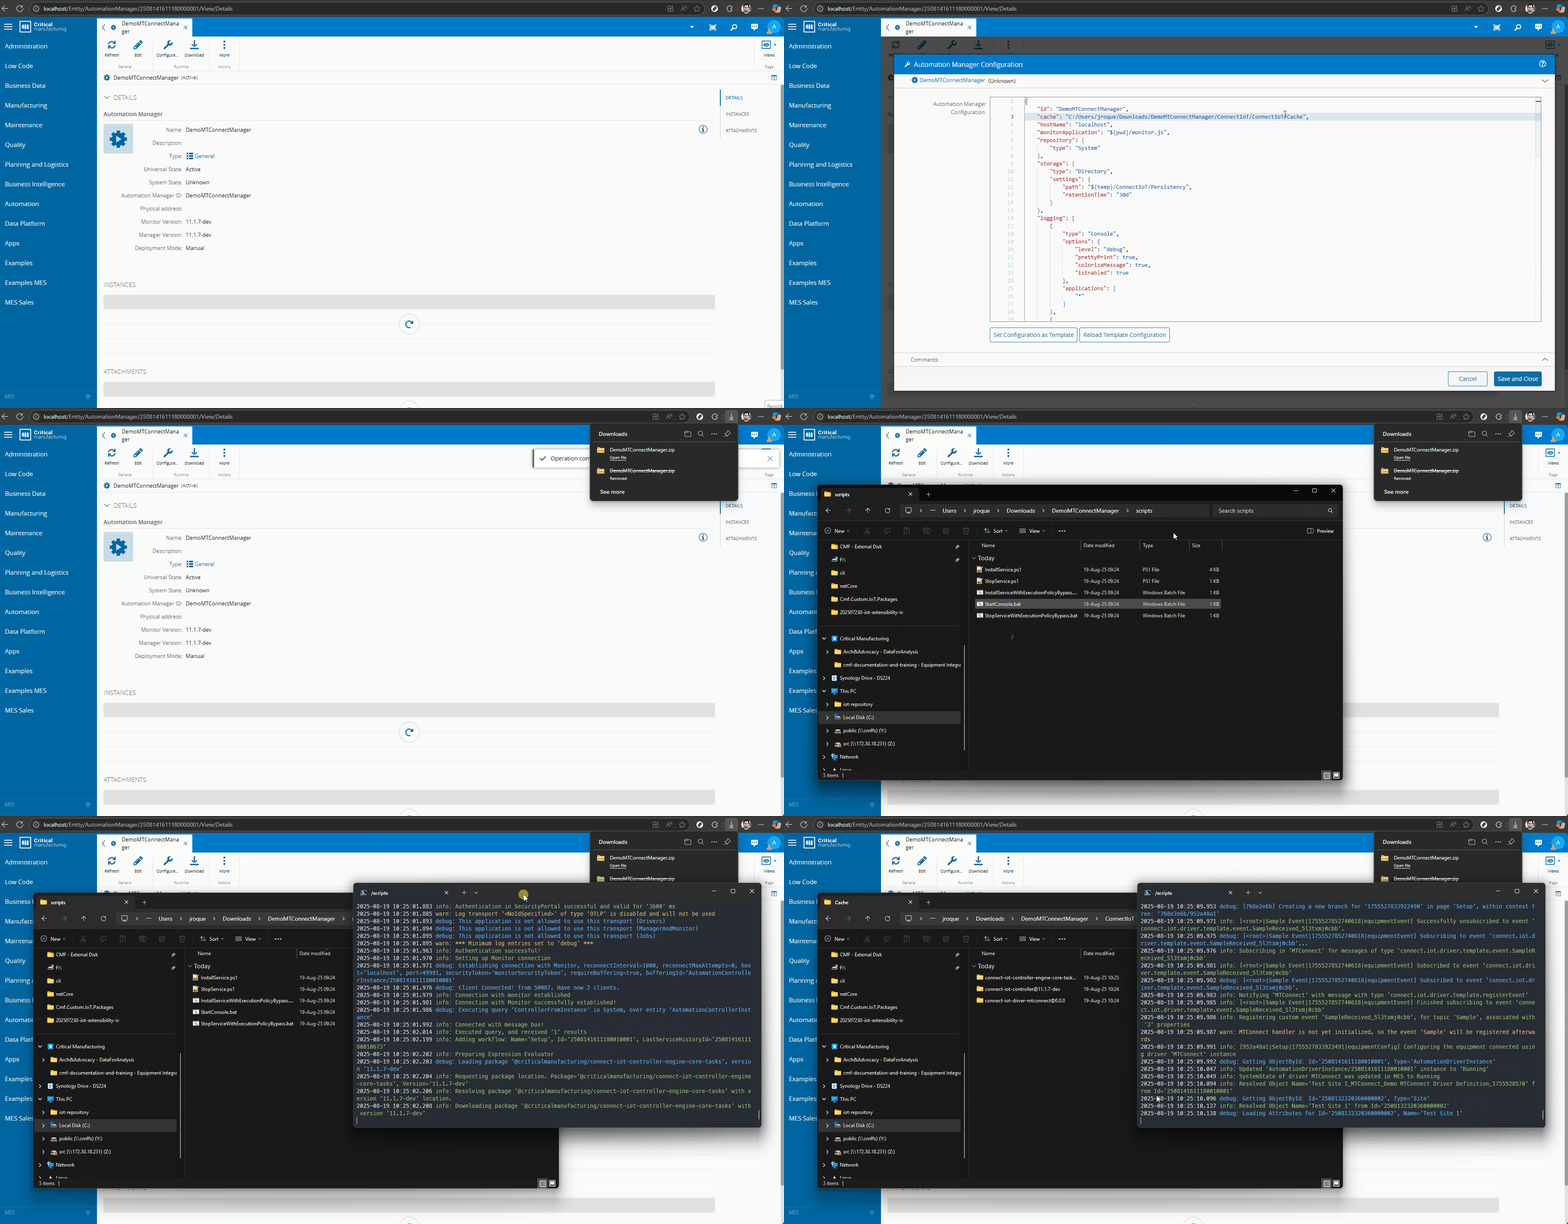
Now we can download and start the manager. Notice that the manager in the first run will download the packages from the repository and store them in the local cache.
Debugging#
We have now done a start with the automation manager and downloaded the packages. In order to debug we can find more information here.
The first step is creating a link between the manager cache and your local package.
mklink /j connect-iot-driver-mtconnect@0.0.0 C:/cmf/cm-demo-repos/MTConnect/Cmf.Custom.IoT/Cmf.Custom.IoT.Packages/src/driver-mtconnect
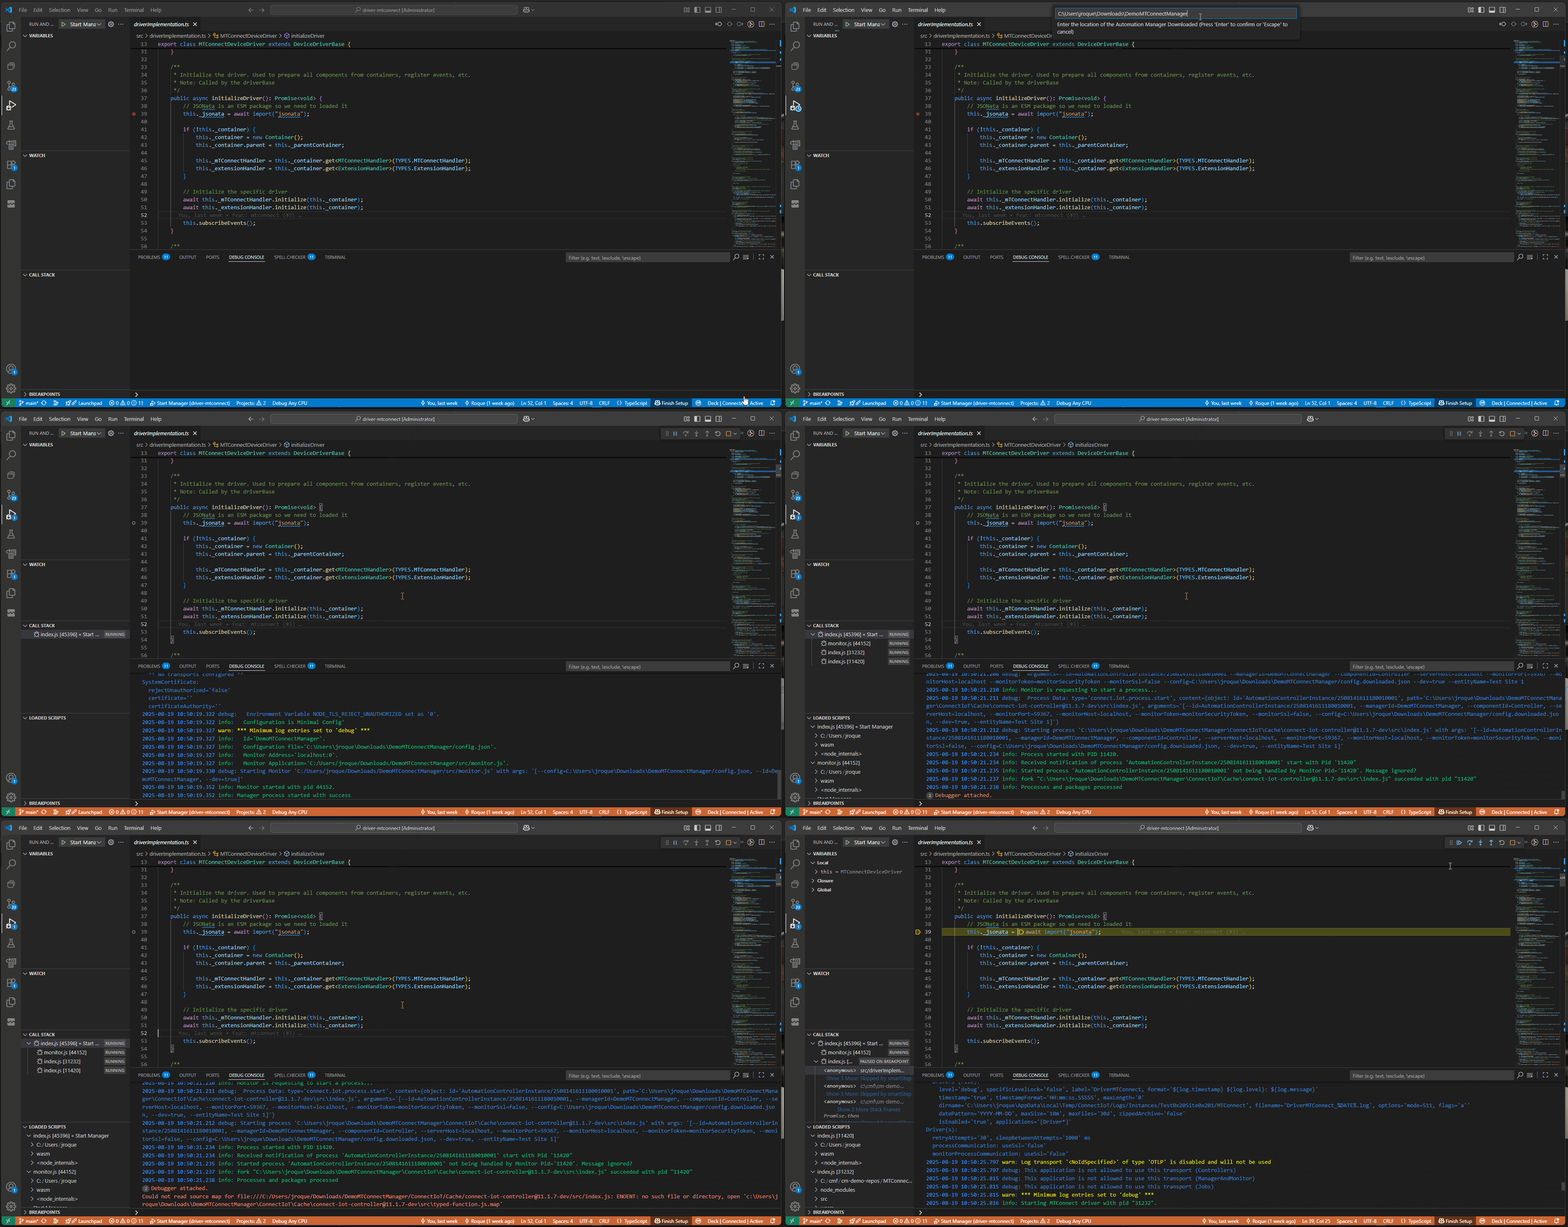
Now all the typings will be available for the runtime. We can launch the manager through the driver vscode, simply by providing the manager location. This way we are able to debug the nodeJs part of the driver.
In drivers that have a .Net component we need to try a different approach.
We can start all the components manually and then start the driver through the visual studio IDE.
In the src folder of the manager we can start the monitor.
node monitor.js --dev --config='../config.downloaded.json' --mp=88
In the cache controller folder (i.e C:\Users\jroque\Downloads\DemoMTConnectManager\ConnectIoT\Cache\connect-iot-controller@11.1.7-dev) we can start the controller. The driver instance is highlighted by the monitor application.
node ./src/index.js --dev --id=AutomationControllerInstance/2508141611180010001 --monitorPort=88 --config=C:/Users/jroque/Downloads/DemoMTConnectManager/config.downloaded.json
Note, that if you have access to the cmf dev command you can do both the link and the start using the cmf dev iot startComponents command.
cmf dev iot startComponents C:/Users/jroque/Downloads/DemoMTConnectManager --linkDir C:/cmf/cm-demo-repos/MTConnect/Cmf.Custom.IoT/Cmf.Custom.IoT.Packages/src
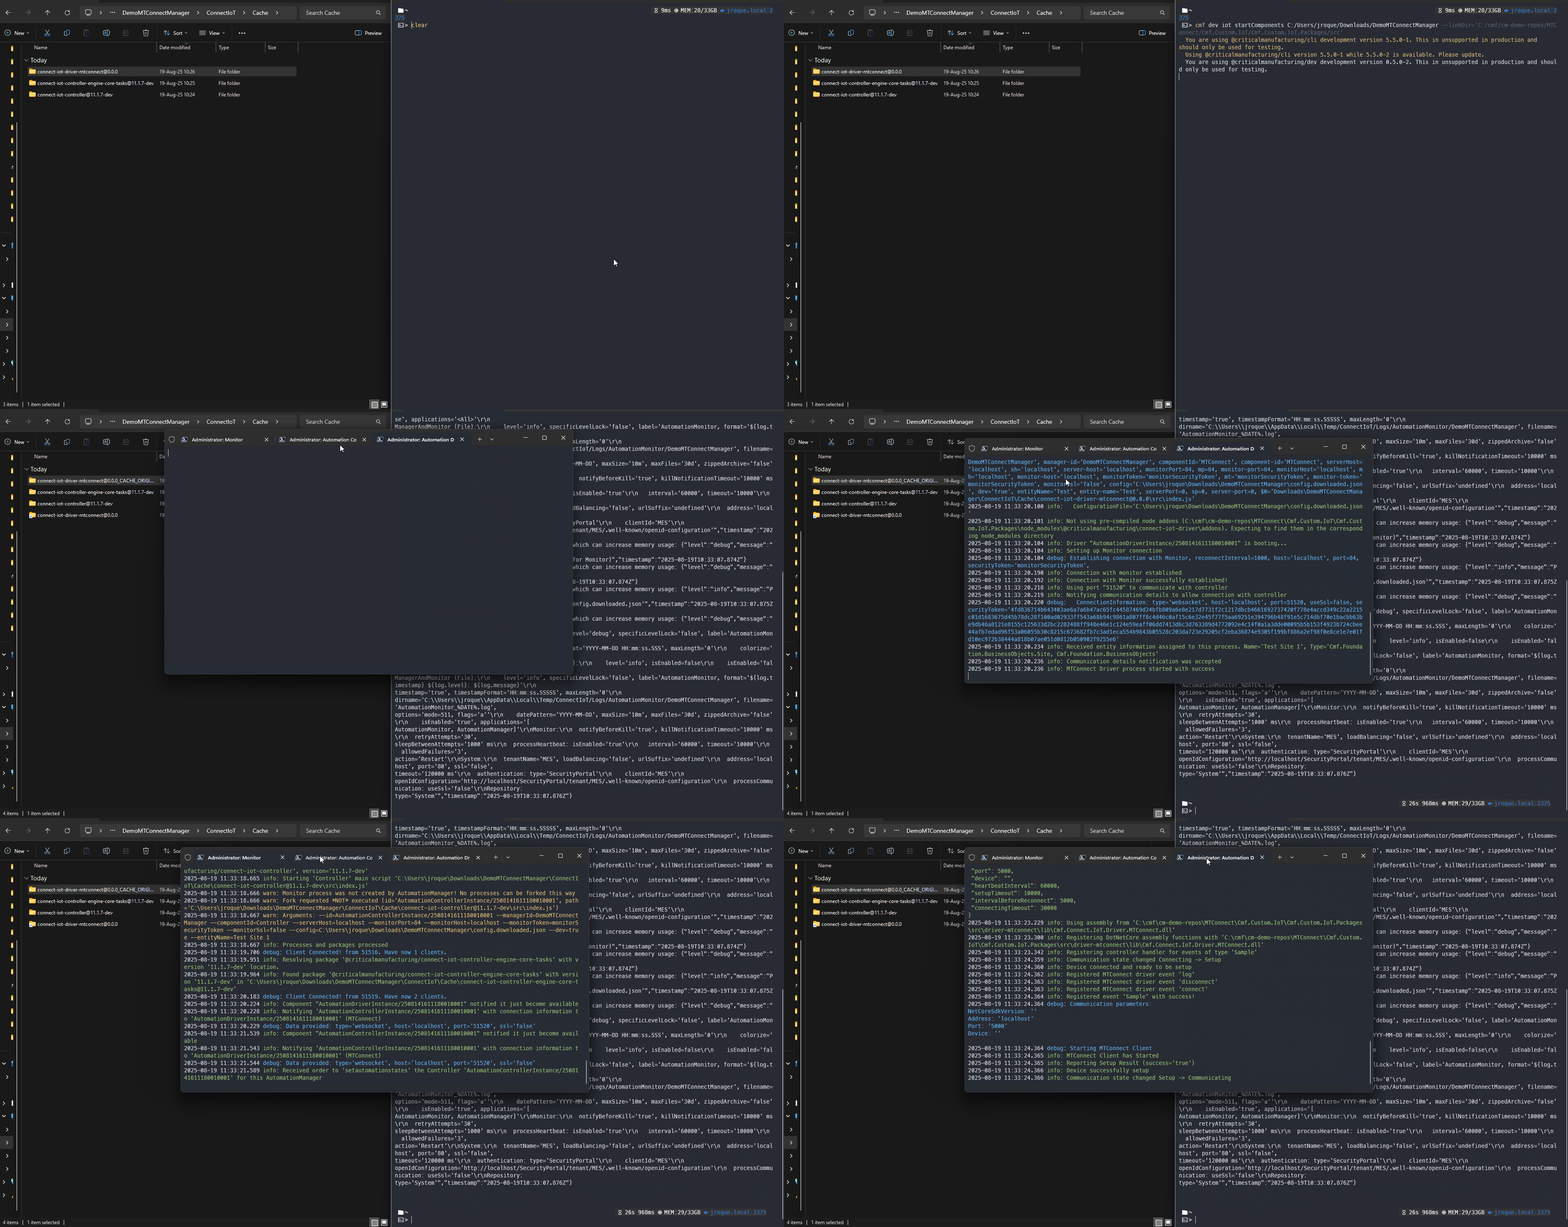
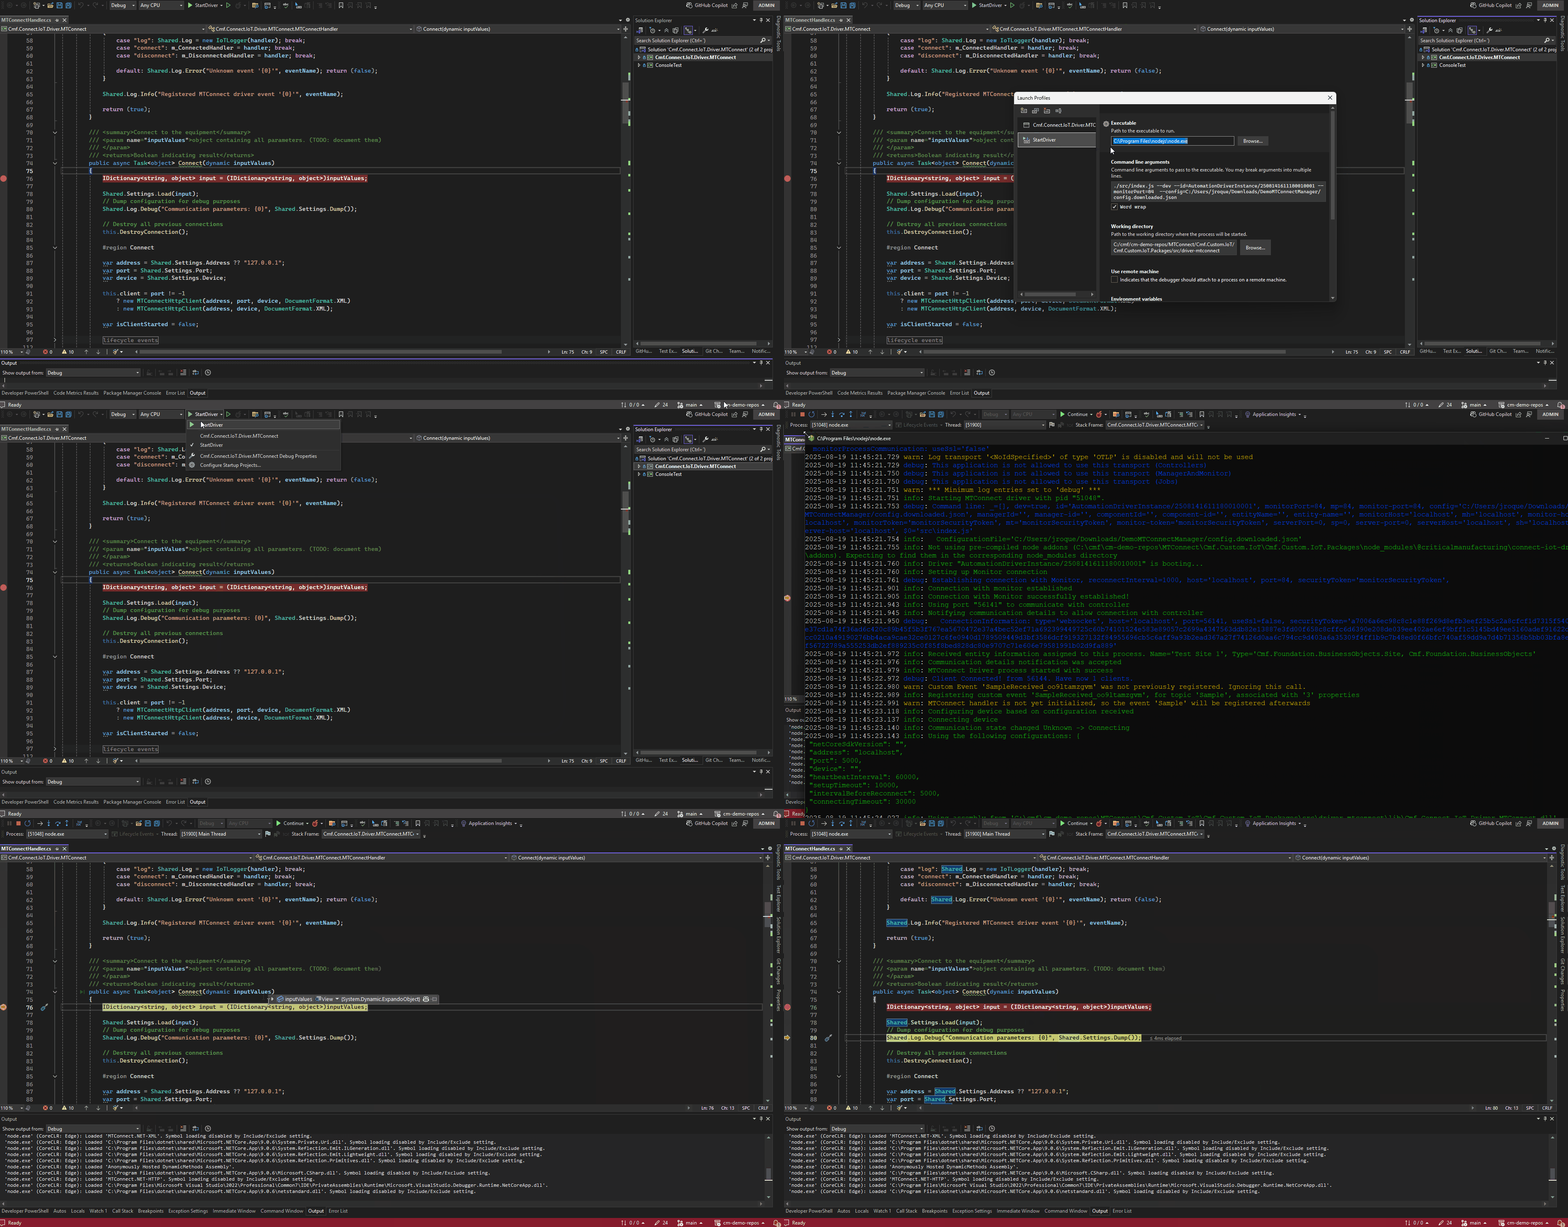
We can stop the terminal for the driver and launch it in the visual studio code to have debug. Then in the visual studio code we can launch the nodeJs part of the driver by launching the ‘Start Driver’. We must provide the manager location, monitor port and the driver instance.
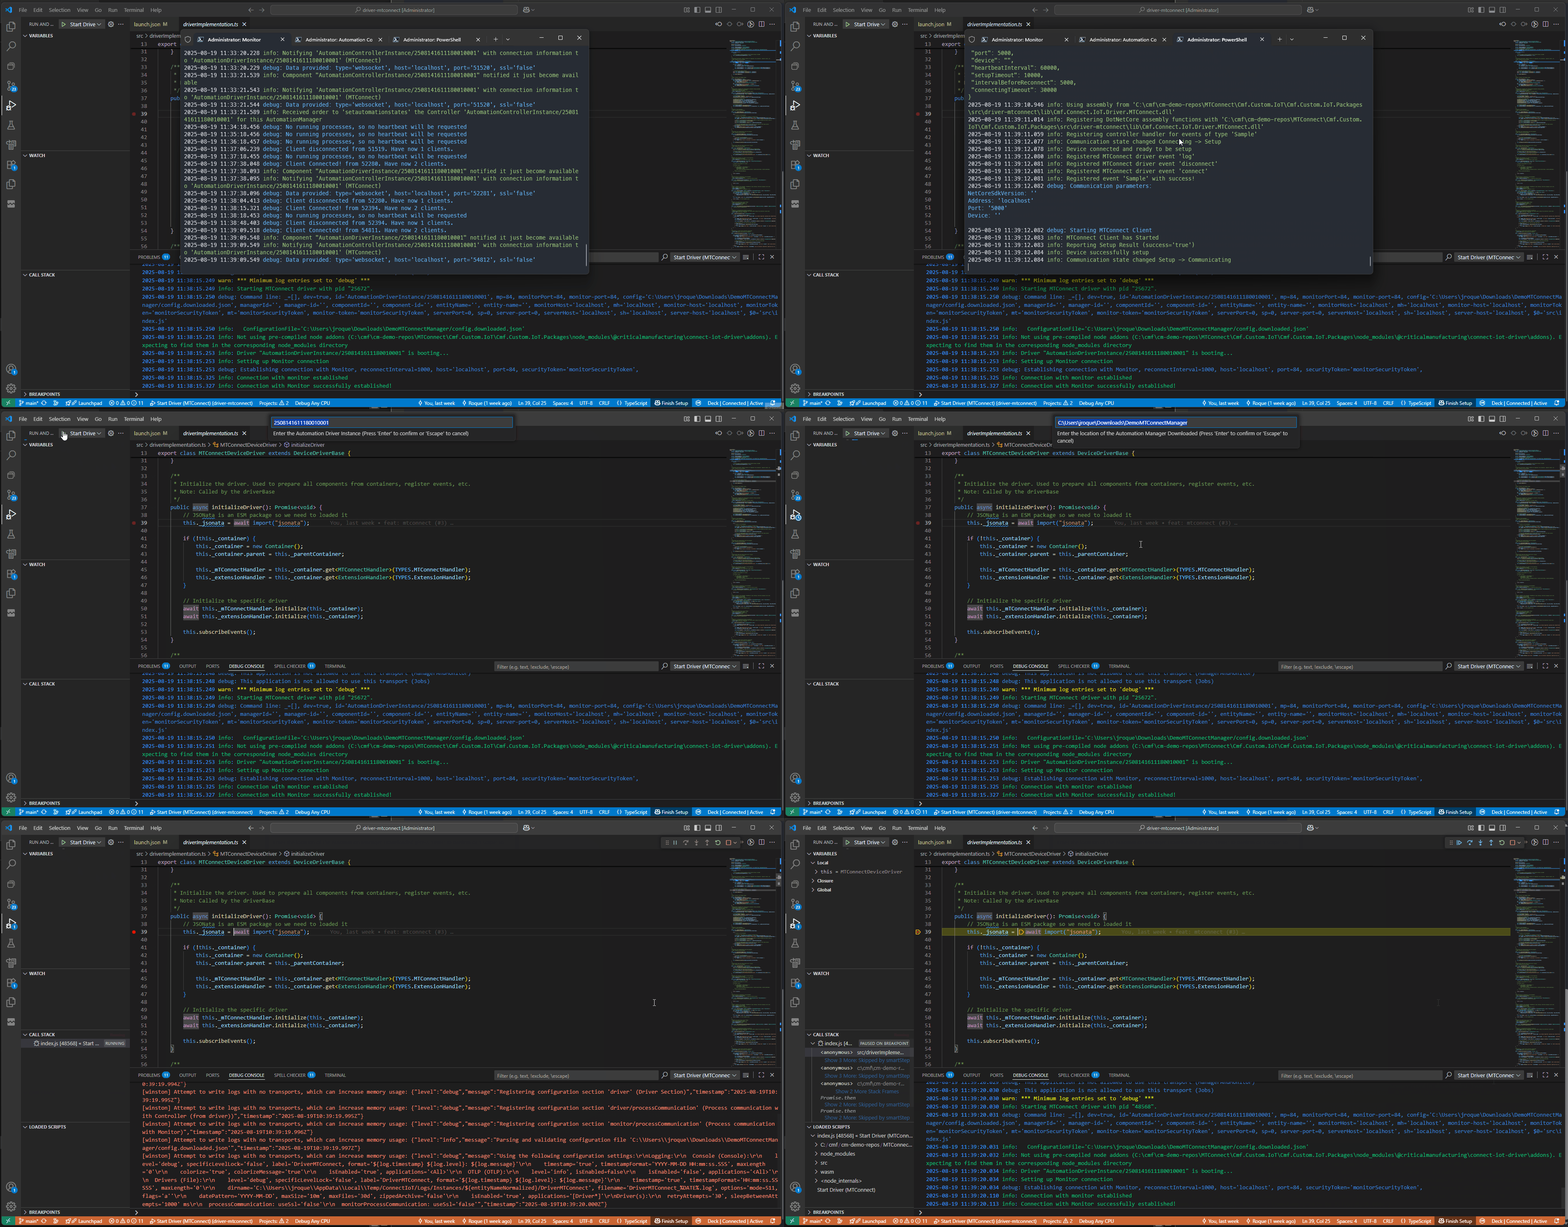
We can now see how we can start the debugger for the .Net part of our driver.
We can create a new launch configuration where we will have
- Executable - node location (i.e. C:\Program Files\nodejs\node.exe)
- Command Line Arguments - As provided from the monitor (i.e. ./src/index.js –dev –id=AutomationDriverInstance/2508141611180010001 –monitorPort=84 –config=C:/Users/jroque/Downloads/DemoMTConnectManager/config.downloaded.json)
- Working Directory - Location of the nodeJs driver (i.e. C:/cmf/cm-demo-repos/MTConnect/Cmf.Custom.IoT/Cmf.Custom.IoT.Packages/src/driver-mtconnect)
Connecting to an MTConnect Agent#
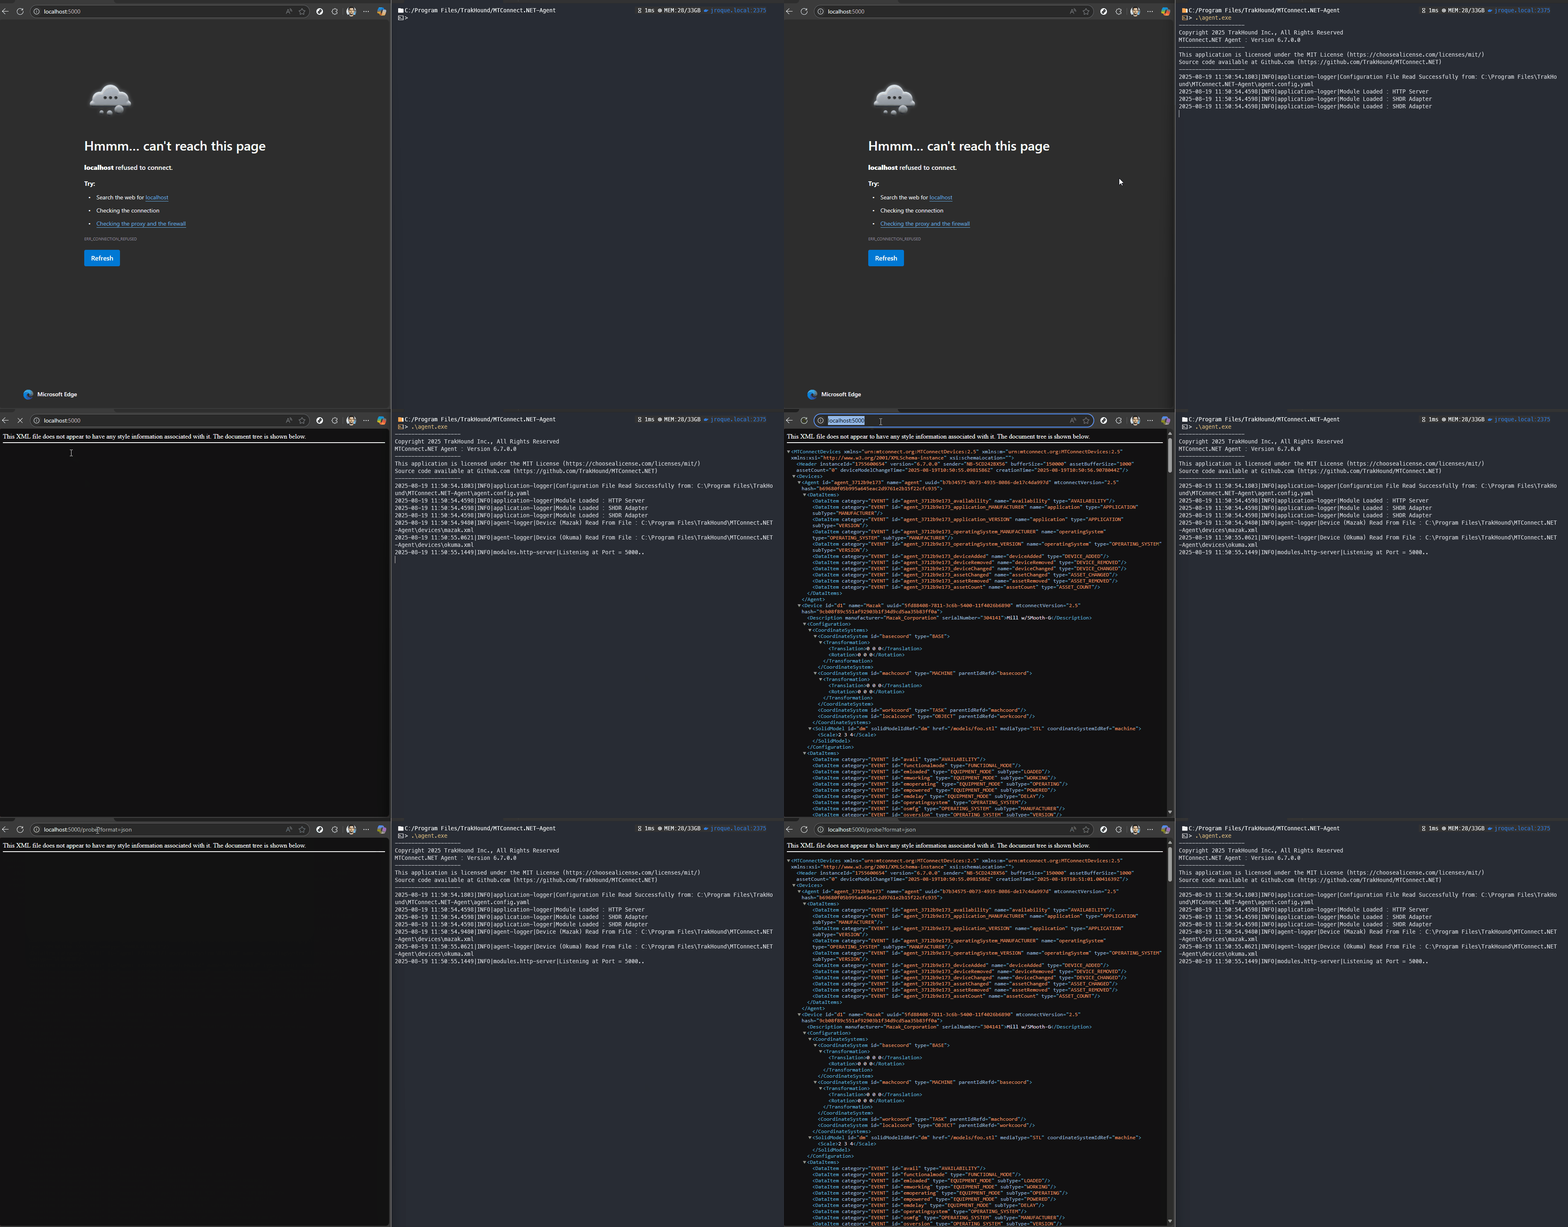
First, let’s start the test agent provided by TrackHound agent and see if we are able to see data.
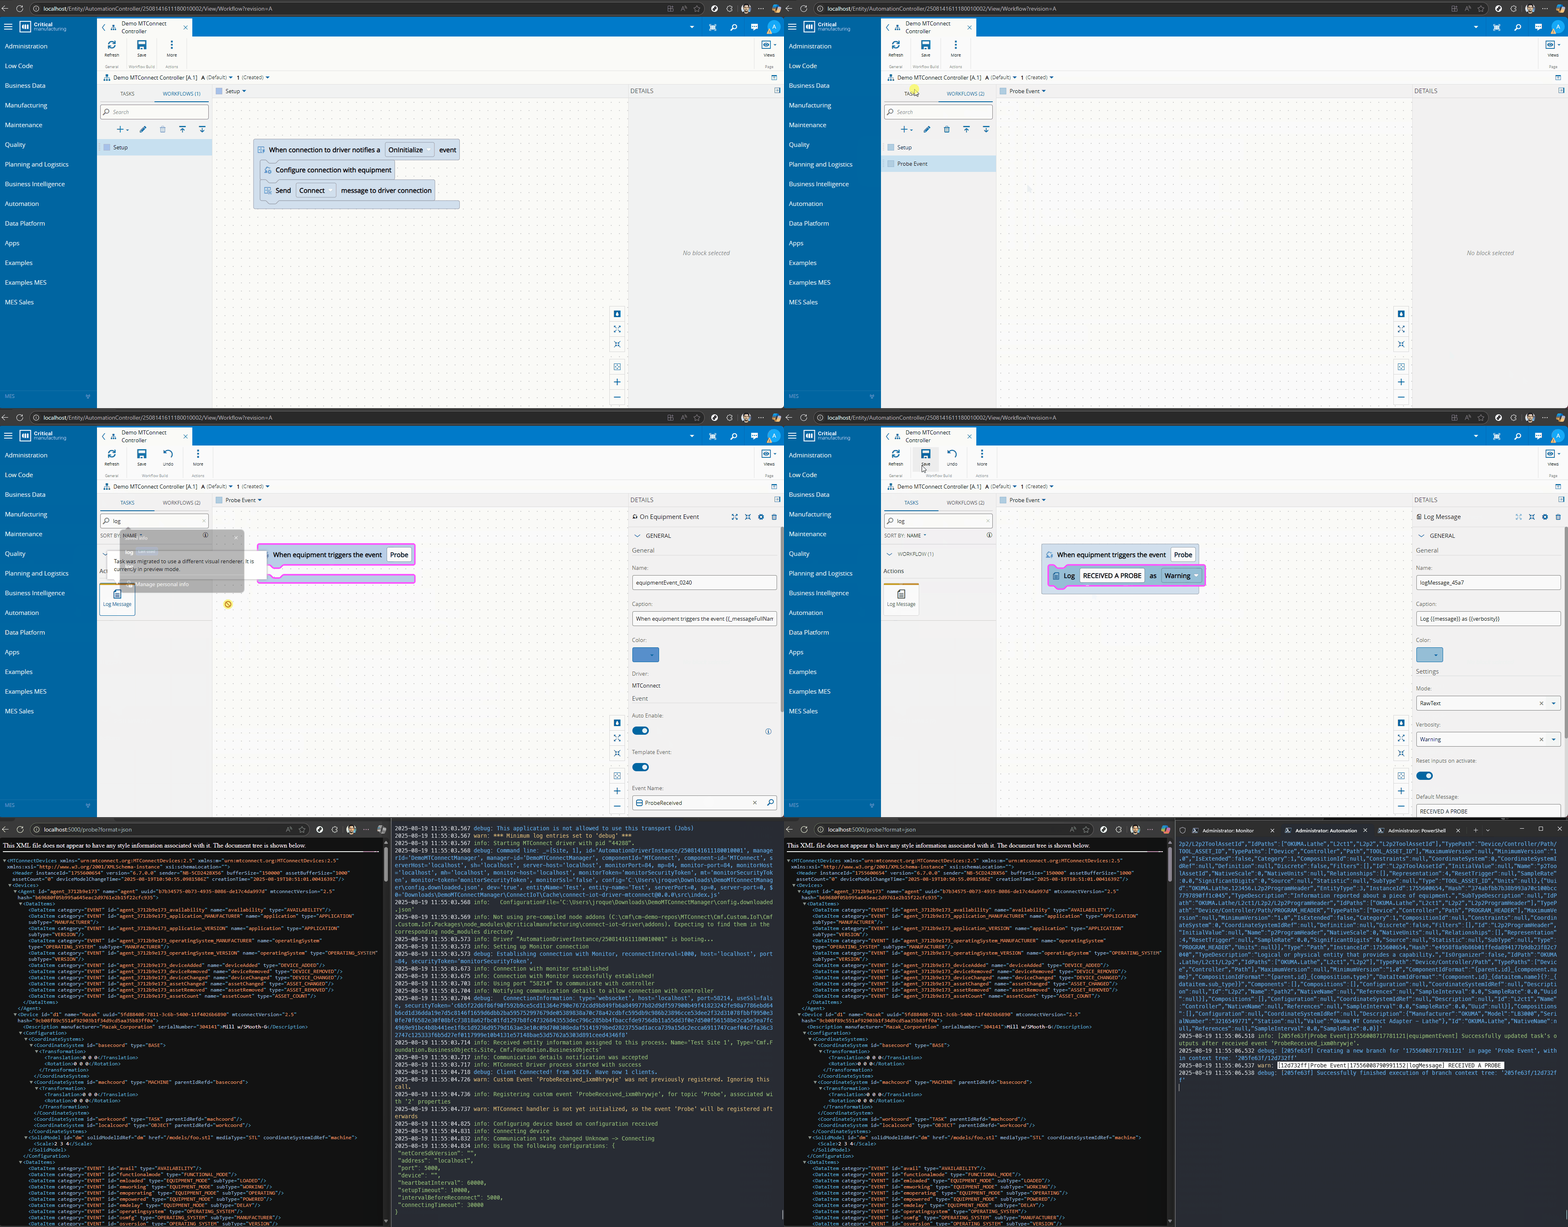
Now that we have an agent running let’s start our driver.
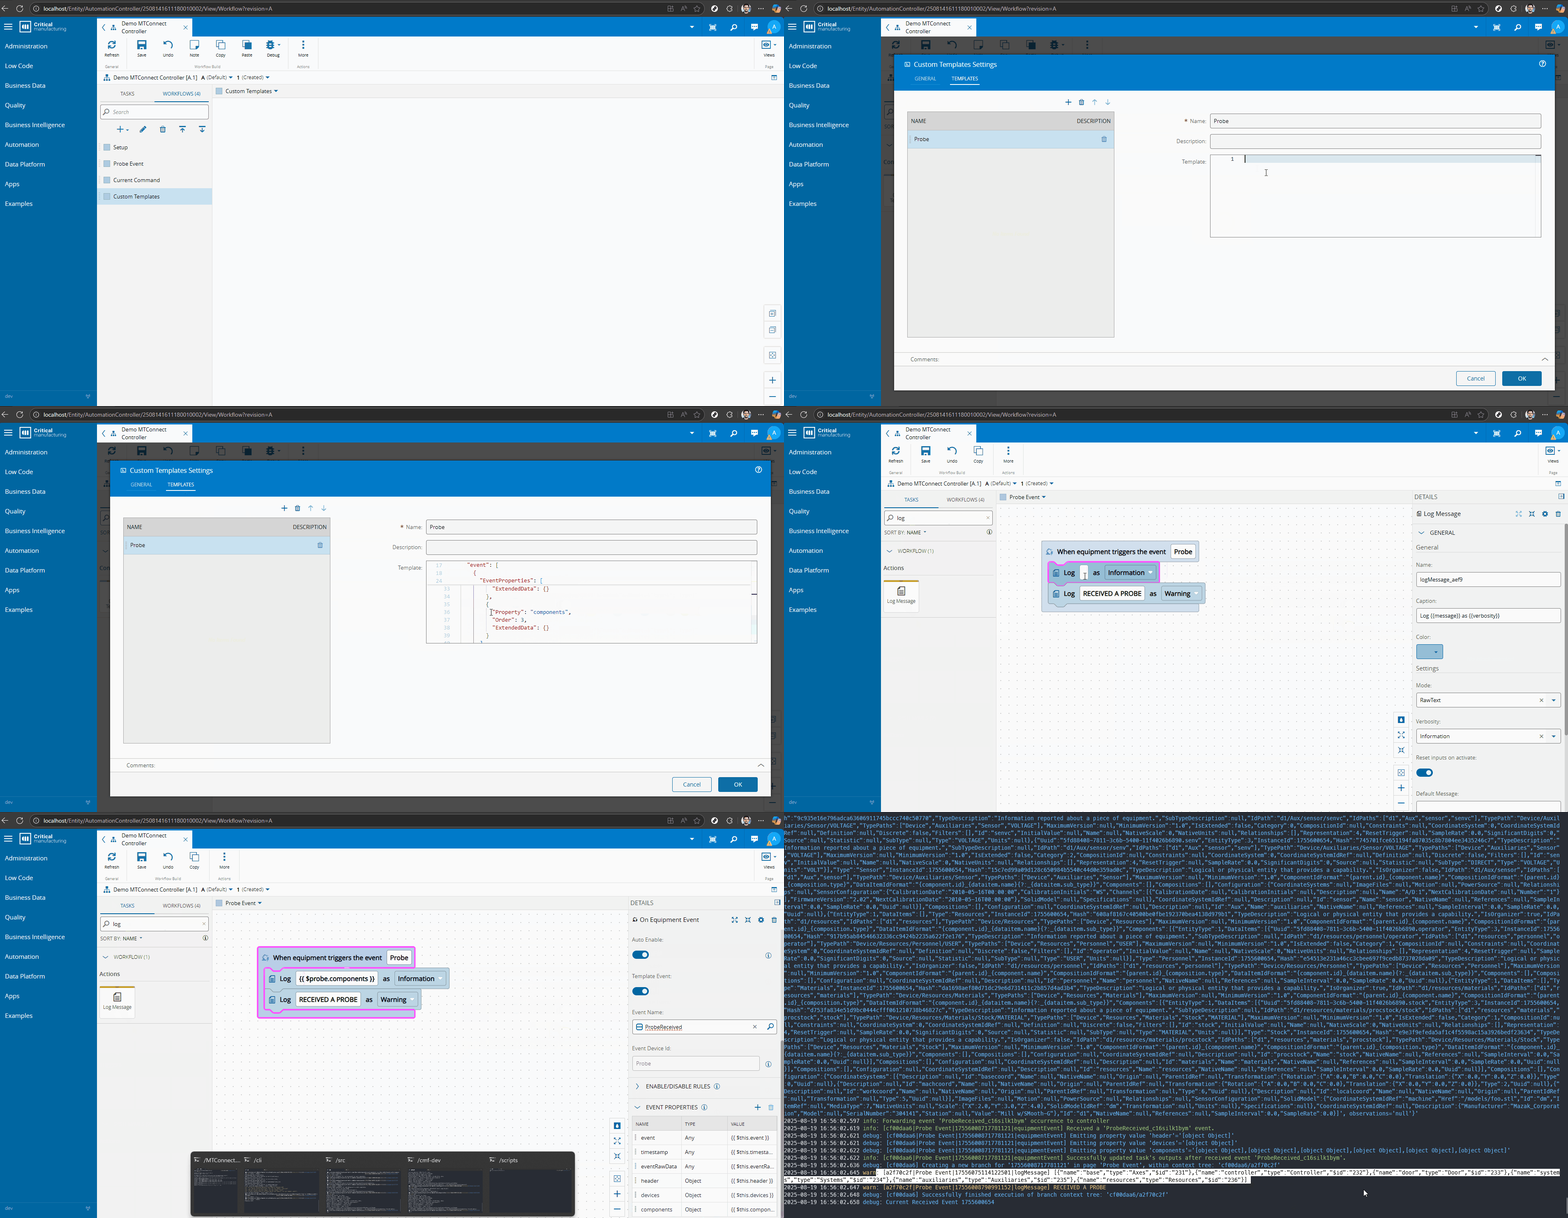
Let’s drag an On Equipment Event task in our Automation Controller for an event Probe and log when we receive it.
Let’s try and add now a command for the current endpoint.
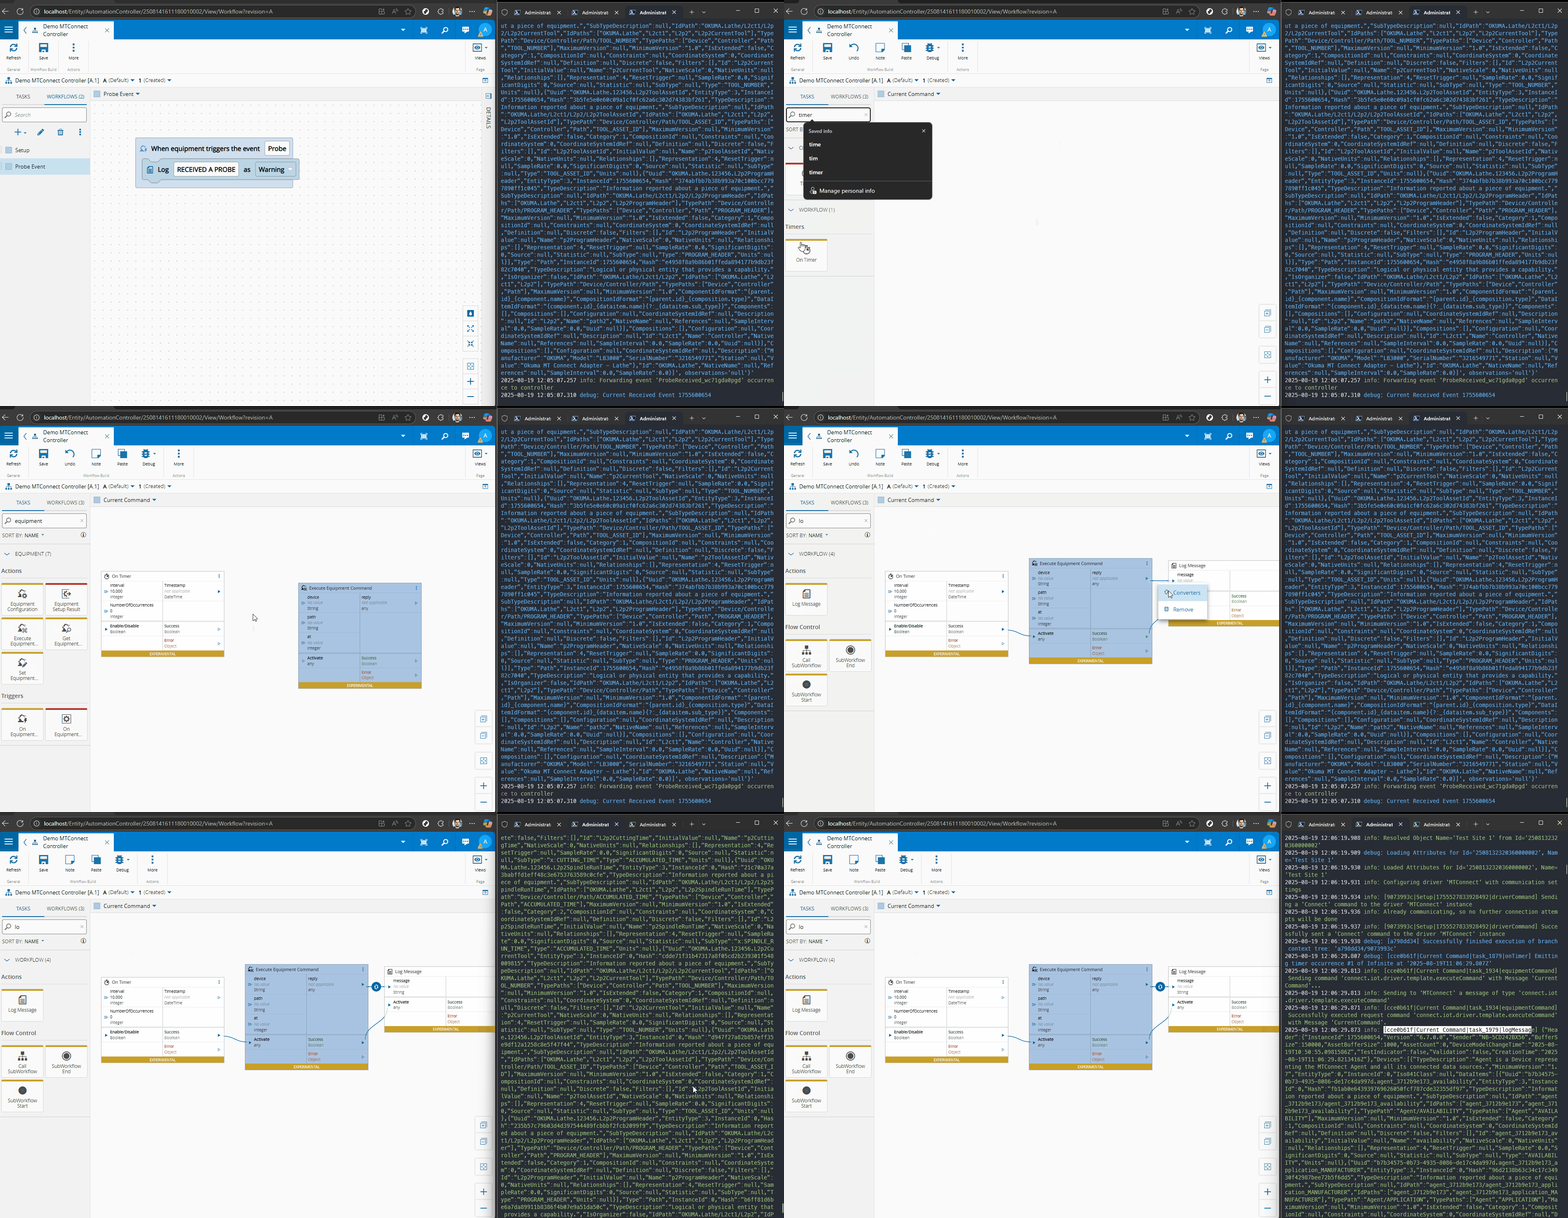
We can see that we are receiving big payloads.
This of course always depends on the data and device that you are querying. Let’s imagine that in our probe event we are only interested in the components names and types, we can add to our probe event a new property with a JSONata expression to retrieve this information.
We can add the task Custom Templates and add a new property to our event ProbeReceived, the property components. This property will be a JSONata transformation on the event result. We will apply the JSONata expression devices.Components.{\"name\": Name, \"type\": Type}, this will retrieve all the component names and types of the probe command.
Note that this is an example, in your particular use case you may want to retrieve other types of information, that is the beauty of using the JSONata, the user is free to create and collect whichever information he wishes from the event.
We updated an existing event, but we could create a new event with the same DeviceEventId, either in the task Custom Templates or by using the Automation Driver Definition.
{
  "property": [
    {
      "Name": "components",
      "Description": "Components Data",
      "DevicePropertyId": "components",
      "DataType": "Object",
      "IsWritable": true,
      "IsReadable": true,
      "AutomationProtocolDataType": "Object",
      "ExtendedData": {
        "expression": "devices.Components.{\"name\": Name, \"type\": Type}"
      },
      "isCustom": true
    }
  ],
  "event": [
    {
      "Name": "ProbeReceived",
      "Description": "ProbeReceived should receive one after start",
      "DeviceEventId": "Probe",
      "IsEnabled": true,
      "ExtendedData": {},
      "EventProperties": [
        {
          "Property": "header",
          "Order": 1,
          "ExtendedData": {}
        },
        {
          "Property": "devices",
          "Order": 2,
          "ExtendedData": {}
        },
        {
          "Property": "components",
          "Order": 3,
          "ExtendedData": {}
        }
      ],
      "isCustom": true
    }
  ]
}
We can now restart and see our components property populated with names and types.
Now we have created a platform for the user to be able to fully integrate with an MTConnect Agent.
Final Thoughts#
This was a use case of building a Connect IoT driver from the ground up, hopefully this helps you build your own solutions.


