This blog post will be part of a series of blog posts where we show case an example of how we can use a third party dependency like SQLite in our Connect IoT code. In this last post we will go through the whole implementation, so as to give an overview on a possible implementation of SQLite in Connect IoT.
All code showed here can be found at demo repo.
Overview#
In this blog post we will show how you can store and retrieve data from sqlite and also do your own queries.
I will be using the vscode extension vscode-sqlite which allows me to have an extension in vscode where I can connect to the SQLite database and perform queries.
Ingesting Data#
Let’s take a look at a specific use case. I have an assorted set of json files where I want to process and insert into my SQLite database.
We will use the File Raw Protocol and will process all new files.
Each json document will be inserted into my SQLite database. Right now I am not doing any kind of parsing I am just storing all the json files into a table called SMT.

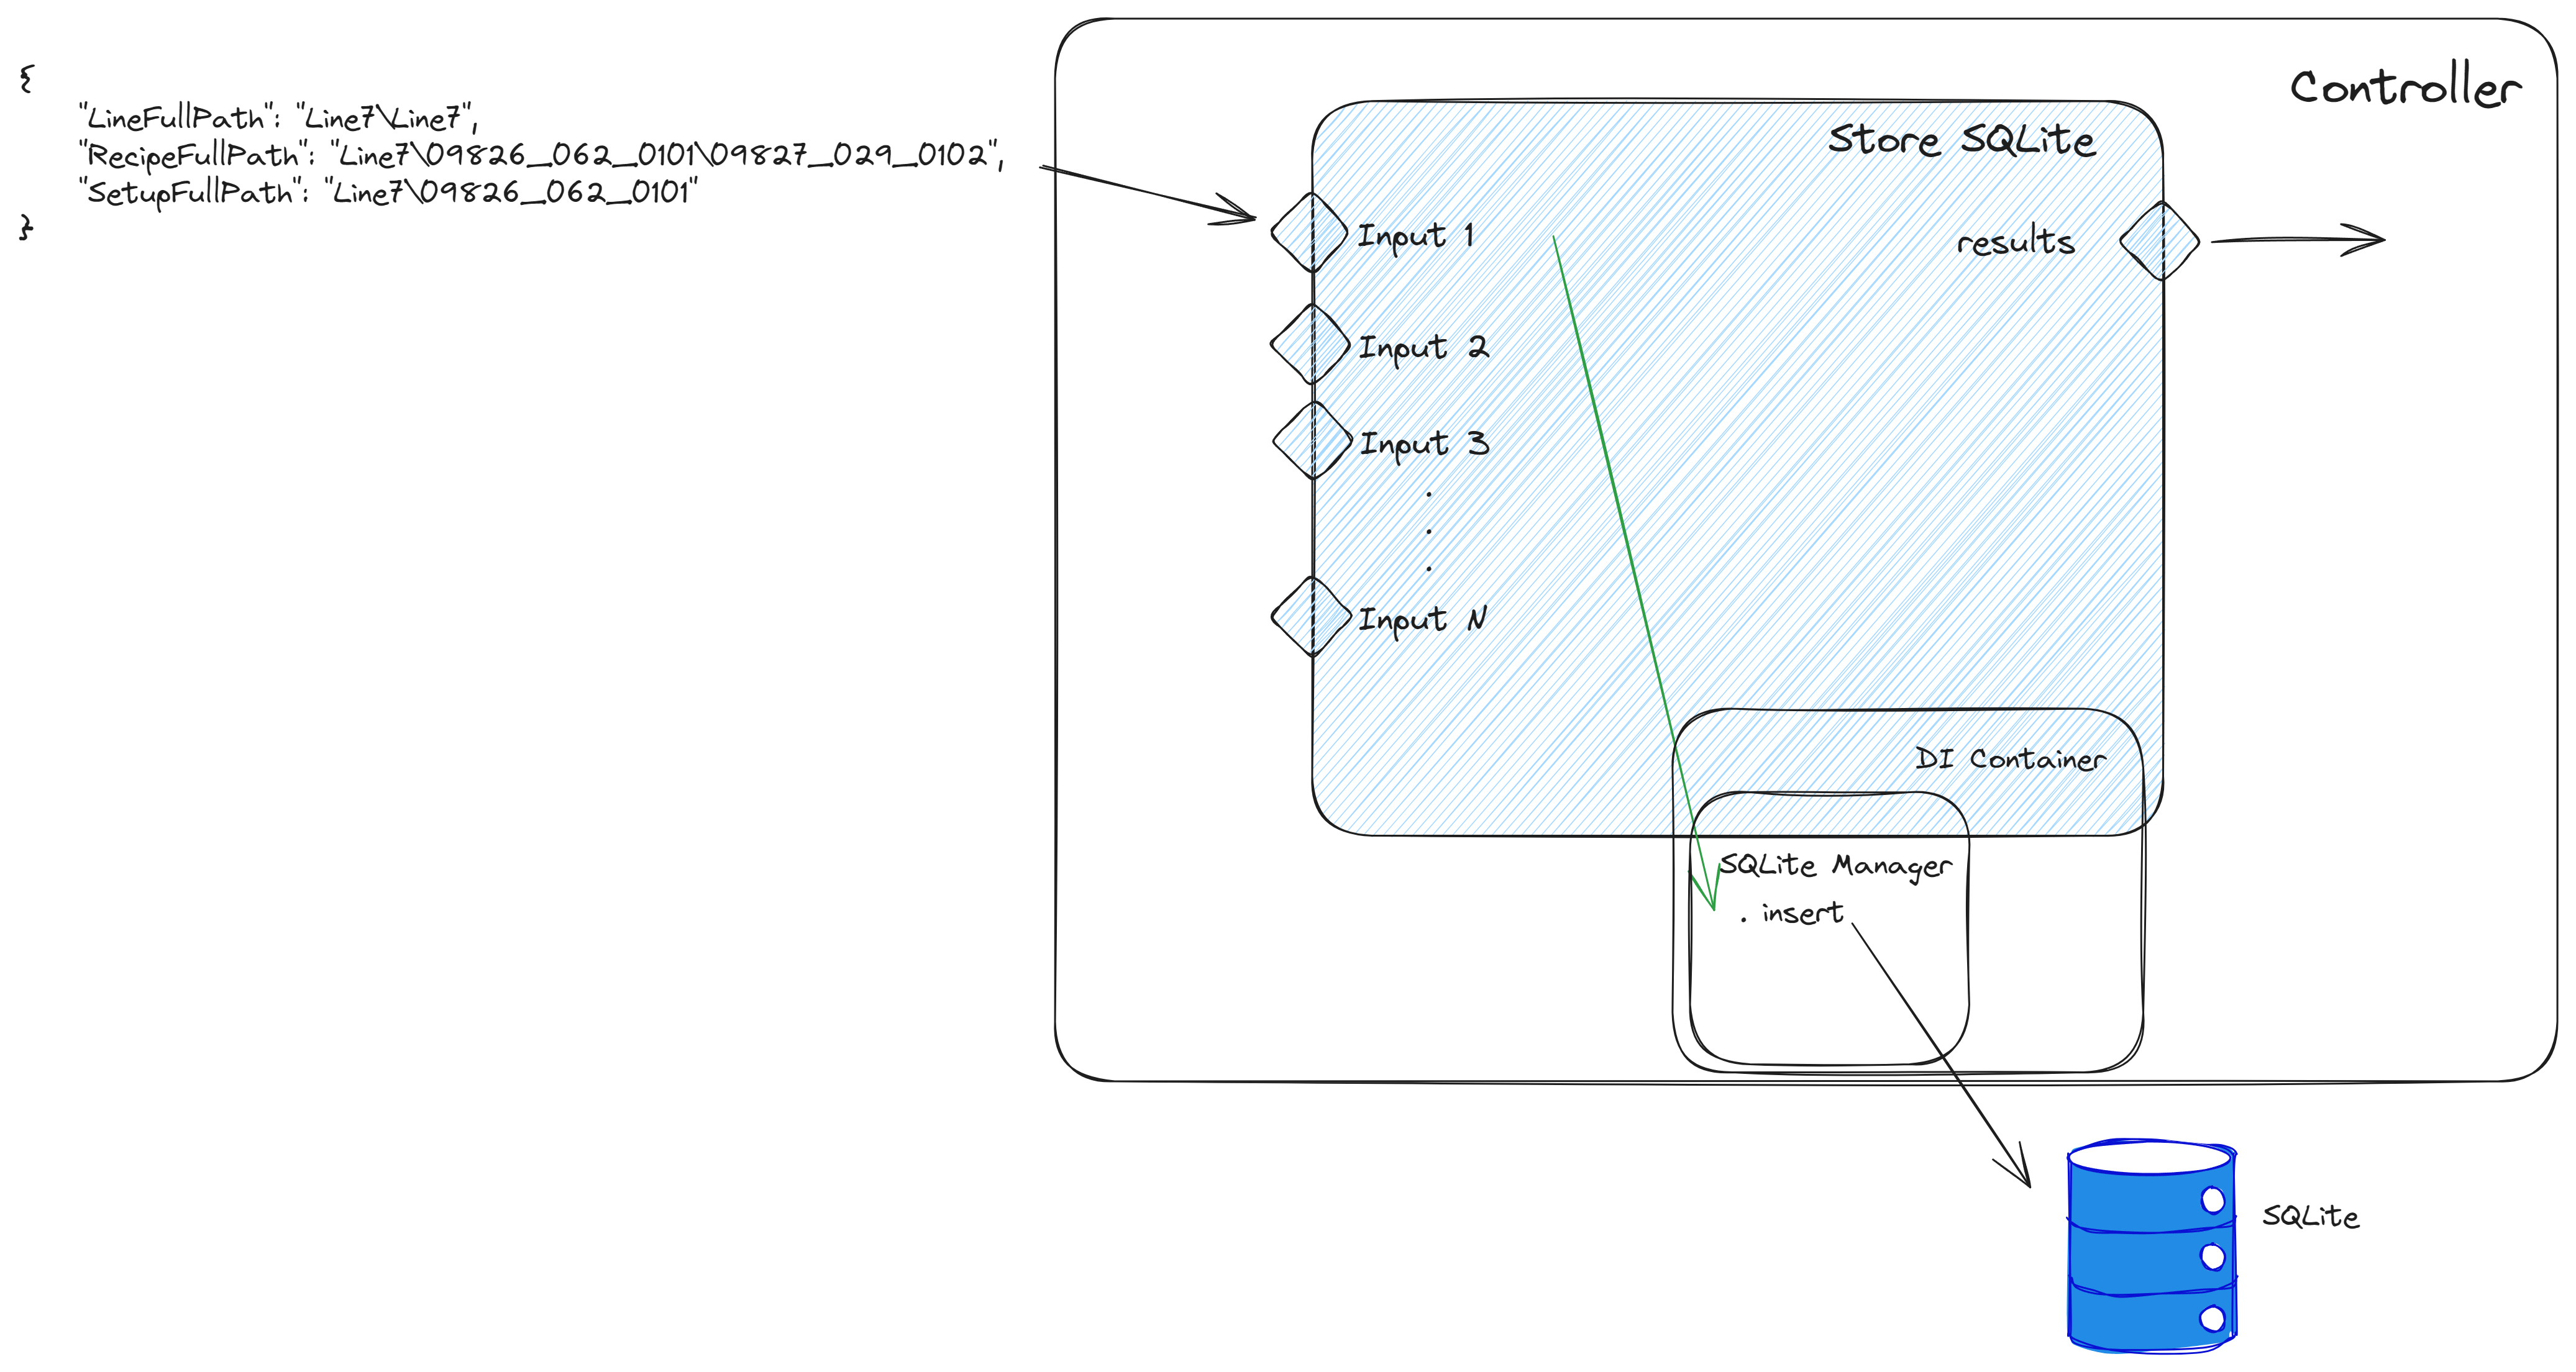
Our Workflow is reacting to new files detected in a folder. For each of them it is reading the contents of the files and storing them using the Store SQLite task.
With this approach we can already perform queries but they tend to be very cumbersome as they will have to deal with schemaless json documents.
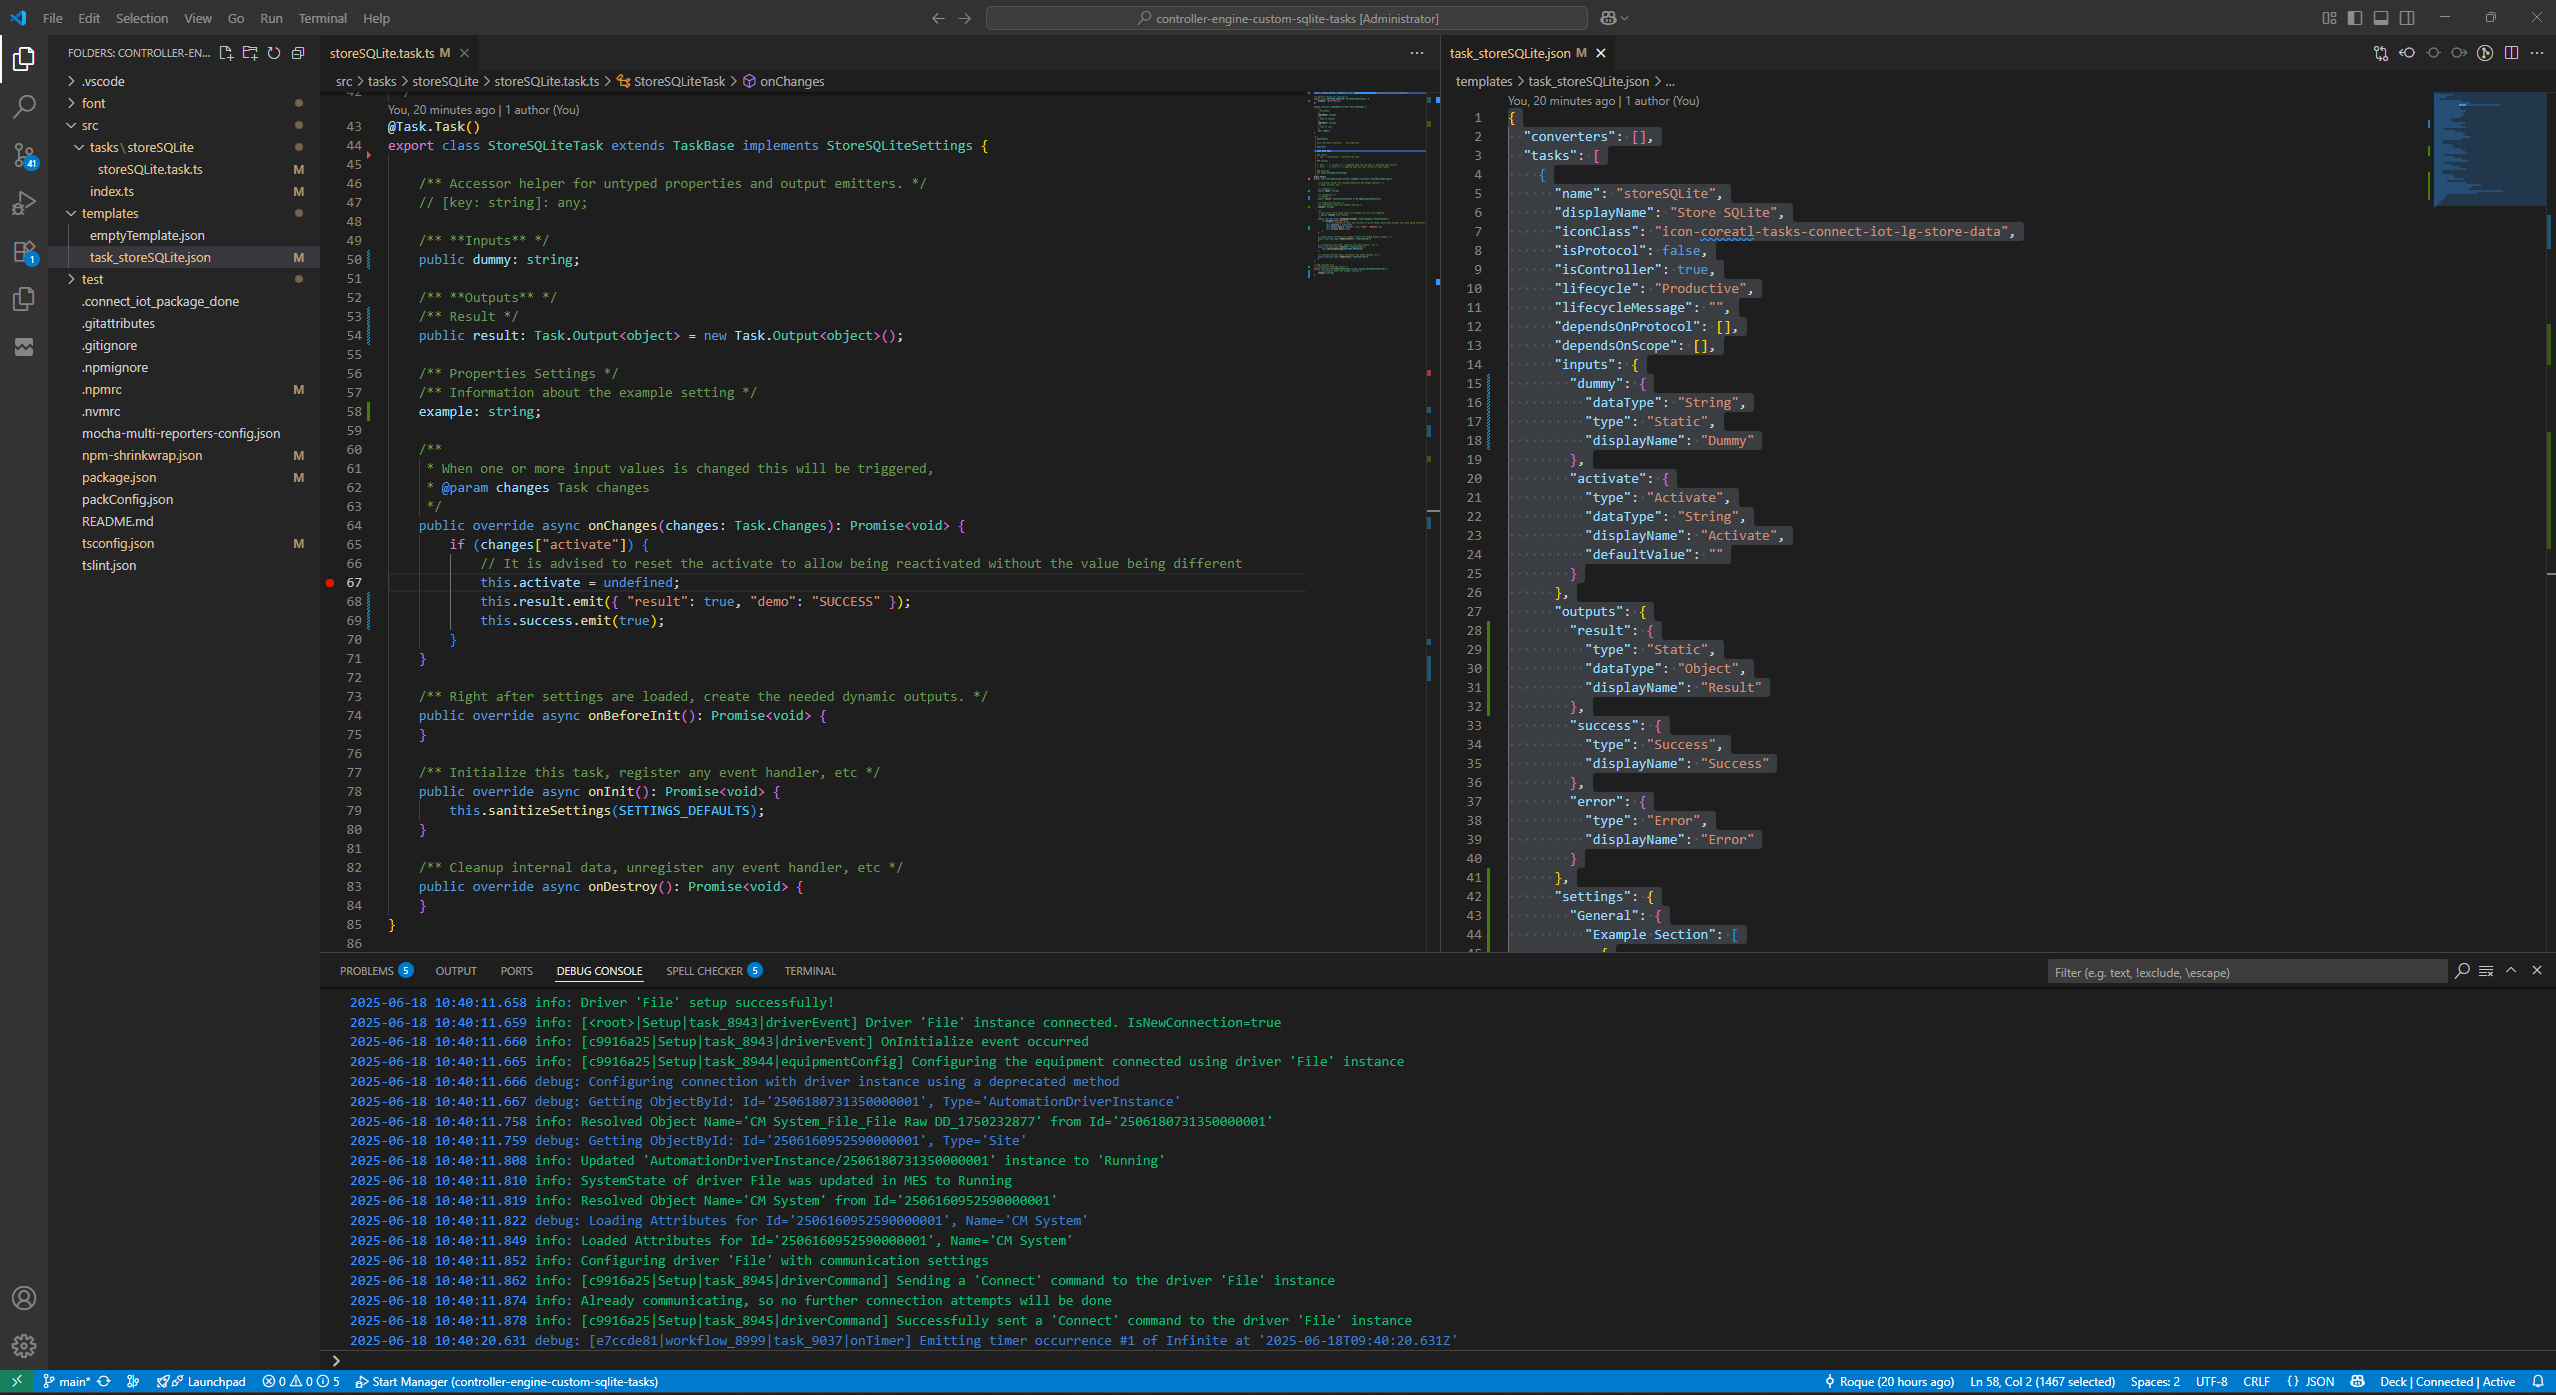
Looking at the Store SQLite Task#
The store SQLite Task will receive json documents, extract information like the give time to live, the table name and the table id and finally store it in the SQLite database.
public override async onChanges(changes: Task.Changes): Promise<void> {
    if (changes["activate"]) {
        // It is advised to reset the activate to allow being reactivated without the value being different
        this.activate = undefined;
        const stmtValues = new Map<string, any[]>();

        try {
            this._logger.debug("Starting Execution of Store SQLite task");
            for (const storeElement of this.inputs) {
                // If there is an input with data to store
                if (this[storeElement.name] != null) {
                    // Try to retrieve the id for the row if there is an id defined for this store element
                    const documentId = JSON.parse(this[storeElement.name] ?? {})?.[storeElement.idElement];
                    const data = this[storeElement.name];
                    // Resolve the table name for the row
                    const tableName = storeElement.tableName != null && storeElement.tableName !== "" ? storeElement.tableName : storeElement.name;

                    // Insert in SQLite database
                    const output = this._sqliteManager.insert(documentId, tableName, data, storeElement?.ttl);

                    // Collect values to provide feedback
                    stmtValues.set(output.id, output.result);
                }
            }

            this.results.emit(stmtValues);
            this.success.emit(true);
            this._logger.info("Finished Executing Store SQLite task");
        } catch (e) {
            this.logAndEmitError(e.message);
        }
    }
}
As you can see the code is quite simple, we check if there’s any input with data to store and if it has we resolve some important metadata. In the SQLiteManager class is where we will handle the actual insert into the SQLite database.
As we saw in part II the SQLiteManager is being injected in the dependency injection container.
Looking at the Insert SQLiteManager#
In SQLiteManager class, we will call the insert method. This method will be responsible for dealing with inserts.
public insert(id: string, documentType: string, data: object, ttlSeconds?: number) {

    // Ensure that the SQLite has been instantiated
    const tableName = this.guardClause(documentType);

    // If needed generate an Id
    if (id == null || id === "") {
        id = this.newGuid();
    }

    // Check if data already exists
    const checkStmt = this._db.prepare(`
        SELECT id FROM ${tableName} WHERE json(data) = json(?)
    `);
    const existingRow = checkStmt.get(JSON.stringify(data));

    // if the row already exists, we are going to keep the data and update the Time To Live
    if (existingRow) {
        // Update existing row with new TTL
        const updateStmt = this._db.prepare(`
            UPDATE ${tableName}
            SET updated_at = CURRENT_TIMESTAMP,
                expires_at = CASE
                    WHEN ? IS NOT NULL THEN datetime(CURRENT_TIMESTAMP, '+' || ? || ' seconds')
                    ELSE NULL
                END
            WHERE id = ?
        `);

        updateStmt.run(ttlSeconds, ttlSeconds, existingRow.id);

        return { id: existingRow.id, result: { changes: 1 }, existed: true };
    }

    // Insert new row with calculated expires_at
    const stmt = this._db.prepare(`
        INSERT INTO ${tableName} (id, data, created_at, updated_at, expires_at)
        VALUES (?, json(json_extract(?, '$')), CURRENT_TIMESTAMP, CURRENT_TIMESTAMP,
                CASE
                    WHEN ? IS NOT NULL THEN datetime(CURRENT_TIMESTAMP, '+' || ? || ' seconds')
                    ELSE NULL
                END)
    `);

    return {
        id,
        result: stmt.run(id, JSON.stringify(data), ttlSeconds, ttlSeconds),
        existed: false
    };
}
The insert will validate that we don’t try to store data with the same ids and will manage helpers like the time to live of our stored data. The controller is always running so it’s helpful to implement mechanisms to handle stale data and to stop our database from growing forever. Notice that we can already see some functions that we use in SQLite to manipulate JSON columns like the json_extract().
With this we can already see the big advantage of separating the SQLite Manager from the tasks. We have a complete separation of concerns, where the task does not need to know the SQLite language. In fact if we were to support other databases, the task store SQLite would remain the same, we could just import the DI Container for any other database. We also are managing the query logic only one location in the code, which is much easier to maintain, troubleshoot and improve.
Ingesting Data with Schema Enforcement#
A better approach is to provide at least a partial schema and storing each document type in different tables.
We will have the same approach of reading a set of json files. But now after reading we will provide some schema enforcement, each one will then be matched against an expected schema.
For example, for LineRecipeSetup we are expecting the schema:
{
  "type": "object",
  "required": [
    "LineFullPath",
    "RecipeFullPath",
    "SetupFullPath"
  ],
  "properties": {
    "LineFullPath": {
      "type": "string"
    },
    "RecipeFullPath": {
      "type": "string"
    },
    "SetupFullPath": {
      "type": "string"
    },
    "RecipeDetails": {
      "type": "object"
    },
    "SetupDetails": {
      "type": "object"
    }
  }
}
When we now store we will store only json objects that obey the schema structure. We will store them in the table LineRecipeSetup. We can also specify meaningful indexes, for example for this json document the recipe full path will be a table index.
Now we are storing data into multiple tables based on schema. I am also storing all the read files in a Raw Data table.
Looking at the JSON Schema Validator Task#
For the JSON schema task we will use ajv as our dependency for schema enforcement.
Ajv is a very simple but powerful tool, it allows us to provide it with a schema and then validate json objects.
public override async onChanges(changes: Task.Changes): Promise<void> {
    if (changes["activate"]) {
        this.activate = undefined;

        let hasErrors = false;
        try {
            // iterate defined schemas
            for (const schema of this.schemas) {
                // If there's data for this schema
                const jsonData = this[schema.name];
                if (jsonData != null) {
                    // Validate against defined schema
                    const validate = this.ajv.compile(schema.schema);
                    if (validate(JSON.parse(jsonData))) {
                        (this[Utilities.propertyToOutput(schema.name)] as Task.Output<object>).emit(this[schema.name]);
                    } else
                        // Check if we should throw an error when schema is not matched
                        if (this.throwOnSchemaValidationFailure) {
                        hasErrors = true;
                        this.logAndEmitError(`Error when validating schema for ${validate.errors}: `);
                    }
                }
            }

            if (!hasErrors) {
                this.success.emit(true);
            }
        } catch (e) {
            this.logAndEmitError(e.message);
        }
    }
}
We will iterate through our defined schemas and check if any of the schemas is validated by the data, for each one if the schema matches we will emit the correspondent output.
If the setting throwOnSchemaValidationFailure is set as true we will throw an exception otherwise, we will continue.

If the json matches the provided schema for the input it will output the json data.
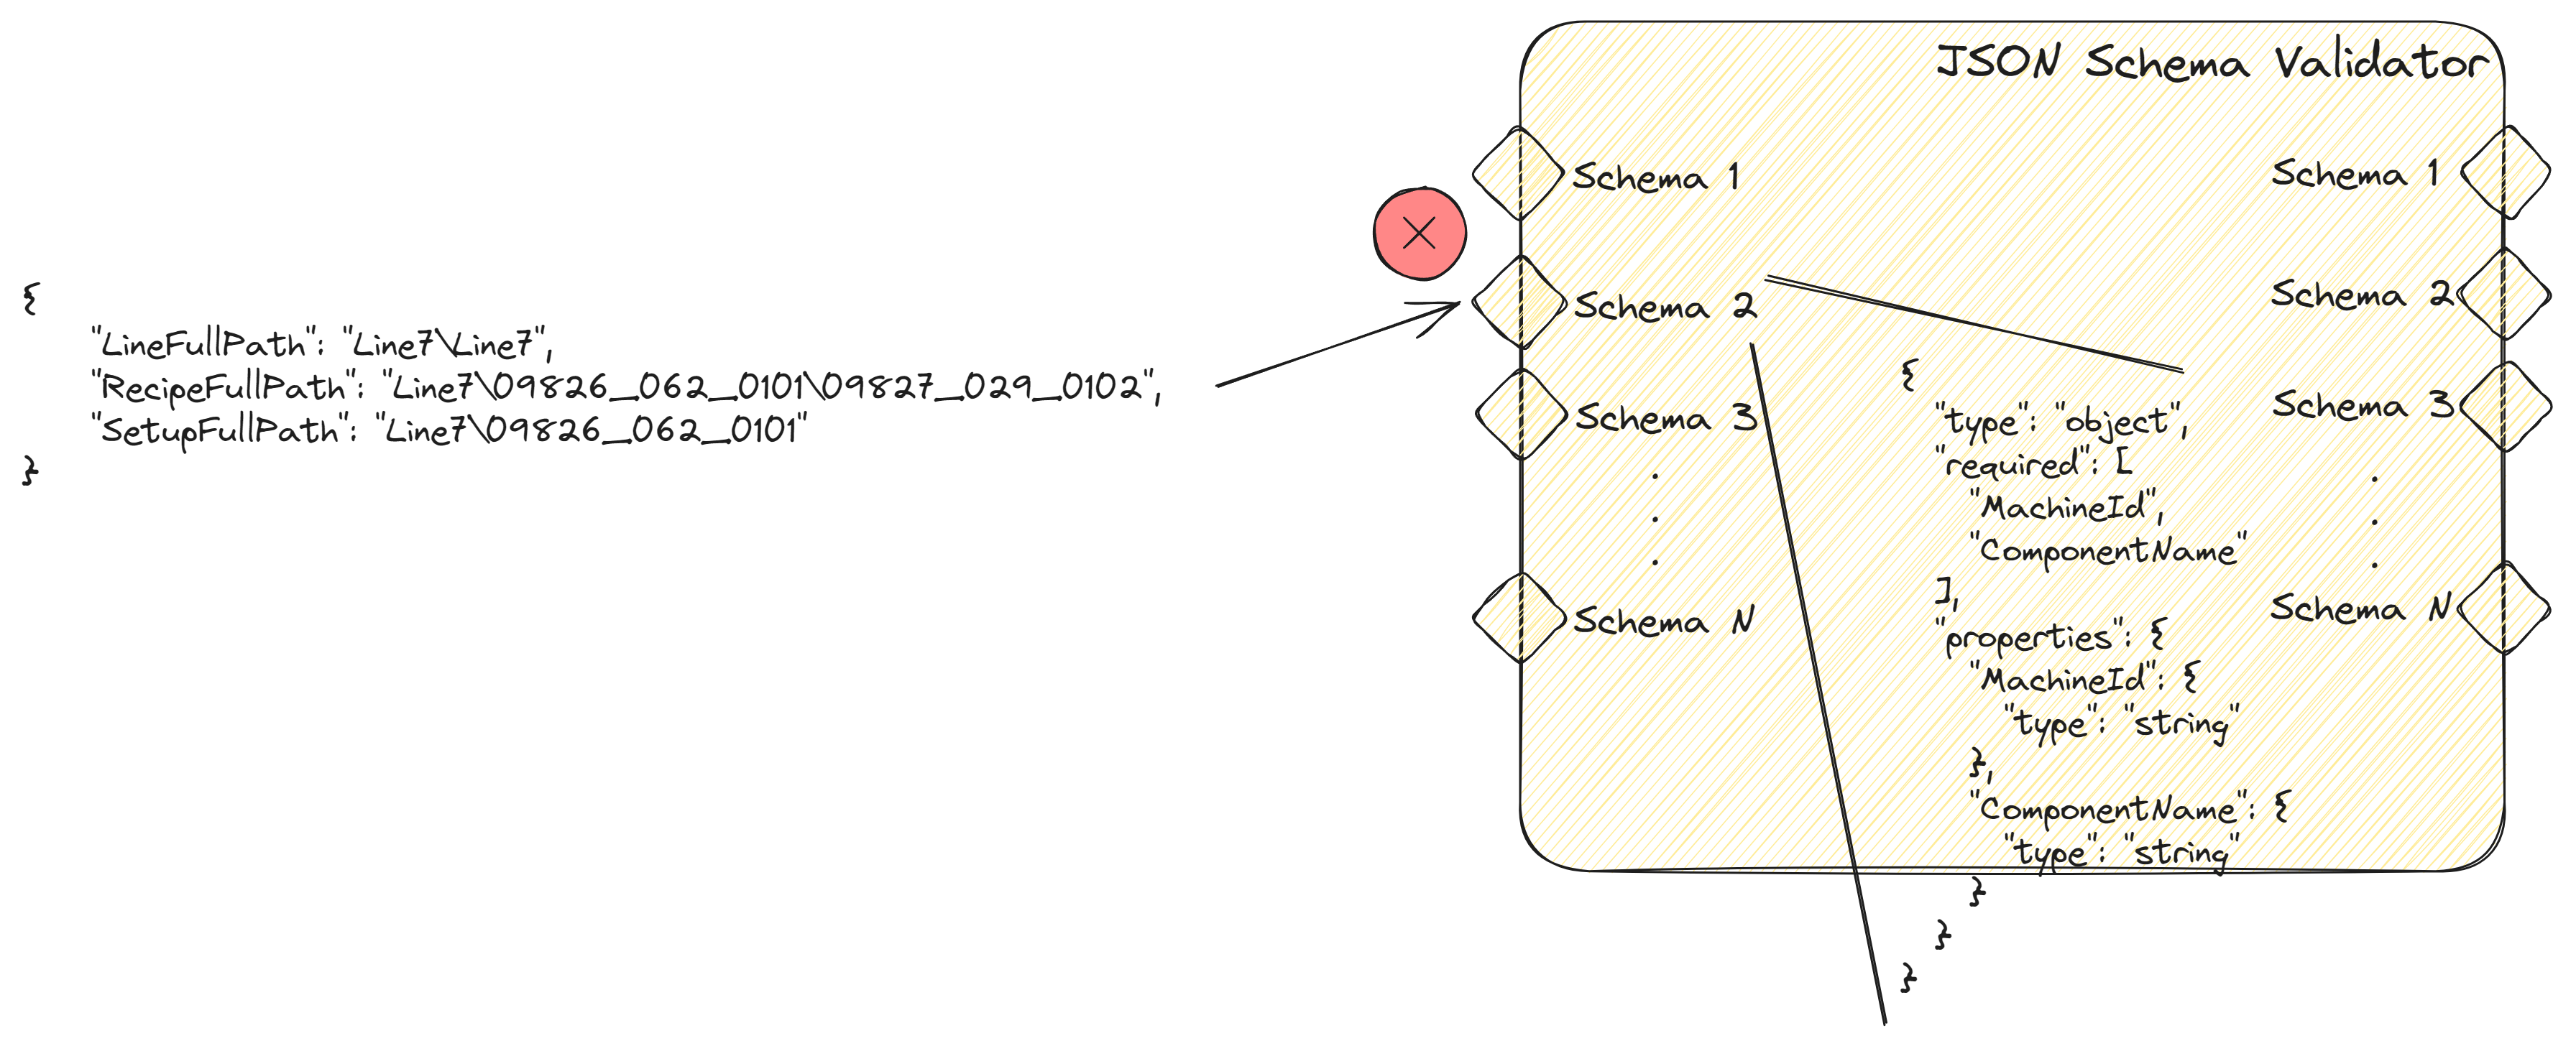
On the other hand if the match of the schema fails for the input. It won’t output the json data and can throw an error if the throwOnSchemaValidationFailure is set as true.
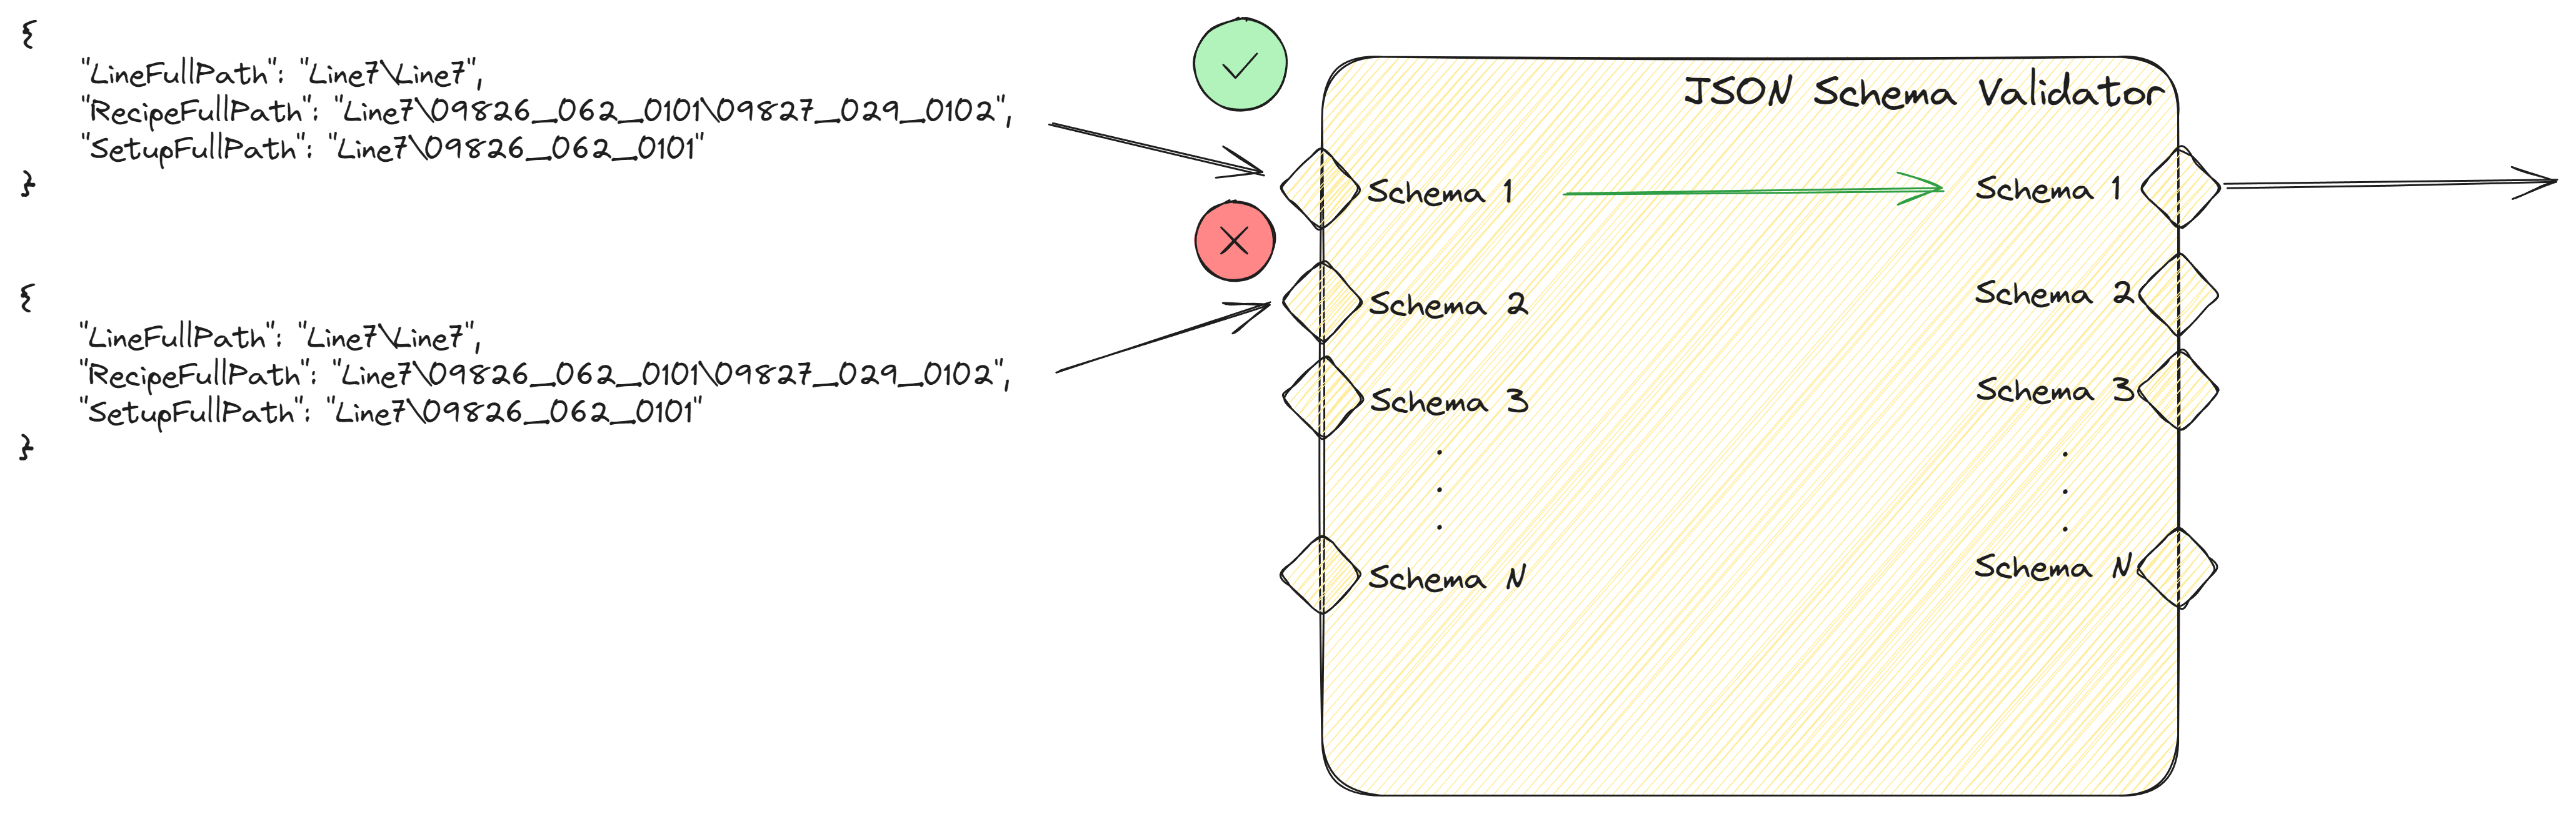
What we can do as well is use our JSON Validator as a schema matcher. If one of the schemas is validated we will emit that output. For our use case where we are processing a batch of json files for which we don’t know beforehand which schema they will match, we can leverage this feature.
Querying Data#
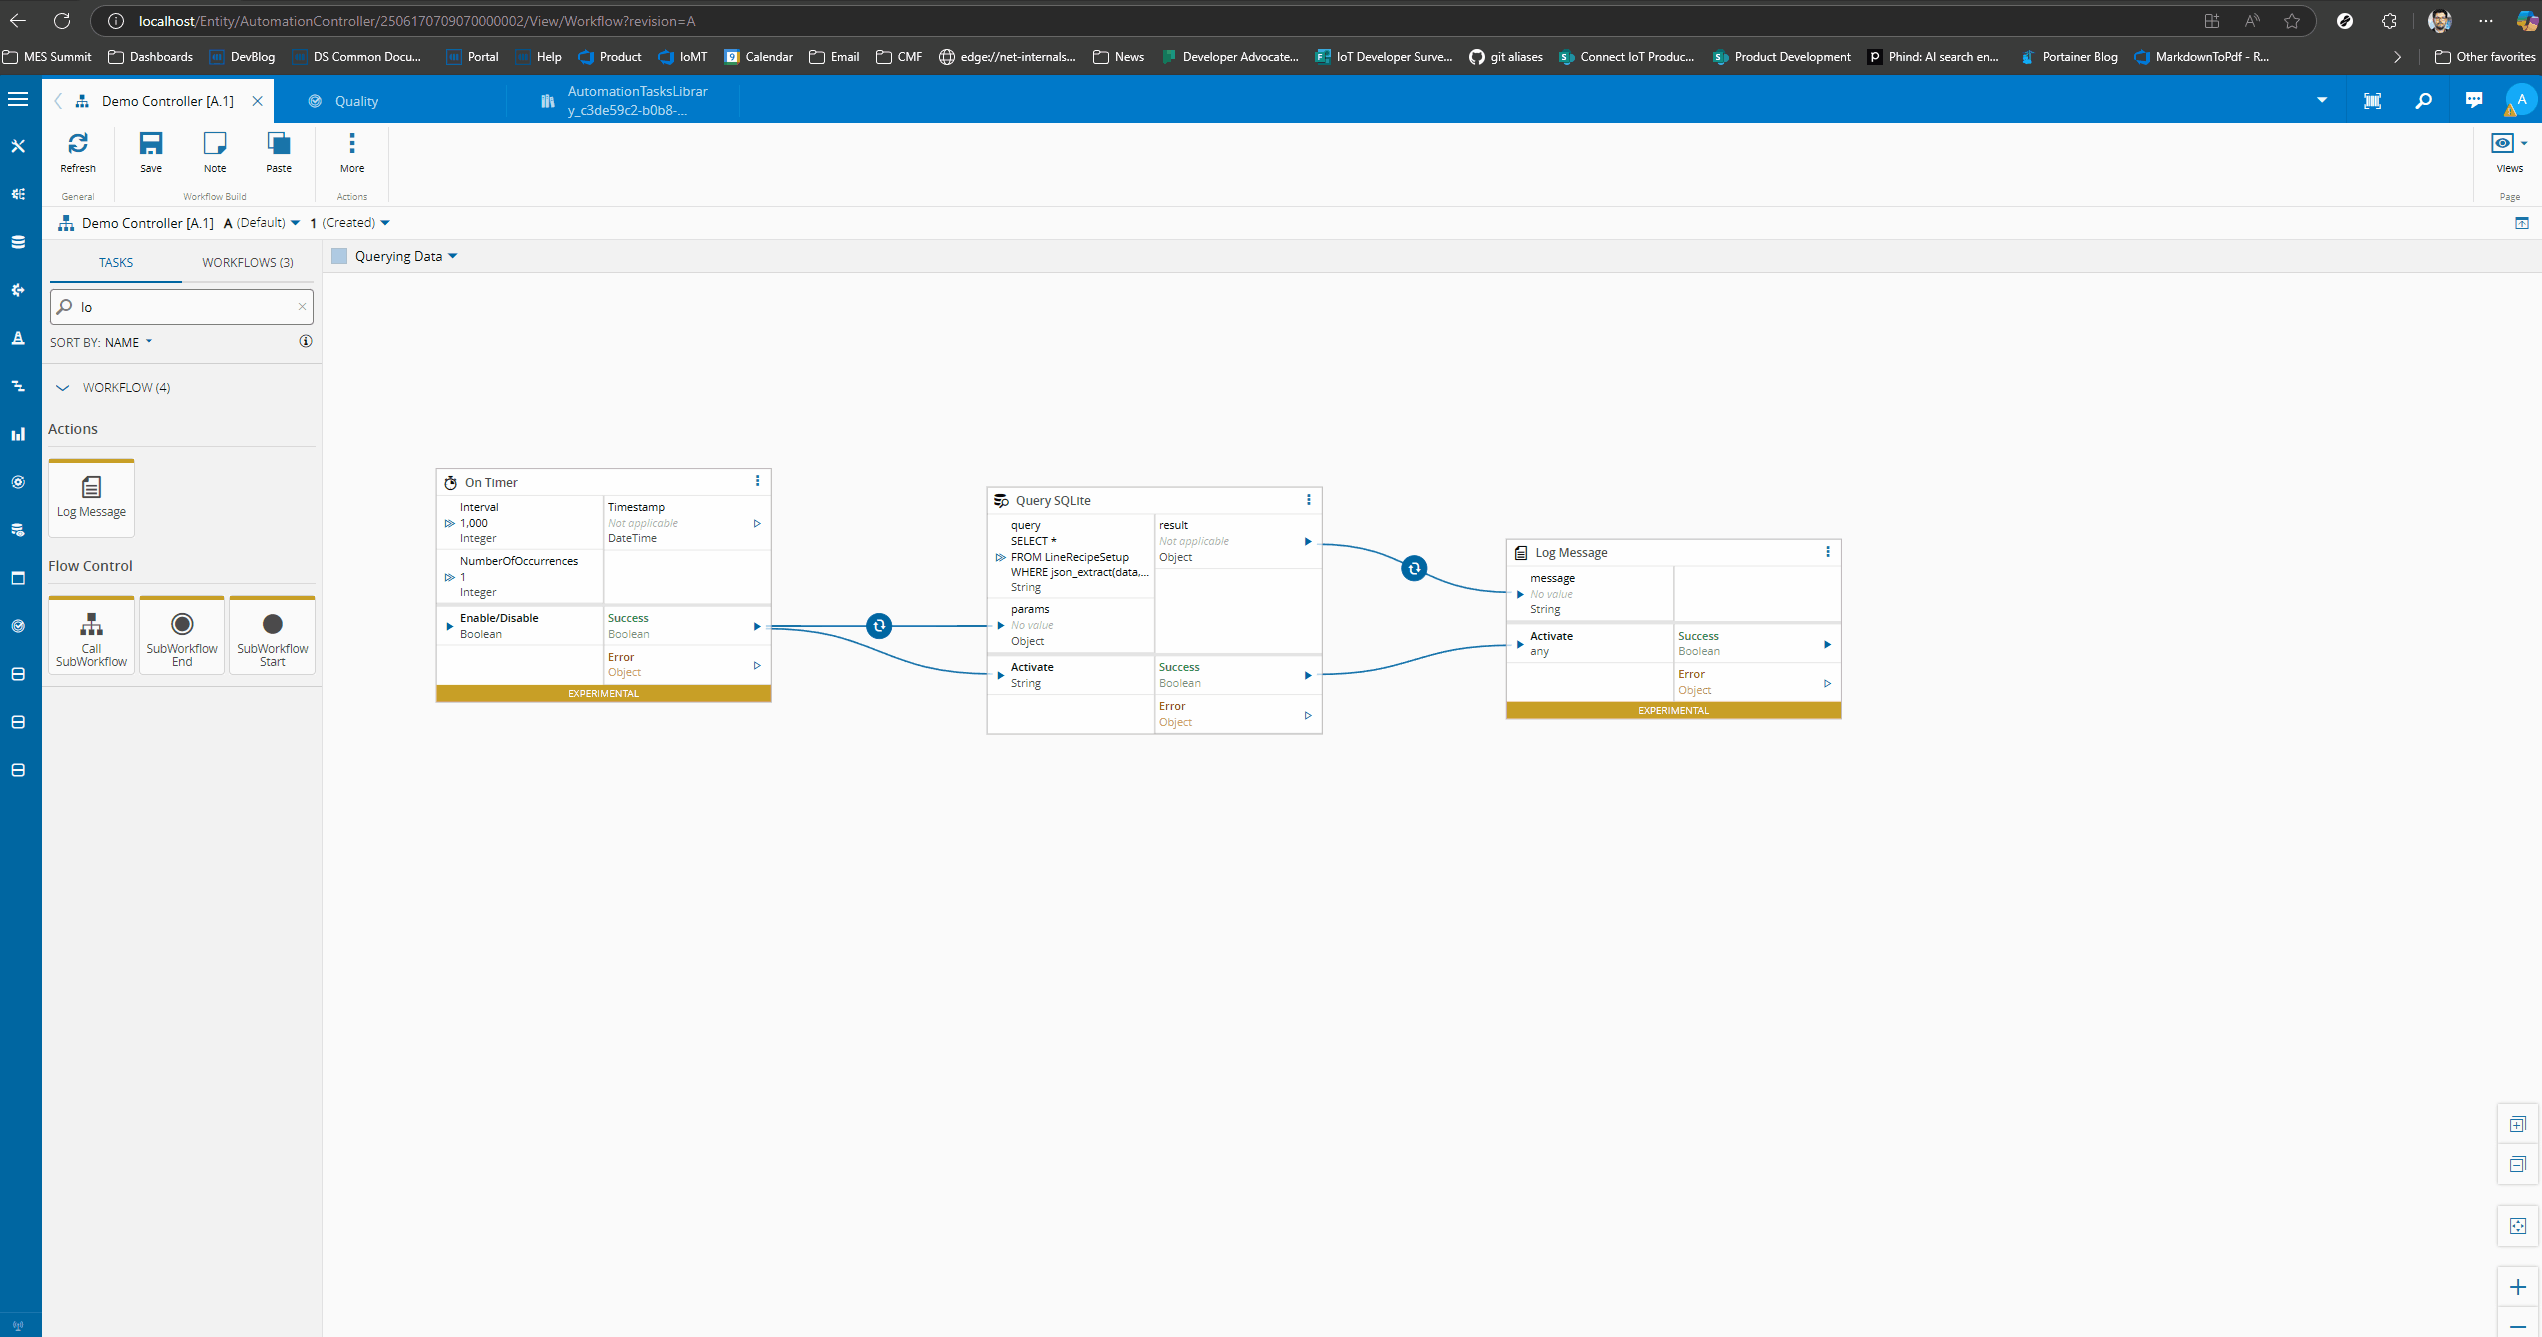
Let’s start with the simplest task. We will create a task that allows us to perform raw queries to our SQLite database.
In this example I am doing a query to check if there is a record with a RecipeFullPath of ‘Line7\80627_758_0005\81712_990_0009’ and a SetupFullPath of ‘Line7\80627_758_0005’.
SELECT *
FROM LineRecipeSetup
WHERE json_extract(data, '$.RecipeFullPath') = 'Line7\80627_758_0005\81712_990_0009'
  AND json_extract(data, '$.SetupFullPath') = 'Line7\80627_758_0005';
We can now try the query both on the SQLite Client and in the Connect IoT task. We will add the query in the Query SQLite task and log the outcome. The outcome is a large payload with the json document.
I can have the values in the query, or use the ? and pass the values as params.
SELECT *
FROM LineRecipeSetup
WHERE json_extract(data, '$.RecipeFullPath') = '?'
  AND json_extract(data, '$.SetupFullPath') = '?';
Now we just need to change our Connect IoT task to have parameters. When we execute the task we can see that it is able to execute and returns the corresponding JSON document.
public override async onChanges(changes: Task.Changes): Promise<void> {
    if (changes["activate"]) {
        // It is advised to reset the activate to allow being reactivated without the value being different
        this.activate = undefined;

        try {

            this._logger.info("Starting Execution of Query SQLite task");
            const queryResult = this._sqliteManager.rawQuery(this.query, this.params);
            this.result.emit(queryResult);
            this.success.emit(true);

            this._logger.info("Finished Executing Query SQLite task");
        } catch (e) {
            this.logAndEmitError(e.message);
        }
    }
}
Notice how by abstracting the SQLite layer, this makes our task very simple. The Query SQLite task is just an entrypoint to the SQLite Manager. It receives the query and params and will call the rawQuery method.
public rawQuery(query: string, params: string[]) {
    if (this._db == null) {
        this.startSQLLite();
    }

    const stmt = this._db.prepare(query, params);
    const rows = stmt.all(...params);

    return rows;
}
This is also quite simple in the SQLite Manager. We are just preparing a statement to be executed.

Simplifying Data Querying#
One of the advantages of using tasks and making them available in low code is the possibility of enabling and simplifying the user experience.
We can now create a set of helpful tasks to allow for a simplified query mechanism.
Querying by JSON Path#
Let’s create a task that allows us to query by JSON path. We could use the query SQLite task and write, for example:
SELECT *
FROM LineRecipeSetup
WHERE json_extract(data, '$.RecipeFullPath') = '?'
This requires the user some knowledge of how to use SQL languages and the particularities of JSON querying in SQLite. An alternative is building a simple task.
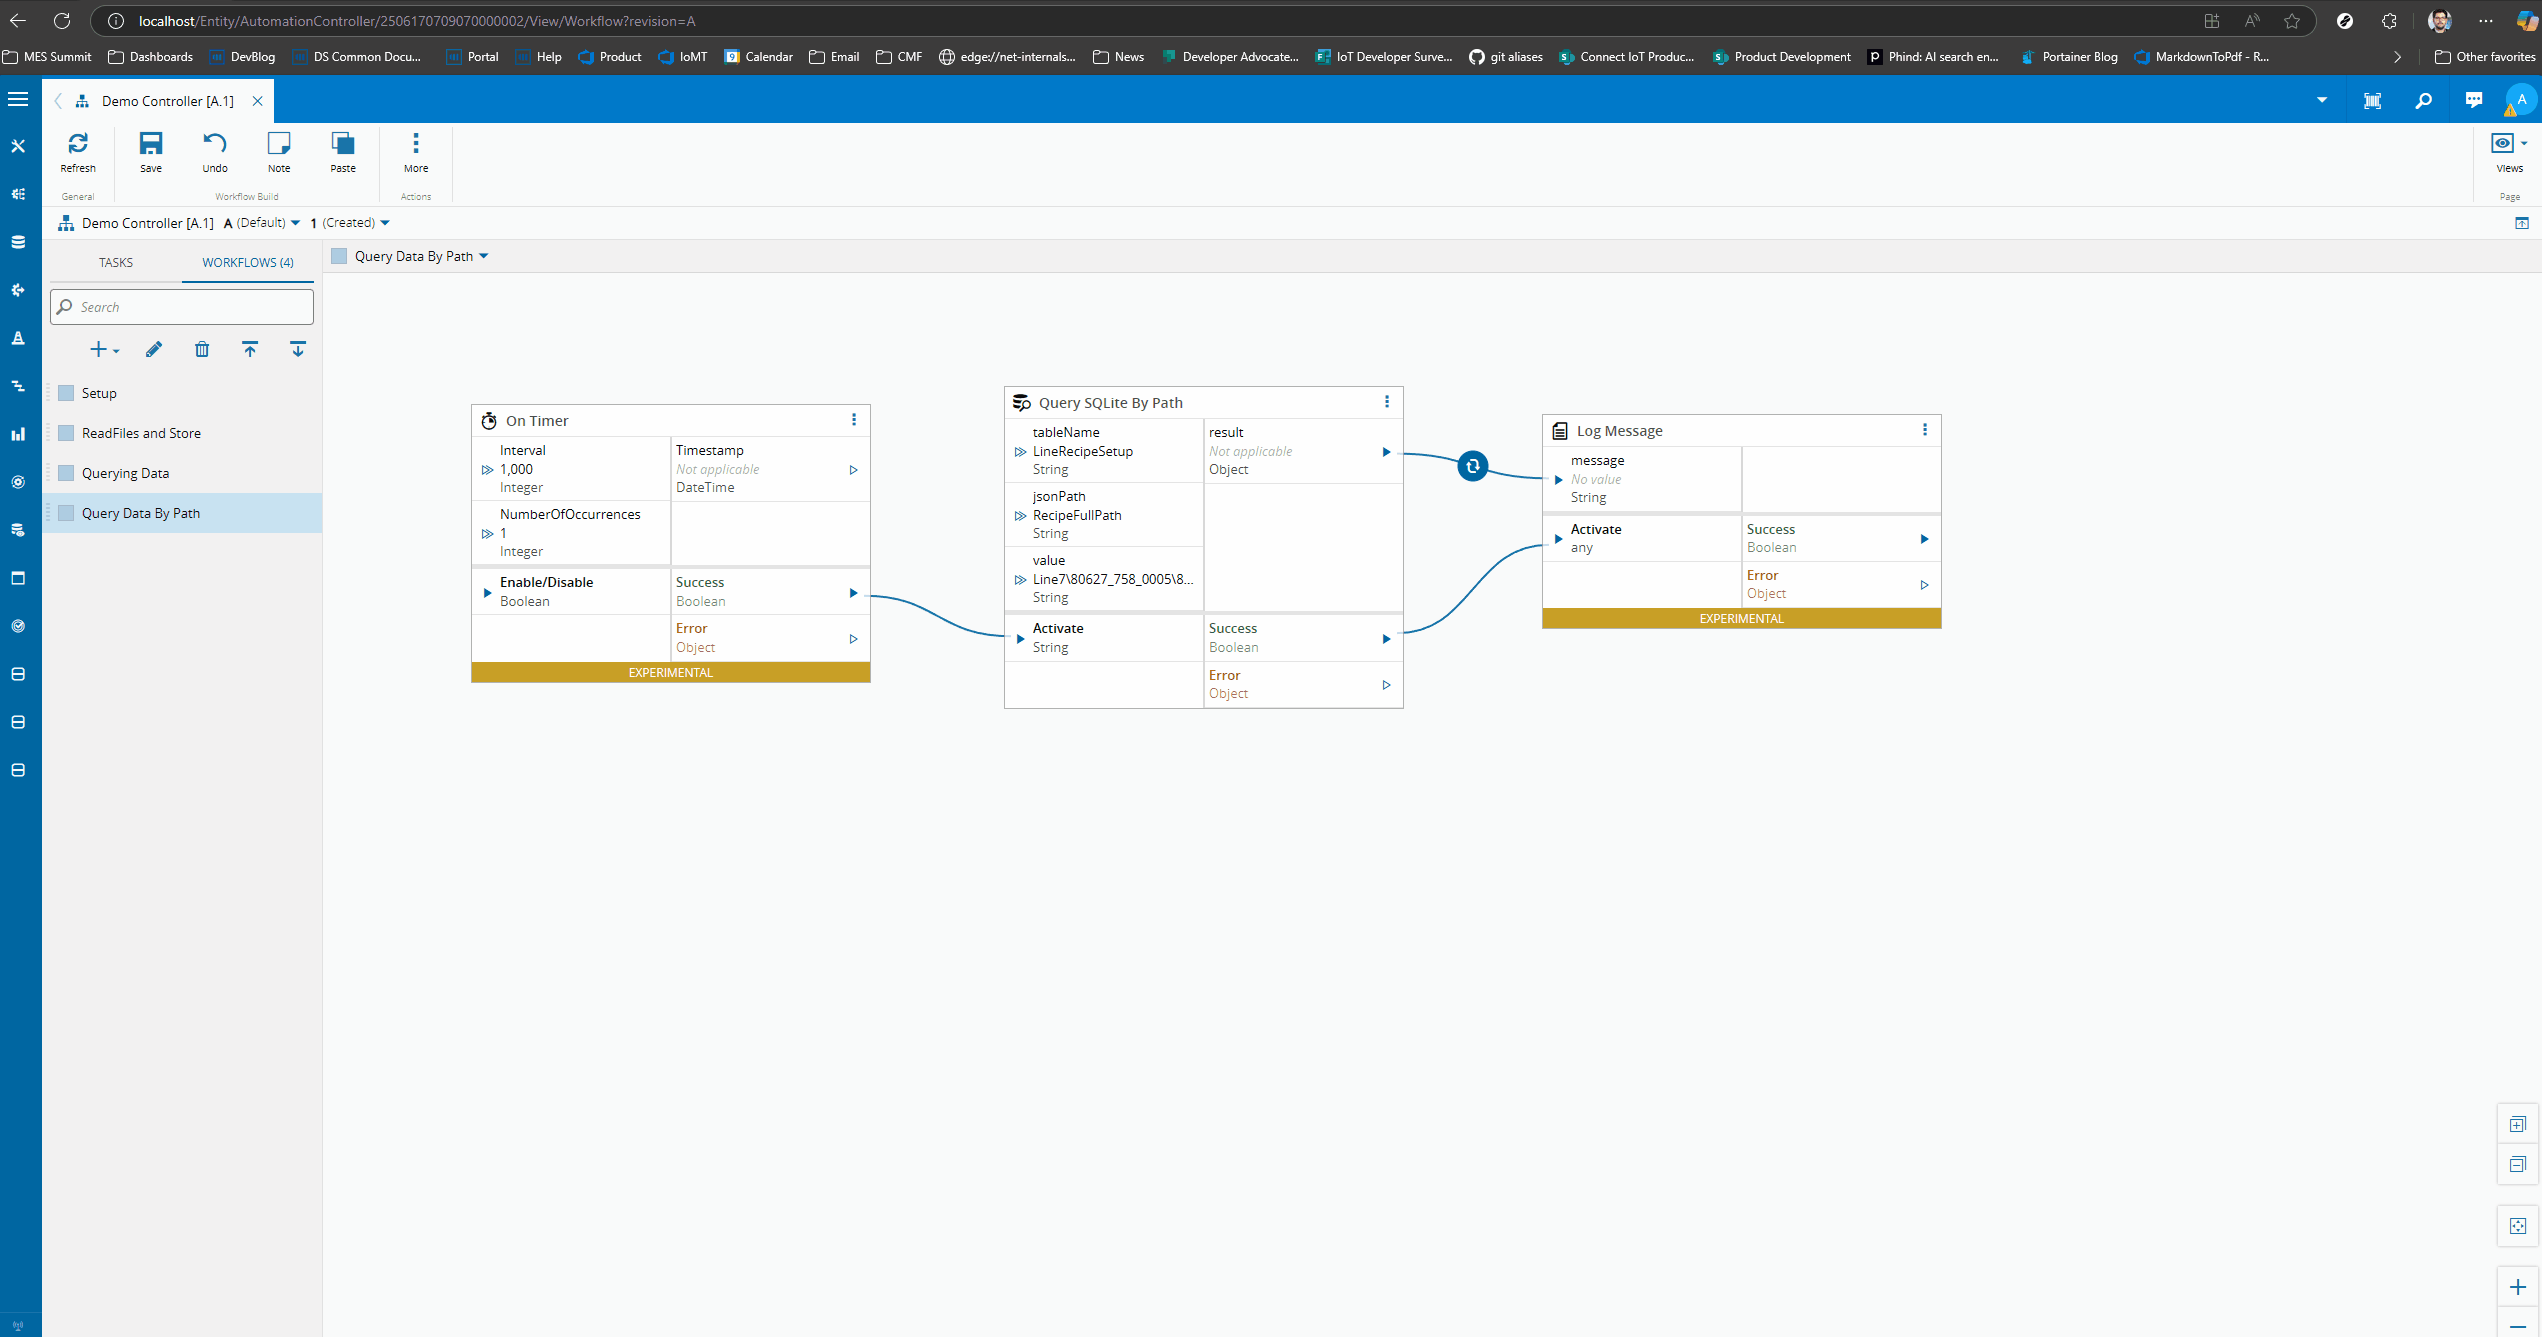
With this task the user does not need to know the intricacies of SQL or the particularities of SQLite.
public override async onChanges(changes: Task.Changes): Promise<void> {
    if (changes["activate"]) {
        // It is advised to reset the activate to allow being reactivated without the value being different
        this.activate = undefined;

        try {

            this._logger.debug("Starting Execution of Query by Path SQLite task");
            const queryResult = this._sqliteManager.queryByPath(this.tableName, this.jsonPath, this.value);
            this.result.emit(queryResult);
            this.success.emit(true);

            this._logger.info("Finished Executing Query by Path SQLite task");
        } catch (e) {
            this.logAndEmitError(e.message);
        }

    }
}
The SQLite Manager is the one concerned with the SQL code execution.
public queryByPath(documentType: string, jsonPath: string, value: string) {
    try {
        const tableName = this.guardClause(documentType);

        const query = `
            SELECT id, json_extract(data, '$') as data, created_at, updated_at
            FROM ${tableName}
            WHERE json_extract(data, ?) = ?
        `;
        const params = ["$." + jsonPath, value];

        const stmt = this._db.prepare(query);
        const rows = stmt.all(...params);
        return rows.map((row: { data: string; }) => ({
            ...row,
            data: JSON.parse(row.data)
        }));
    } catch (error) {
        this._logger.error("Error querying by path:", error);
        return [];
    }
}
Creating a Smarter Querying Mechanism#
We can create an even simpler approach to query building.
For example, our original query:
SELECT *
FROM LineRecipeSetup
WHERE json_extract(data, '$.RecipeFullPath') = 'Line7\80627_758_0005\81712_990_0009'
  AND json_extract(data, '$.SetupFullPath') = 'Line7\80627_758_0005';
Can know be constructed by configuration with the task flexible query SQLite.
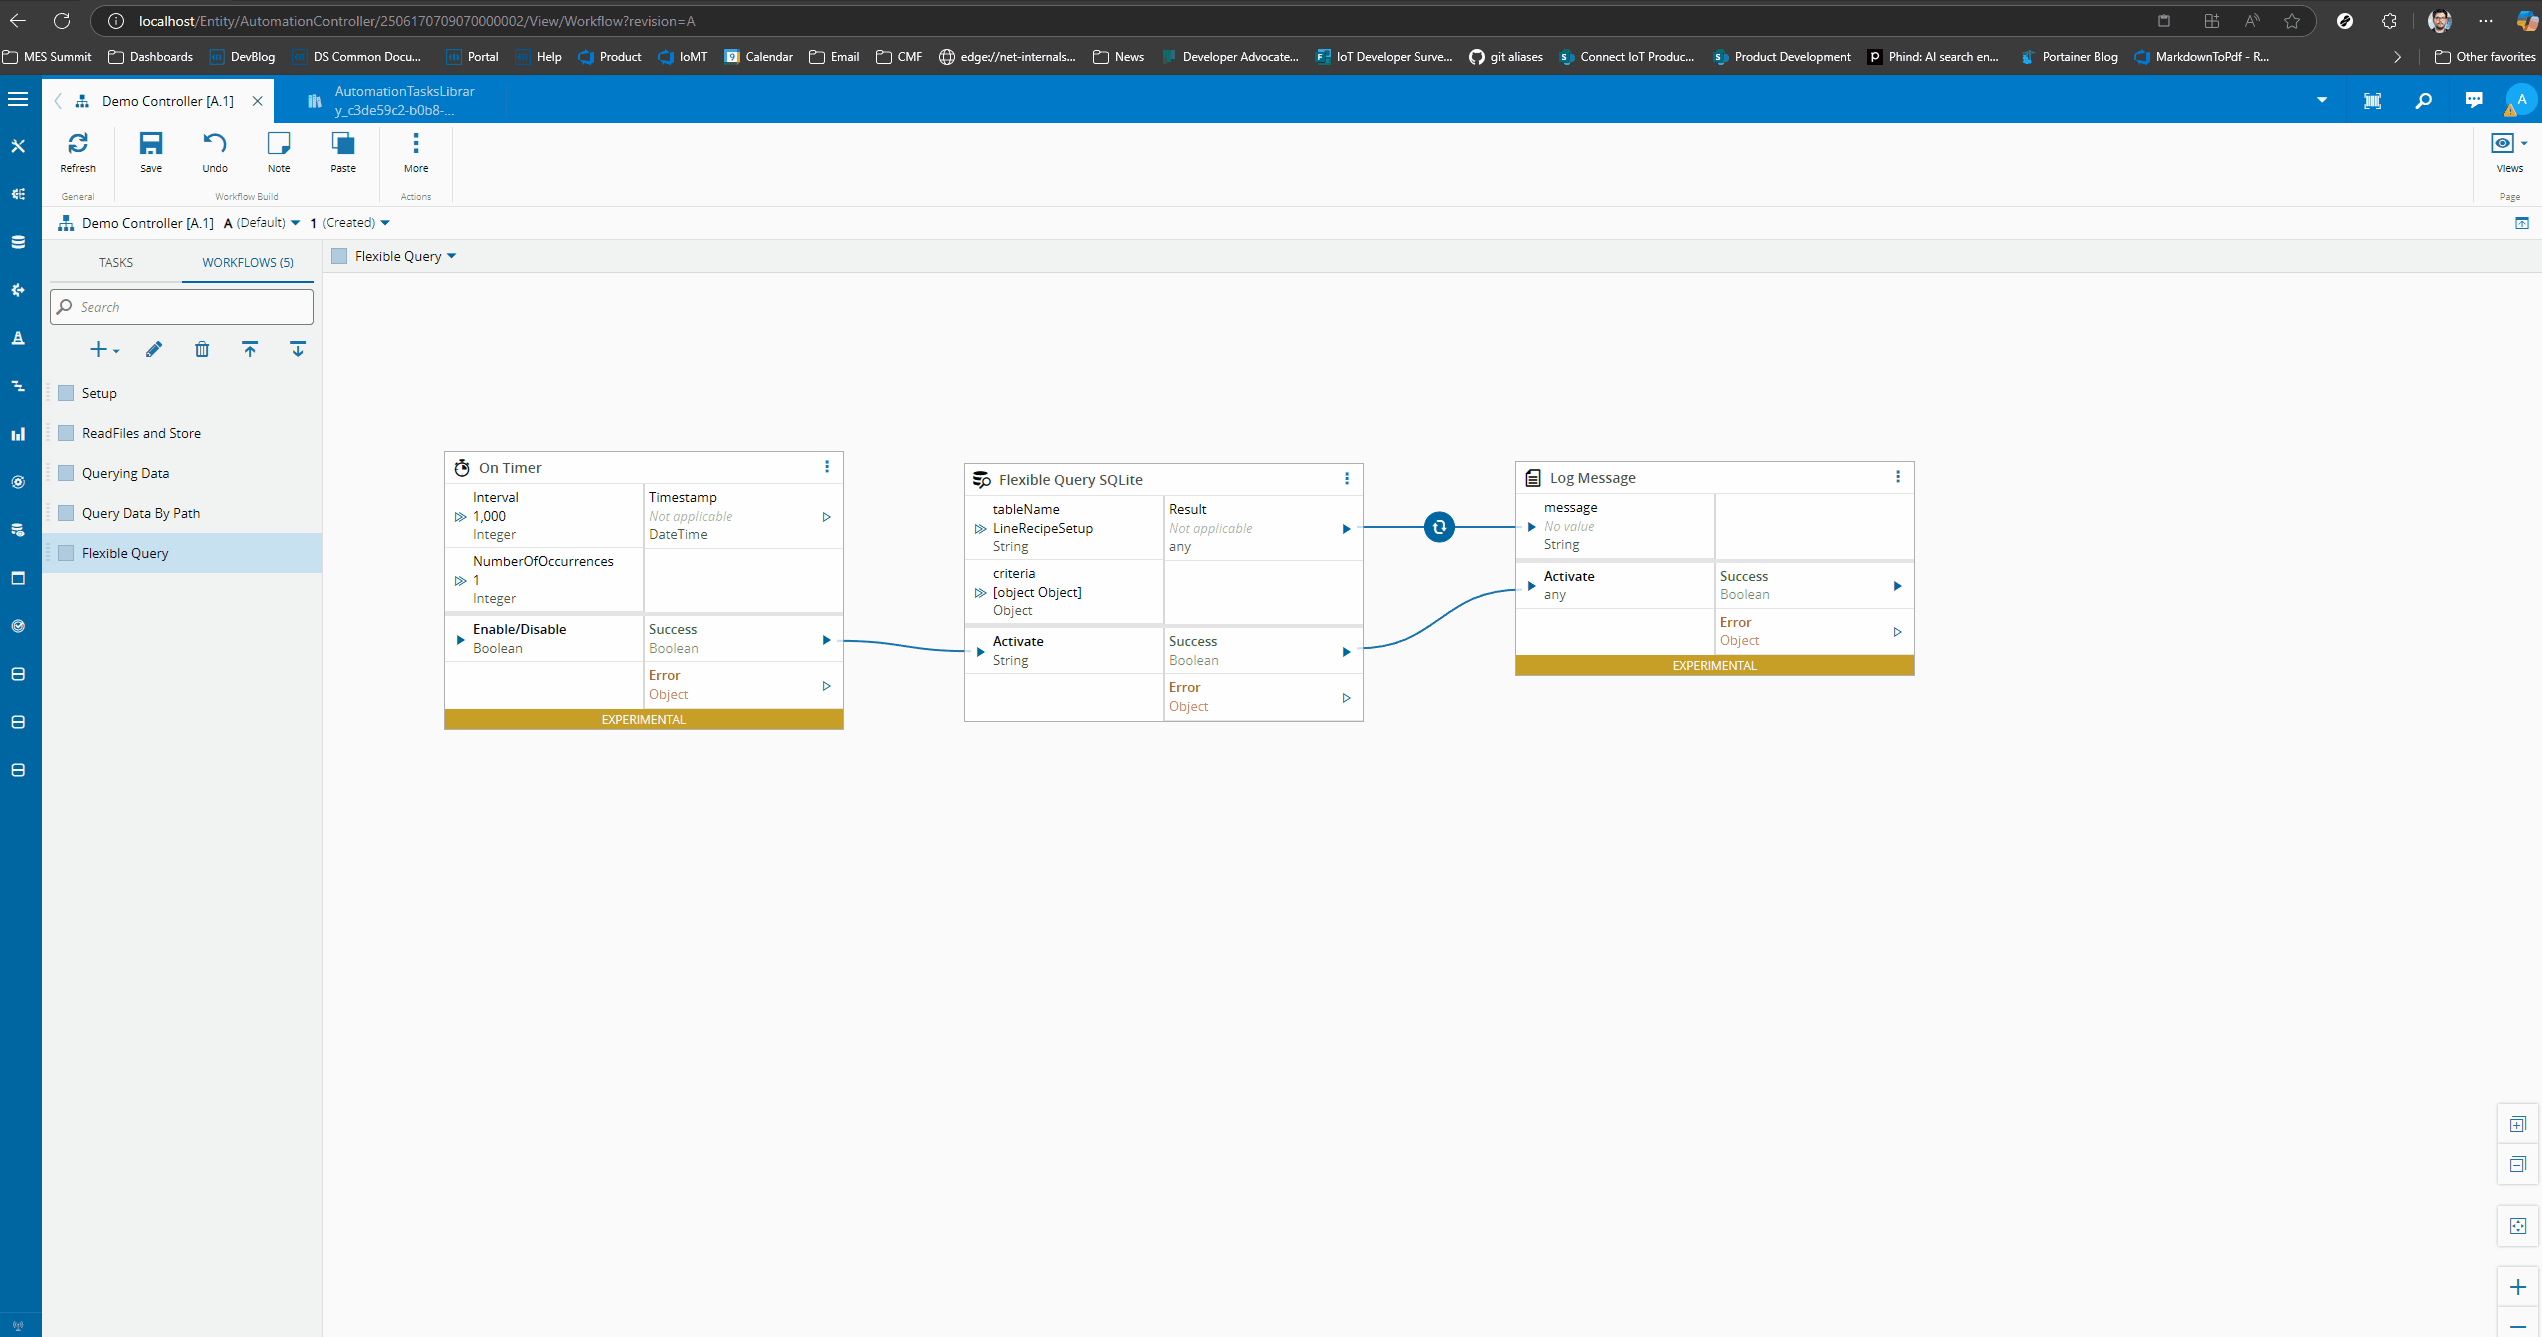
We created a simple structure that can be constructed as an input or as a setting.
[
  {
    "operator": "equals",
    "path": "RecipeFullPath",
    "value": "Line7\\80627_758_0005\\81712_990_0009"
  },
  {
    "operator": "equals",
    "path": "SetupFullPath",
    "value": "Line7\\80627_758_0005"
  }
]
We provide an operator ’like’, ’equals’, ‘greater_than’, ’less_than’, ‘contains’ a path in the json document and a value to match. We can create an array of operator and the in the SQLiteManager create a very simple query builder.
public override async onChanges(changes: Task.Changes): Promise<void> {
    if (changes["activate"]) {
        // It is advised to reset the activate to allow being reactivated without the value being different
        this.activate = undefined;

        try {

            this._logger.info("Starting Execution of Flexible Query SQLite task");
            const queryResult = this._sqliteManager.flexibleSearch(this.tableName, this.criteria);
            this.result.emit(queryResult);
            this.success.emit(true);

            this._logger.info("Finished Executing Flexible Query SQLite task");
        } catch (e) {
            this.logAndEmitError(e.message);
        }
    }
}
In the SQLite Manager class we can create our flexible search method.
public flexibleSearch(documentType: string,
    criteria: {
        jsonFilters: { operator: string; path: string; value: any }[];
        limit: any;
    }) {
    try {

        const tableName = this.guardClause(documentType);

        let query = `
            SELECT id, json_extract(data, '$') as data,
                created_at, updated_at
            FROM ${tableName} WHERE 1=1
        `;
        const params = [];

        // Add JSON path filters
        if (criteria.jsonFilters) {
            criteria.jsonFilters.forEach(filter => {
                switch (filter.operator) {
                    case "equals":
                        query += ` AND json_extract(data, ?) = ?`;
                        params.push(filter.path, filter.value);
                        break;
                    case "greater_than":
                        query += ` AND CAST(json_extract(data, ?) AS REAL) > ?`;
                        params.push(filter.path, filter.value);
                        break;
                    case "less_than":
                        query += ` AND CAST(json_extract(data, ?) AS REAL) < ?`;
                        params.push(filter.path, filter.value);
                        break;
                    case "contains":
                        query += ` AND json_extract(data, ?) LIKE ?`;
                        params.push(filter.path, `%${filter.value}%`);
                        break;
                }
            });
        }

        // Add ordering and limit
        query += ` ORDER BY created_at DESC`;
        if (criteria.limit) {
            query += ` LIMIT ?`;
            params.push(criteria.limit);
        }

        const stmt = this._db.prepare(query);
        const rows = stmt.all(...params);
        return rows.map(row => ({
            ...row,
            data: JSON.parse(row.data)
        }));
    } catch (error) {
        this._logger.error("Error in flexible search:", error);
        return [];
    }
}
These types of helpers allow for the developer to create a very simple experience for all other consumers of his task. The user no longer needs to be an expert in creating SQL queries. He can leverage a simple task to create his implementations.
Of course for more advanced users they can still use the raw query where they fully control what is being used.
Unstructured Querying#
Notice that these tasks also work if you choose to go with a one table approach to hold all your json documents. Currently, we are storing all json documents in a rawdata table and we can use the same query we’ve been using to query that table.
This is also a valid approach, of course you will have the downsides of being slower, you can be storing inconsistent data and that table may grow larger in a hard to control way.
Final Thoughts#
We have reached the end of our use case. Hopefully this use case was an interesting showcase of what you can do with Connect IoT. How you can leverage NPM packages and how you can extend what Critical Manufacturing provides out of the box.