In this post I am going to introduce the use of a testing framework for IoT low code flow testing, using machine simulators. All detailed information about this tool can be found in the developer portal, the goal of this blog post is to present some use cases.
Low Code#
Low code is great at bringing increased transparency to whatever it is you’re doing, it enables stakeholders that are not software engineers to intuitively understand customization logic without having to understand code. Low code is based on some form of composability, you add blocks of atomic actions to create complex flows. The sum of these flows will be your integration.
Motivation#
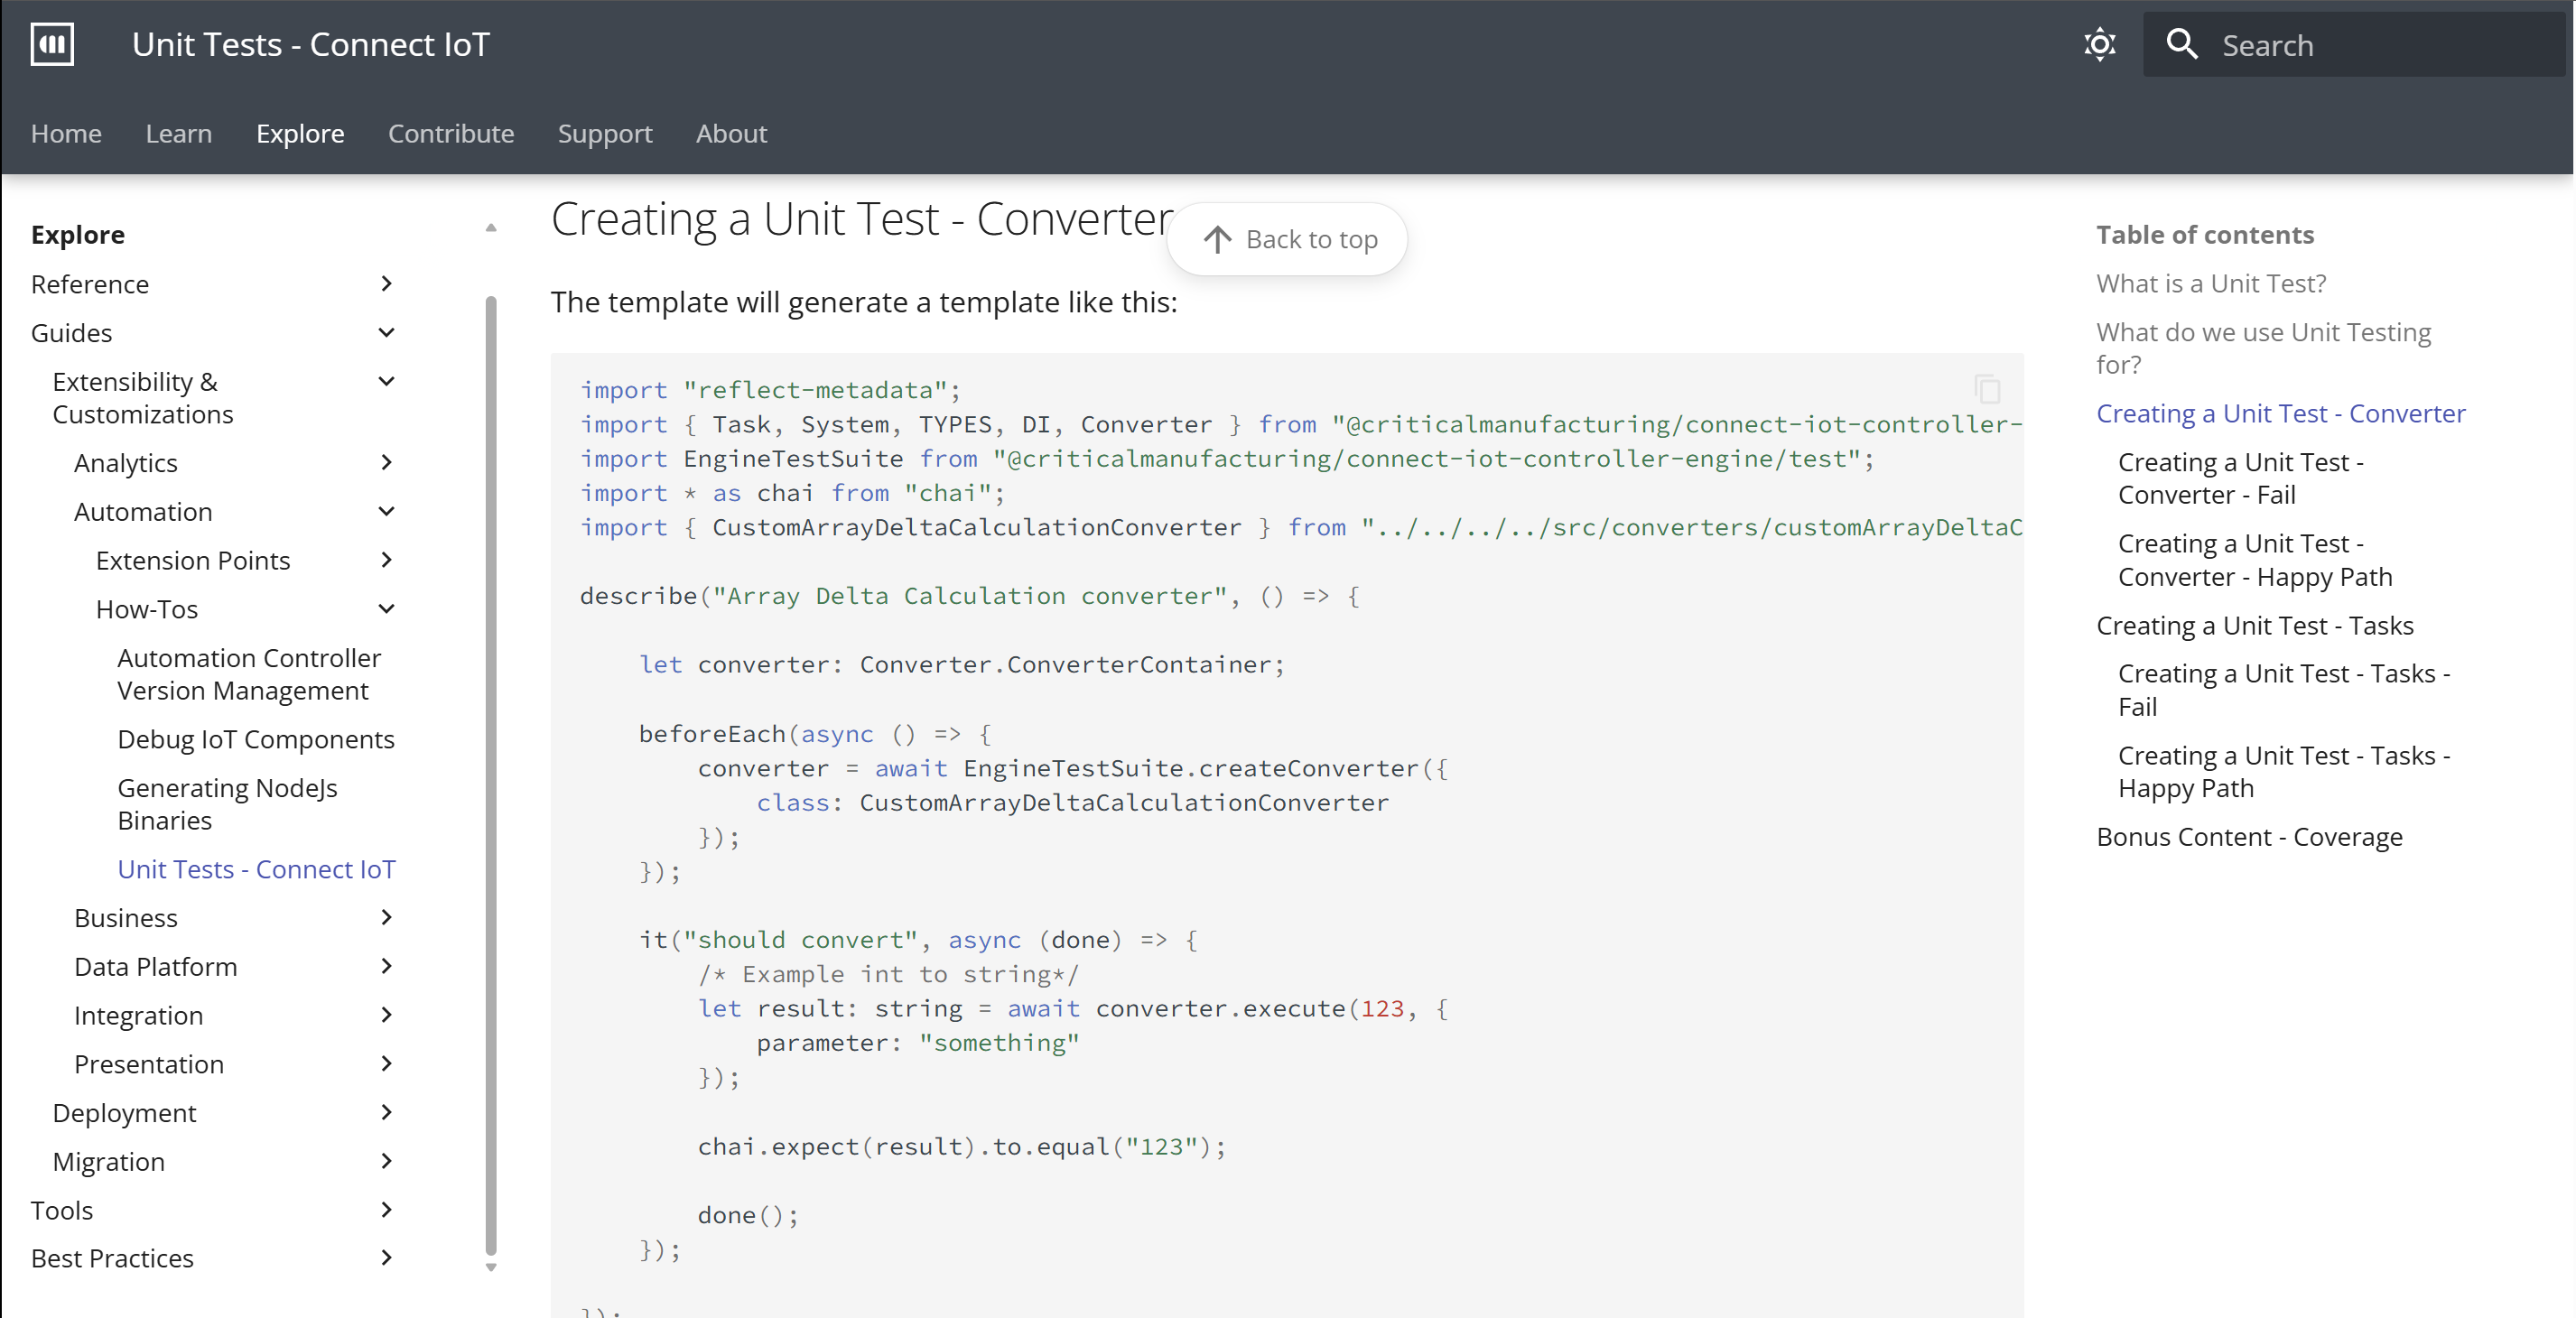
We have extensive documentation on how to build tests for low code components like tasks or converters (documentation on unit testing). These allow you to create your custom components and create test suites to guarantee that they behave as expected.
The major challenge is moving from component level testing to flow testing or integration testing. We guarantee the behavior of our task and converter, but how can we guarantee the behavior of a chain of tasks and converters, and how can we guarantee that adding a driver for protocol X or Y will not break your implementation?
This is a big concern, particularly in integrations that have complex flows. The challenge we gave ourselves was then to create a tool that would allow us to test full on integrations, but still be simple, extensible, fast and autonomous.
Simple#
It needs to be simple, we can’t create a framework for automation that works in low code and then have it be very complex to build tests. It also needs to be simple to incentivize an increase in testing as a way to reduce manual qualification time and to improve the overall quality of the deliverables. If tests are very cumbersome, people will avoid doing them and will default to manual testing.
Extensible#
Extensibility is very important, it is not enough for the tool to support out of the box protocols and features. It needs to be able to work with custom protocols and also to develop your own tool plugins.
Fast & Autonomous#
Fast and autonomous are very important features. One of the challenges of previous tools was that they were focused on having all components of the integration running. So you would need a full on MES environment with all of its components up and working and then you would need to have a test suite that would connect to the environment and perform actions and then eventually get to test the automation layer. This is of course a very valid scenario for full on functional tests, but it is very cumbersome for all other kinds of testing and also it is very slow. What we started seeing is that as projects grow, the time it takes for the tests to run grows exponentially. Also, if tests are slow, people will avoid running them or creating them as they will be seen as a time sink. Another aspect of this is that as tests become less isolated and try to test multiple running components at the same time, they tend to be flaky and are of course very hard to parallelize.
We wanted to build a tool that was still able to perform functional tests with a full on live MES System, but also that was able to run completely without any MES interaction.
Development Process#
A bit of a side topic, but one that I think is pertinent is how to develop an integration. It is a common paradigm in everyday backend software development to write code and then write unit tests and eventually some integration tests. For equipment integration or any kind of interfacing software this is normally a very messy and error prone way to develop.
A more interesting way to develop is to have a more test driven development way of coding, because you will test how your integration responds to different external inputs.
In other words, you want to have the machine send an event with a set of data and see how your integration responds. In my experience it’s easier to create a test of a machine sending an event and validating what you expect to happen, than creating an integration and then build the test to send an event. It seems like it shouldn’t matter, but it does as if you do this later you may realize in the end that there are problems in the interfacing that influence the whole concept behind your integration.
This is to say that an easy way to build tests is also a way to vastly increase not only the quality of development but also the implementation time.
Building a Test#
Importing the dependencies#
Critical Manufacturing already shares a couple of important .Net nugets in order to use this tool, in https://criticalmanufacturing.io.
The nugets that are required depend on what the user wishes to test. For each protocol that is supported by the tool a different nuget is required. For example, in this post I will show tests of an integration using for example MQTT, therefore I will have to import the nuget Cmf.ConnectIoT.TestOrchestrator.Plugin.Simulator.MQTT. The testing tool will also start an automation manager, so we need to provide a startup plugin. For now we have available the Cmf.ConnectIoT.TestOrchestrator.Plugin.StartMode.Local, finally we have some additional one’s for utilities Cmf.ConnectIoT.TestOrchestrator.Core.ScenarioBuilder and Cmf.ConnectIoT.TestOrchestrator.Core.Common. If you wish to use the tool in the standalone mode without a running MES system you will also need the Cmf.ConnectIoT.TestOrchestrator.Plugin.System.MockSystem nuget.
If you wish to also use CM’s framework you can also import the Light Business Objects.
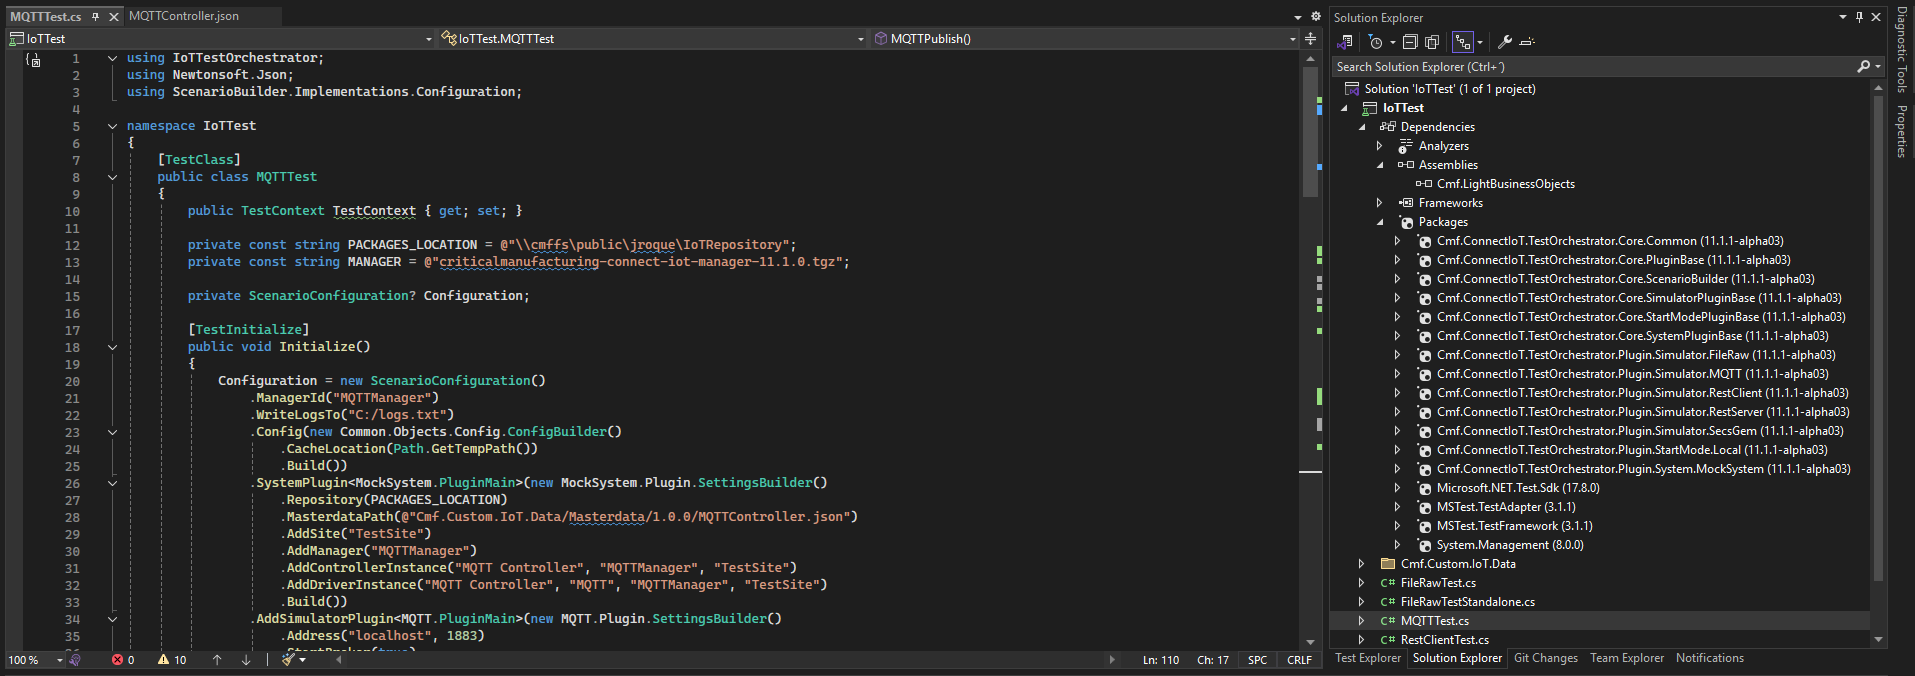
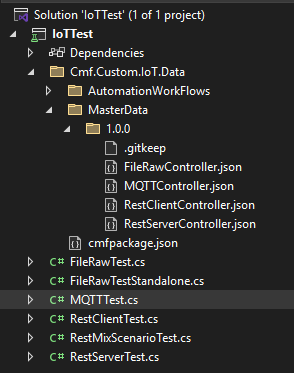
Creating a Test Solution#
I created a new solution called IoTTest and added all the required dependencies.
Example Autonomous Test MQTT Publish#
Let’s create an example of a test for the autonomous (without MES) mode.
Workflow#
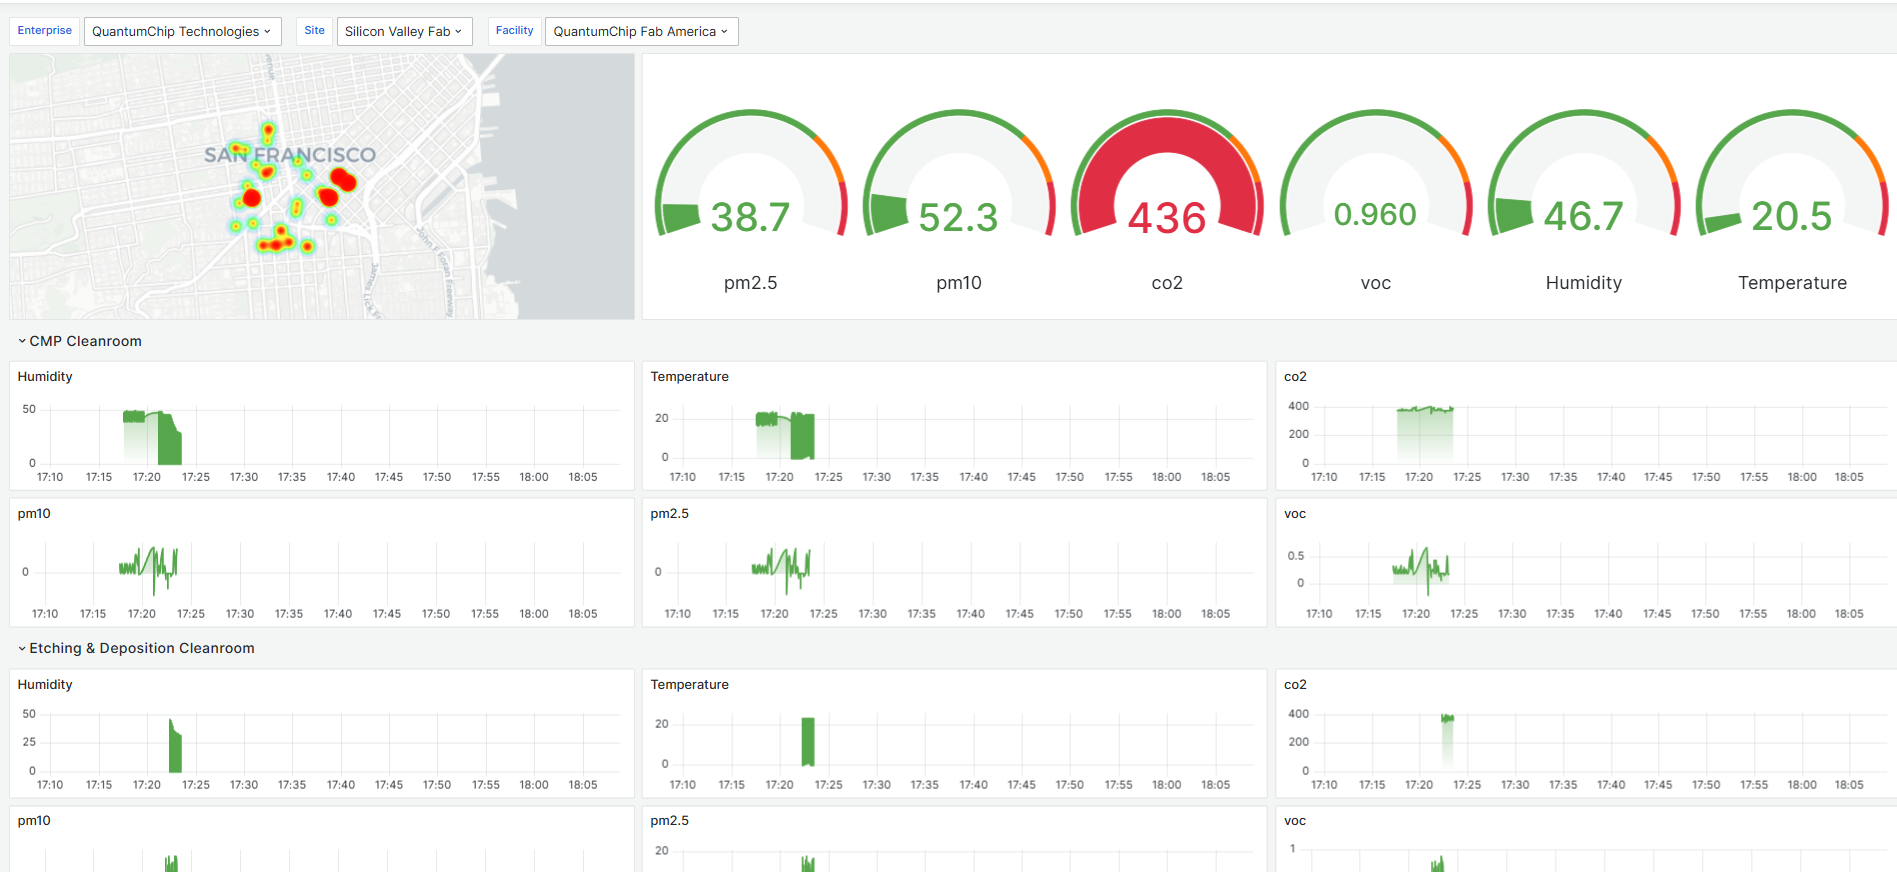
I have created a very simple MQTT integration, for an example of this check out Clean Room Monitoring.
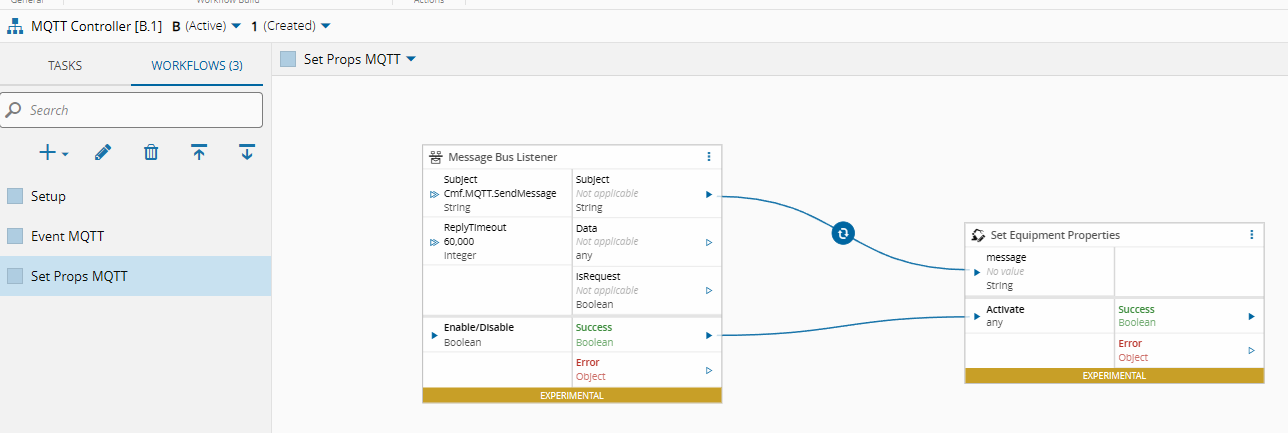
This workflow will receive a message from the message bus topic Cmf.MQTT.SendMessage and will set the equipment property message with a constant value OK.
Let’s build our test…
Building a Scenario#
MSTest supports several different hooks like TestClassInitialize or TestInitialize. Let’s create our scenario configuration in our test initialize method.
In the scenario configuration is where we will set up the behavior of our test orchestrator tool.
private const string PACKAGES_LOCATION = @"\\jroque\IoTRepository";
private const string MANAGER = @"criticalmanufacturing-connect-iot-manager-11.1.0.tgz";

[TestInitialize]
public void Initialize()
{
  Configuration = new ScenarioConfiguration()
    // Manager to start
    .ManagerId("MQTTManager")
    // Optional but nice for development where we can follow our test execution
    .WriteLogsTo("C:/logs.txt")
    // Manager Configuration Settings
    .Config(new Common.Objects.Config.ConfigBuilder()
        .CacheLocation(Path.GetTempPath())
        .Build())
    // Configurations for our Mock System
    .SystemPlugin<MockSystem.PluginMain>(new MockSystem.Plugin.SettingsBuilder()
        .Repository(PACKAGES_LOCATION)
        .MasterdataPath(@"Cmf.Custom.IoT.Data/Masterdata/1.0.0/MQTTController.json")
        .AddSite("TestSite")
        .AddManager("MQTTManager")
        .AddControllerInstance("MQTT Controller", "MQTTManager", "TestSite")
        .AddDriverInstance("MQTT Controller", "MQTT", "MQTTManager", "TestSite")
        .Build())
    // Configurations for the equipment simulator
    .AddSimulatorPlugin<MQTT.PluginMain>(new MQTT.Plugin.SettingsBuilder()
        .Address("localhost", 1883)
        .StartBroker(true)
        .Build())
    // Settings for starting our manager
    .StartMode<LocalStartMode.PluginMain>(new LocalStartMode.Plugin.SettingsBuilder()
        .ManagerLocation(Path.Join(PACKAGES_LOCATION, MANAGER))
        .Build());
}
The scenario configuration is a simple way to setup our test orchestrator. The manager id corresponds to the id of the manager we want to run. The master data path will correspond to the path where my workflow has been exported.
In my test I added a link to my CM CLI IoT Data package where I have my integrations. Having a link to your data package enforces that every time there is a change in the integration, the tests will execute against it (make sure that the files are always being copied to the output directory).
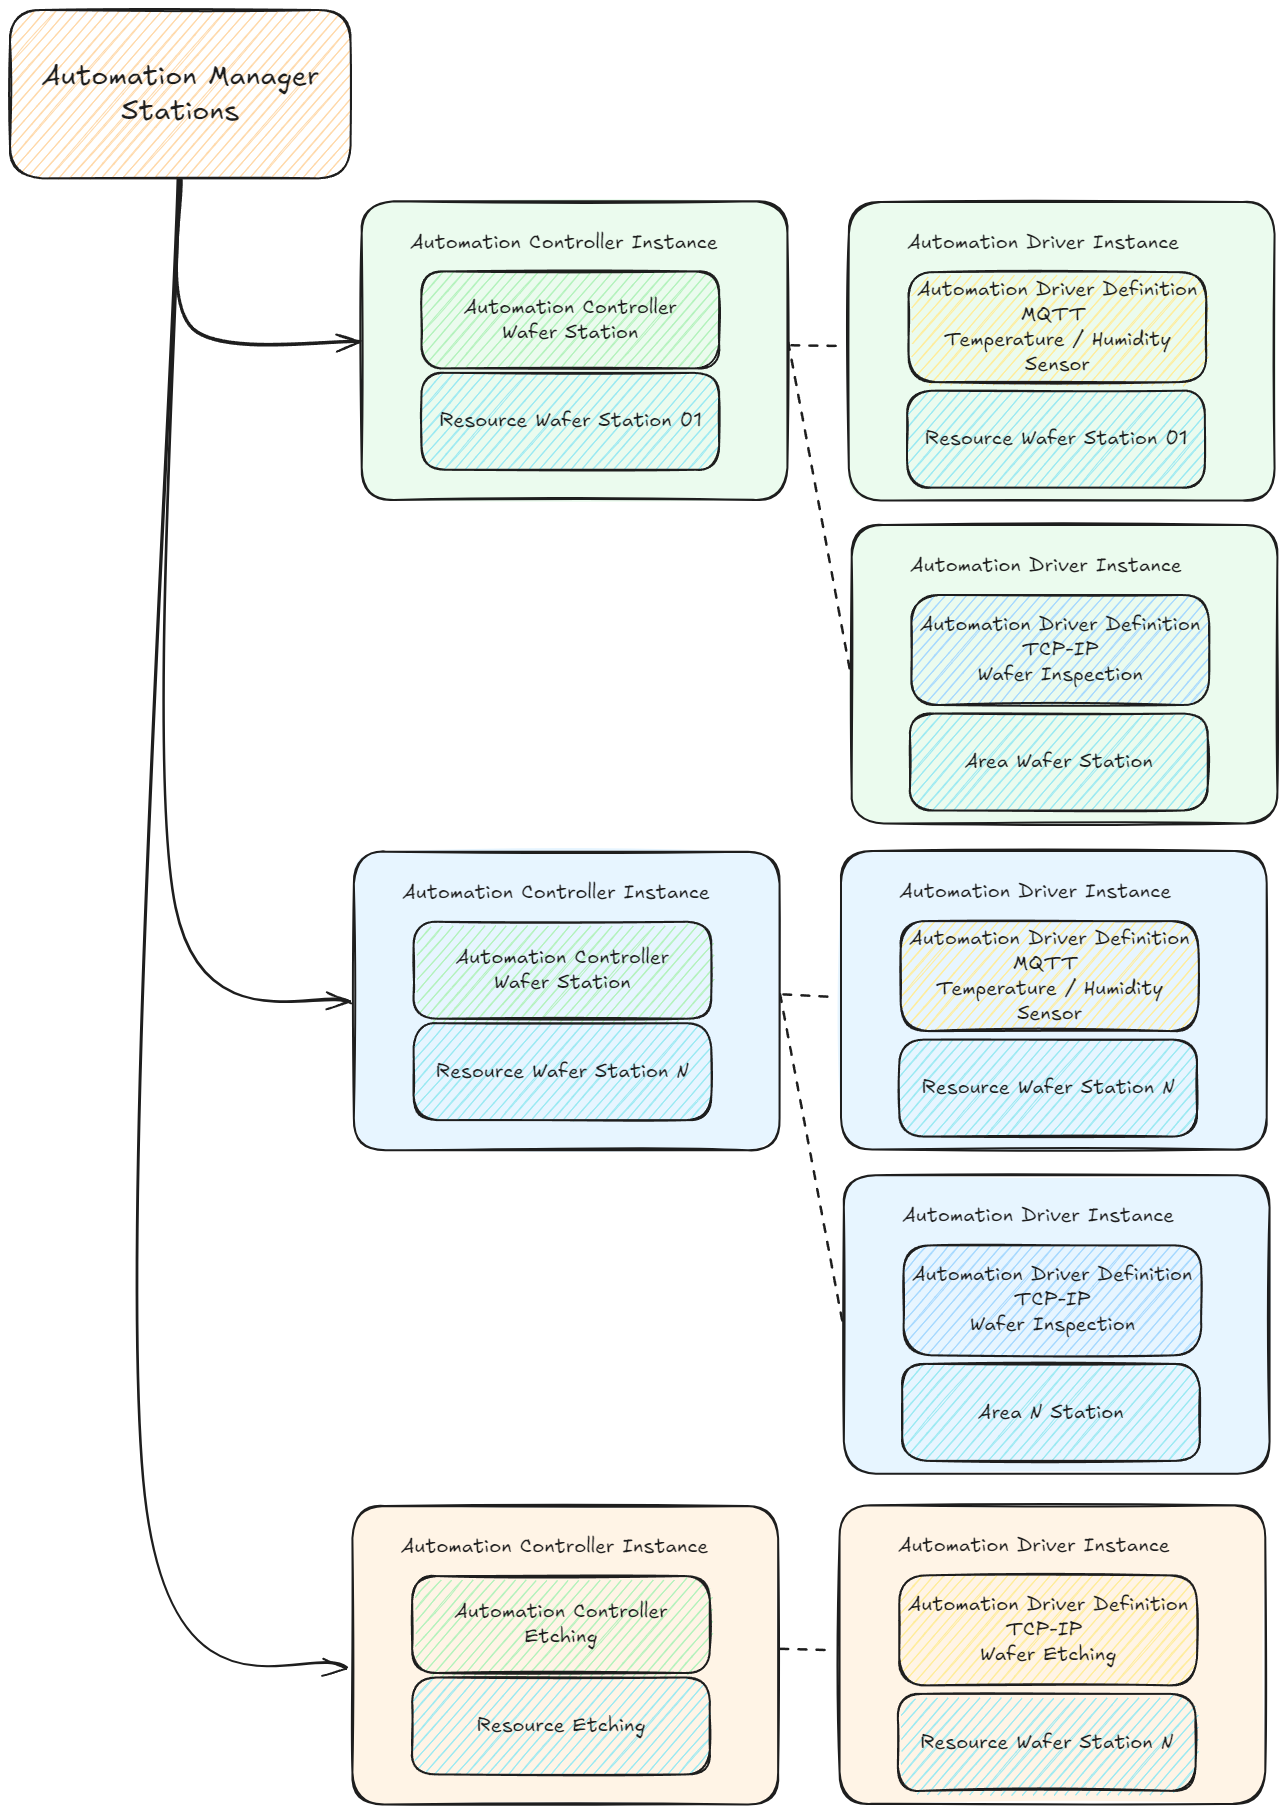
The system plugin is where we will configure our mock System (MES). The system will use your master data location to create mock representations of your objects. In our test, we have a master data file with the export of the Automation Controller. So it has the Automation Protocol, Automation Driver Definition and Automation Controller entities, but it doesn’t have an Automation Manager, the Entity for our tests or the instances required to run automation. We could have them in our master data file, but it is common for these to be delivered outside of the customization deliverables, so we declared them explicitly. You can construct your MES entities by adding them in the scenario builder directly.
The simulator plugin is where we define our equipment test simulator. For MQTT, the test will be responsible for starting an MQTT broker and for allowing subscribing to topics and publishing to topics. This is a simple protocol, so we just need to configure the address of the broker and if we should start the broker.
The start mode is the plugin required for starting the Connect IoT Automation layer. In this example, I have a local repository with all the IoT Packages. The test will search for my manager tgz, unpack it and start the manager according to the specified configurations.
Looking at the test itself:
[TestMethod]
public void MQTTPublish()
{
    new TestScenario(Configuration).Run((scenario, context) =>
    {
        #region Setup

        MockSystem.PluginMain system = (context.System as MockSystem.PluginMain);
        MQTT.PluginMain mqttSimulator = (context.Simulators["MQTT"] as MQTT.PluginMain);

        // Will wait for IoT to connect to the equipment simulator
        system.WaitForAllComunicating(20);

        #endregion Setup

        var messageWasReceived = false;

        // Will create a new message bus client and send a message to a topic
        var mbClient = system.NewMessageBusClient();
        mbClient.Publish("Cmf.MQTT.SendMessage", null);

        // Will subscribe the mqtt equipment simulator to a topic
        mqttSimulator.WaitForMessage(40, "cleanroom/message", (message, topic) =>
        {
            Assert.IsTrue(topic == "cleanroom/message");
            Assert.IsTrue(message == "OK");
            messageWasReceived = true;
            return true;
        });

        scenario.Utilities.WaitFor(50, "No get request was called", () =>
        {
            return messageWasReceived;
        });
    });
}
Test Setup#
The first element of our test is
new TestScenario(Configuration).Run((scenario, context) =>
What this code does is enclose a test run in a scenario execution. It will give to the test orchestrator the responsibility in each run of this test to start a Manager from scratch, start the simulators and then make sure everything is shutdown in the end of the test.
The setup region is where we will wait for the Connect IoT Manager to boot up the controllers and drivers and for them to connect to the equipment simulators.
#region Setup

MockSystem.PluginMain system = (context.System as MockSystem.PluginMain);
MQTT.PluginMain mqttSimulator = (context.Simulators["MQTT"] as MQTT.PluginMain);

// Will wait for IoT to connect to the equipment simulator
system.WaitForAllComunicating(20);

#endregion Setup
Test Run#
The test itself is quite simple. The workflow is expecting to receive a message bus message to the topic Cmf.MQTT.SendMessage and it will the reply with an OK. So our test is sending a message to the topic and subscribe an MQTT client to the topic that expects the message and validate that the message received is as expected.
// Will create a new message bus client and send a message to a topic
var mbClient = system.NewMessageBusClient();
mbClient.Publish("Cmf.MQTT.SendMessage", null);

// Will subscribe the mqtt equipment simulator to a topic
mqttSimulator.WaitForMessage(40, "cleanroom/message", (message, topic) =>
{
    Assert.IsTrue(topic == "cleanroom/message");
    Assert.IsTrue(message == "OK");
    messageWasReceived = true;
    return true;
});

scenario.Utilities.WaitFor(50, "No message was received", () =>
{
    return messageWasReceived;
});
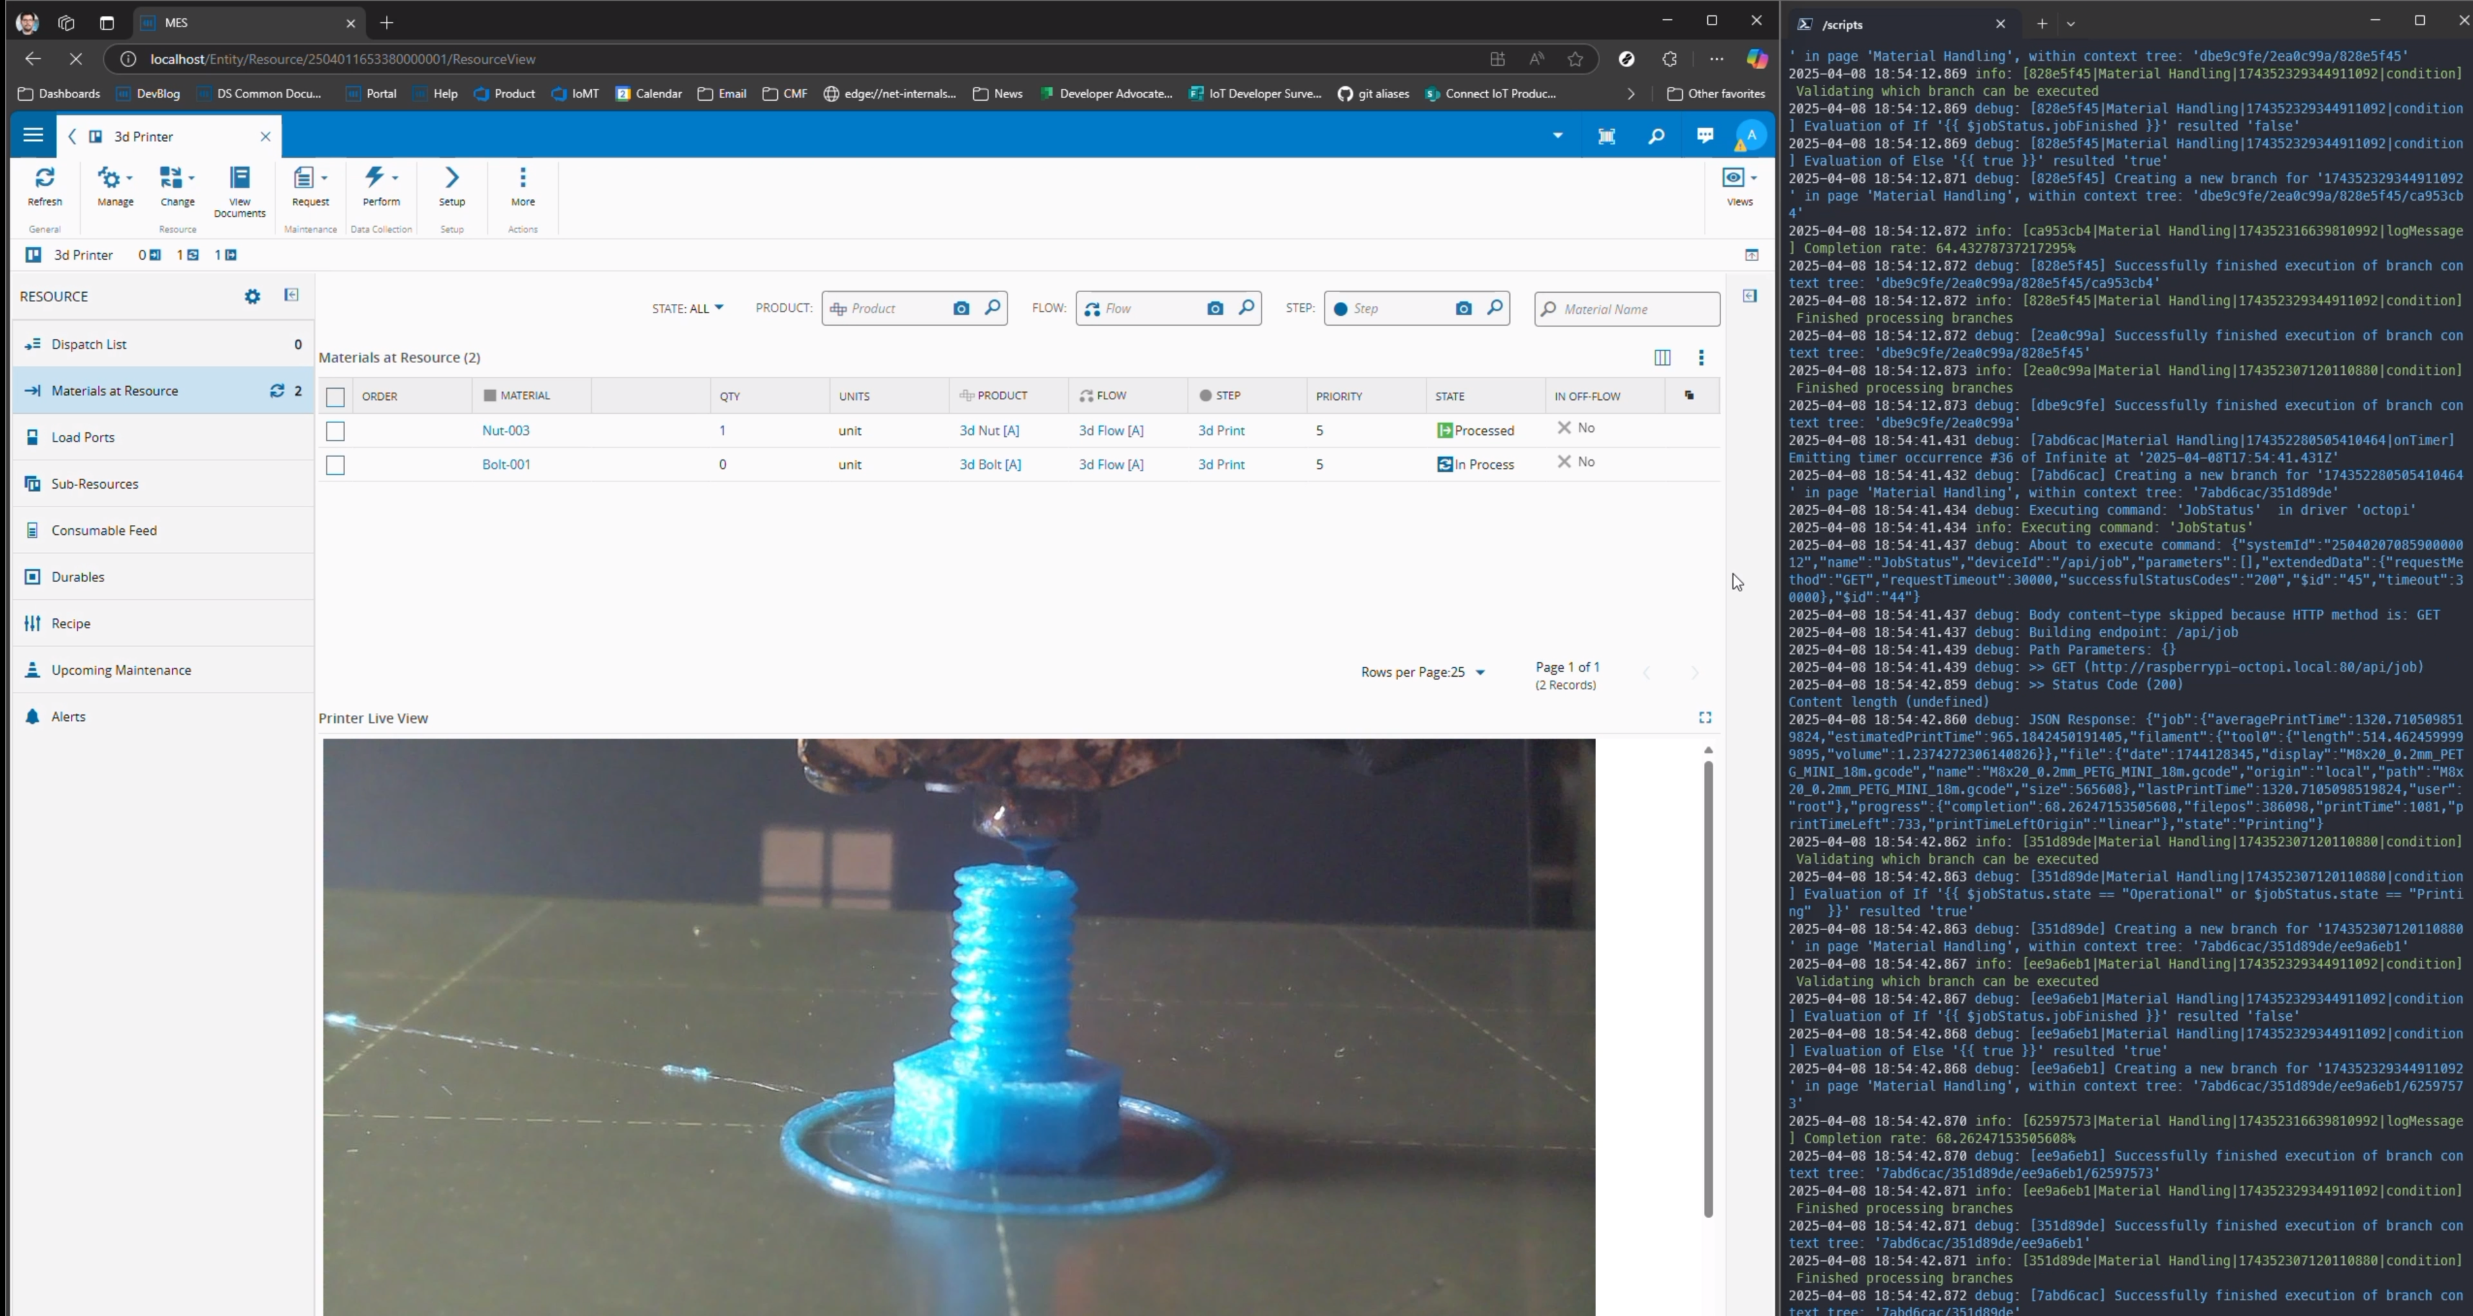
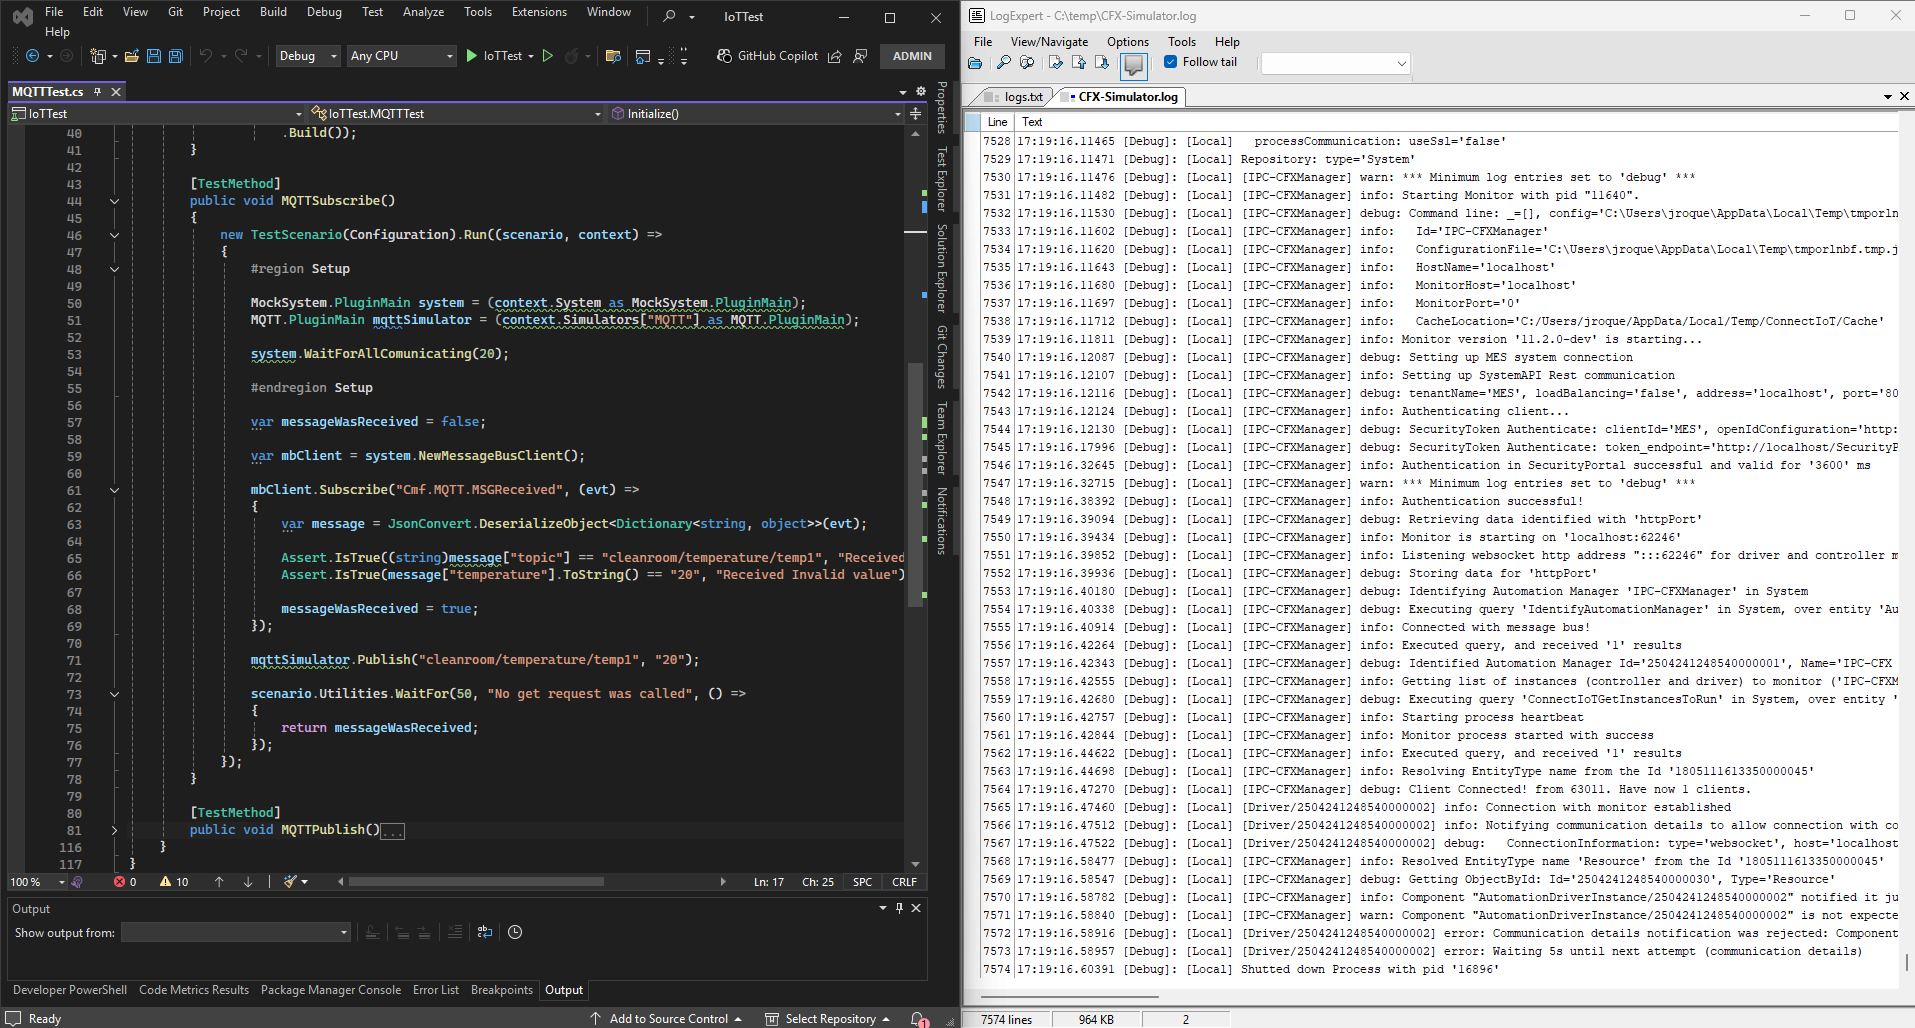
Test Execution#
Example Autonomous Test MQTT Subscribe#
Let’s take a look at the mirror image of the previous test. I have the following workflow, where I am expecting an MQTT event and will then broadcast a message via message bus.
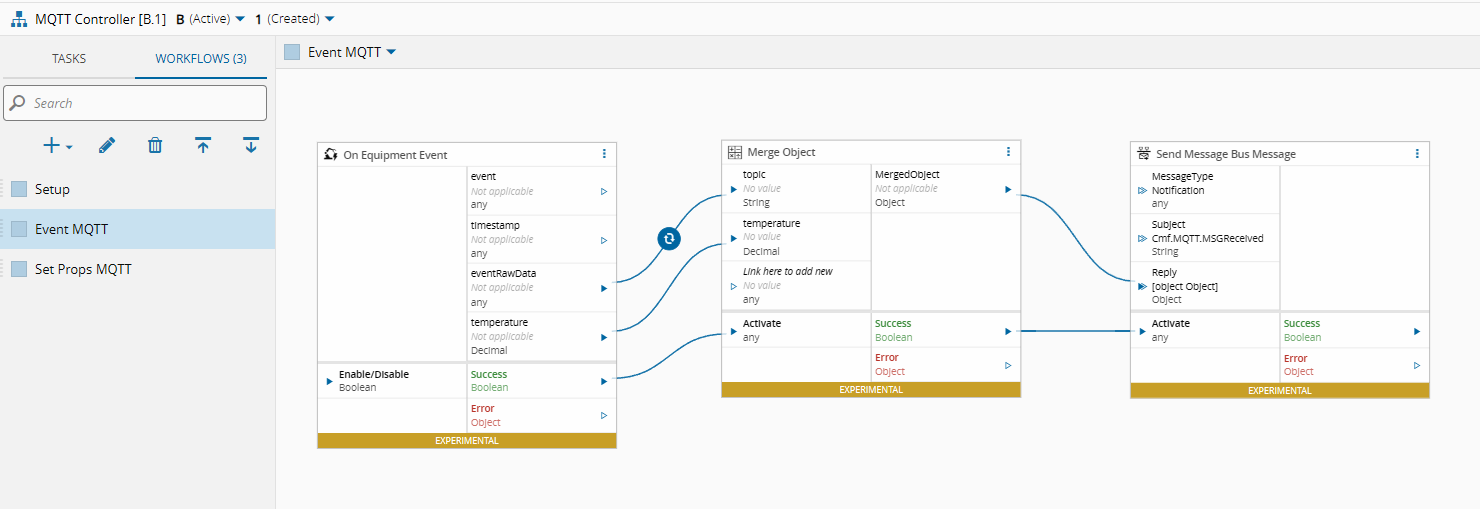
Let’s do the same and build a test.
[TestMethod]
public void MQTTSubscribe()
{
    new TestScenario(Configuration).Run((scenario, context) =>
    {
        #region Setup

        MockSystem.PluginMain system = (context.System as MockSystem.PluginMain);
        MQTT.PluginMain mqttSimulator = (context.Simulators["MQTT"] as MQTT.PluginMain);

        system.WaitForAllComunicating(20);

        #endregion Setup

        var messageWasReceived = false;
        var mbClient = system.NewMessageBusClient();

        mbClient.Subscribe("Cmf.MQTT.MSGReceived", (evt) =>
        {
            var message = JsonConvert.DeserializeObject<Dictionary<string, object>>(evt);

            Assert.IsTrue((string)message["topic"] == "cleanroom/temperature/temp1", "Received Invalid topic");
            Assert.IsTrue(message["temperature"].ToString() == "20", "Received Invalid value");

            messageWasReceived = true;
        });

        mqttSimulator.Publish("cleanroom/temperature/temp1", "20");

        scenario.Utilities.WaitFor(50, "No message received", () =>
        {
            return messageWasReceived;
        });
    });
}
The test setup is the same. The test will create a new message bus client and subscribe to the topic Cmf.MQTT.MSGReceived, it will then send an MQTT publish to the topic cleanroom/temperature/temp1 with the value 20. The message bus subscription callback will be activated and validate that the message and topic are as expected.
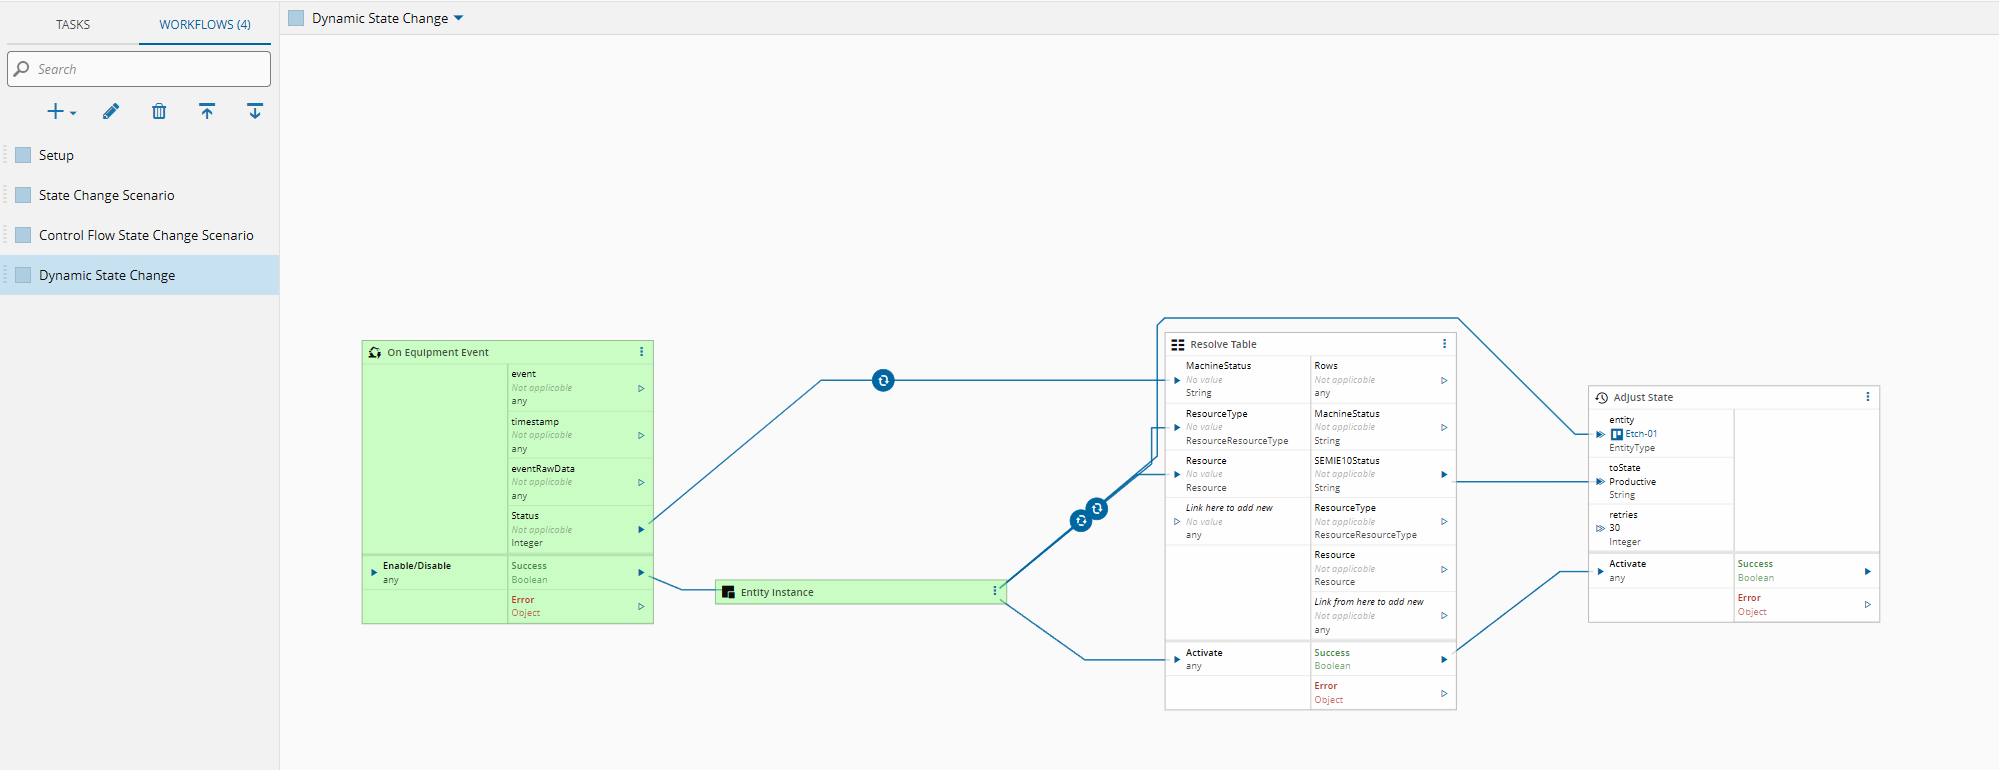
Example Autonomous Test API Post Event#
Let’s take a look at a test that requires MES interaction. The api post event task is a task that allows us to send data to IoT Data Platform. This workflow will wait for a message bus message to this controller and will then call an api post event.
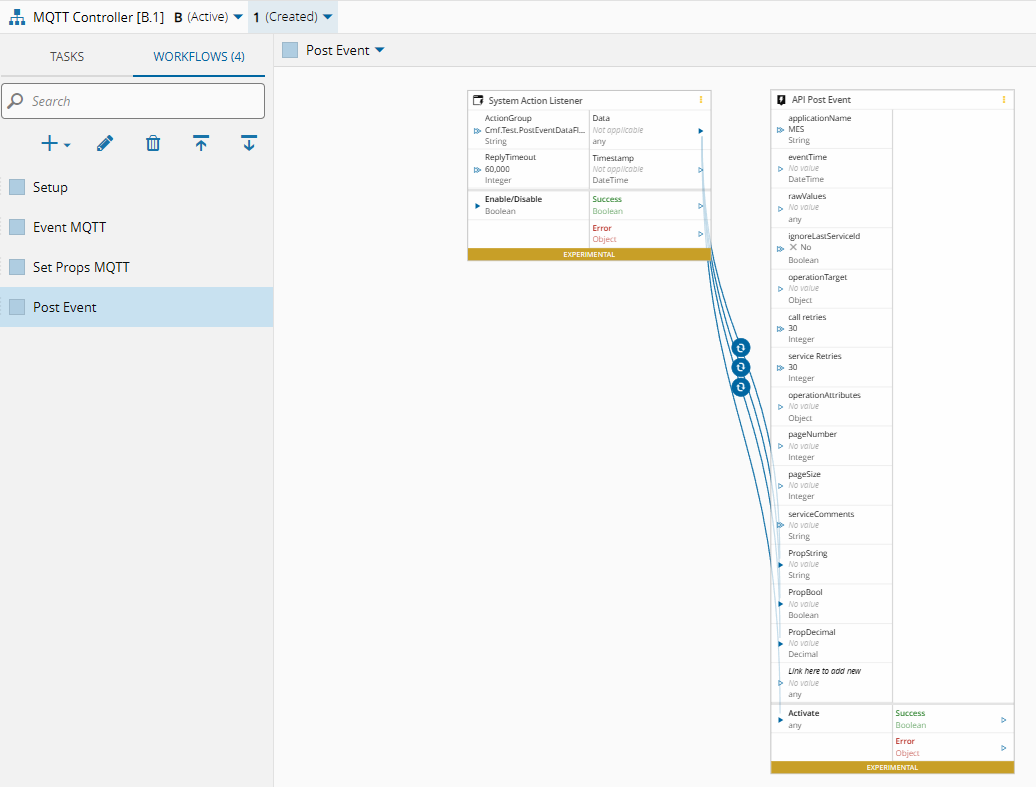
Now we will have to build a test that also mocks the MES API post event.
[TestMethod]
public void PostEvent()
{
    new TestScenario(Configuration).Run((scenario, context) =>
    {
      #region Setup
      MockSystem.PluginMain system = (testContext.System as MockSystem.PluginMain);

      system.WaitForAllComunicating(20);
      var controllerInstance = testContext.Instances["Controller"] as IControllerInstanceContext;

      #endregion Setup

      var hasBeenCalled = false;

      // Register the mock for this particular API Call
      system.ApiHandlingManager.Register("/api/DataPlatform/PostEvent",
          (ISystemRequest request) =>
          {
              var input = system.ApiHandlingManager.DeserializeObject<PostEventInput>(request.Body);
              Assert.IsTrue(input.Data["PropString"].ToString() == "123", "Prop String is incorrect.");
              Assert.IsTrue(input.Data["PropBool"].ToString() == "False", "Prop Bool is incorrect.");
              Assert.IsTrue((input.Data["PropDecimal"] as JValue).ToString(CultureInfo.InvariantCulture) == "113.1", "Prop Decimal is incorrect.");

              hasBeenCalled = true;

              return (new SystemReply(200, system.ApiHandlingManager.SerializeObject(new PostEventOutput())));
          });

      // Send the starting System event
      controllerInstance.SystemEvent("Cmf.Test.PostEventDataFlow", new
      {
          propString = "123",
          propDecimal = 113.1,
          propBool = false
      });

      // Check if post event was received
      scenario.Utilities.WaitFor(5, "It was never invoked", () =>
      {
          return hasBeenCalled;
      });

    }
  }
The test setup is the same. In this test we will use the system.ApiHandlingManager to register our mock api. Whenever our API is called, the callback will activate. We will then check the request we received and reply back with the expected object. By registering APIs we are able to test all interactions from the MES to the Automation layer.
Example IPC-CFX Running MES System#
Now let’s look at an example where we are using a different protocol and are running not against a mock system but against a running system.
I have an SMT Line Reflow Oven integration. This integration will create materials through an SMT Line and then will execute the reflow oven actions through using IPC-CFX.
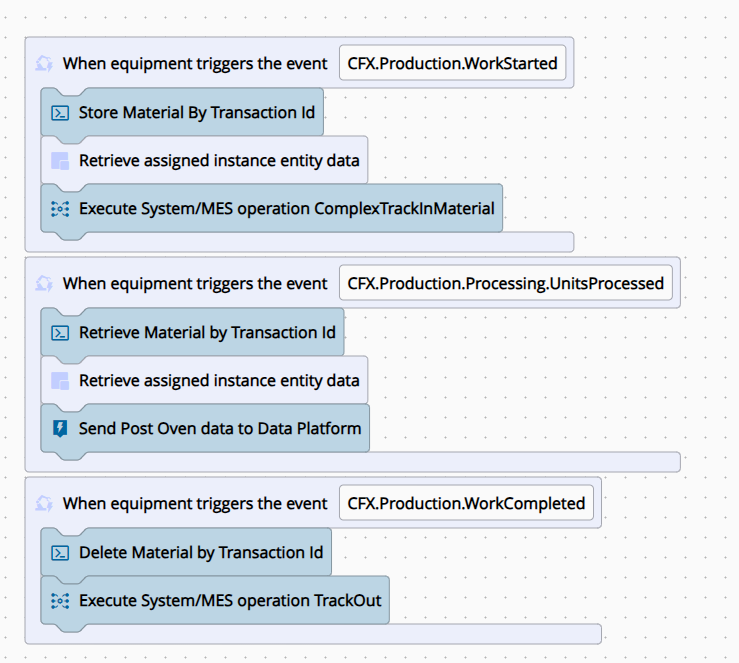
It will use the Work Started event to perform an MES Track-In, a UnitsProcessed to send a message to IoT Data Platform and then send a Work Completed event to Track-Out the material.
The scenario for this test run is a bit different.
[TestInitialize]
public void Initialize()
{
  var driverHandle = "CMF.Driver.IPCCFX";
  var driver = $"amqp://localhost:5001";
  var driverAddress = "/queue/CMF.Driver.IPCCFX";
  var targetHandle = "oven.test.machine";
  var target = $"amqp://localhost:5672";
  var managerName = "IPC-CFX Manager";

  Configuration = new ScenarioConfiguration()
    .ManagerId("IPC-CFXManager")
    .WriteLogsTo("c:/temp/CFX-Simulator.log")// Activate this line to send the logs to a particular place
    .ConfigPath("C:\\Users\\jroque\\Downloads\\IPC-CFXManager\\config.full.json")
    .AddSimulatorPlugin<IPCCFX.PluginMain>(new IPCCFX.Plugin.SettingsBuilder()
      .AddBroker()
      .AddTestCFXEndpoint(targetHandle, "", target)
      .AddConnectIoTCFXEndpoint(driverHandle, driverAddress, driver)
    .StartMode<LocalStartMode.PluginMain>(new LocalStartMode.Plugin.SettingsBuilder()
      .ManagerLocation("C:\\Users\\jroque\\Downloads\\IPC-CFXManager")
      .Build())
  .Build());
}
For this test I used a downloaded manager from the system and I am connecting to the system using the downloaded configuration. The IPC-CFX simulator will require me to add a broker, a CFX Endpoint and also information about my integration endpoint.
My test will now consist of sending CFX messages and validate that in the MES the corresponding object are in the correct state. Here we will focus on testing the material tracking events.
(...)

var events = new Events();
var transactionId = Guid.NewGuid();

#region Work Started

var workStarted = new CFX.Production.WorkStarted
{
    TransactionID = transactionId,
    PrimaryIdentifier = panel.Name,
    Lane = 1
};

_scenario.Log.Debug($"Work Started '{panel.Name}'");

this._cfxSimulators["Oven"].SendMessage(new CFX.CFXEnvelope(workStarted),
    Cmf.Connect.IoT.Driver.IpcCfx.DriverObjects.CommandExecutionMode.Publish,
    Cmf.Connect.IoT.Driver.IpcCfx.DriverObjects.CommandExecutionDestination.Exchange);

_scenario.Utilities.WaitFor(60, $"Oven material for '{panel.Name}' never trackedin", () =>
{
    panel = new GetObjectByNameInput()
    {
        Name = panel.Name,
        Type = typeof(Cmf.Navigo.BusinessObjects.Material)
    }.GetObjectByNameSync().Instance as Cmf.Navigo.BusinessObjects.Material;

    return panel?.SystemState == MaterialSystemState.InProcess;
});

#endregion Work Started

var product = new GetObjectByIdInput()
{
    Id = panel.Product.Id,
    Type = typeof(Cmf.Navigo.BusinessObjects.Product)
}.GetObjectByIdSync().Instance as Cmf.Navigo.BusinessObjects.Product;

var unitsProcessed = new CFX.Production.Processing.UnitsProcessed
{
    TransactionId = transactionId,
    OverallResult = CFX.Structures.ProcessingResult.Succeeded,
    CommonProcessData = events.Products.FirstOrDefault(prod => prod.Key == product.Name).Value
};

_scenario.Log.Debug($"Units Processed '{panel.Name}'");

this._cfxSimulators["Oven"].SendMessage(new CFX.CFXEnvelope(unitsProcessed),
    Cmf.Connect.IoT.Driver.IpcCfx.DriverObjects.CommandExecutionMode.Publish,
    Cmf.Connect.IoT.Driver.IpcCfx.DriverObjects.CommandExecutionDestination.Exchange);

#region Work Completed

var workCompleted = new CFX.Production.WorkCompleted
{
    TransactionID = transactionId,
    PrimaryIdentifier = panel.Name
};

_scenario.Log.Debug($"Work Completed '{panel.Name}'");

this._cfxSimulators["Oven"].SendMessage(new CFX.CFXEnvelope(workCompleted),
    Cmf.Connect.IoT.Driver.IpcCfx.DriverObjects.CommandExecutionMode.Publish,
    Cmf.Connect.IoT.Driver.IpcCfx.DriverObjects.CommandExecutionDestination.Exchange);

_scenario.Utilities.WaitFor(60, $"Oven material for '{panel.Name}' never trackedout", () =>
{
    panel = new GetObjectByNameInput()
    {
        Name = panel.Name,
        Type = typeof(Cmf.Navigo.BusinessObjects.Material)
    }.GetObjectByNameSync().Instance as Cmf.Navigo.BusinessObjects.Material;

    return panel?.SystemState == MaterialSystemState.Queued;
});

#endregion Work Completed
Notice that now my test does not need any links to master data, now all the information used is the one inside the the running MES system. Also, the test has to be more complex as it has to prepare the MES objects to be in the correct scenario for the Oven integration to be tested. In the snippet of code we only show the pertinent part to the test orchestrator tool.
Running against a live local system is a good way to work for developing a solution as every change in the workflow will impact the test run. Personally I work against my local system to create a solution, when I finish I export my solution and then point my test against the IoT Data package, so I am sure that what was tested against development works against what was exported.
Final Thoughts#
There are several more variations of the use of this tool and of how you can mock all the externalities. Hopefully this post jogs your curiosity and prompts you to start using the tool.