Integrating a Prusa mini 3D printer into an MES system.
Overview#
I have been wanting to integrate my personal 3D printer into the CM MES for some time. I think it’s a simple example of how you can map integration touch points to bring visibility and control to the shopfloor. It’s not uncommon to see additive manufacturing elements being brought to the shopfloor, either for prototyping, spare parts production or event for the production process itself.
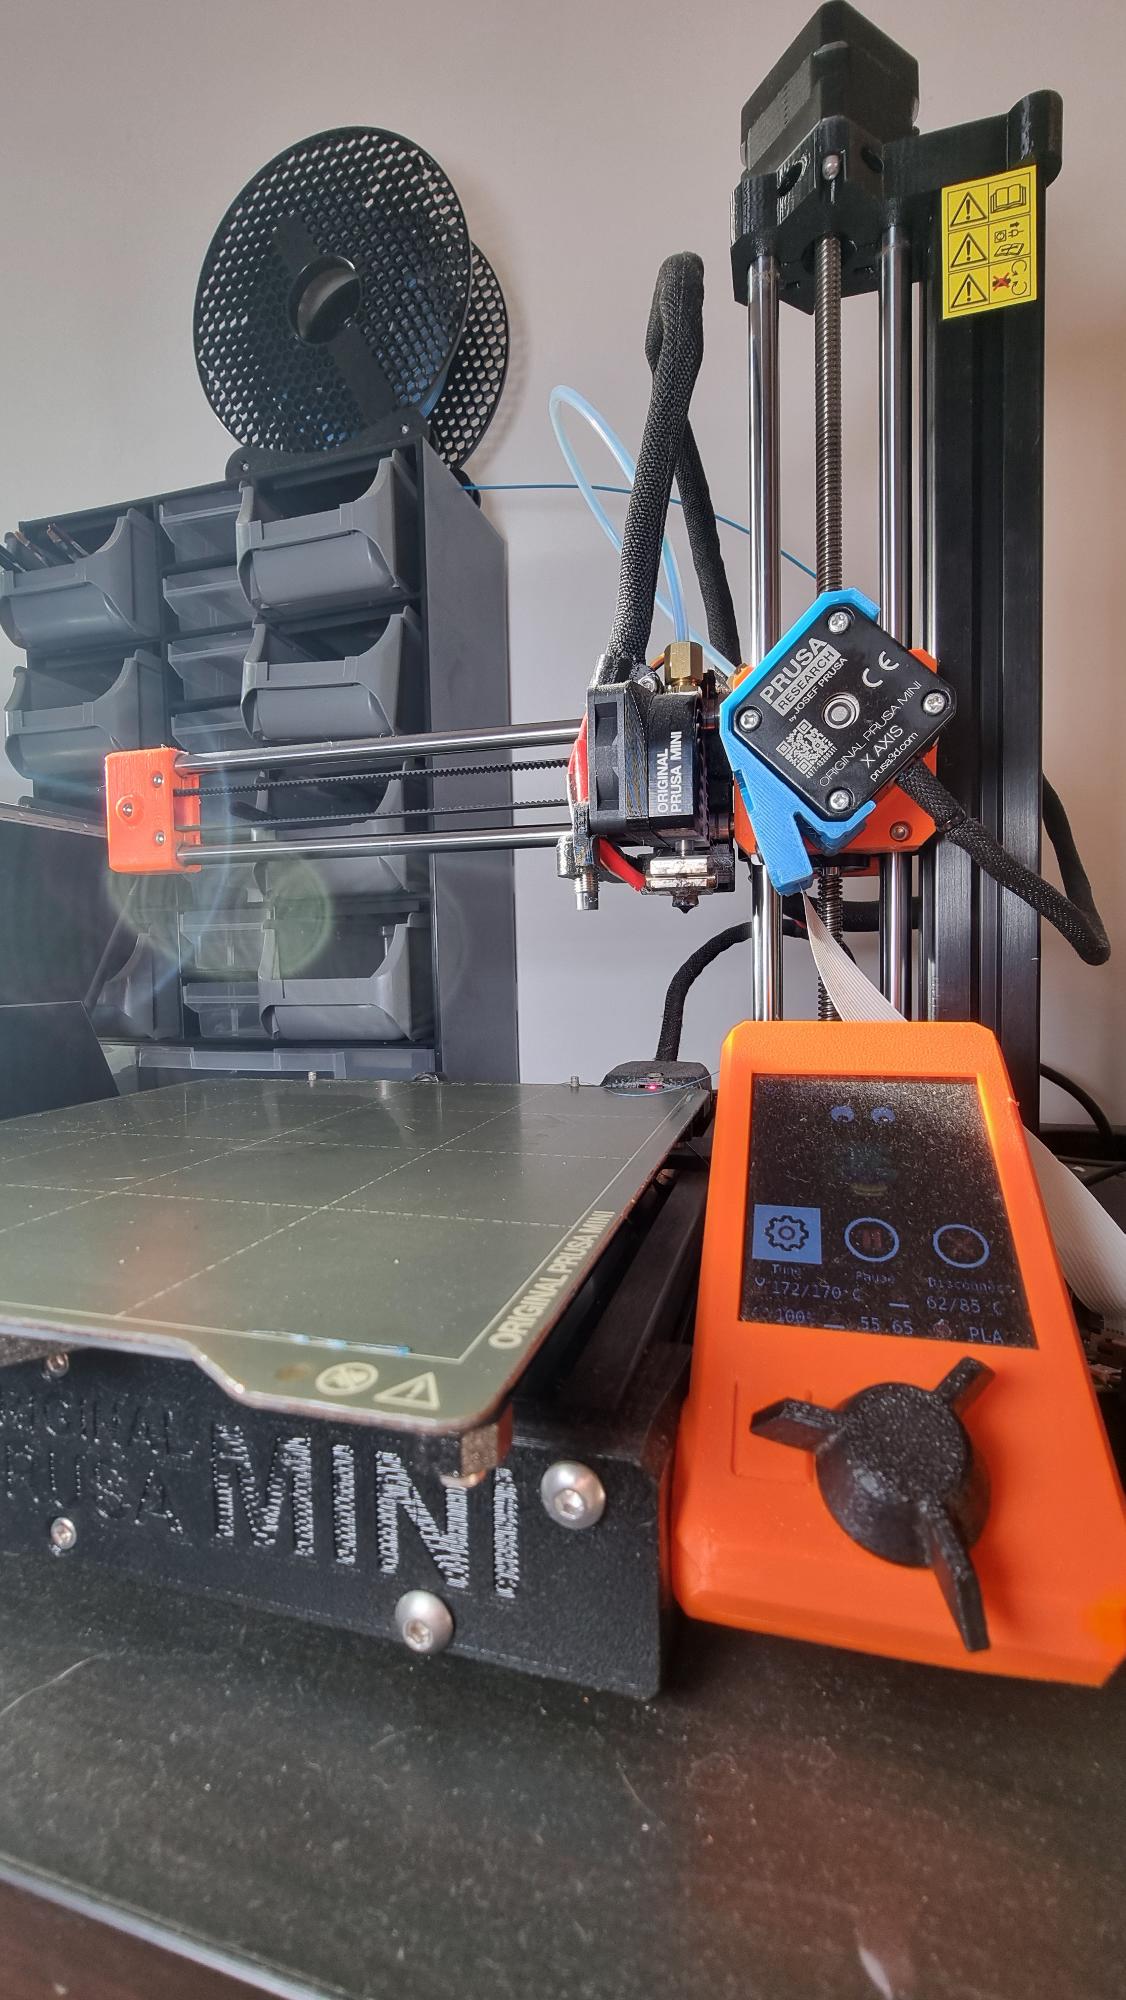
The 3D Printer has a Raspberry Pi 4b with a camera and is running OctoPi. OctoPi is a very common, remote controller and UI for 3D printer control. It uses the printer serial port interface and is able to send and receive information from the printer.
For this integration, we will:
- Retrieve a recipe from the printer
- Validate the recipe on Track-In
- Start the printing job
- Perform an Assemble - Explicit Add
- Track-Out the material.
MES Model Overview#
For this scenario we will have a resource 3d Printer and a step 3d Print. The 3d Printer will also have a resource consumable feed called Filament Feeder.
The consumable feeds in the MES are where we can attach our raw materials, so that they are able to be consumed. In my use case my printer has only one filament slot, but for other printers we could have several consumable feeds each one capable of having different materials with different products, for example the use case of multiple colors or multiple filament types.
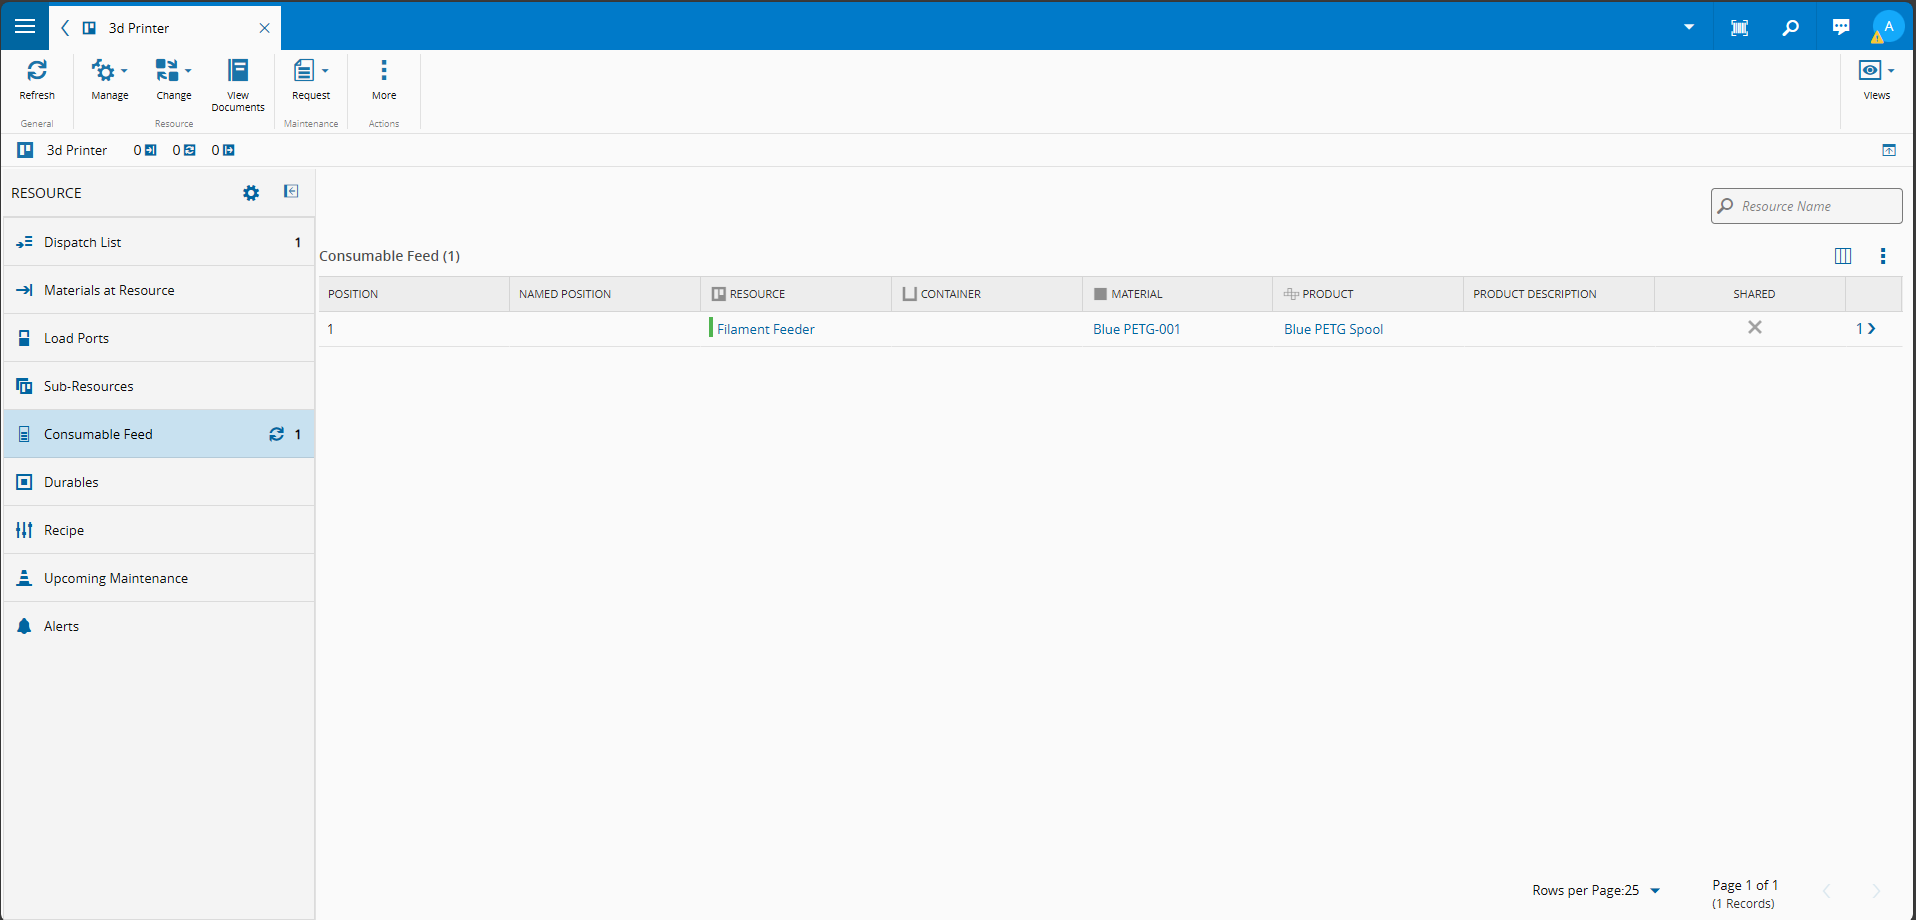
Notice that we have already attached a material Blue PETG-001 with product Blue PETG Spool and that this matches what we see in the actual printer.

One important aspect of our integration is that we will have a BOM (bill of materials) to describe the materials required for our product and a Recipe to describe what will be the machine recipe to be applied. We will see more information about both further on the use case.
There were other configurations that are relevant, like creating a product, defining a material flow, defining what services the resource provides. Explanations on these topics is out of scope for our goal today. Here are some helpful references to our documentation portal:
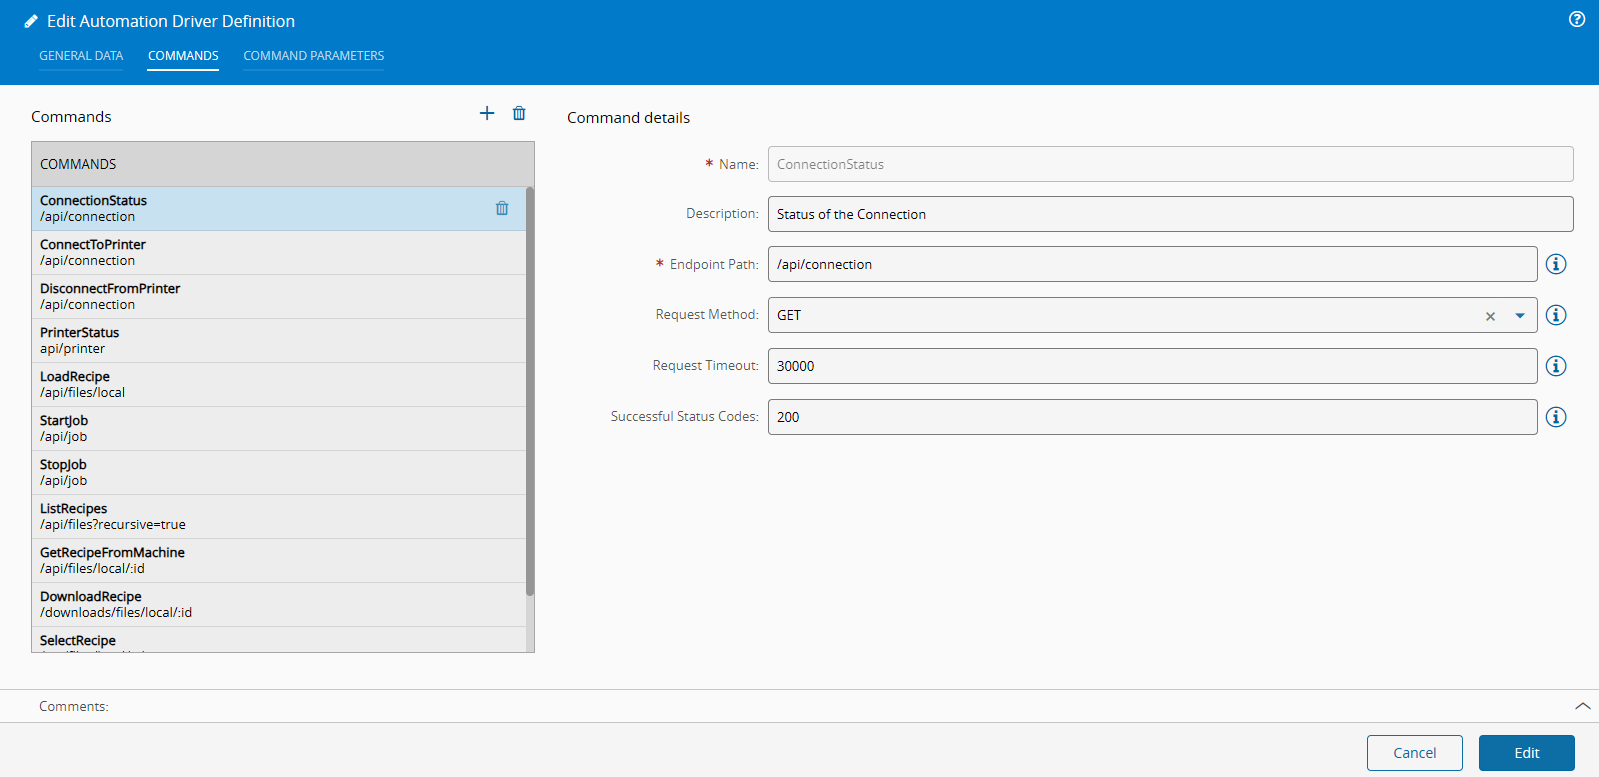
Create an Automation Driver Definition REST Client#
Create an Automation Protocol for REST Client with the default configurations.
As stated before we will integrate with OctoPi. OctoPi has very good documentation that can be read here. According to this specification let’s map the APIs we need.
Two important APIs to understand the state of the printer are /api/connection and api/printer, one to retrieve the connection status and the other for the printer status.
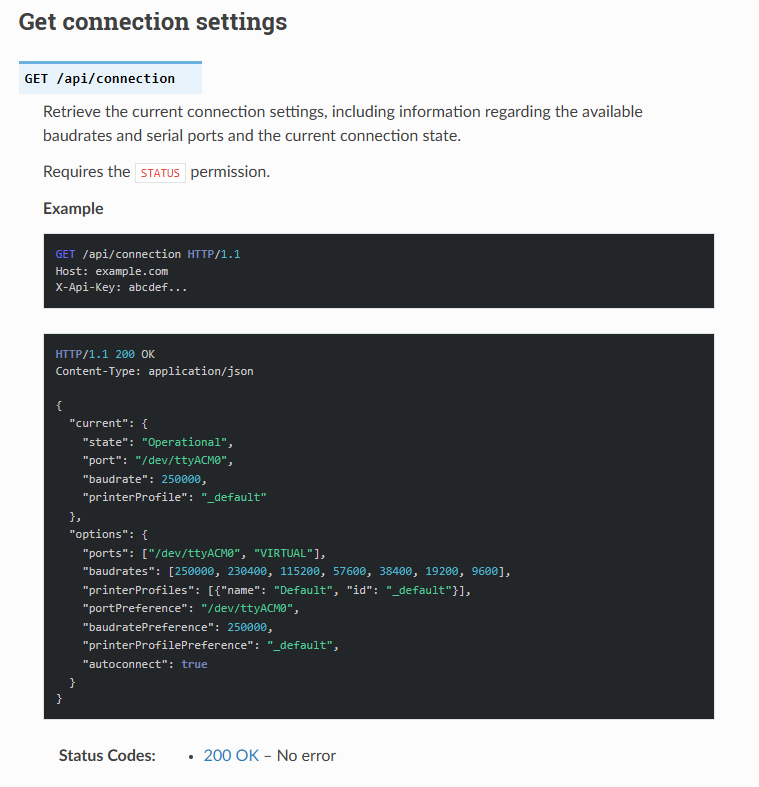
We can map the connection status as:
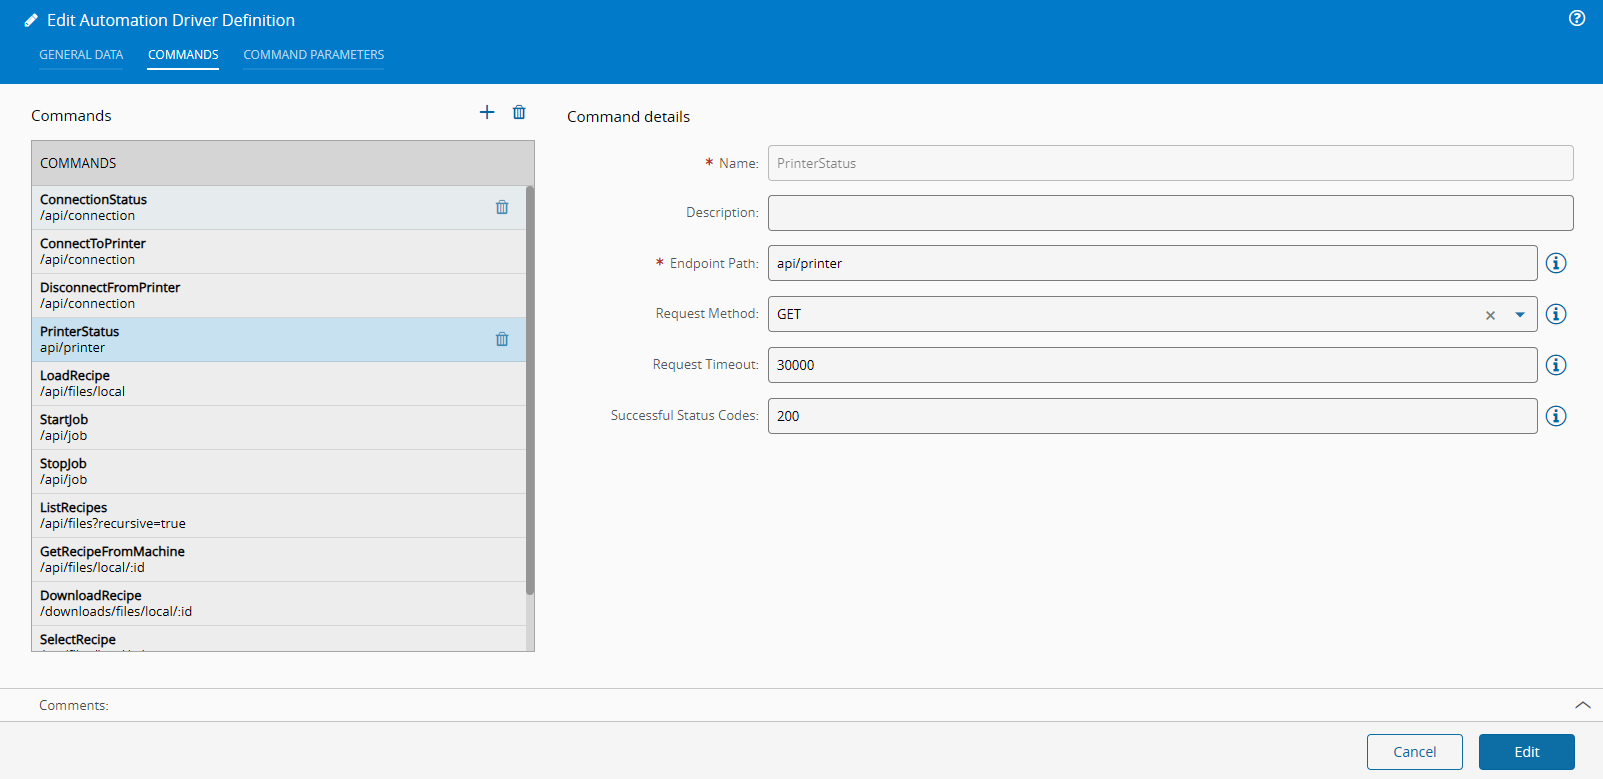
Also, for the printer status:
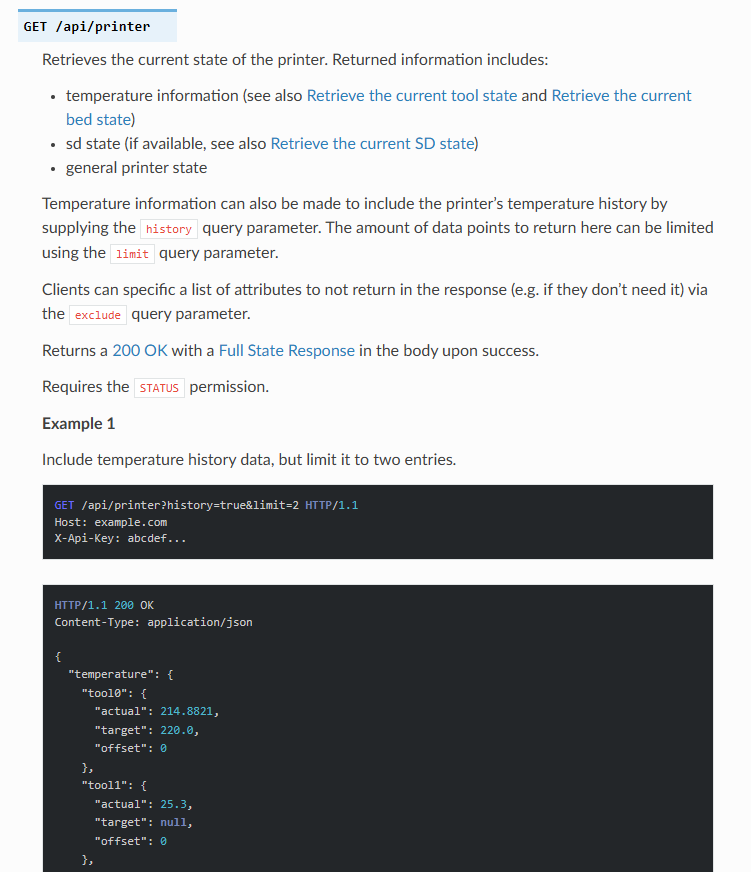
We can map the printer status as:
For this use case, we will also retrieve a the recipe list and download the Recipe Body.
For the recipe list we can leverage the files api:
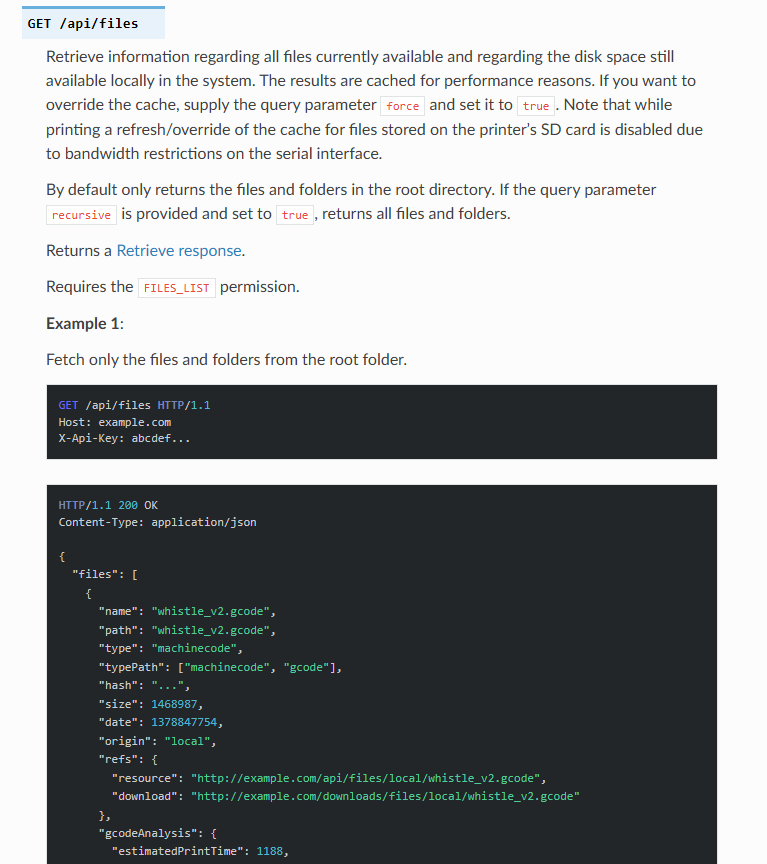
Which we can then map as:

For our use case we want to receive all possible recipes, so we send with a query path recursive as true.
The download body we will also use the files api.
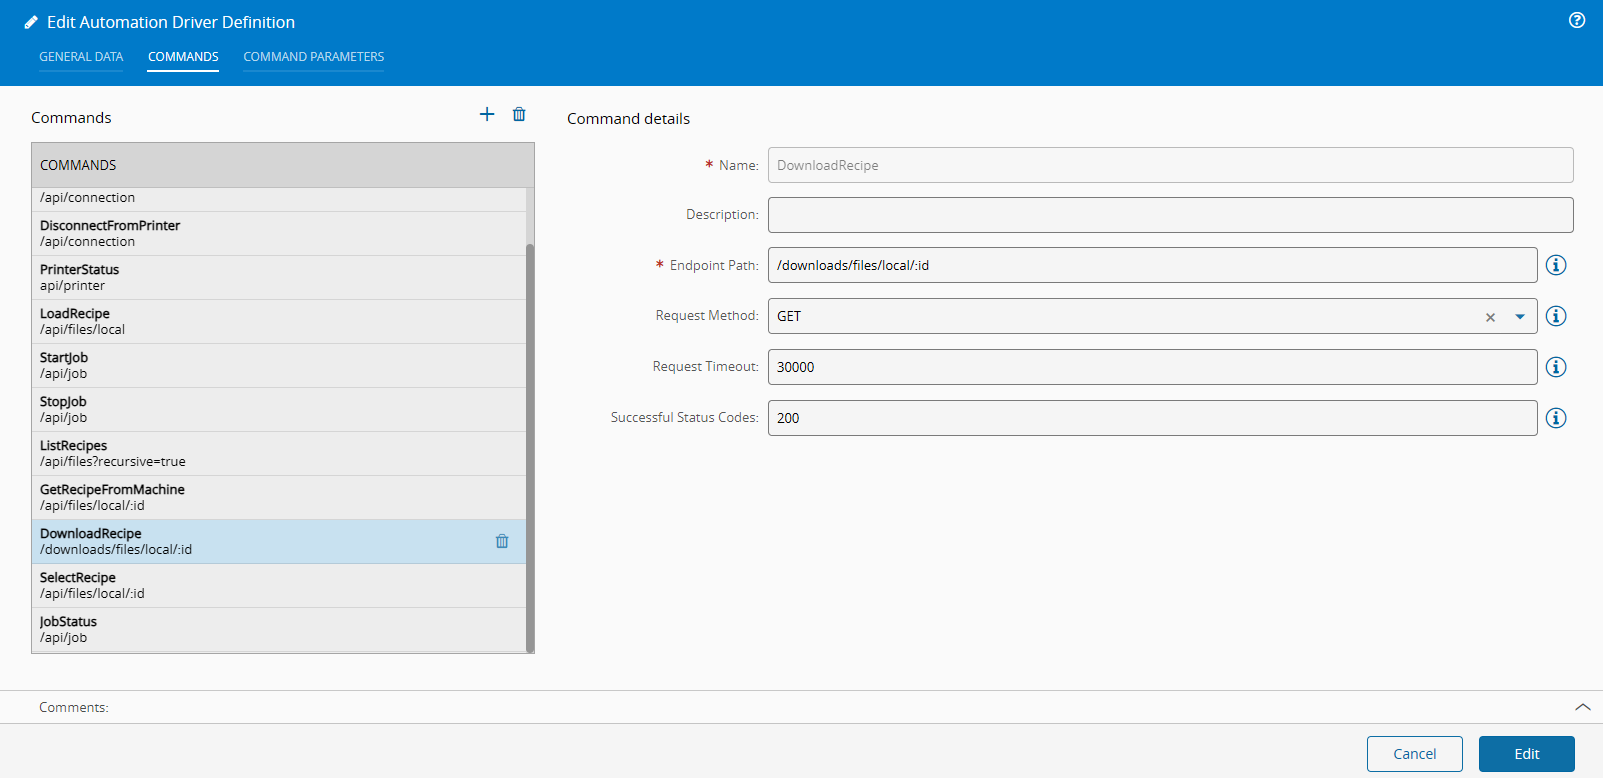
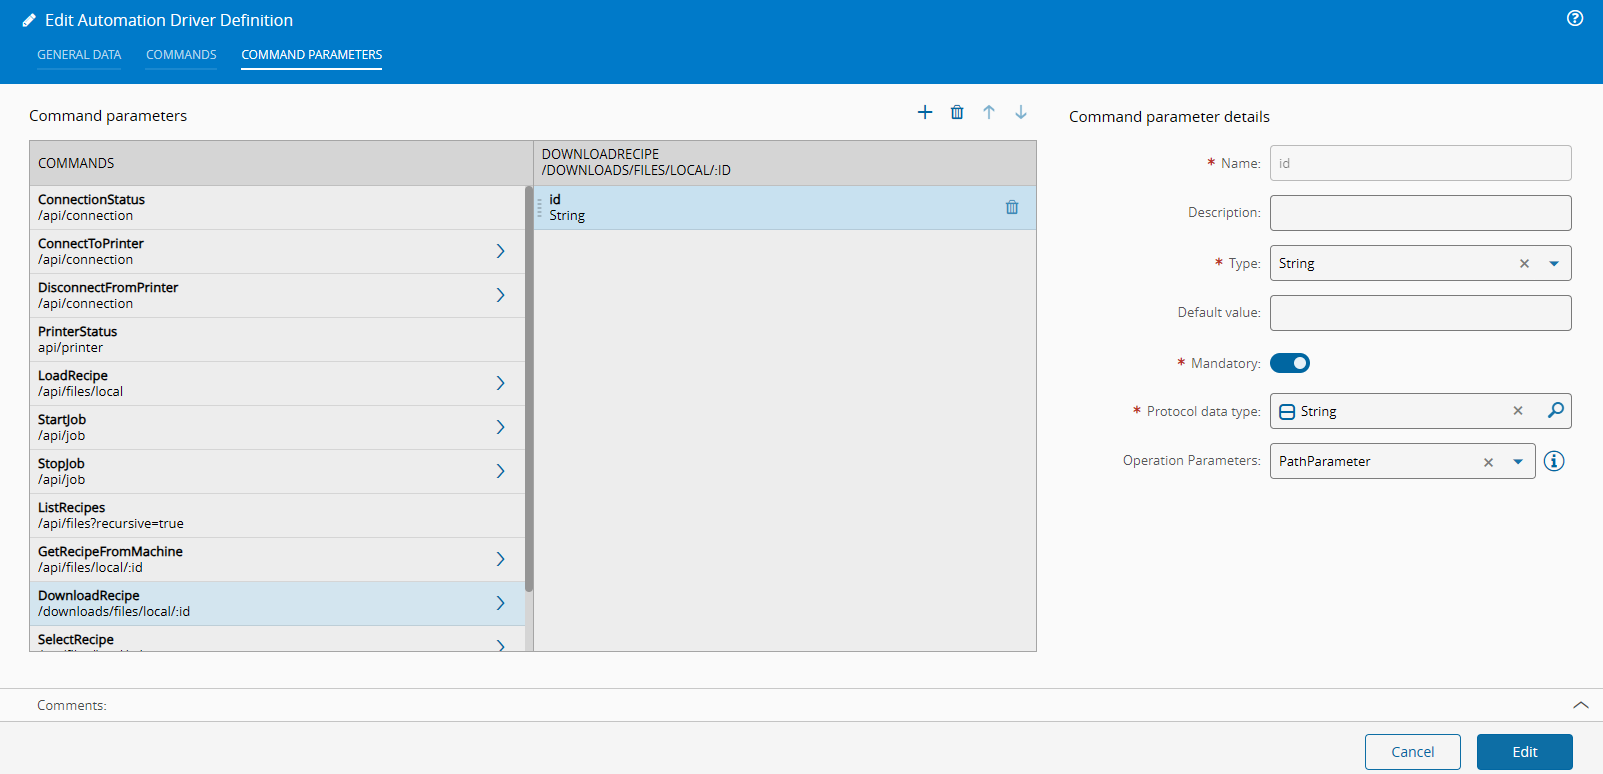
For the download recipe the user will have to invoke the command with a recipe id. The driver will use the id provided to replace it in the url.
Now we have the action APIs, these are the APIs that are going to be used to perform actions in the printer.
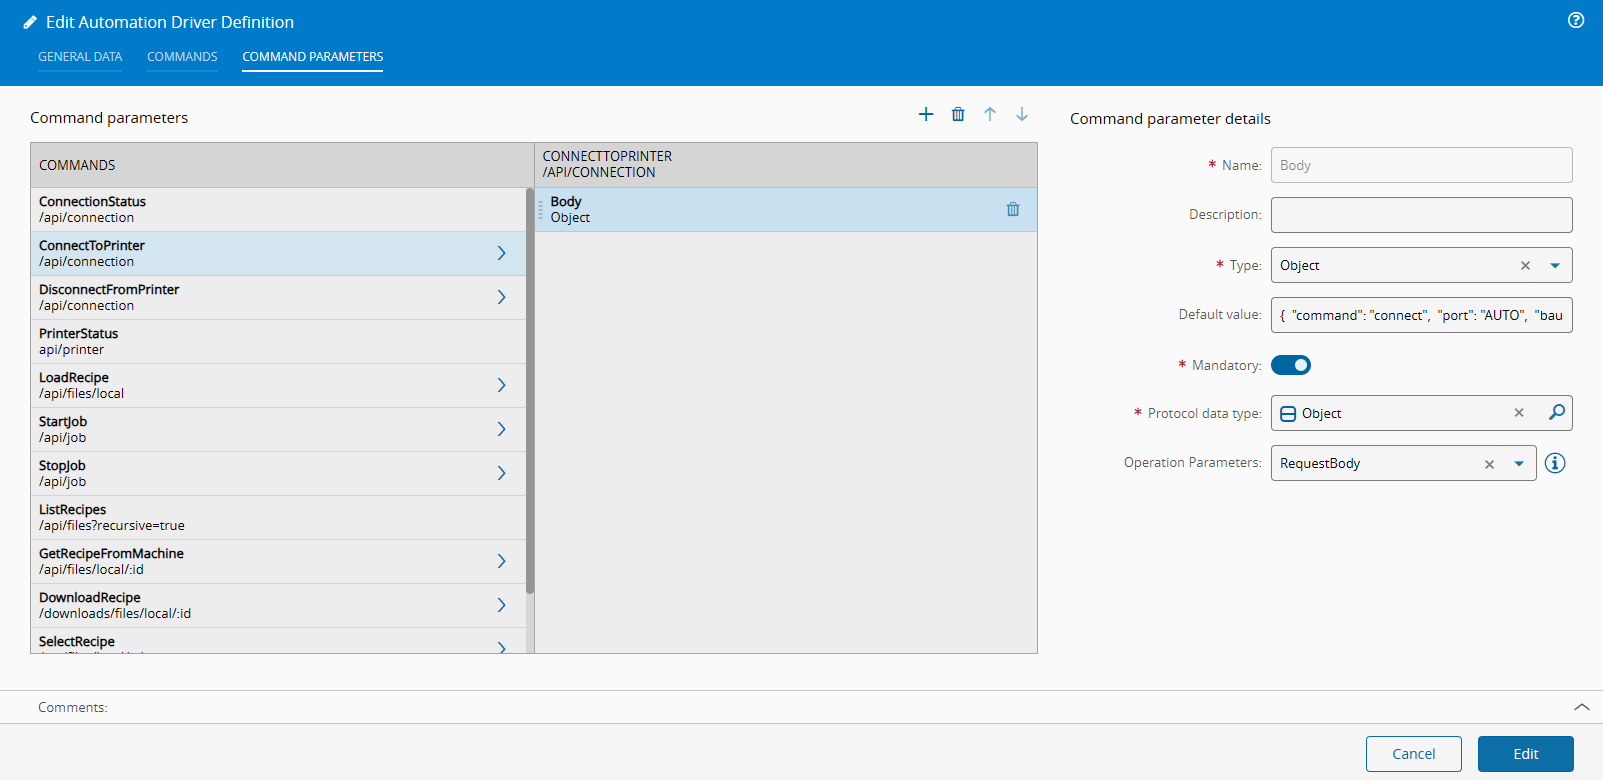
The ConnectToPrinter will create a connection between OctoPi and the printer.
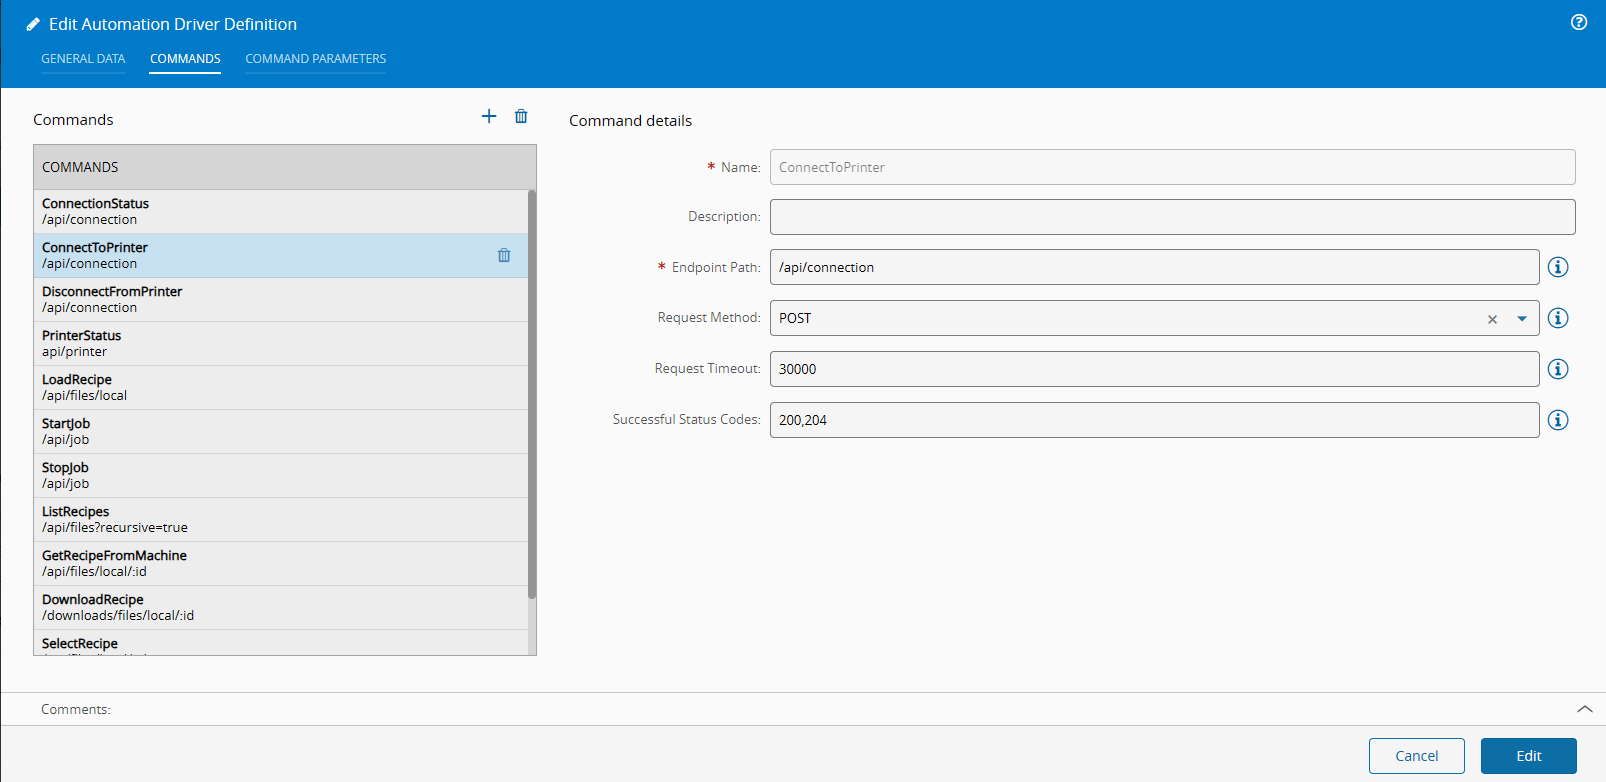
The connect to printer requires a specific set of arguments. For this use case we will set the expected value in the default, this can be overridden by the integration when invoking the command.
{ "command": "connect", "port": "AUTO", "baudrate": 0, "printerProfile": "_default", "save": false, "autoconnect": true}
The SelectRecipe will upload the recipe from OctoPi to the printer.

One interesting thing about this API is that it requires the recipe id, similar to the download, but also that success is returning as a 204. This is very common that is why in the REST Client driver you can have comma separated status code, that qualify what is a success.
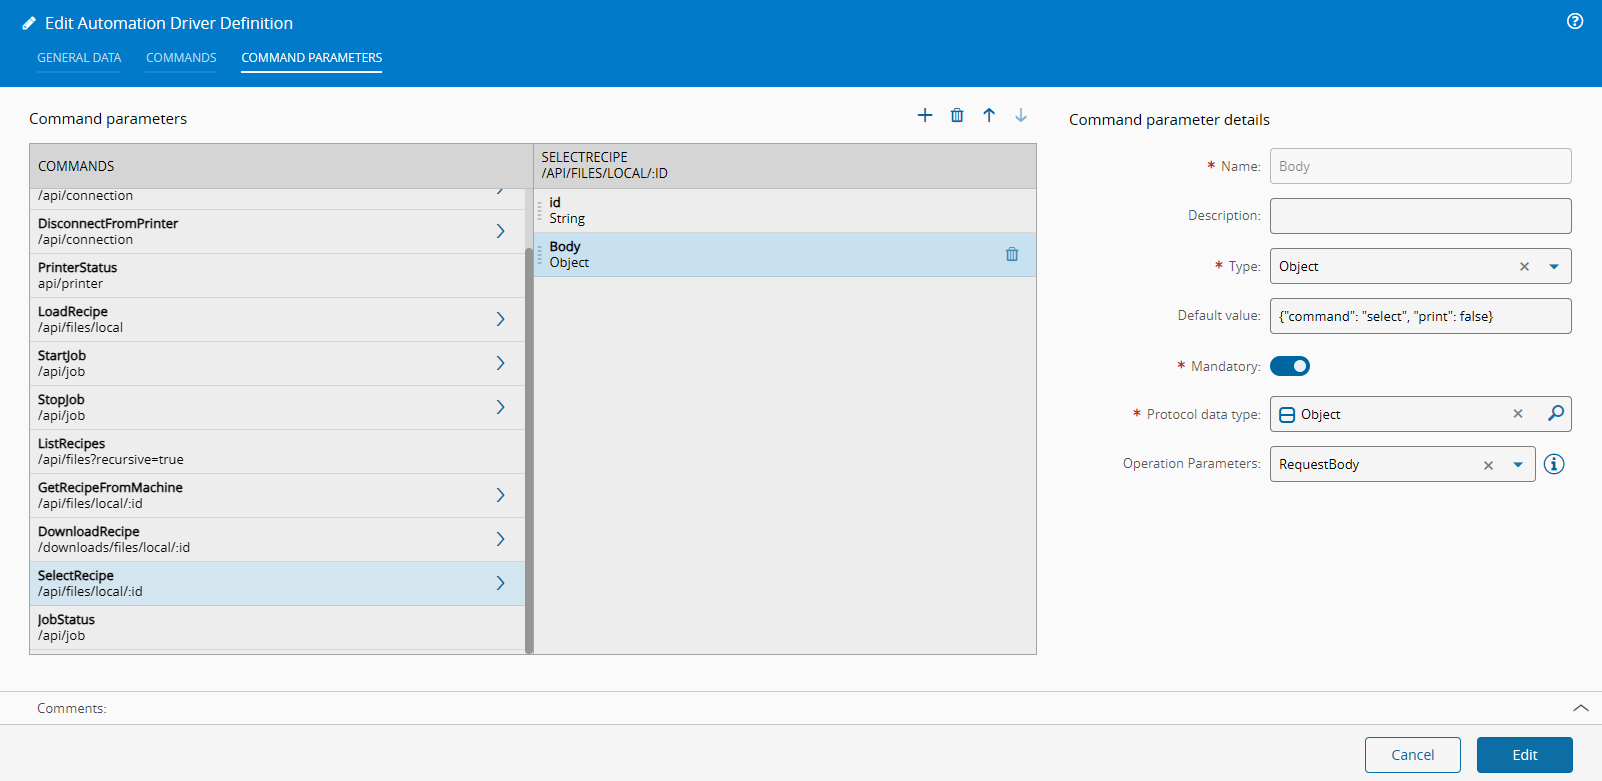
{"command": "select", "print": false}
This API also requires a body. This API would allow to select the recipe and print, but for this use case I decided to separate it into two different moments.
The StartJob will create a new printer job, so it can start printing.
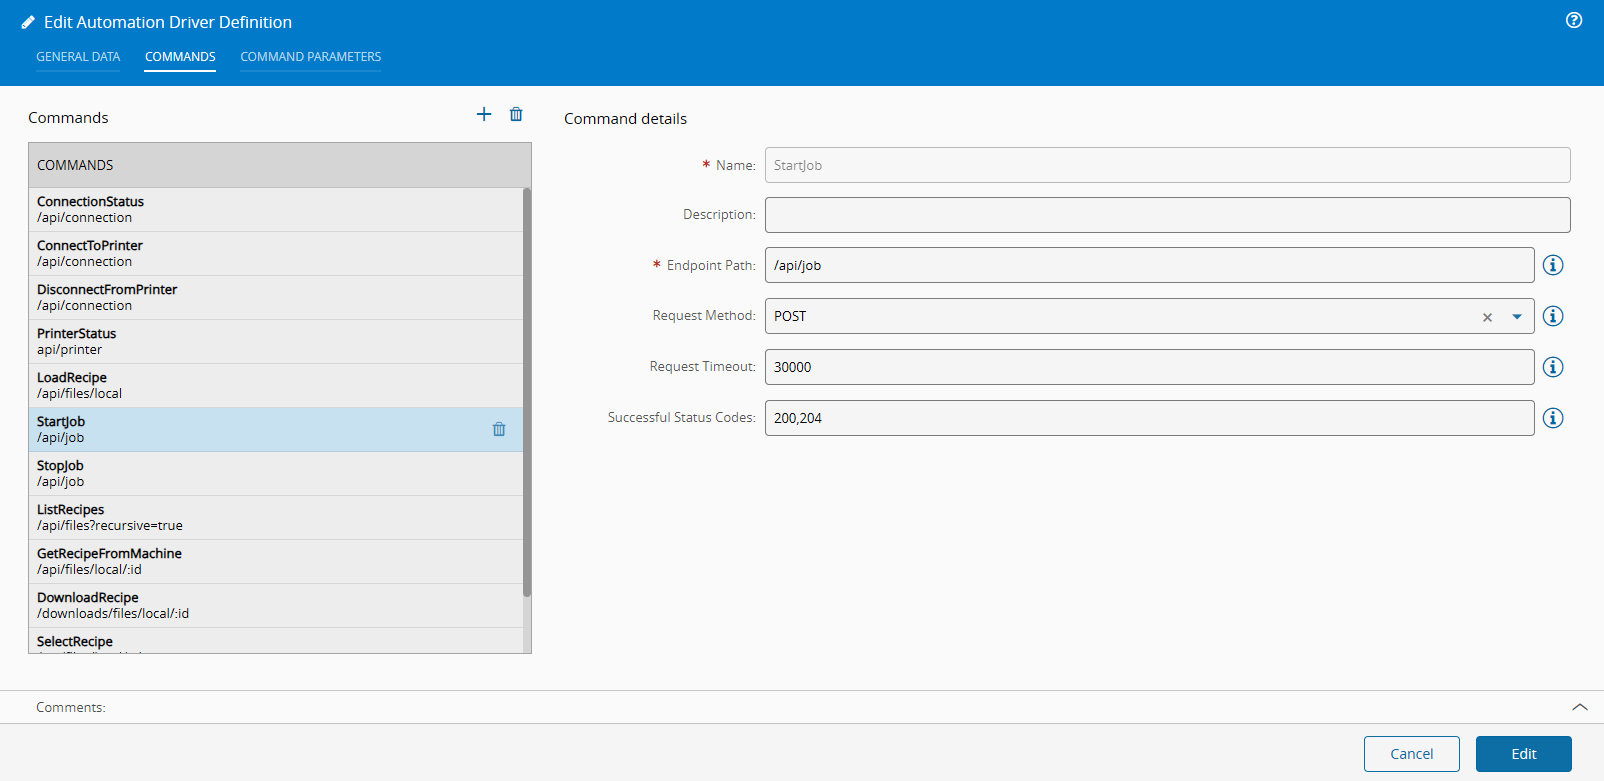
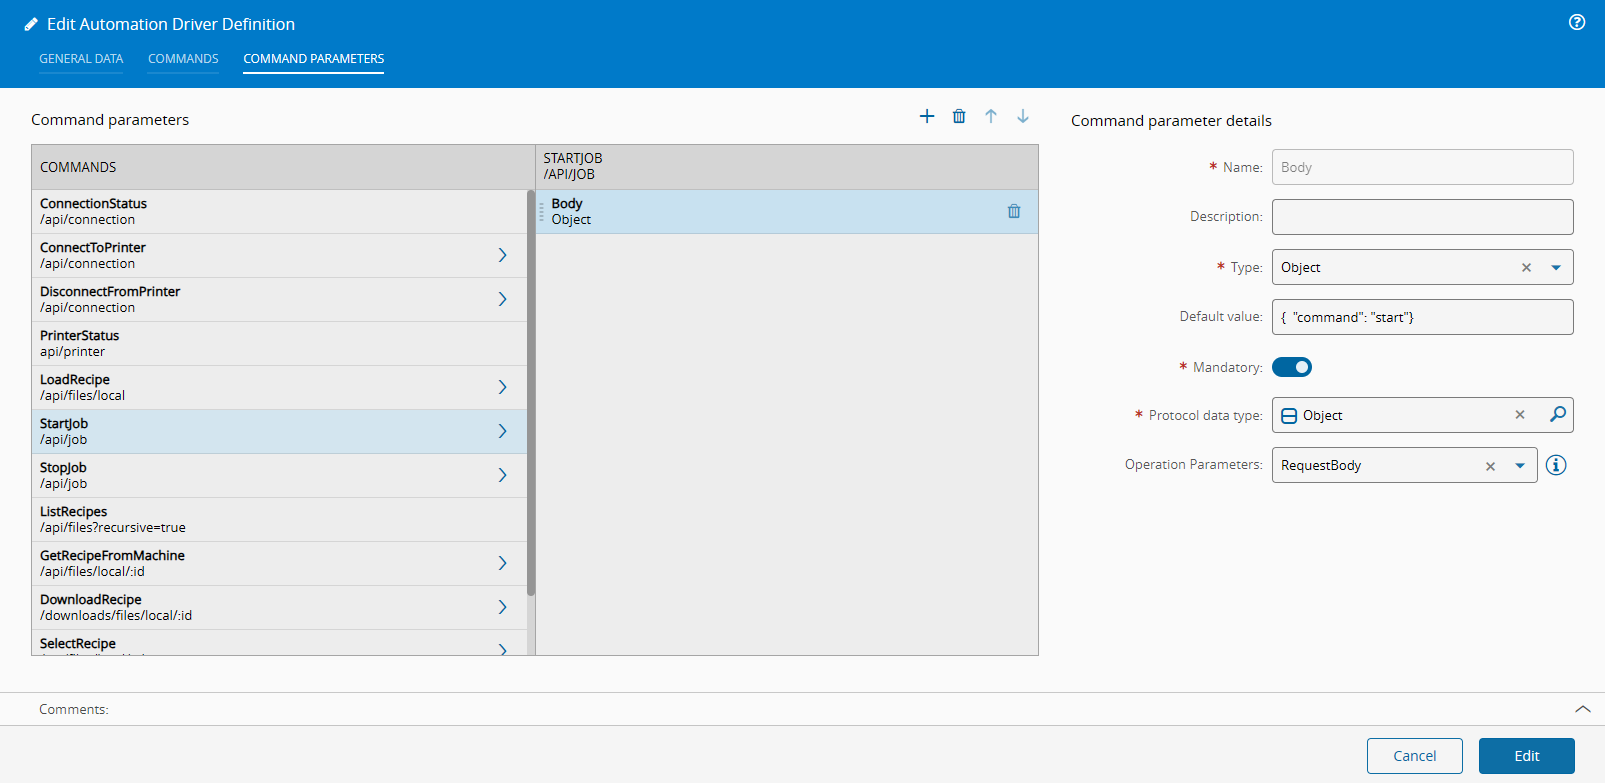
{ "command": "start"}
This API also requires a body.
Finally, we require an API to track the status of the printing job.
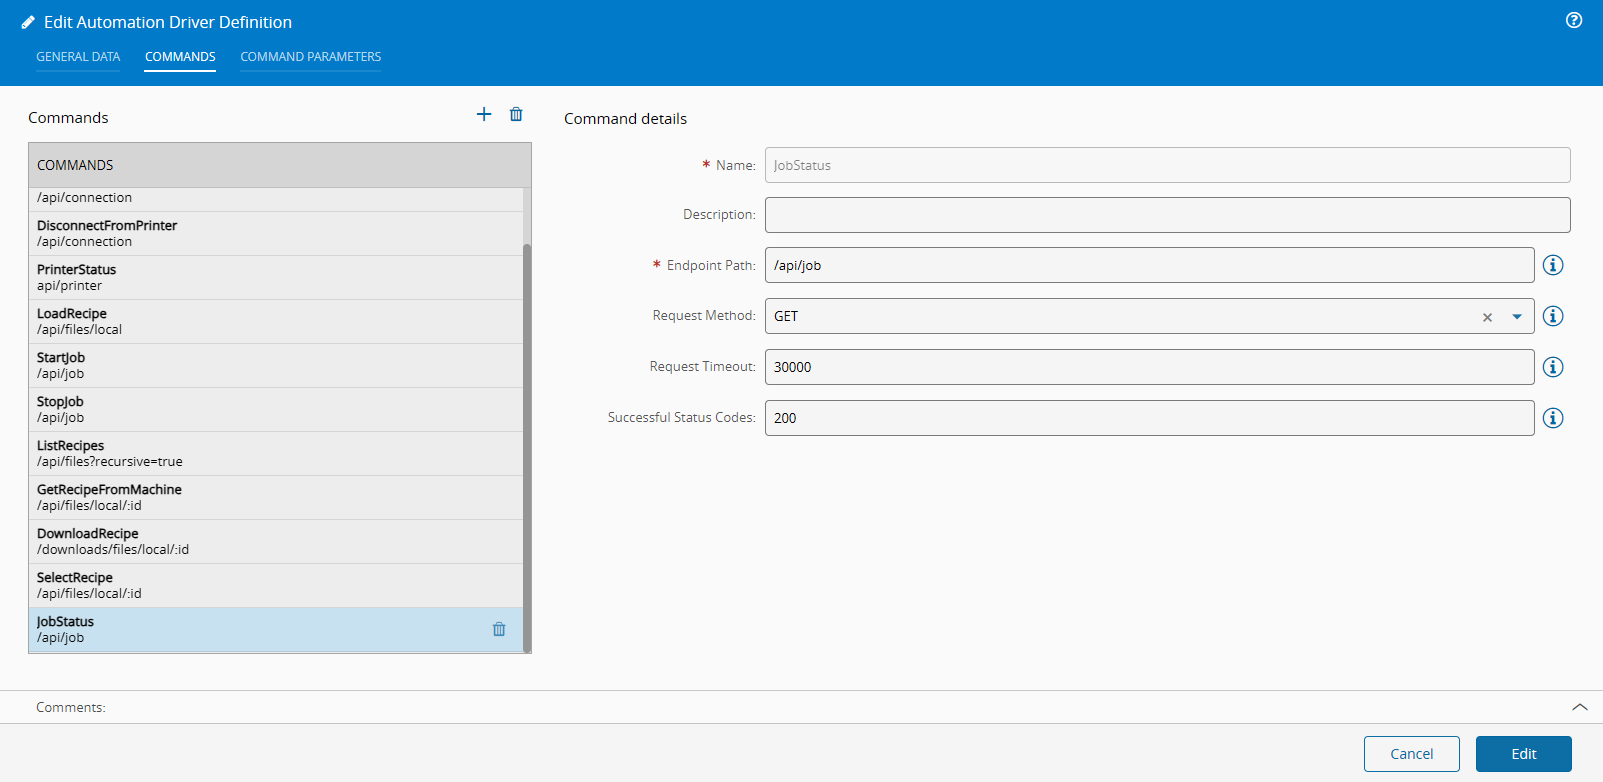
This api will inform the job progression status. When the Job reaches completion 100%, we will assemble and track-out.
Create an Automation Controller#
Creating our controller, we will specify that it has one driver for REST Client.
Setup#
In our setup page the template will automatically generate the driver quickstart. In previous posts we used Data Flow when creating the controller and it generated the template in Data Flow this time I chose Control Flow, so we will have an example of a Control Flow template.
For setting up the connection, we will configure our connection, then call a function, if successful we will finish the connection cycle. For simpler setup cycles, the OnInitialize event has an auto setup flag that will merge both actions, of course this is contingent on your specific integration.
The call function will check what is the current communication status. If the status is Closed it means we will need to perform the connection from OctoPi to the Printer. If it’s Operational or Printing it means the system is already live and running.
Depending on your integration boot cycles and what constitutes being connected can be simpler or more complex.
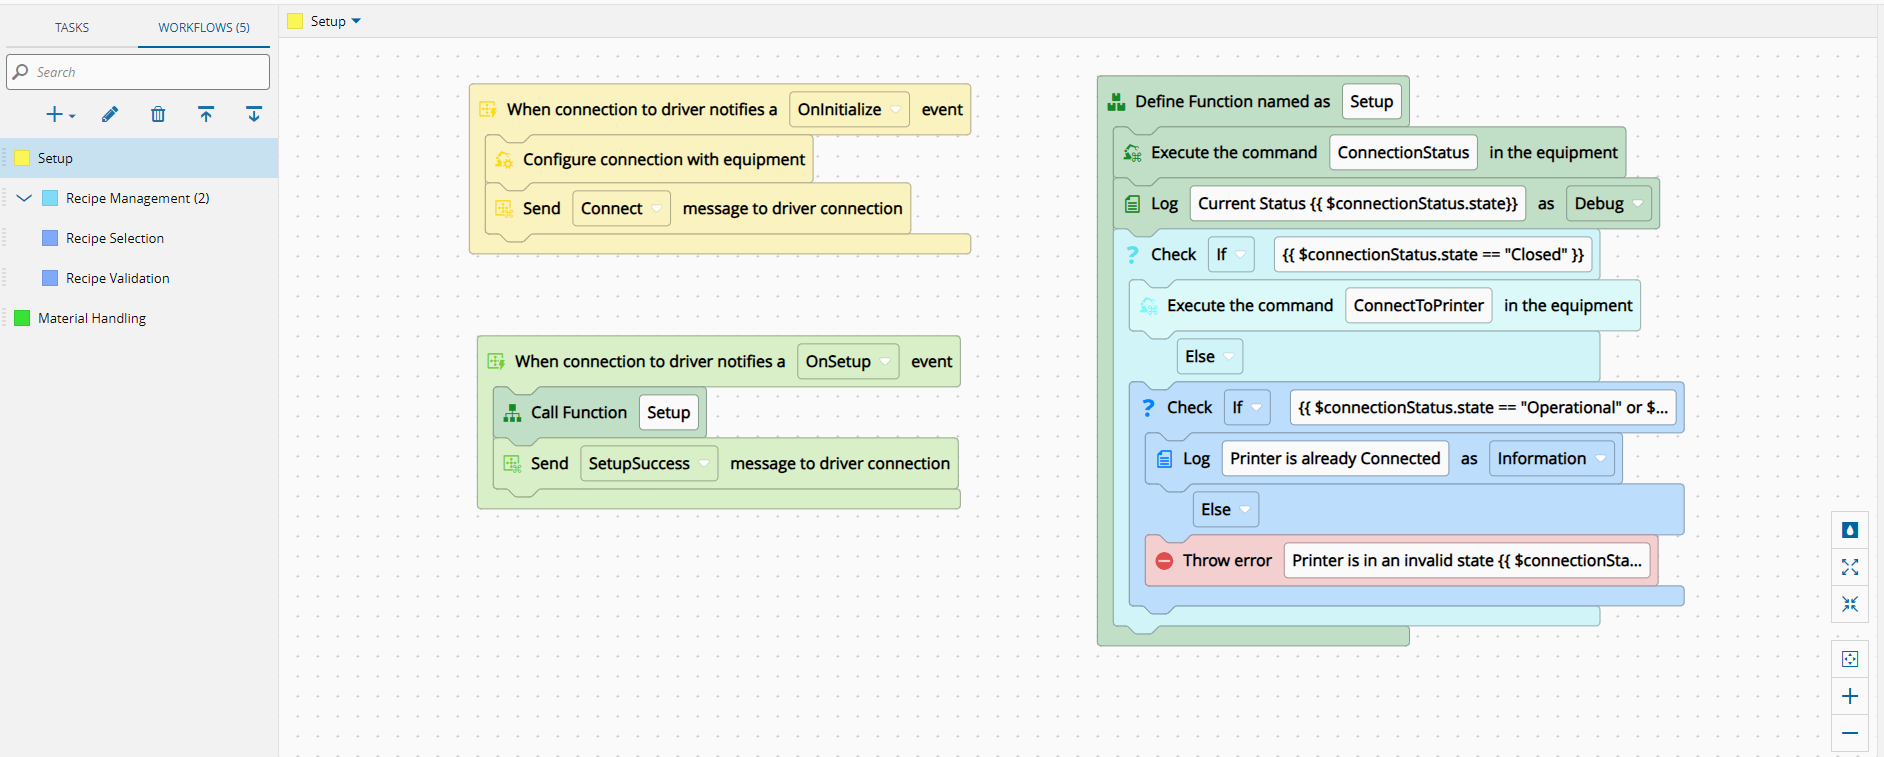
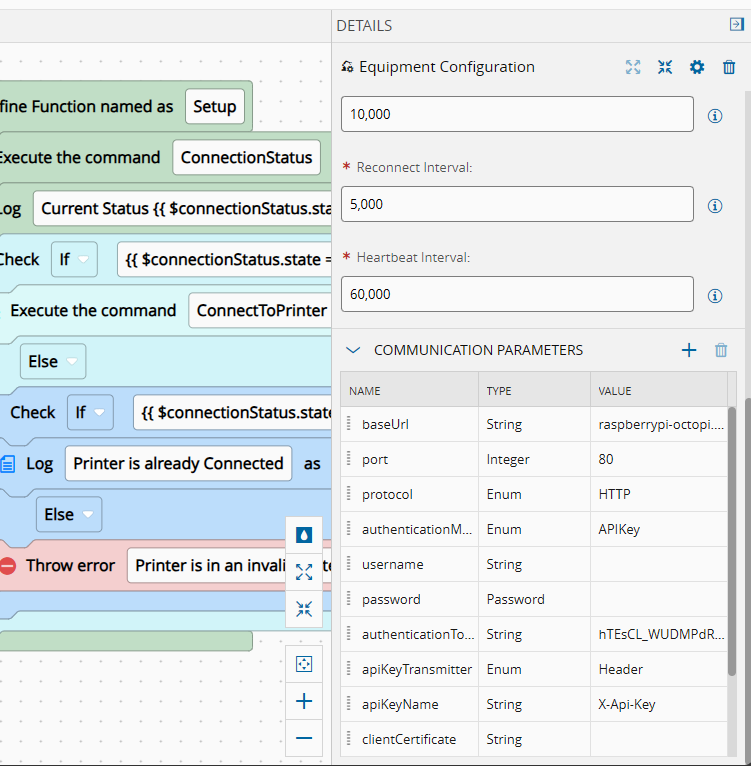
In yellow, we can see the initialization of the driver, here we will set all the communication values, like the REST API to connect to, port and for OctoPi the API token. All OctoPi requests must have a header X-API-Key with the api key. This would be very cumbersome to have to configure this in the driver definition for all the requests. That is why you can define it in the Equipment Configuration and it will impact all the requests.
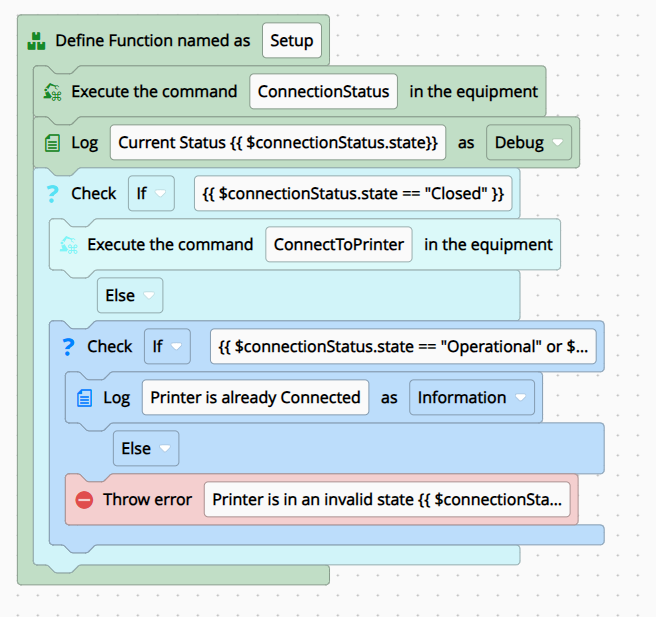
In green, is where we will perform the setup actions. On the right side we define a function that is to be invoked in the setup.
This function will execute a call to check the connection status and will either, send a connect to the printer, do nothing as the printer may already be connected or throw an exception if the connection is in an invalid state.
Recipe Selection#
In the recipe selection page we will handle selecting a recipe and uploading it to the MES.
The recipe selection has two flows, one is to list recipes and another to download recipe bodies. There are two native IoT tasks, the Recipe List Requested and the Recipe Body Requested.
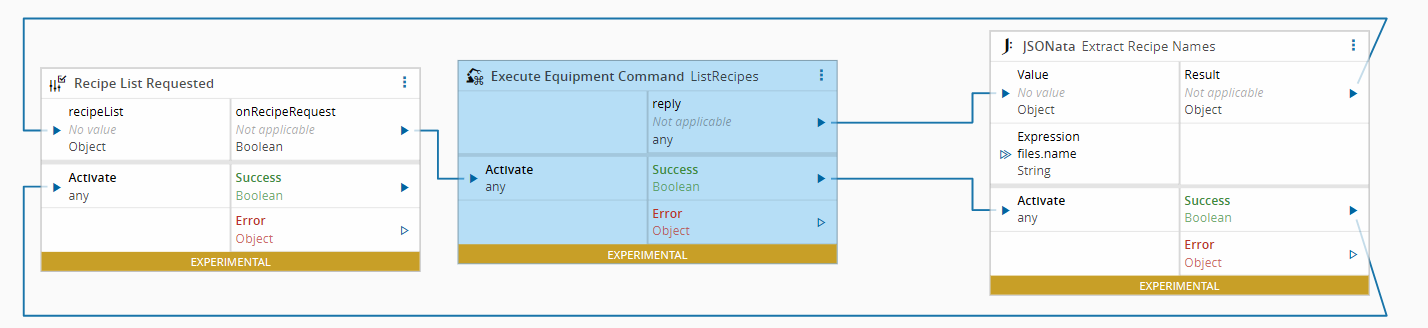
For the Recipe List Requested, when we receive a call we will reply back with an array of recipe names. In order to extract the recipe names from a REST API call we will use the JSONata task.
The API response is:
{
  "files": [
    {
      "date": 1743496451,
      "display": "nut_0.2mm_PETG_MINI_10m.gcode",
      "gcodeAnalysis": {
        "dimensions": {
          "depth": 105.835,
          "height": 7.0,
          "width": 130.0
        },
        "estimatedPrintTime": 525.7696335117364,
        "filament": {
          "tool0": {
            "length": 295.8933699999964,
            "volume": 0.7117069599134038
          }
        },
        "printingArea": {
          "maxX": 170.0,
          "maxY": 103.835,
          "maxZ": 7.0,
          "minX": 40.0,
          "minY": -2.0,
          "minZ": 0.0
        },
        "travelArea": {
          "maxX": 179.0,
          "maxY": 178.0,
          "maxZ": 37.0,
          "minX": 0.0,
          "minY": -2.0,
          "minZ": 0.0
        },
        "travelDimensions": {
          "depth": 180.0,
          "height": 37.0,
          "width": 179.0
        }
      },
      "hash": "c88736e62a260028d6df98218d1a36c0dbae0463",
      "name": "nut_0.2mm_PETG_MINI_10m.gcode",
      "origin": "local",
      "path": "nut_0.2mm_PETG_MINI_10m.gcode",
      "prints": {
        "failure": 4,
        "last": {
          "date": 1743702683.226399,
          "printTime": 809.2995931629994,
          "success": true
        },
        "success": 3
      },
      "refs": {
        "download": "http://raspberrypi-octopi.local/downloads/files/local/nut_0.2mm_PETG_MINI_10m.gcode",
        "resource": "http://raspberrypi-octopi.local/api/files/local/nut_0.2mm_PETG_MINI_10m.gcode"
      },
      "size": 347321,
      "statistics": {
        "averagePrintTime": {
          "_default": 887.0897298313794
        },
        "lastPrintTime": {
          "_default": 809.2995931629994
        }
      },
      "type": "machinecode",
      "typePath": [
        "machinecode",
        "gcode"
      ]
    }
  ],
  "free": 27399016448,
  "total": 31109500928
}
The JSONata expression is quite simple files.name.
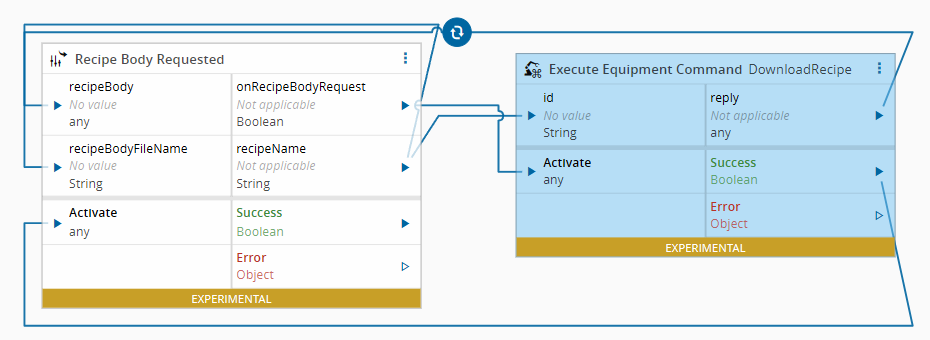
For the Recipe Body Requested, when we receive a call we will use the recipe id and call the Download Recipe, we will then use the response and apply a converter to convert it into a Base64 string.
Recipe Selection - MES#
When we have a running manager with this controller we can use this integration to chose a recipe. We can create a recipe and choose a body with Source Downloaded From Equipment. The action of Get Recipe will query the Recipe List Requested for the instance of the selected Resource. For the selection of recipes and then when selecting Download Recipe it will grab a Base64 string and store it in the MES and also create a Recipe Checksum.
Online and then has the recipe relevant checkboxes. The Resources available for the Get Recipe are the one’s configured as mode Online and with the checkboxes enabled.Recipe Validation#
One of the common requests when handling recipes is the need to always make sure that the MES has the latest version of the recipe. It is not uncommon for a machine recipe to be changed and keep the same name. For this use case in the Track-In action we will perform a validation of the recipe body.
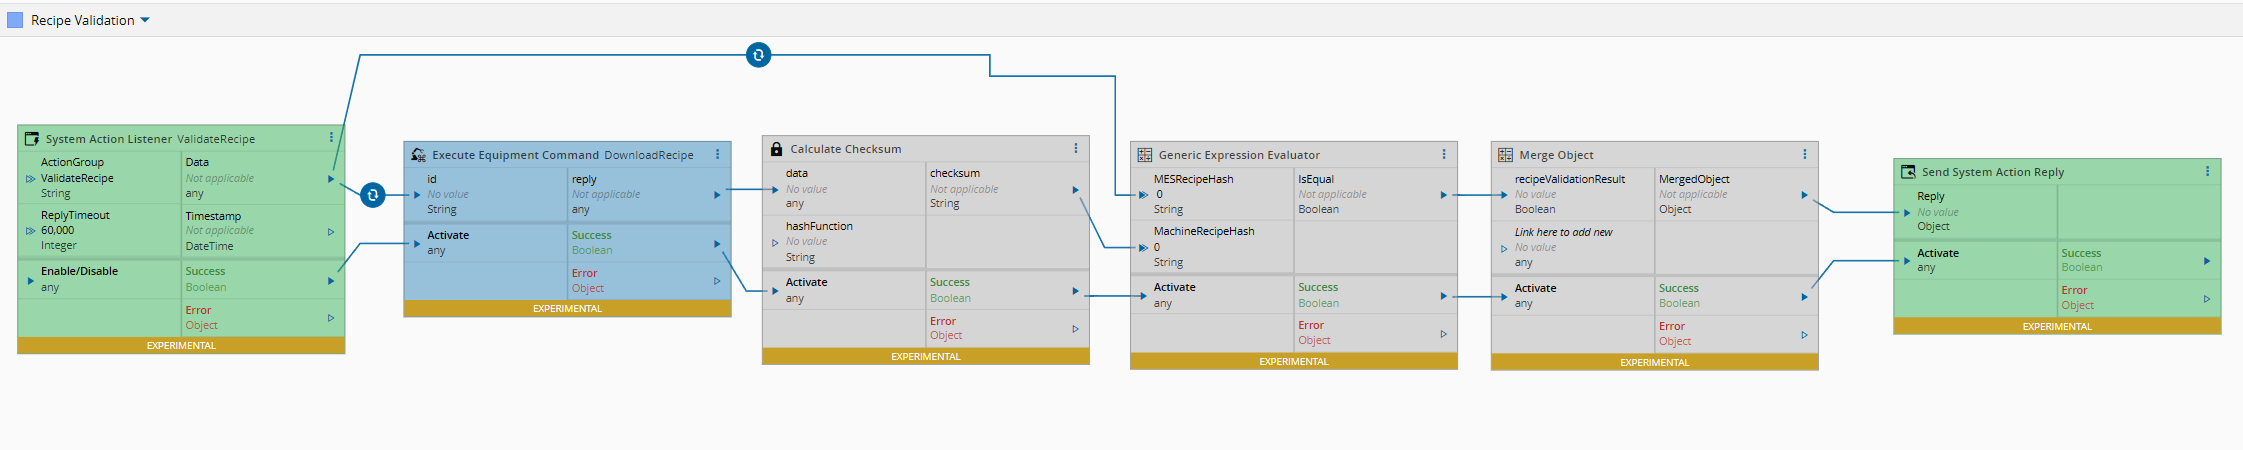
This workflow can be split into three actions. In green, the workflow listener and replier to the topic Validate Recipe. In blue, the download of the recipe body and in grey, the calculation of the recipe body checksum, the comparison between the MES recipe checksum and the machine recipe checksum and then we create a reply to the MES.
Material Handling#
In the material handling page we will handle all the actions regarding the material. There will be several different actions, let’s go step by step.
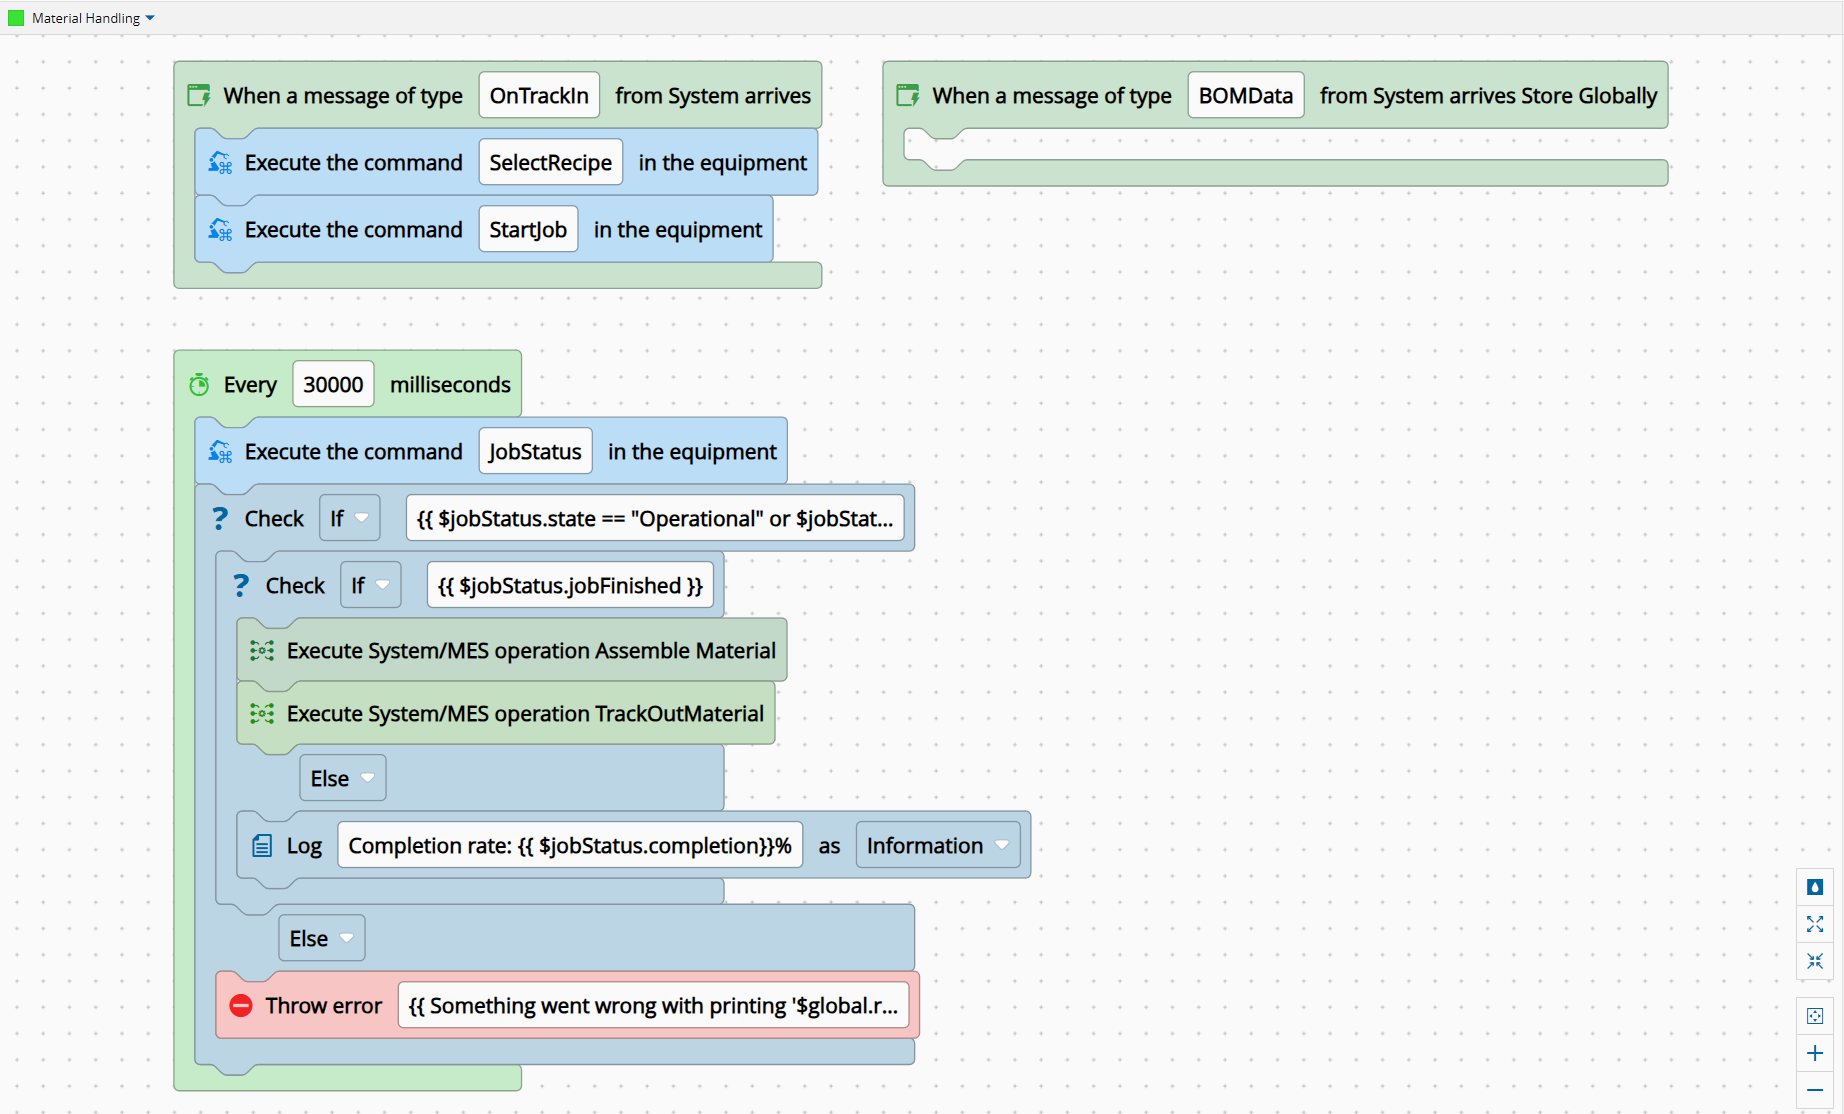
Start Printing Job#
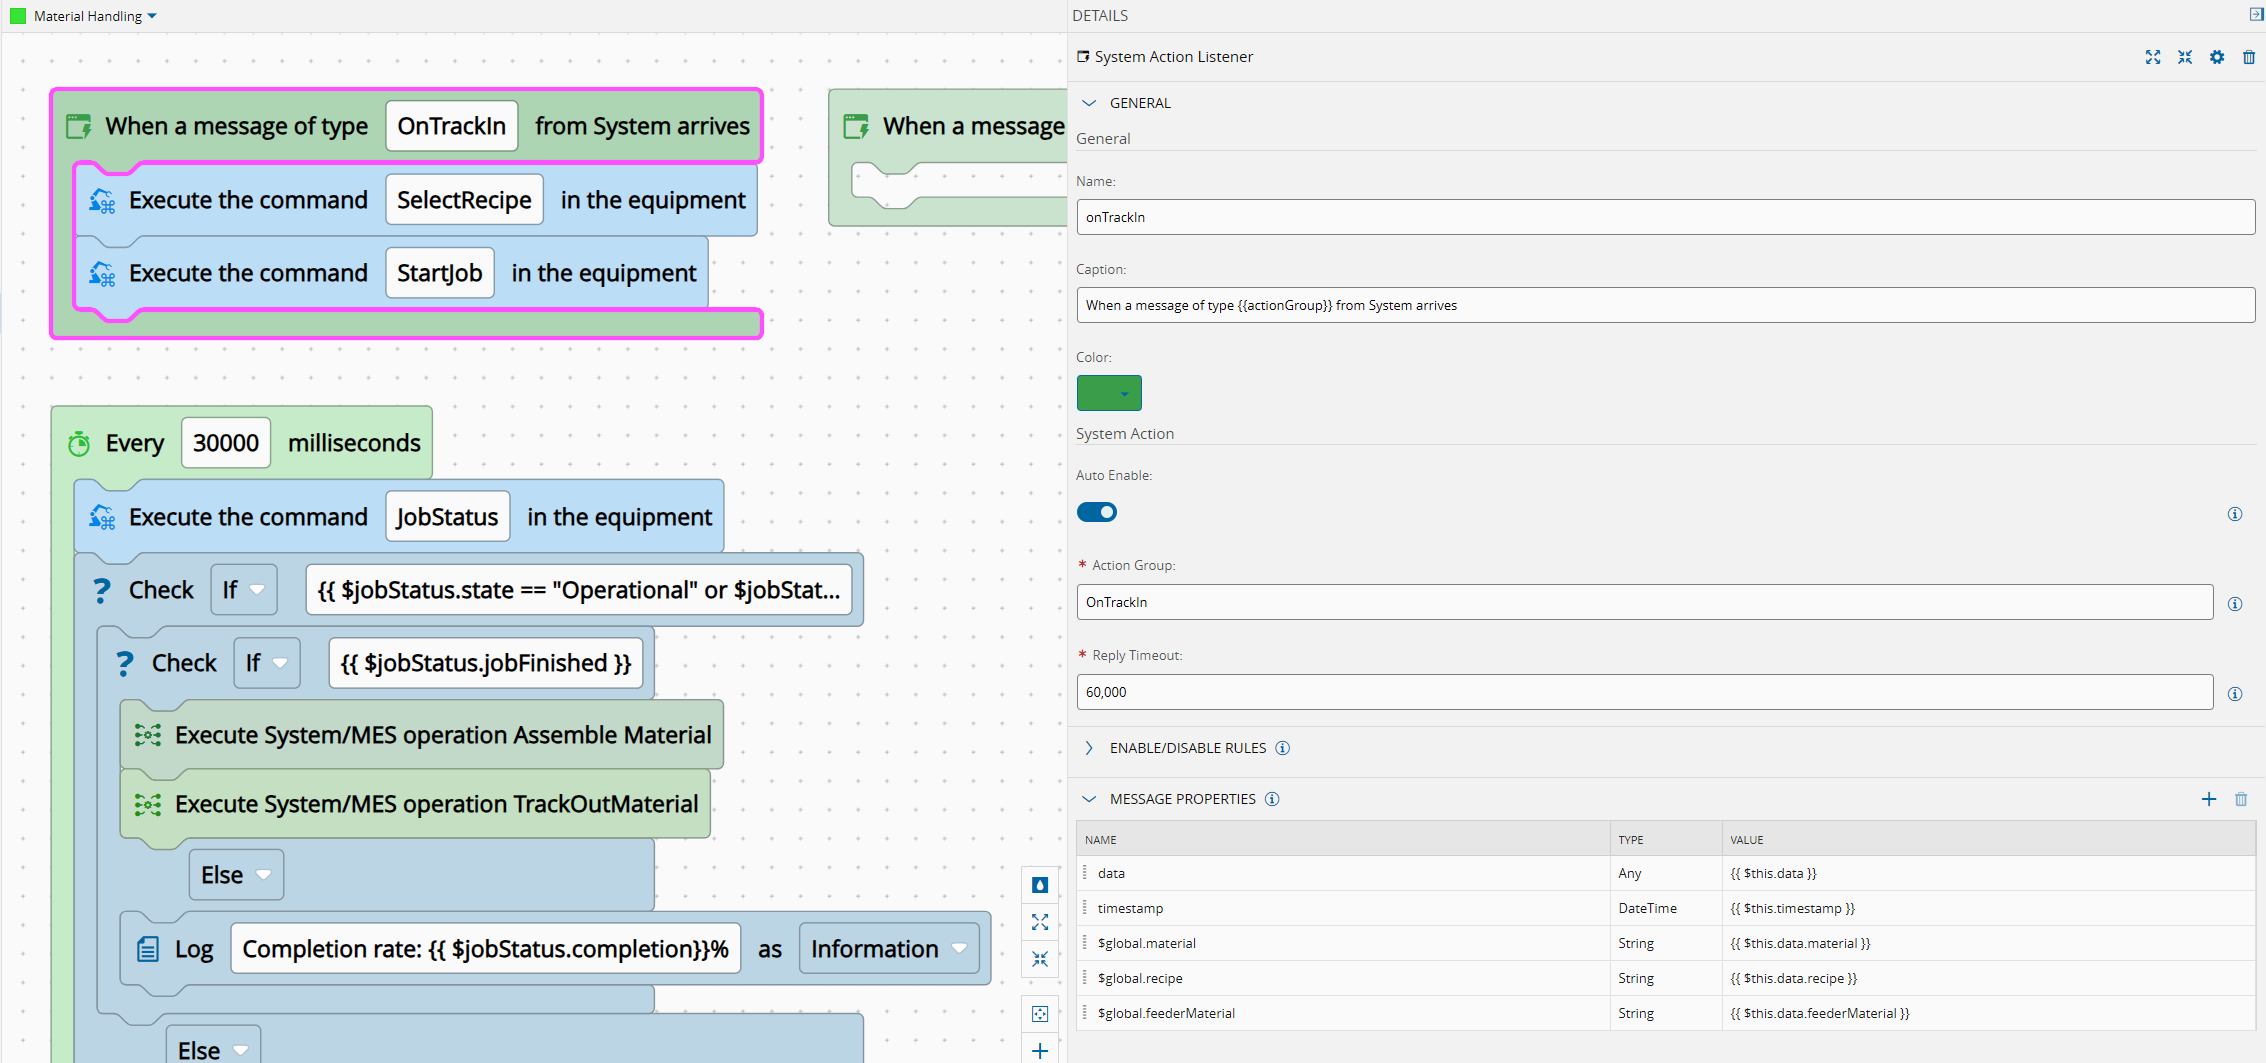
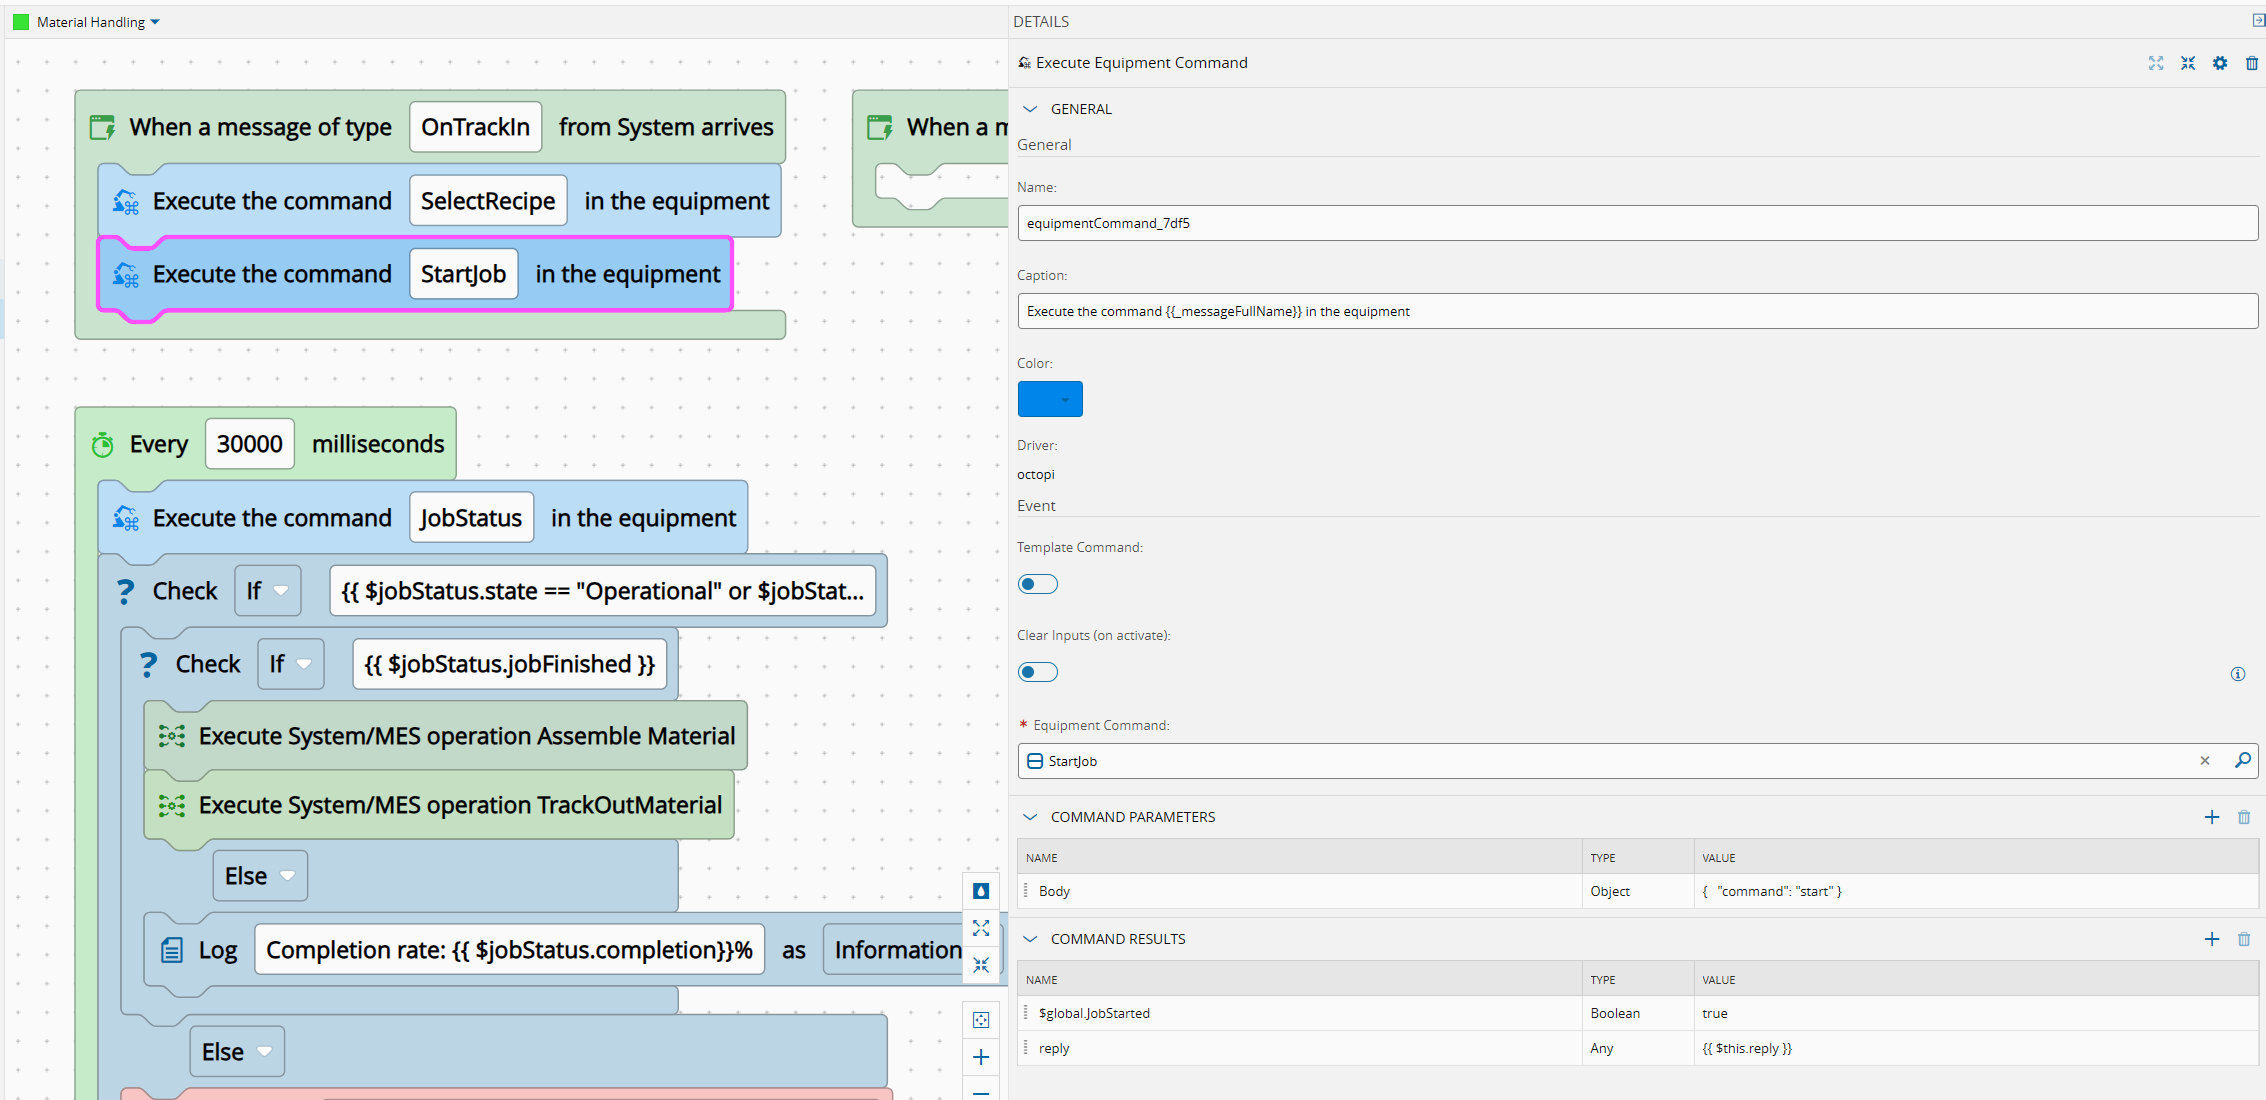
The first action of the flow will be the listener for the topic OnTrackIn. When it receives a message in this topic, it will perform the Select Recipe and the Start Job. It will also save a set of global variables, one of those will start the polling for the job status.
It will store the $global.material, $global.recipe and the Start Job will store the $global.JobStarted.
Receive BOM information#
For the track-in we have actions that must occur before the track-in transaction like the recipe validation, but we also want some information that is only resolved after the transaction is complete like the BOM information. We will have a listener for BOM information that will just store the information in the global context.
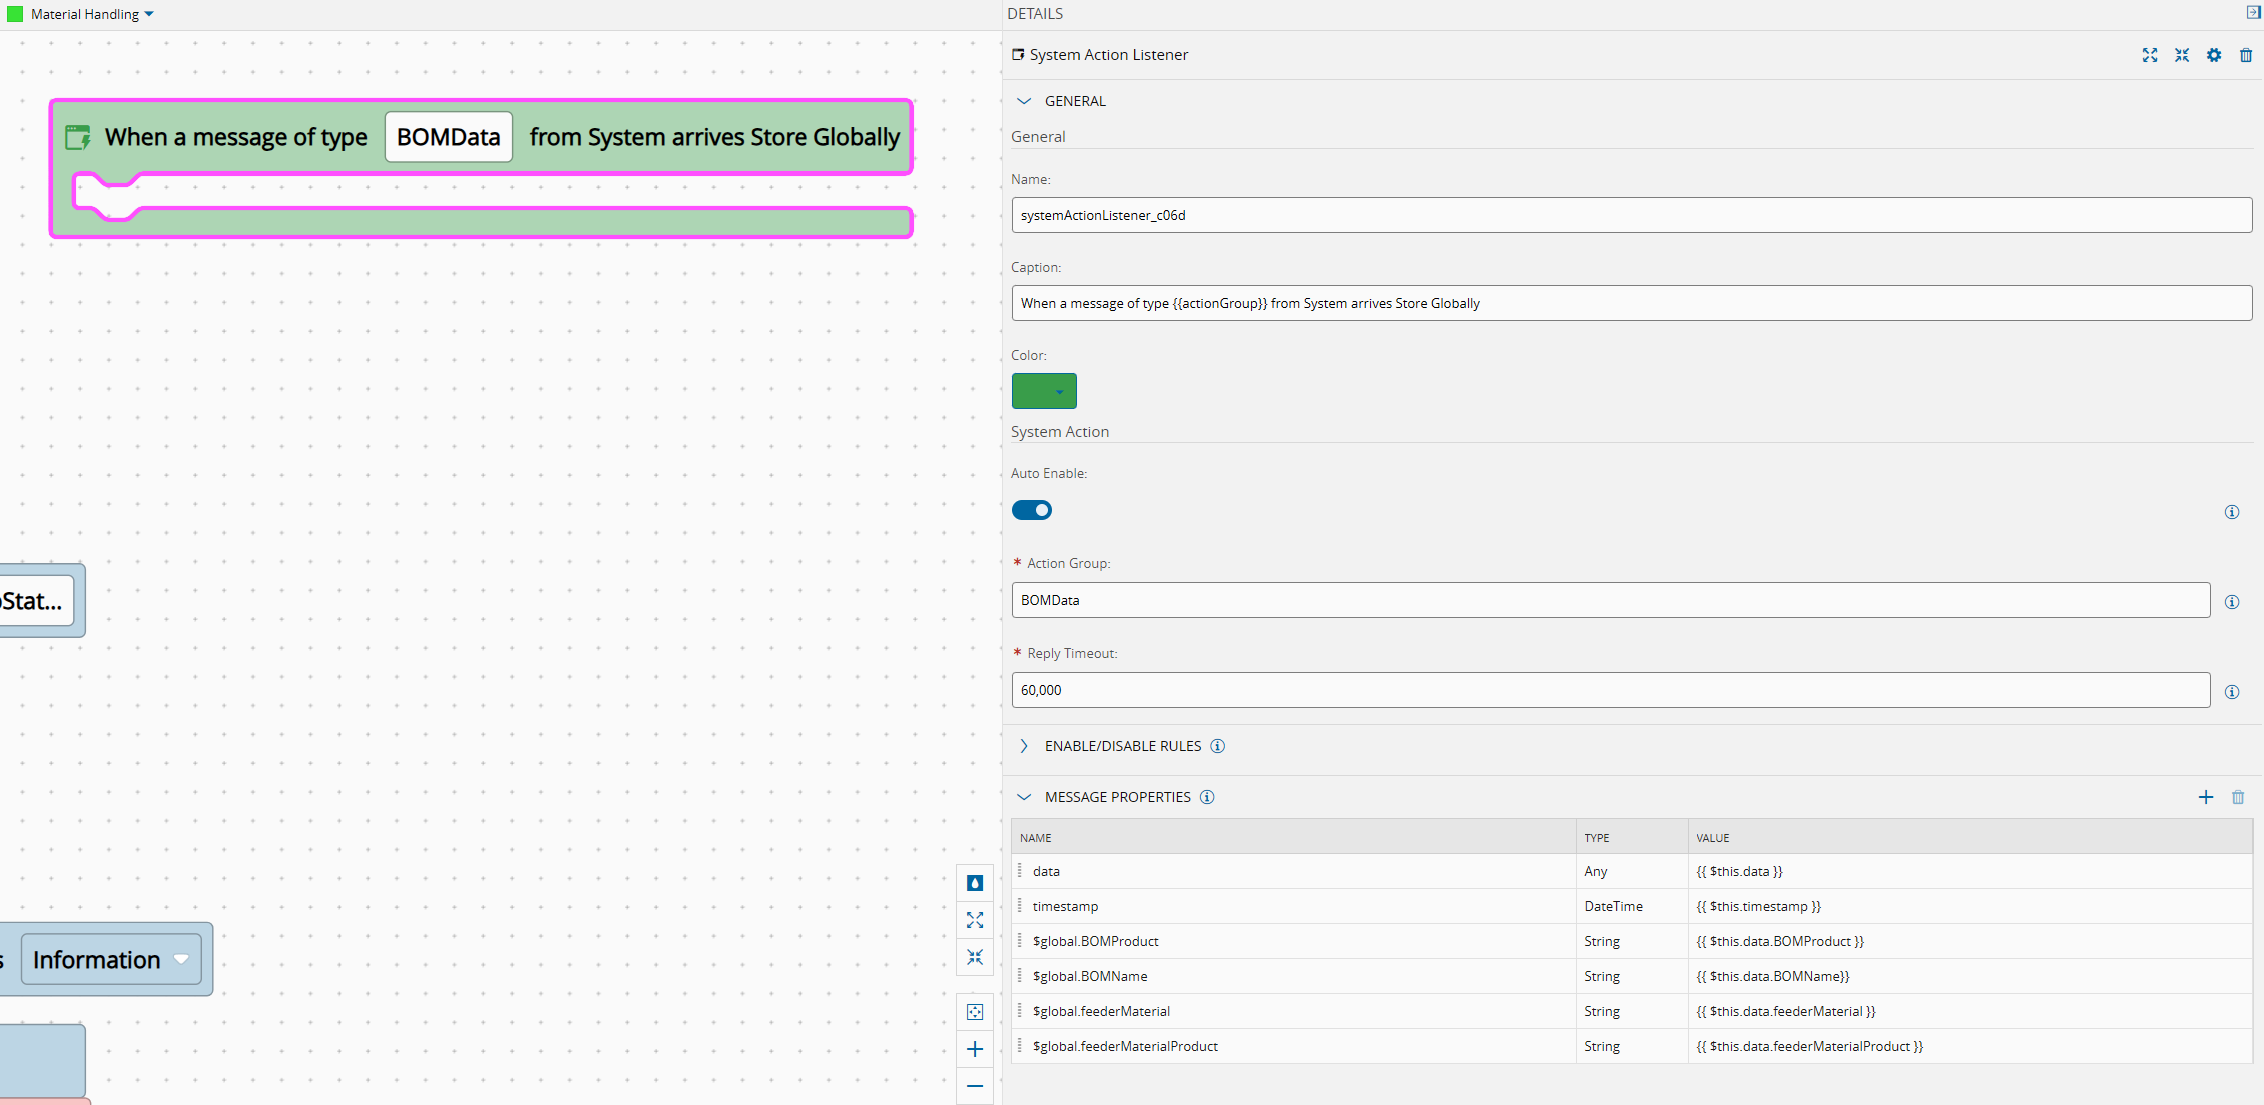
It will store the $global.BOMProduct, $global.BOMName, $global.feederMaterial and the $global.feederMaterialProduct.
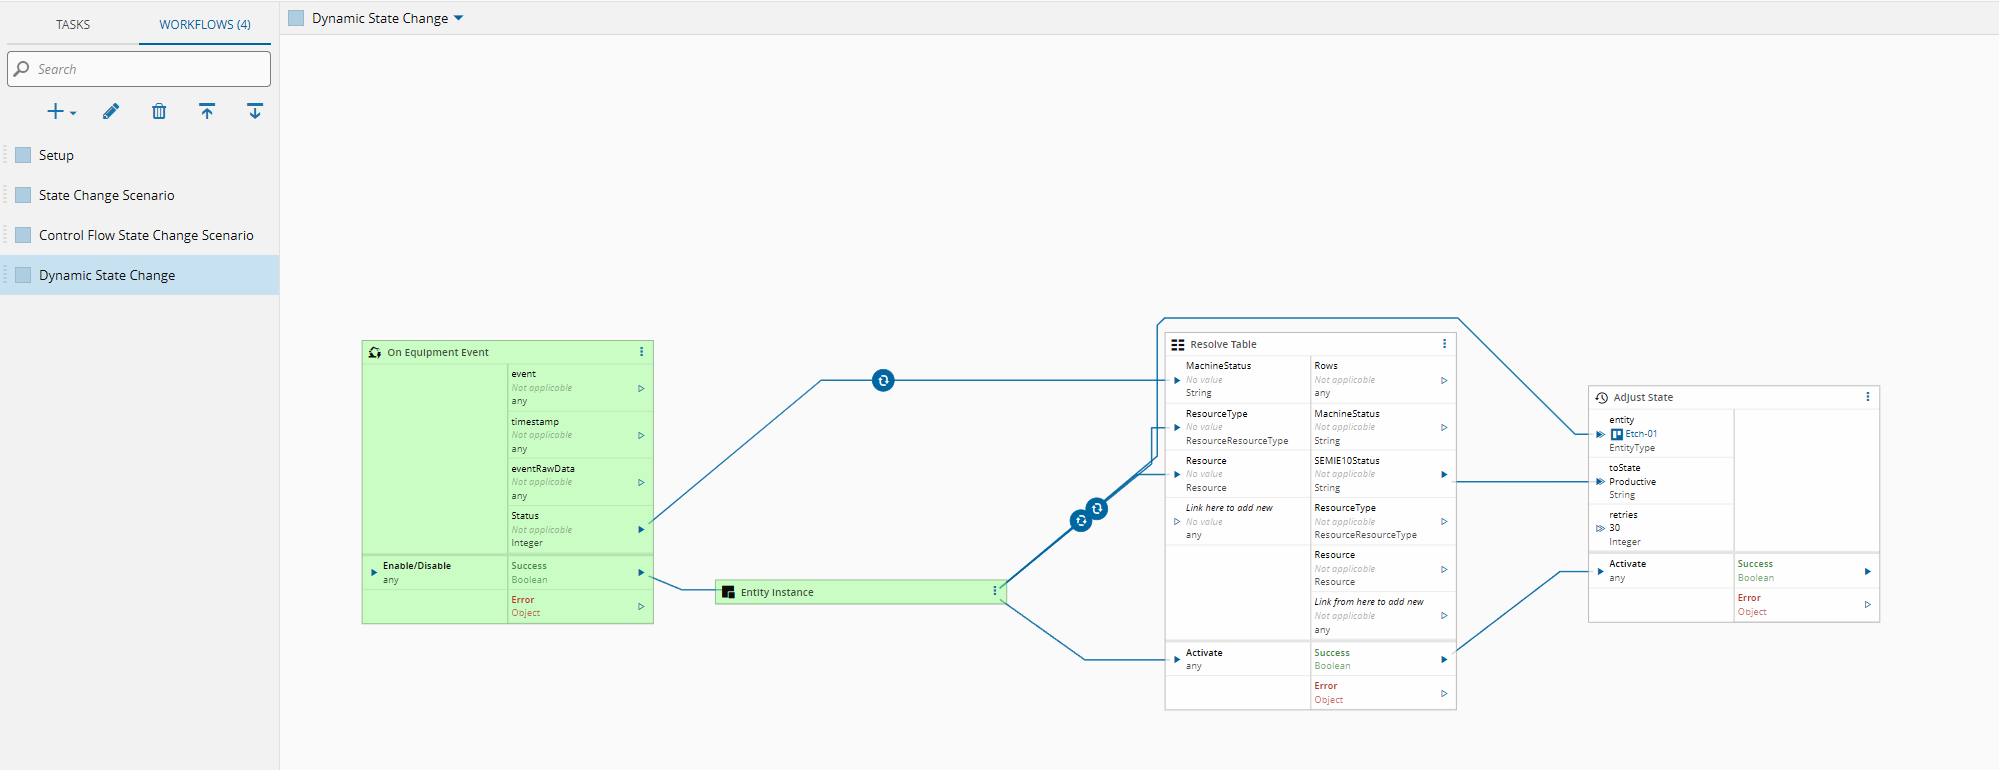
Job Finish Polling#
When the Job Started is finished it will start the timer for the job status monitoring.
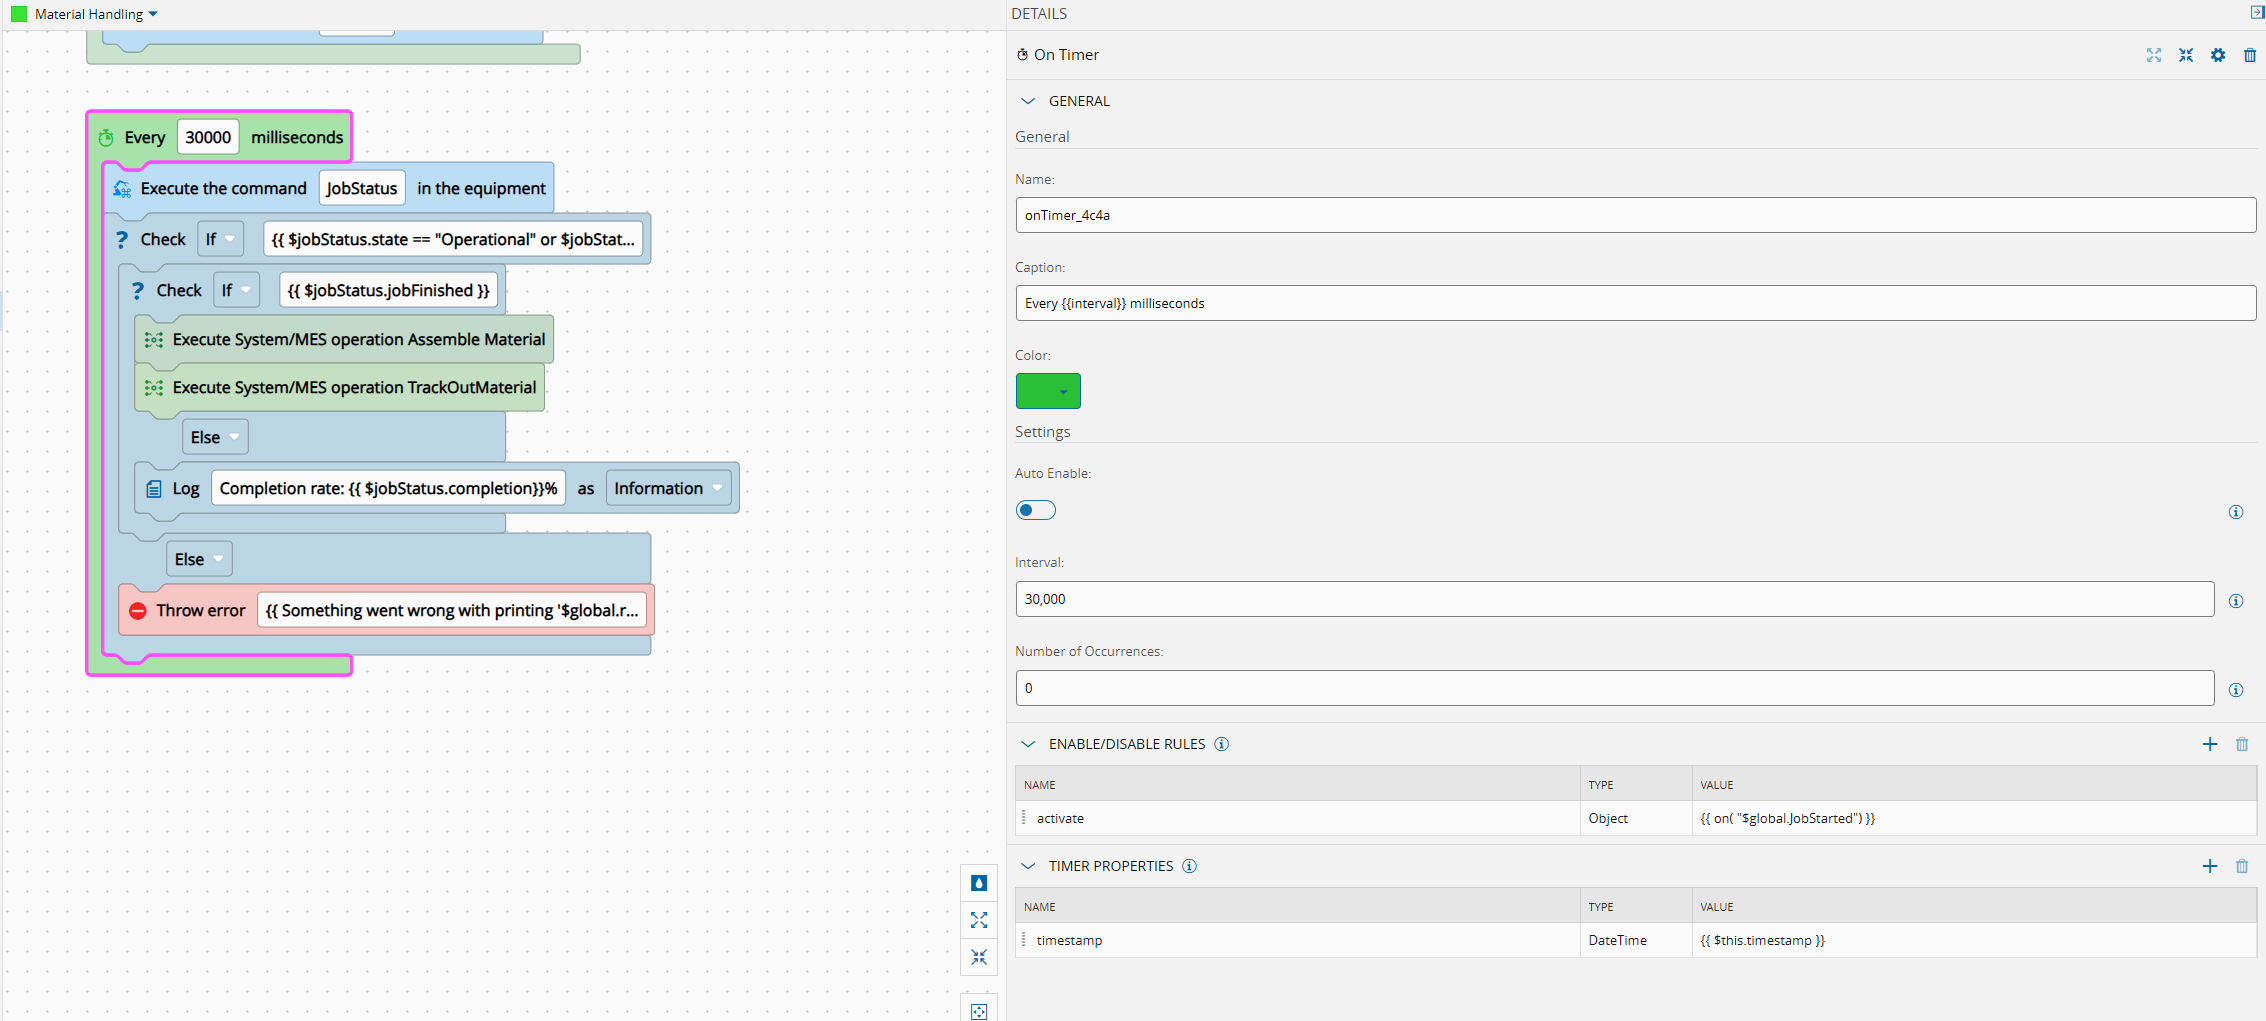
This timer will execute every 30 seconds and will query the printer for the Job Status.
If the printer is in an unexpected state it will throw an exception.
If the job status is Operational or Printing and the completion is 100% it will execute an assemble and a track-out of the material.
We will create outputs in the Job Status that will parse the information and make it easier to use it.

If the job is not yet finished we will log the completion rate.
Creating the Business Logic#
In our workflows we created three system listeners. We have the OnTrackIn, ValidateRecipe and the BOMData.
Developer Portal#
The MES is able to execute logic before and after system transactions. In our developer portal we have a detailed explanation of both the MES REST API and detailing all the action groups where we can hook the business logic.
Critical Manufacturing MES API Reference
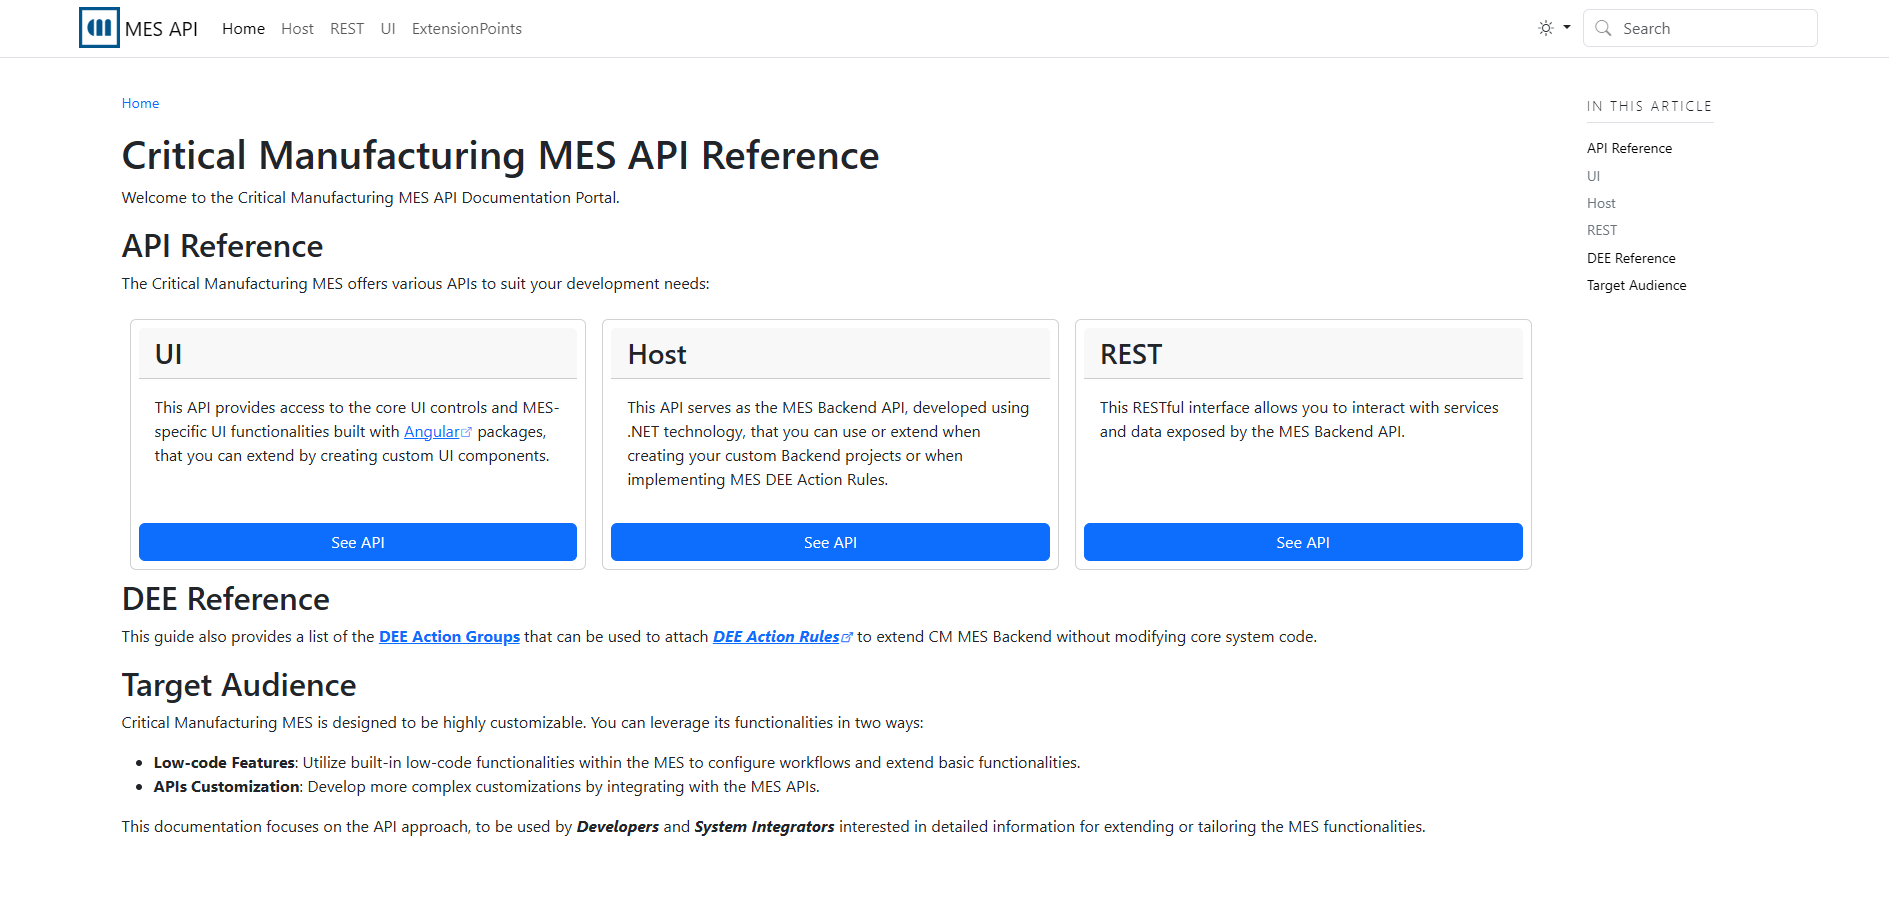
We will want to hook our events when the user tracks-in the material.
In the developer portal we can take a look at the REST API as if we were calling it with an external REST application.
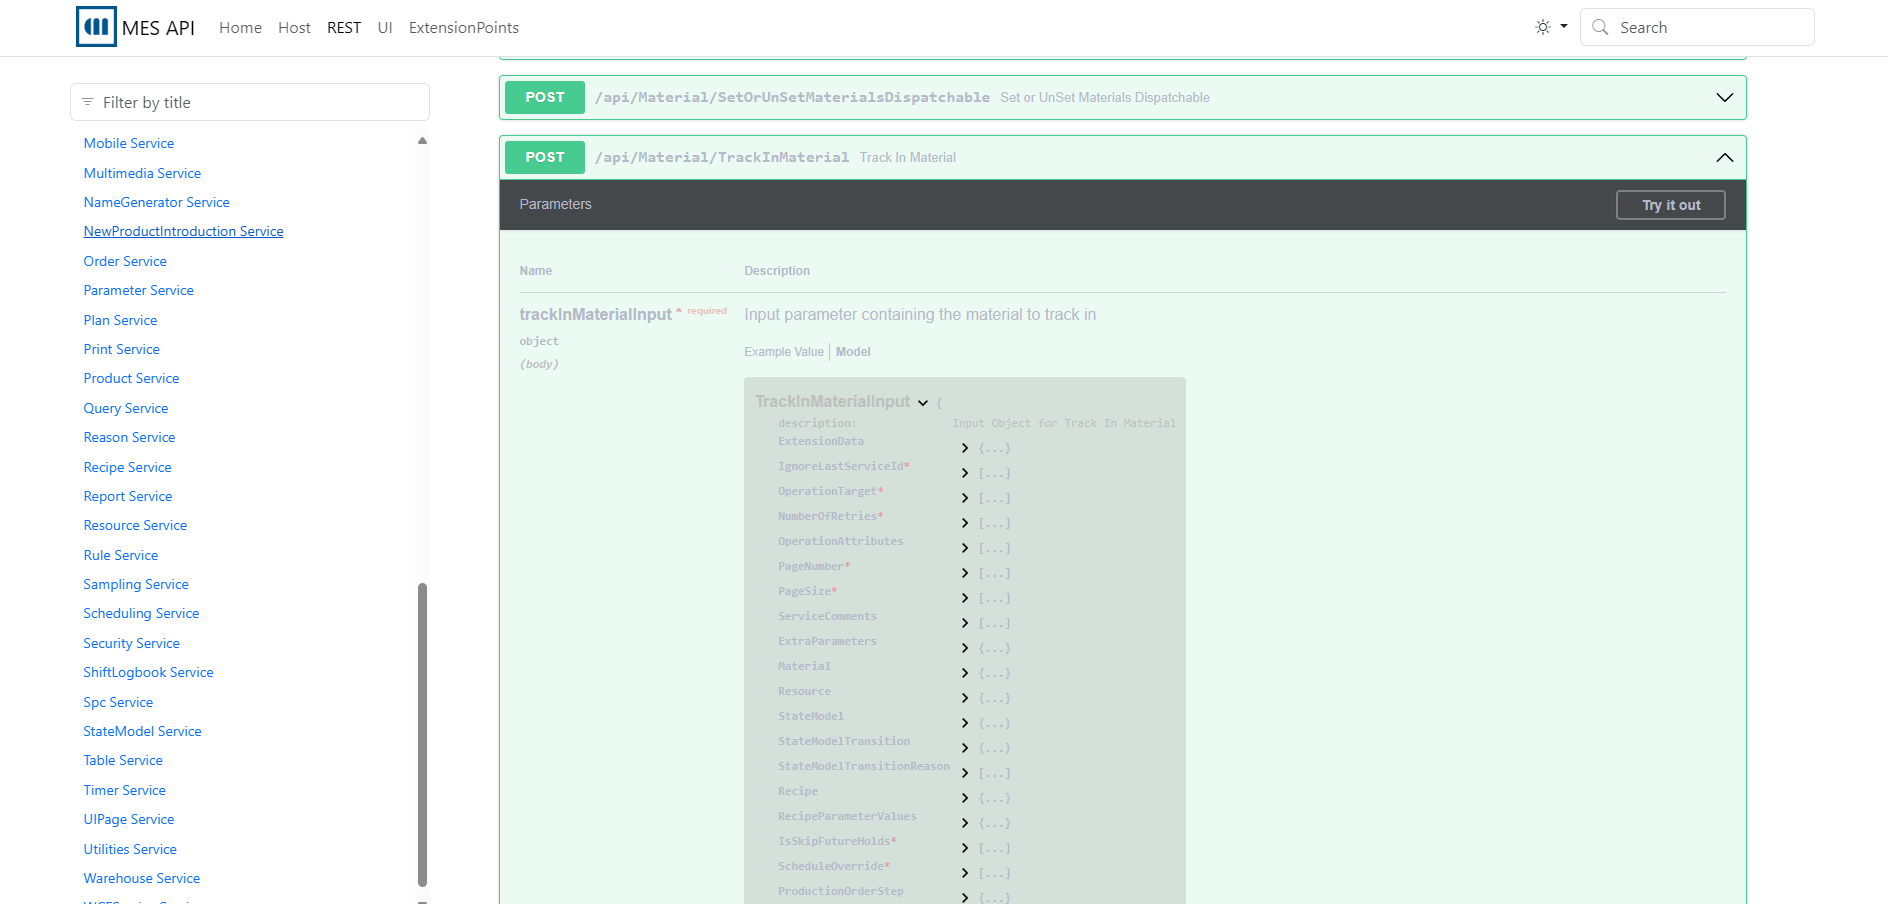
As we are using the default system hooking mechanism and the call is being made by a button press in the Resource View UI track-in button, we do not have to know all of that API.
If we go to the DEE Reference page:
Critical Manufacturing MES Extension Points Reference
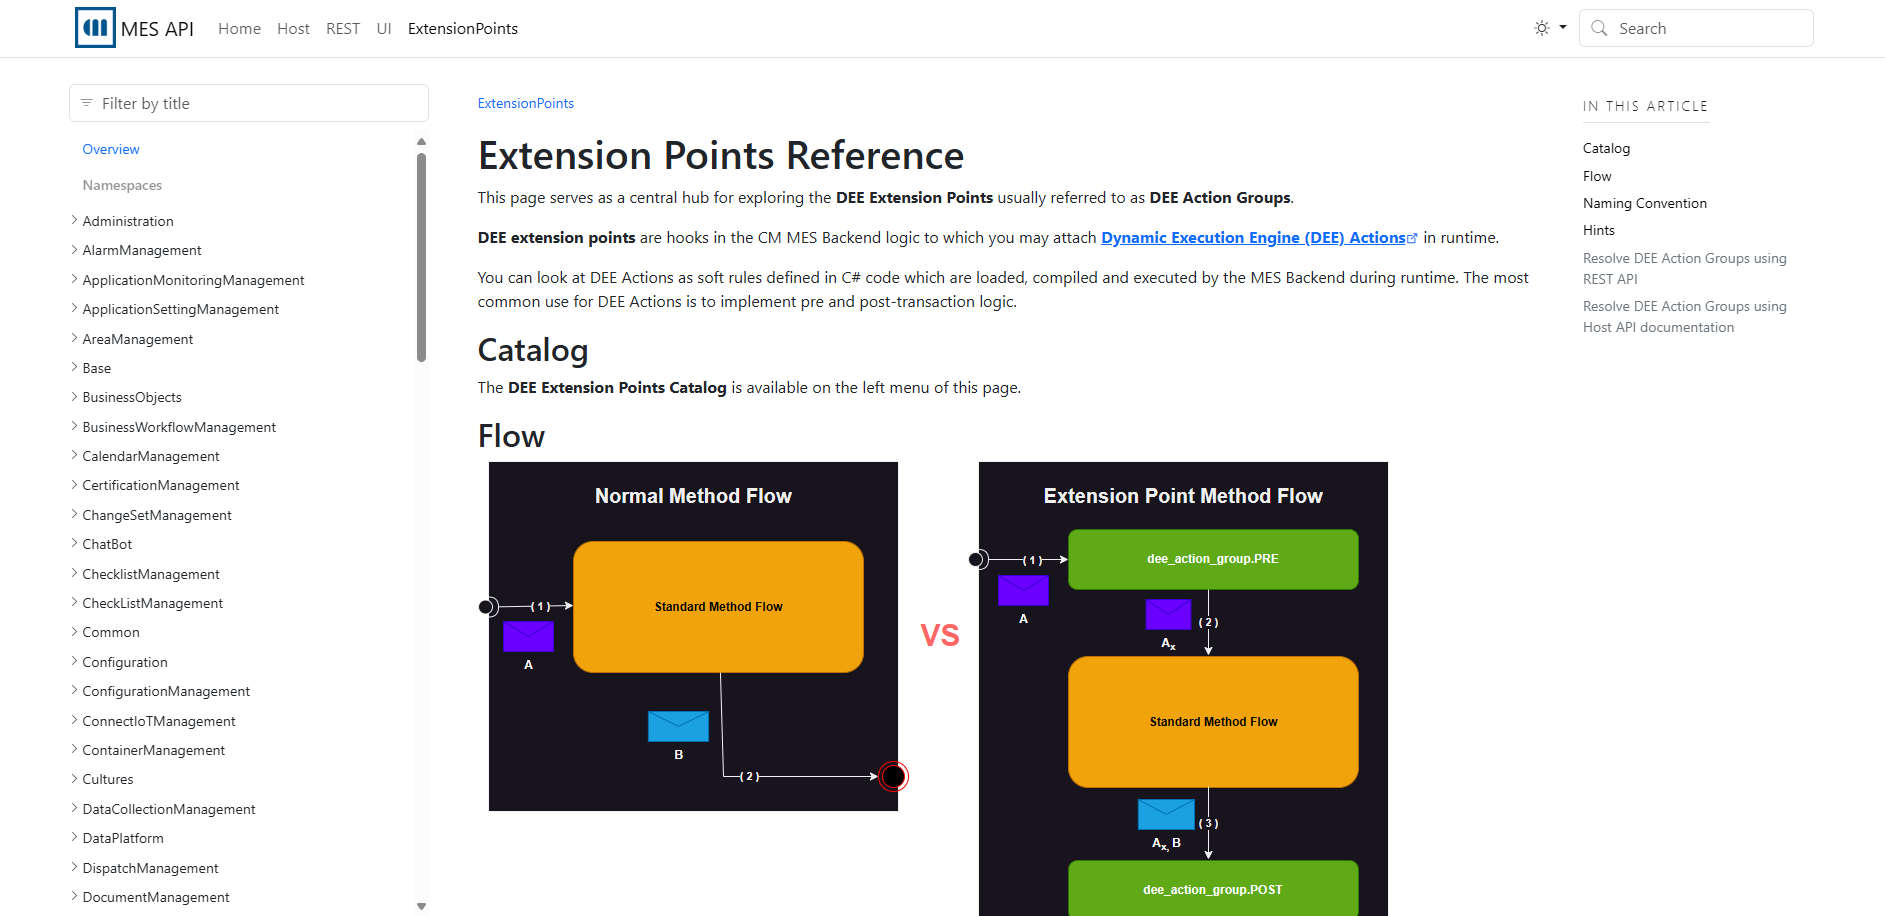
We will have an introduction of the hooking mechanism and on the right side a list of all the extension points.

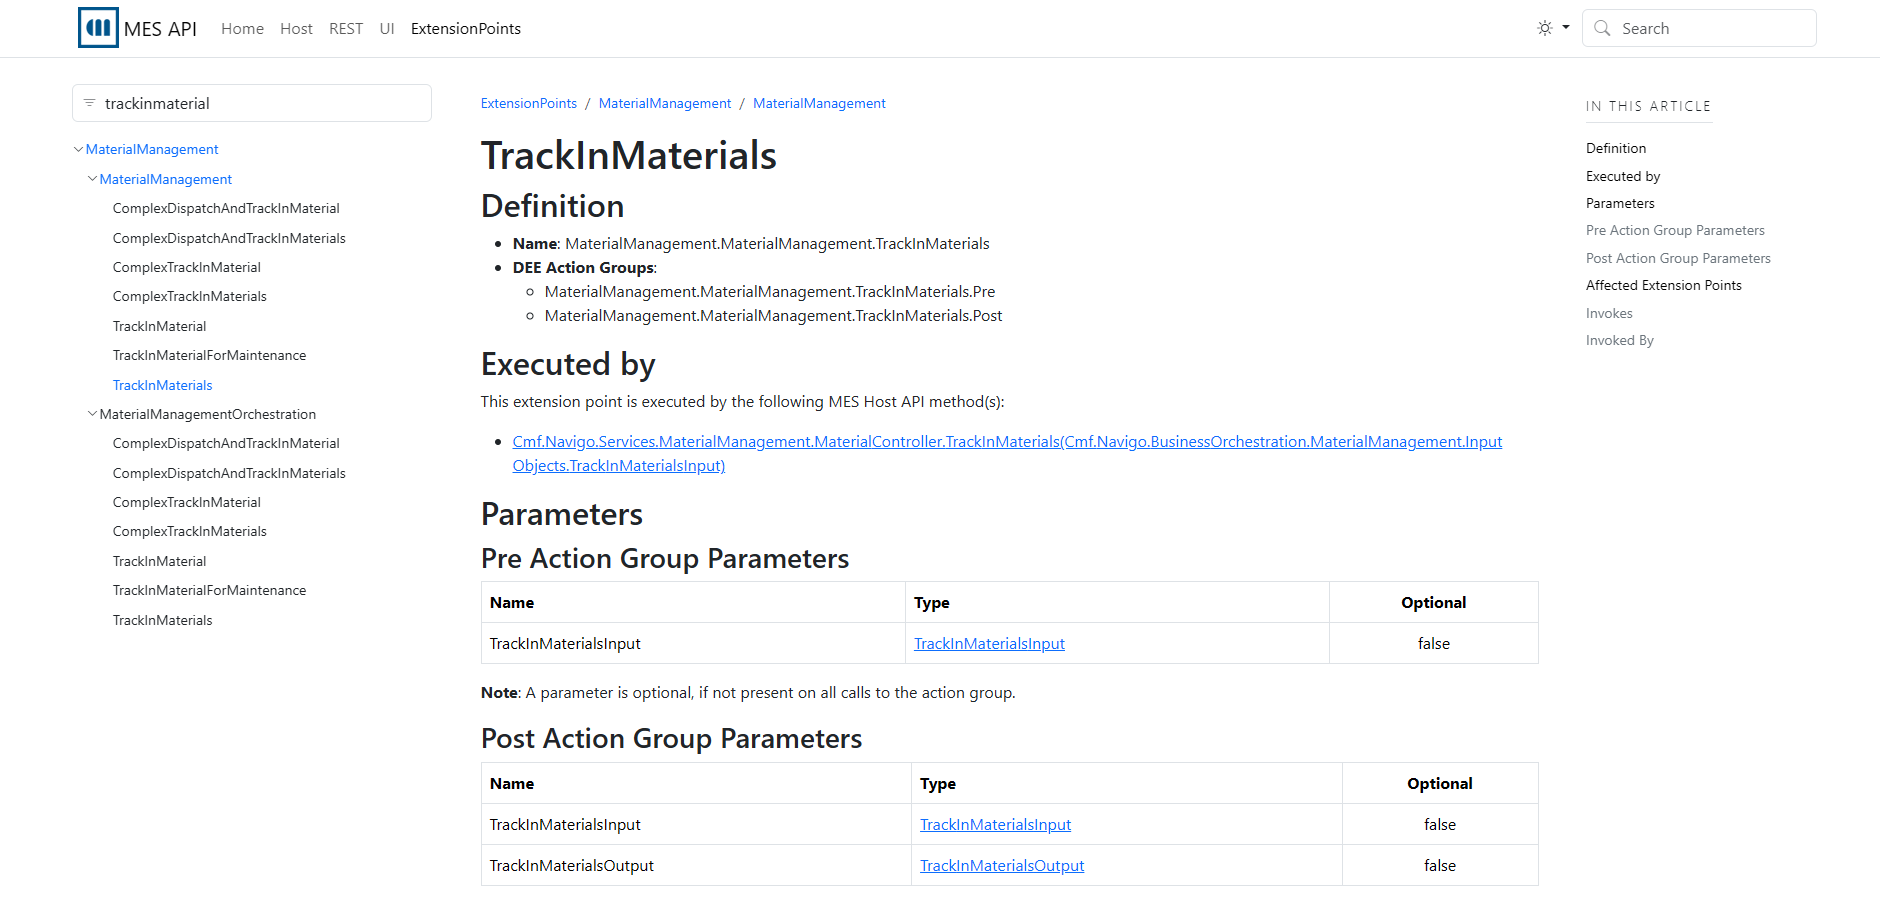
We can search by our action and then we will see all the possible extension points. For our use case we will perform a simple track-in so we will use the TrackInMaterials.
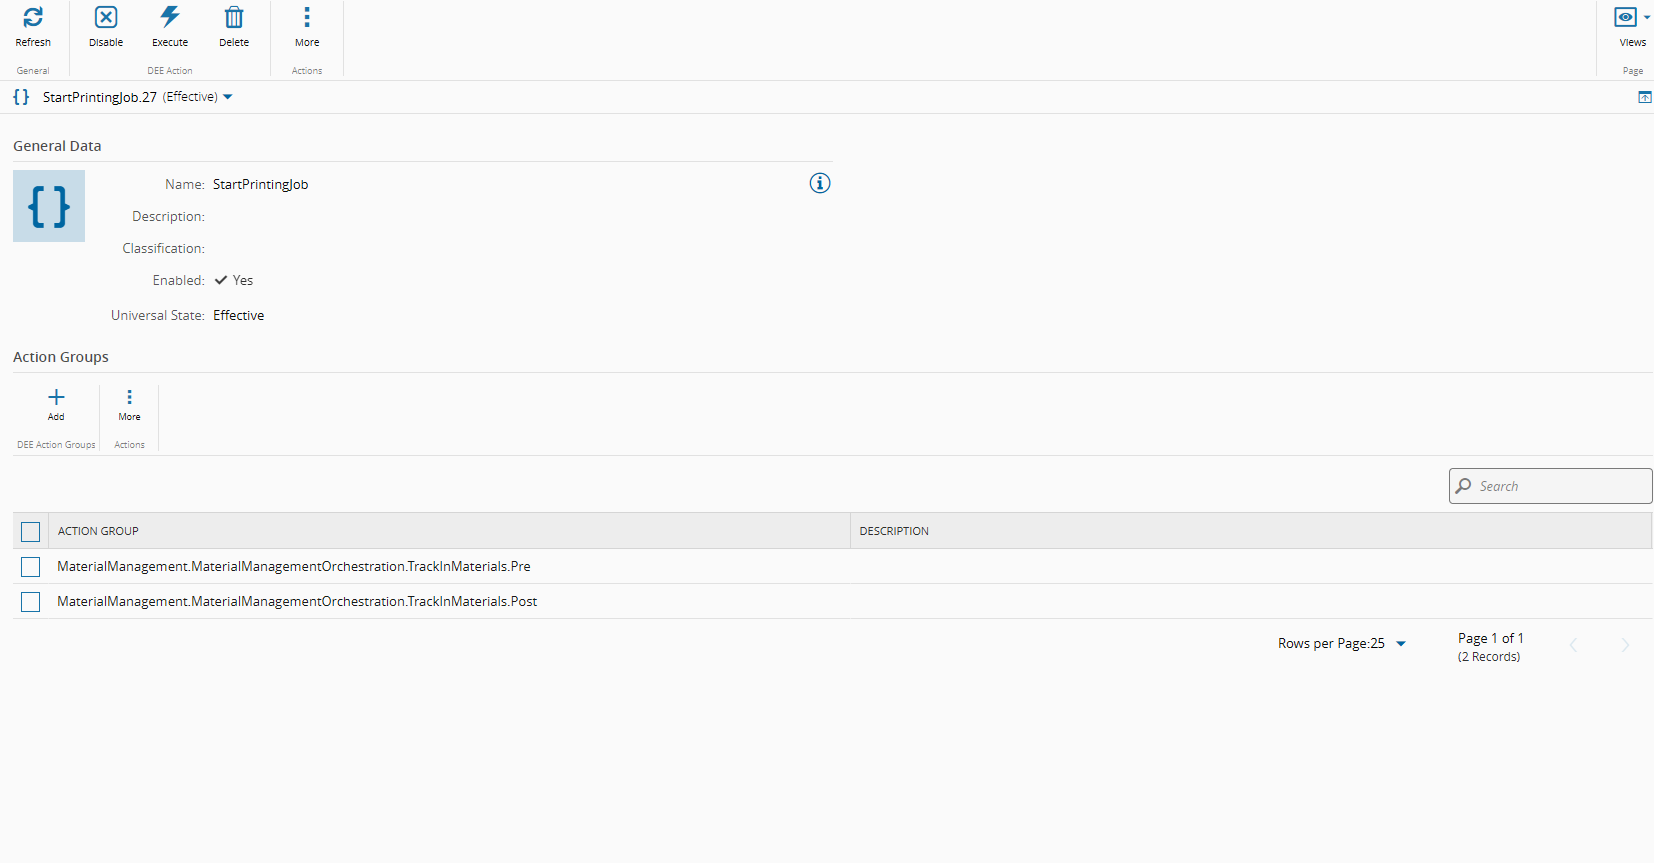
Create a DEE#
In the MES we can add the action group, both for pre and post:
- MaterialManagement.MaterialManagement.TrackInMaterials.Pre
- MaterialManagement.MaterialManagement.TrackInMaterials.Post
The first action of our extensibility DEE will be to handle the recipe validation and start the printing job.
#region Info

/// <summary>
/// Summary text
///     Start Printing Job - Will validate the Recipe, Start Printing Job and send BOM information
///	Assumptions:
/// Action Groups:
///     MaterialManagement.MaterialManagement.TrackInMaterials.Pre
///     MaterialManagement.MaterialManagement.TrackInMaterials.Post
/// Depends On:
/// Is Dependency For:
/// Exceptions:
/// </summary>

#endregion Info

// System
UseReference("", "System.Data");
UseReference("Newtonsoft.Json.dll", "Newtonsoft.Json.Linq");
UseReference("%MicrosoftNetPath%Microsoft.CSharp.dll", "");

// Foundation
UseReference("Cmf.Foundation.BusinessObjects.dll", "Cmf.Foundation.BusinessObjects");
UseReference("Cmf.Foundation.BusinessOrchestration.dll", "");
UseReference("", "Cmf.Foundation.Common.Exceptions");
UseReference("", "Cmf.Foundation.Common");

// Navigo
UseReference("Cmf.Navigo.BusinessObjects.dll", "Cmf.Navigo.BusinessObjects");
UseReference("Cmf.Navigo.BusinessObjects.dll", "Cmf.Navigo.BusinessOrchestration.Abstractions");
UseReference("Cmf.Navigo.BusinessOrchestration.dll", "Cmf.Navigo.BusinessOrchestration.ResourceManagement.InputObjects");

// Intercept Transaction input
var serviceProvider = (IServiceProvider)Input["ServiceProvider"];
var trackInMaterialsInput = Input["TrackInMaterialsInput"] as Cmf.Navigo.BusinessOrchestration.MaterialManagement.InputObjects.TrackInMaterialsInput;

var resource = trackInMaterialsInput.Resource;
var instance = resource.GetAutomationControllerInstance(); // Retrieve automation instance

// Our Code will only apply to
//  - resources of Resource Type "3d Printer"
//  - that have an automation instance
if(resource.ResourceType == "3d Printer" && instance != null) {

    // Code to be executed on before the Track-In
    if(Input["ActionGroupName"].ToString().Contains("Pre")) {
        var data = new
        {
            material = trackInMaterialsInput.Materials.FirstOrDefault().Name,
            recipe = trackInMaterialsInput.Recipe.ResourceRecipeName,
            recipeHash = trackInMaterialsInput.Recipe.BodyChecksum
        };

        // Validate Recipe - If successful recipeValidationResult will be true
        dynamic reply = instance.SendRequest("ValidateRecipe", Newtonsoft.Json.JsonConvert.SerializeObject(data), 10000);

        if((bool) reply.recipeValidationResult) {
            // Start Printing Job
            instance.SendRequest("OnTrackIn", Newtonsoft.Json.JsonConvert.SerializeObject(data), 10000);
        } else {
            throw new Exception("Invalid Recipe");
        }
    }
}

(...)
It is very important to realize that when you hook a DEE Action to an action group it will be executed for every track in in the system. For our use case, we used the Resource resource type to be the anchor of executing this particular integration.
If the Resource ResourceType is 3d Printer and the resource has an automation instance attached we will execute two actions. First we will send a message to the instance with the topic Validate Recipe with a data object with relevant information. if the reply comes with a recipeValidationResult as true, we will then start the printing job, by sending a message to the topic OnTrackIn.
The next phase of our DEE is to provide information regarding the bill of materials. The bill of materials for the material is resolved in the track in operation. If we hook in Pre we will have the objects in a state pre transaction, if we hook in Post we will already have the objects in the final state. In our case we wish to send the information that is resolved in the track-in transaction, so we can add the hook in Post and send the information to the automation instance.
#region Info

/// <summary>
/// Summary text
///     Start Printing Job - Will validate the Recipe, Start Printing Job and send BOM information
///	Assumptions:
/// Action Groups:
///     MaterialManagement.MaterialManagement.TrackInMaterials.Pre
///     MaterialManagement.MaterialManagement.TrackInMaterials.Post
/// Depends On:
/// Is Dependency For:
/// Exceptions:
/// </summary>

#endregion Info

// System
UseReference("", "System.Data");
UseReference("Newtonsoft.Json.dll", "Newtonsoft.Json.Linq");
UseReference("%MicrosoftNetPath%Microsoft.CSharp.dll", "");

// Foundation
UseReference("Cmf.Foundation.BusinessObjects.dll", "Cmf.Foundation.BusinessObjects");
UseReference("Cmf.Foundation.BusinessOrchestration.dll", "");
UseReference("", "Cmf.Foundation.Common.Exceptions");
UseReference("", "Cmf.Foundation.Common");

// Navigo
UseReference("Cmf.Navigo.BusinessObjects.dll", "Cmf.Navigo.BusinessObjects");
UseReference("Cmf.Navigo.BusinessObjects.dll", "Cmf.Navigo.BusinessOrchestration.Abstractions");
UseReference("Cmf.Navigo.BusinessOrchestration.dll", "Cmf.Navigo.BusinessOrchestration.ResourceManagement.InputObjects");

// Intercept Transaction input
var serviceProvider = (IServiceProvider)Input["ServiceProvider"];
var trackInMaterialsInput = Input["TrackInMaterialsInput"] as Cmf.Navigo.BusinessOrchestration.MaterialManagement.InputObjects.TrackInMaterialsInput;

var resource = trackInMaterialsInput.Resource;
var instance = resource.GetAutomationControllerInstance(); // Retrieve automation instance

// Our Code will only apply to
//  - resources of Resource Type "3d Printer"
//  - that have an automation instance
if(resource.ResourceType == "3d Printer" && instance != null) {

    // Code to be executed on before the Track-In
    if(Input["ActionGroupName"].ToString().Contains("Pre")) {
        var data = new
        {
            material = trackInMaterialsInput.Materials.FirstOrDefault().Name,
            recipe = trackInMaterialsInput.Recipe.ResourceRecipeName,
            recipeHash = trackInMaterialsInput.Recipe.BodyChecksum
        };

        // Validate Recipe - If successful recipeValidationResult will be true
        dynamic reply = instance.SendRequest("ValidateRecipe", Newtonsoft.Json.JsonConvert.SerializeObject(data), 10000);

        if((bool) reply.recipeValidationResult) {
            // Start Printing Job
            instance.SendRequest("OnTrackIn", Newtonsoft.Json.JsonConvert.SerializeObject(data), 10000);
        } else {
            throw new Exception("Invalid Recipe");
        }
    } else {
        // Get Resource Current State
        resource.Load();
        // Retrieve BOM (bill of materials)
        var bom = resource.CurrentBOM;
        if(bom != null) {

            string feederMaterial;
            string feederMaterialProduct;

            var material = trackInMaterialsInput.Materials.FirstOrDefault();

            #region Retrieve Feeder Material

            // For Resource ResourceType "3d Printer" we will only have one consumable feed with one material
            IResourceOrchestration resourceOrchestration = ApplicationContext.CurrentServiceProvider.GetService<IResourceOrchestration>();
            var consumables = resourceOrchestration.GetConsumableFeeds(new GetConsumableFeedsInput(){
                OnlyFirstMaterials = true,
                Resource = resource
            });

            DataSet ds = NgpDataSet.ToDataSet(consumables.ConsumableFeeds);
            if (HasData(ds))
            {
                if(ds.Tables[0].Rows.Count > 1){
                    throw new Exception("Only one feeder is supported for 3D Printer");
                }
                var row = ds.Tables[0].Rows[0];
                feederMaterial = row.Field<string>("SubResourceTargetEntityMaterialResourceSourceEntityName");
                feederMaterialProduct = row.Field<string>("SubResourceTargetEntityMaterialResourceSourceEntityProductName");
            } else {
                throw new Exception("Please attach a Material to the Consumable Feeder");
            }

            #endregion

            // Retrieve BOM Products
            bom.Load();
            bom.LoadBomProducts(material.Step, material.LogicalFlowPath);
            var data = new
            {
                BOMProduct = bom.BomProducts.FirstOrDefault().Name,
                BOMName = bom.Name,
                feederMaterial = feederMaterial,
                feederMaterialProduct = feederMaterialProduct
            };

            instance.SendRequest("BOMData", Newtonsoft.Json.JsonConvert.SerializeObject(data), 10000);
        } else {
            throw new Exception("Missing Mandatory BOM");
        }
    }
}

static bool HasData(DataSet ds)
{
    return ds != null && ds.Tables != null && ds.Tables.Count > 0 && ds.Tables[0].Rows != null && ds.Tables[0].Rows.Count > 0;
}
We have extracted all the required information for the assemble and will send it to the topic BOMData.
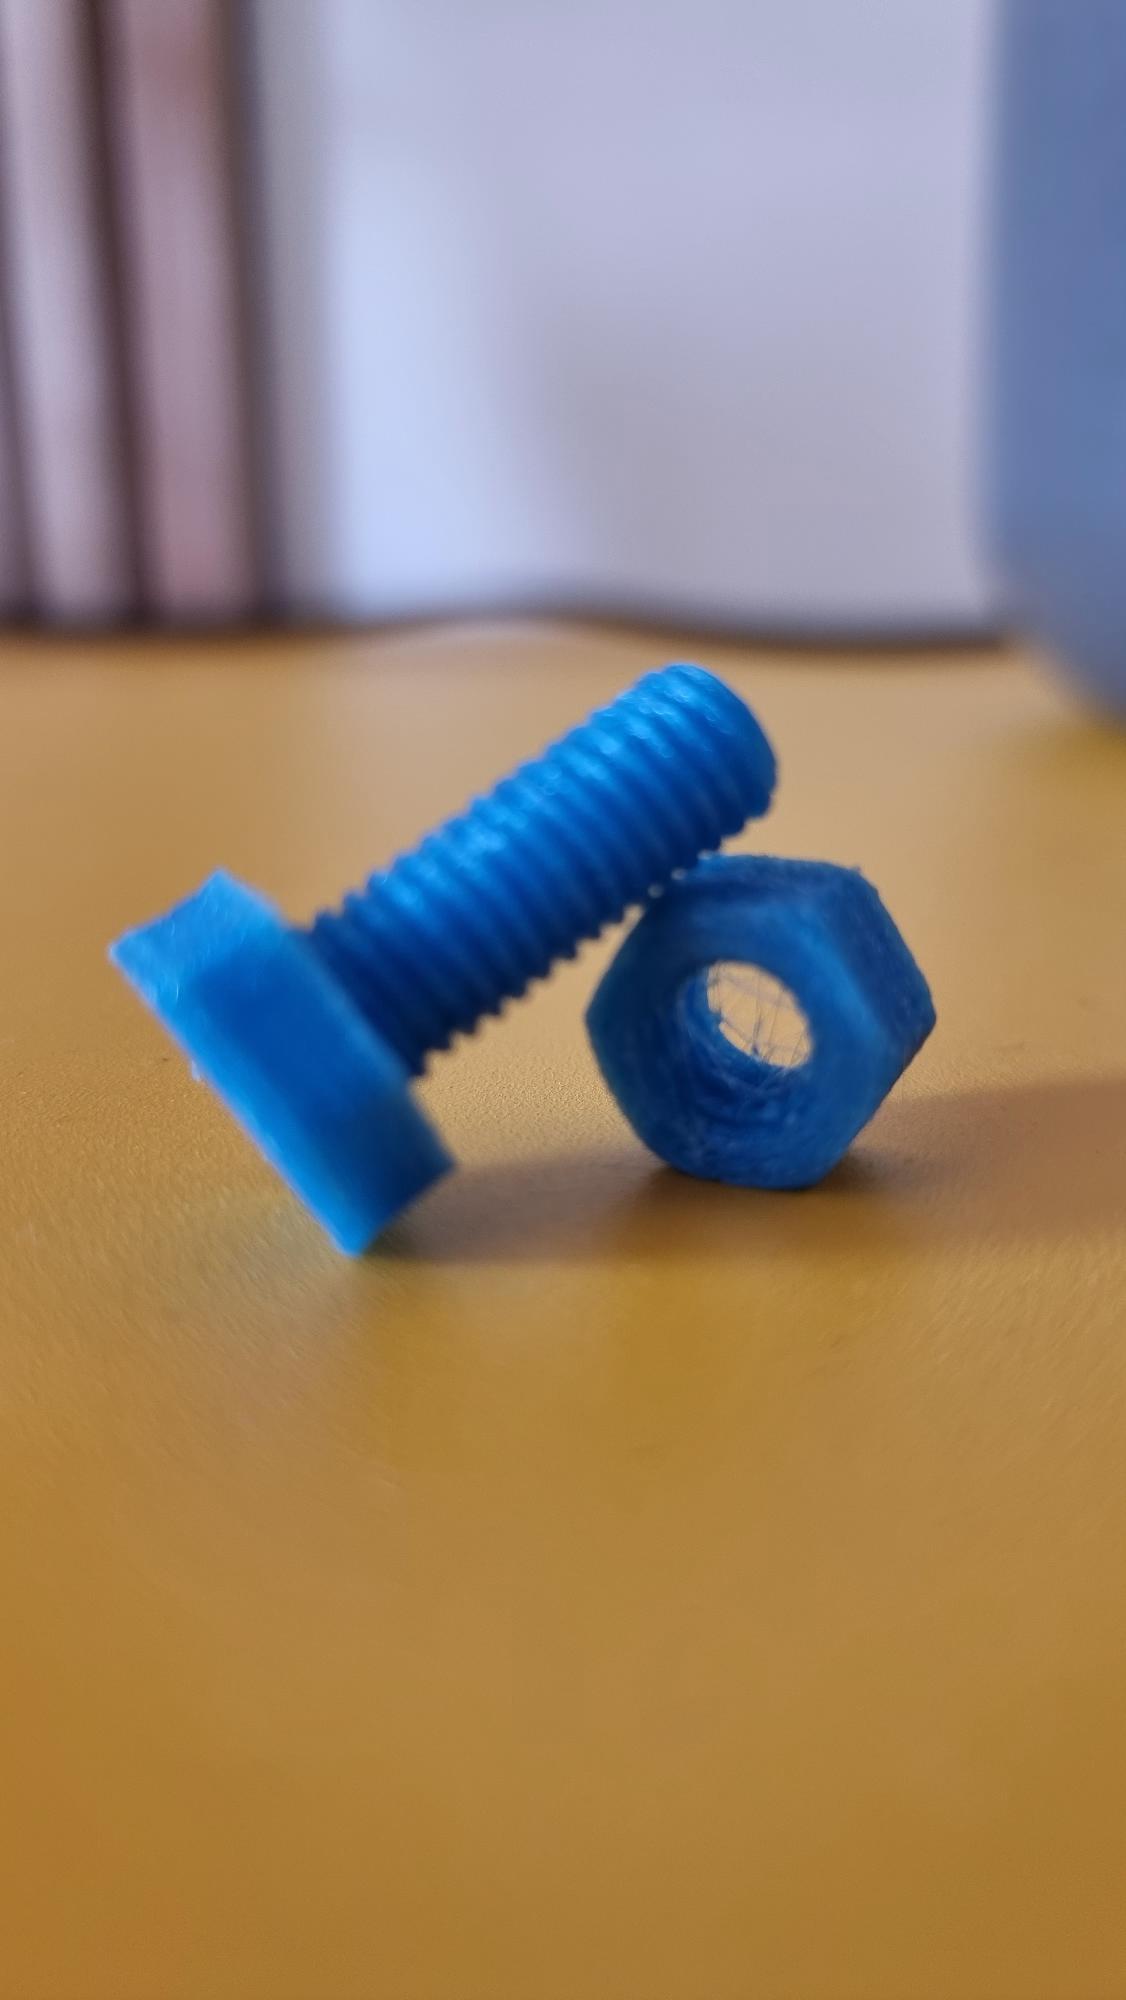
Running the Scenario - Nuts and Bolts#
Let’s see what we can do with this controller!!!
Automation Manager#
I connected the Controller to an Automation Manager.
We have already seen the recipe selection, so let’s try and use a material and perform a material handling cycle. For this scenario we will print a 3D Nut.
We have a product 3d Nut and a material Nut-003.
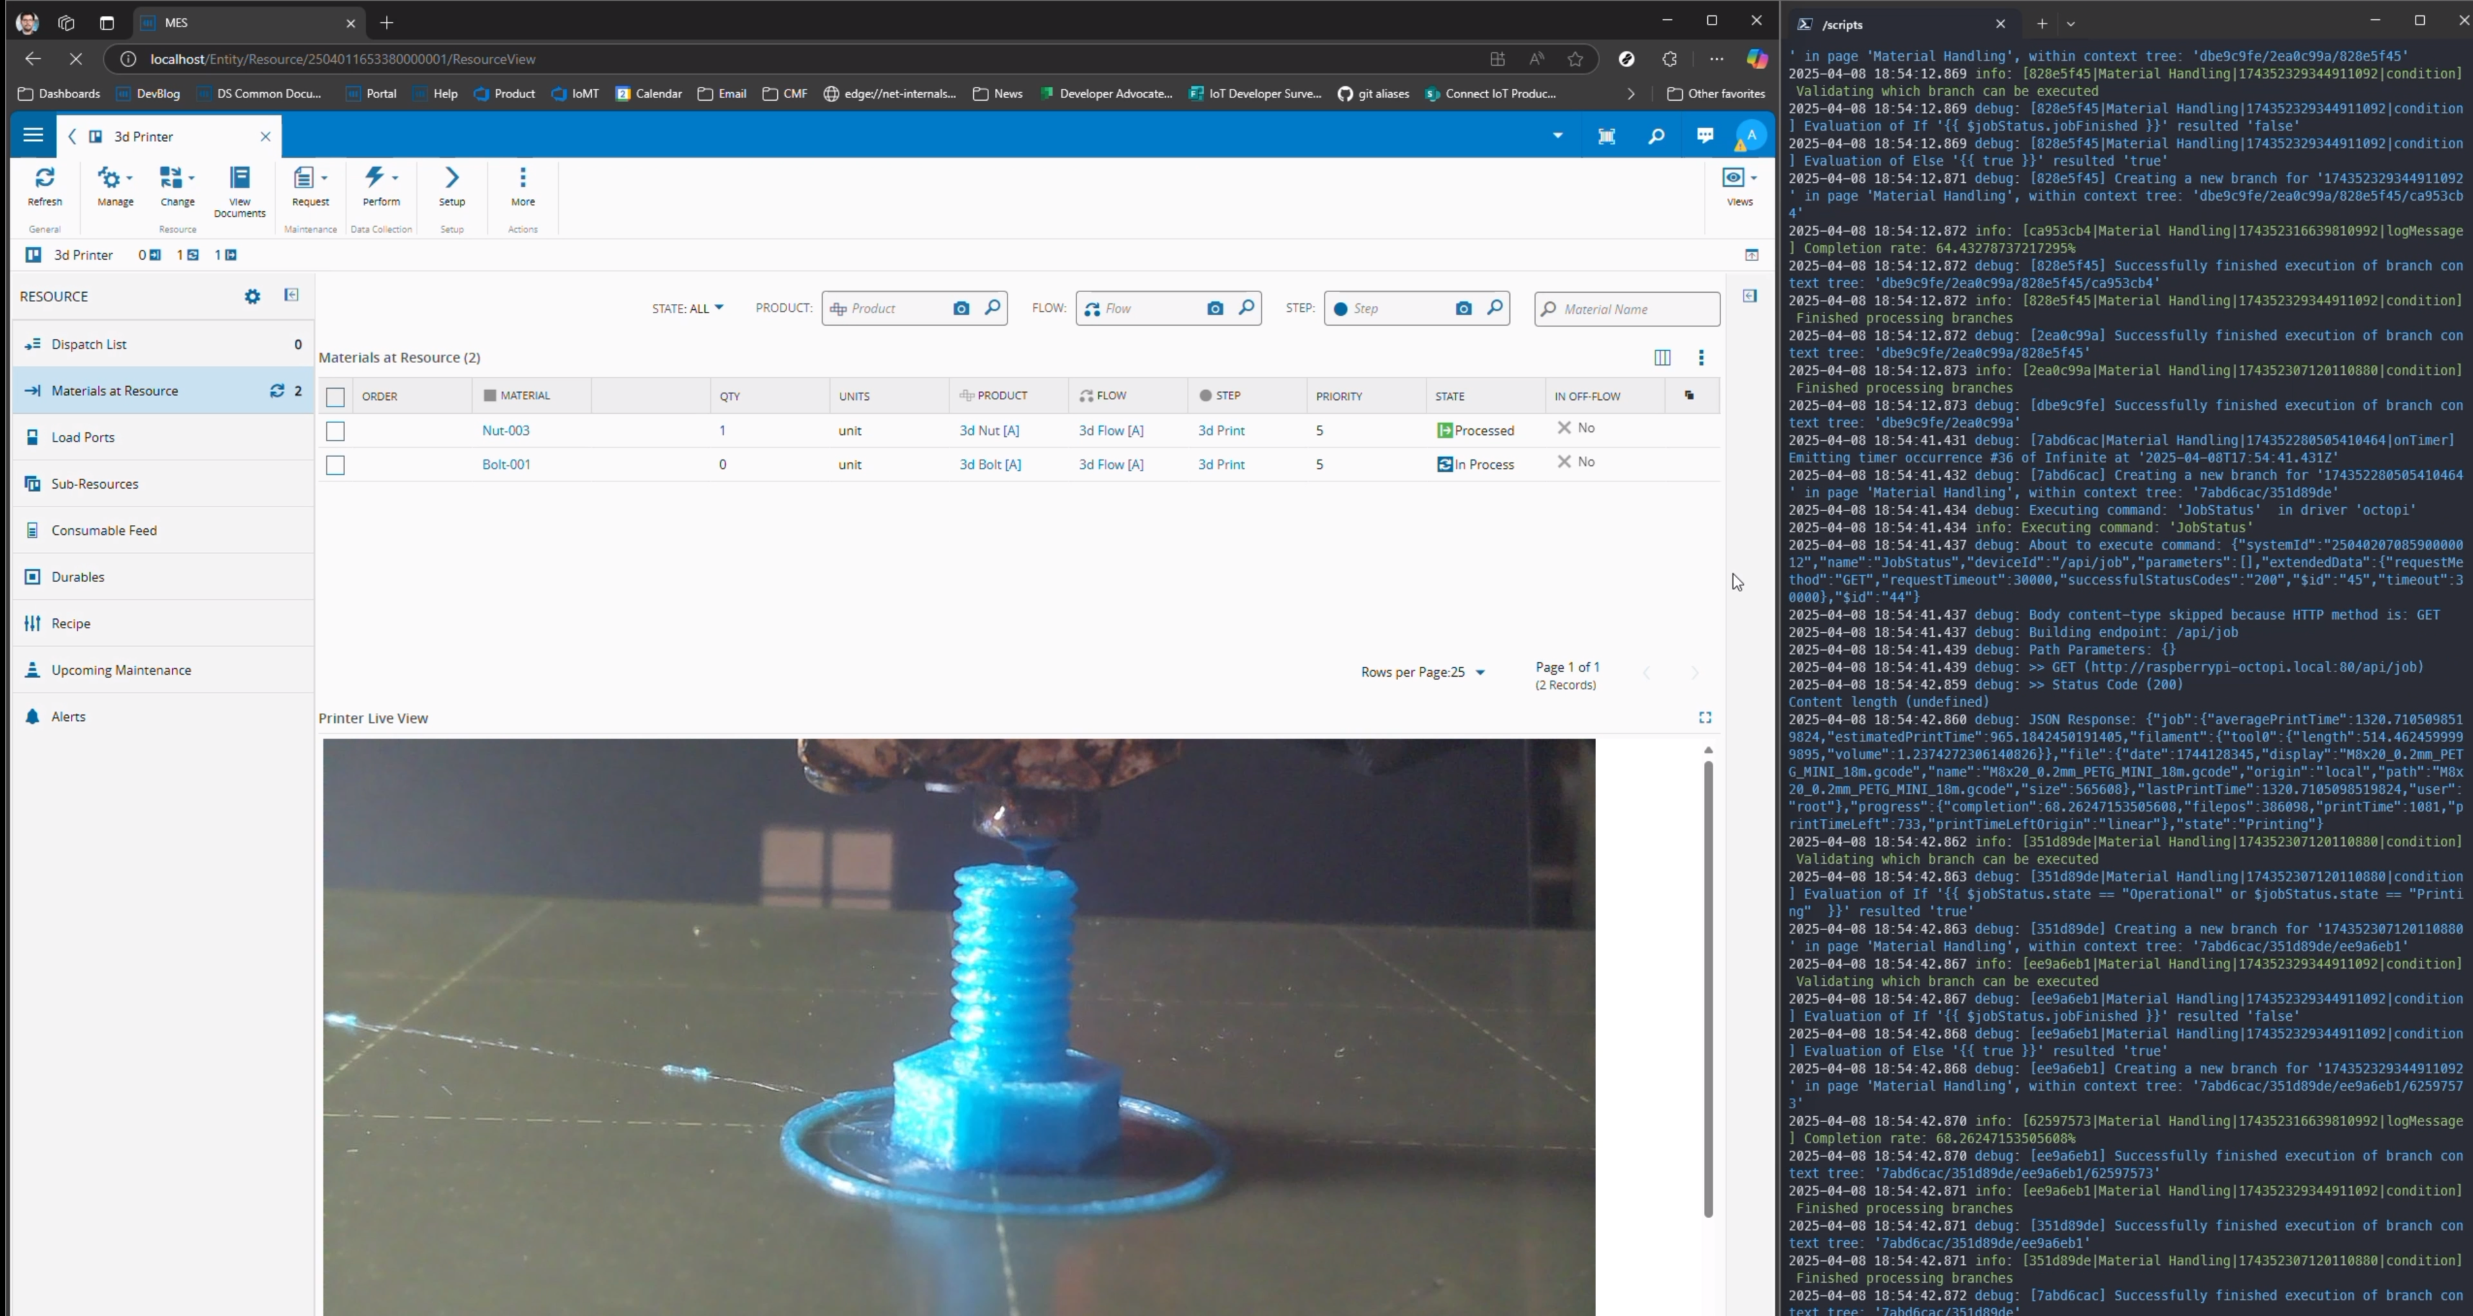
Notice that when we press the track-in button in the UI, Connect IoT is notified and performs the recipe validation and also the start of the printing job. Throughout the printing process, IoT is logging the completion rate every 30 seconds. When the completion rate is 100% it will retrieve the feeder length information and do an assemble with explicit add. This will change the material quantity to 1. It will then perform the track-out changing the material to processed.
UI - Live Printer Feed#
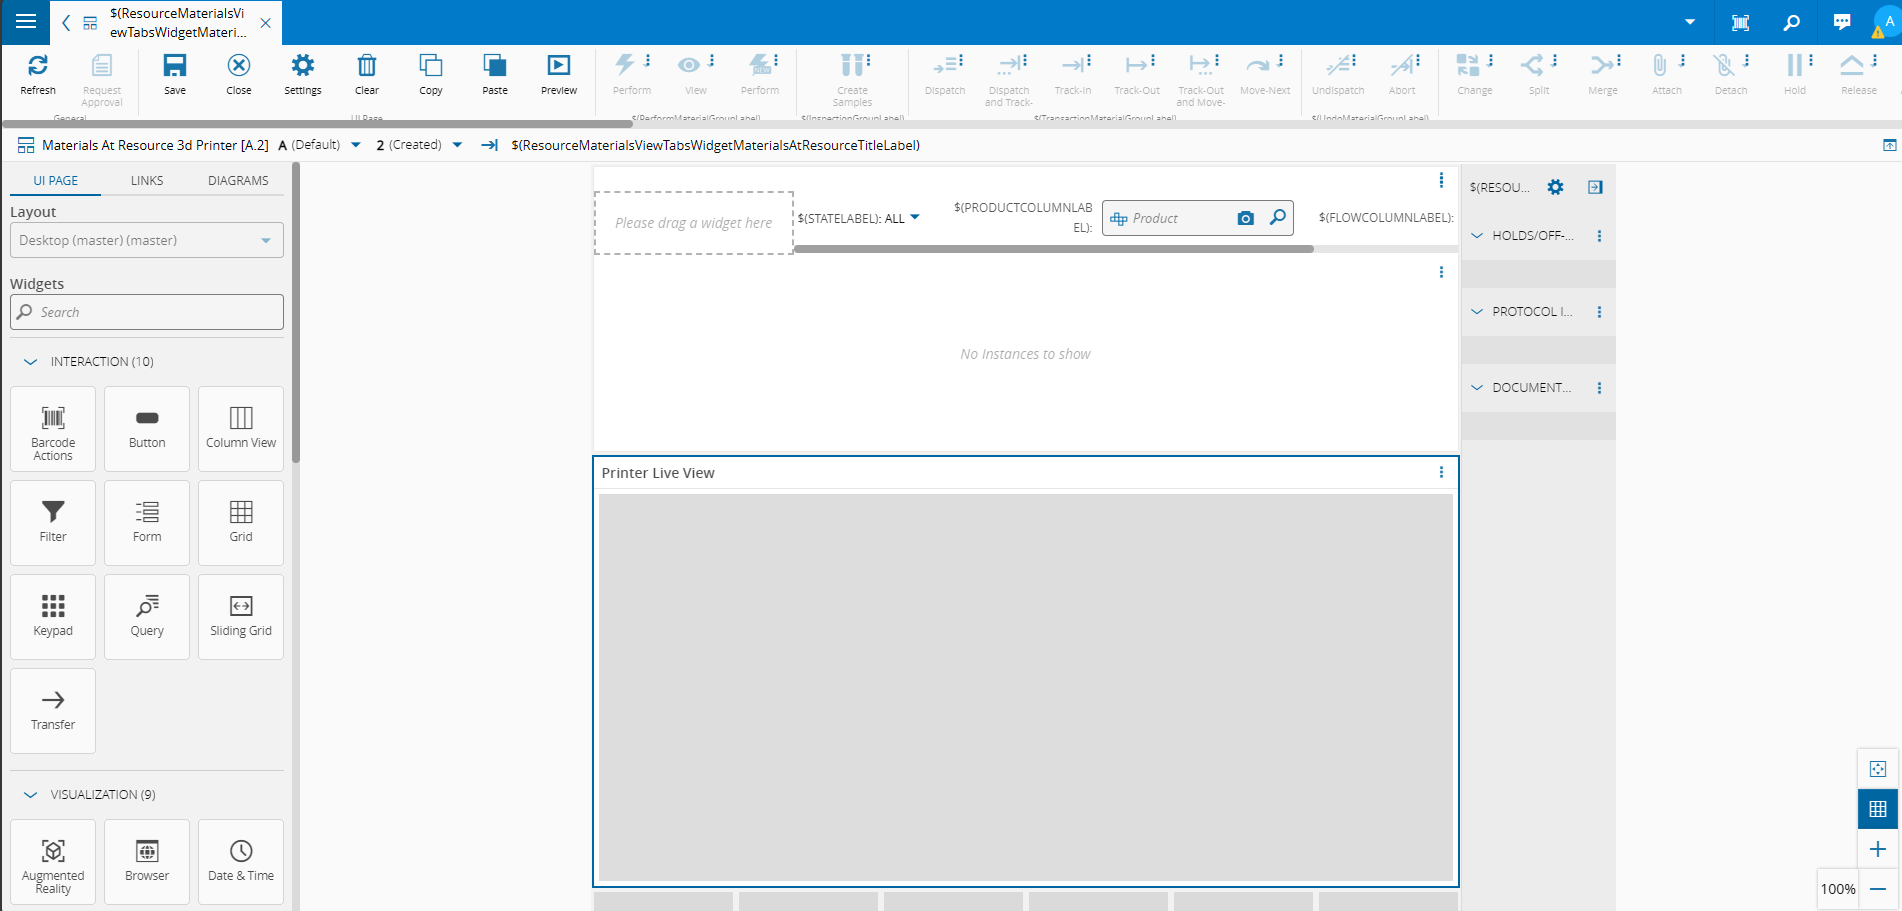
This implementation had a small customization in the Resource View page. The Resource View and Step View are central pages of the interaction between the operator and the MES. These pages are build in a low code framework UI Pages that the user is able clone and customize.
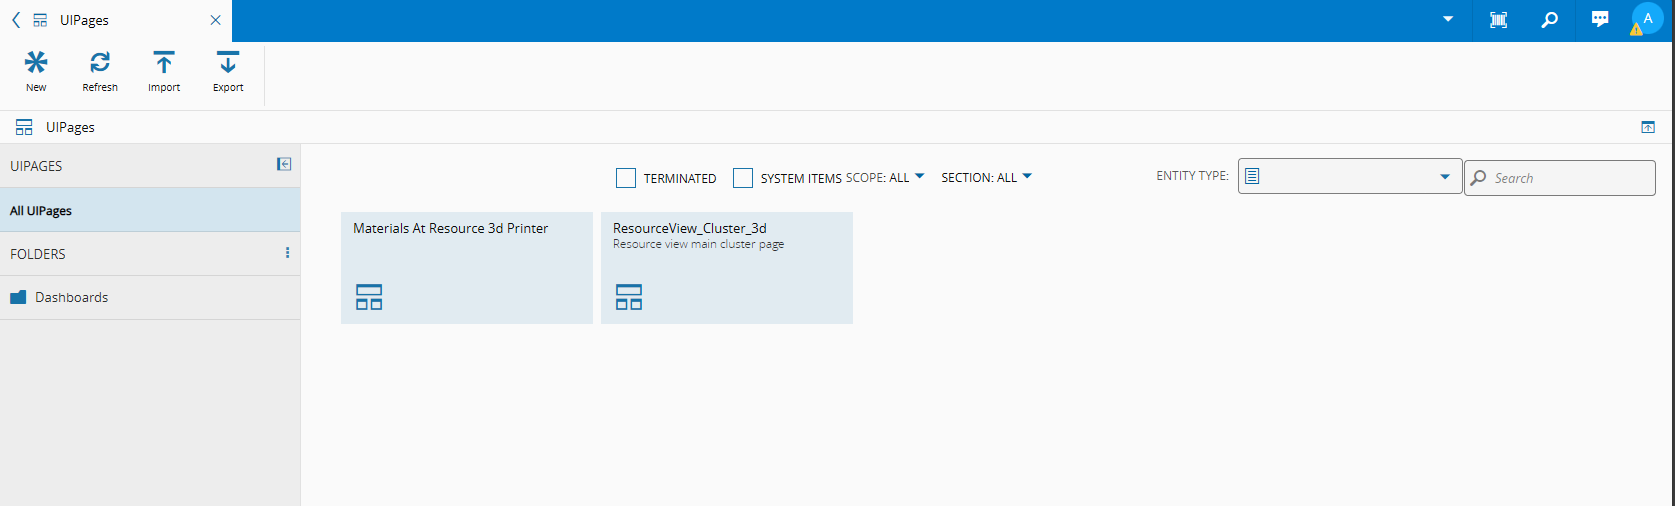
I cloned both the main page, the ResourceView_Cluster and the Materials at Resource and created the ResourceView_Cluster_3d and the Materials at Resource 3d Printer. In the Materials at Resource 3d Printer I dragged and dropped a browser widget that will use the OctoPi camera feed url.
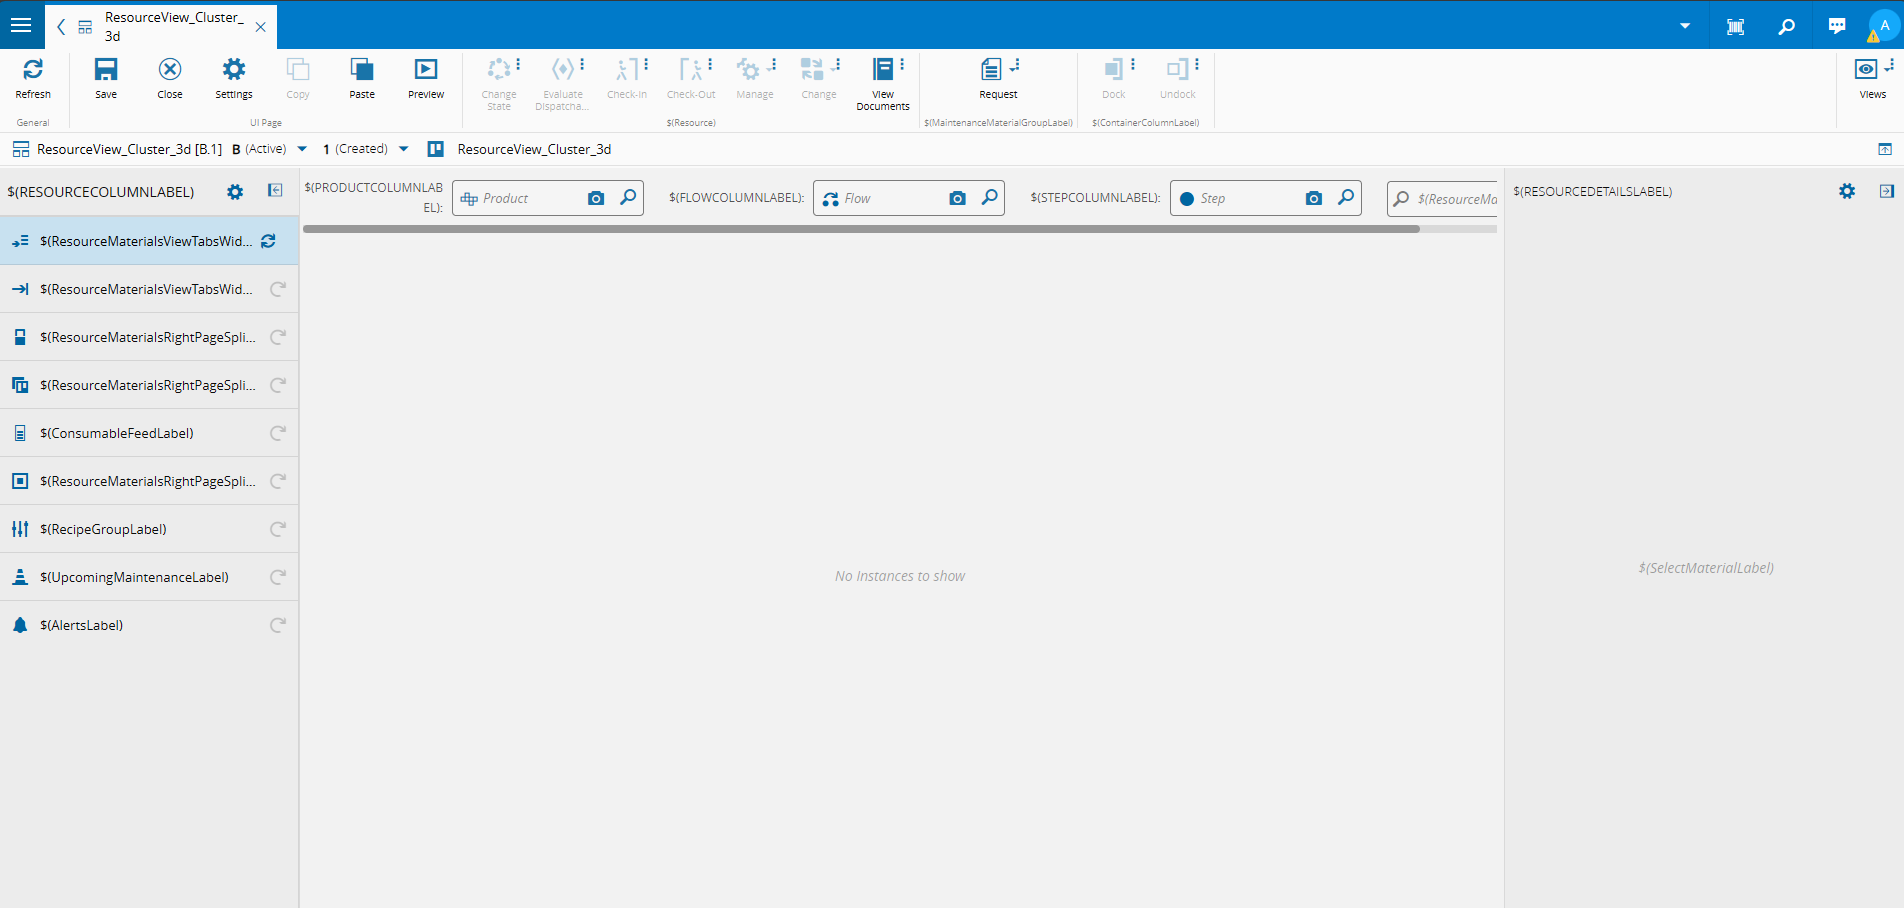
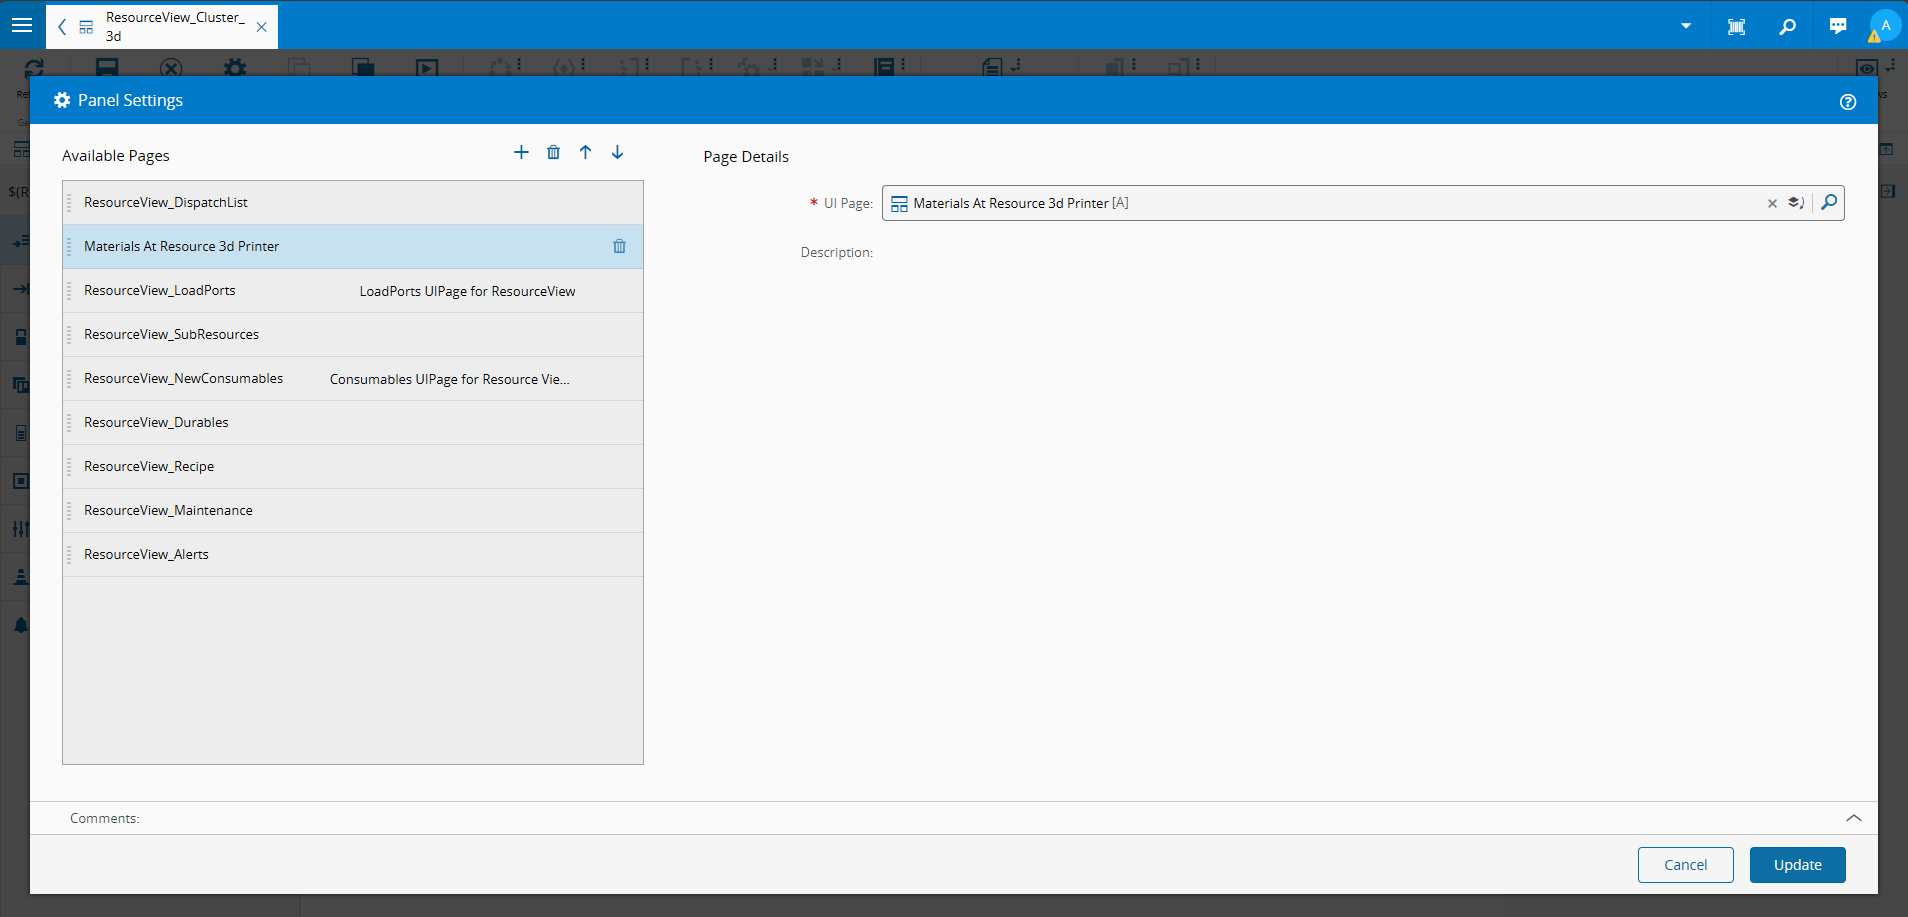
Then I just add the reference to my page in the ResourceView_Cluster:
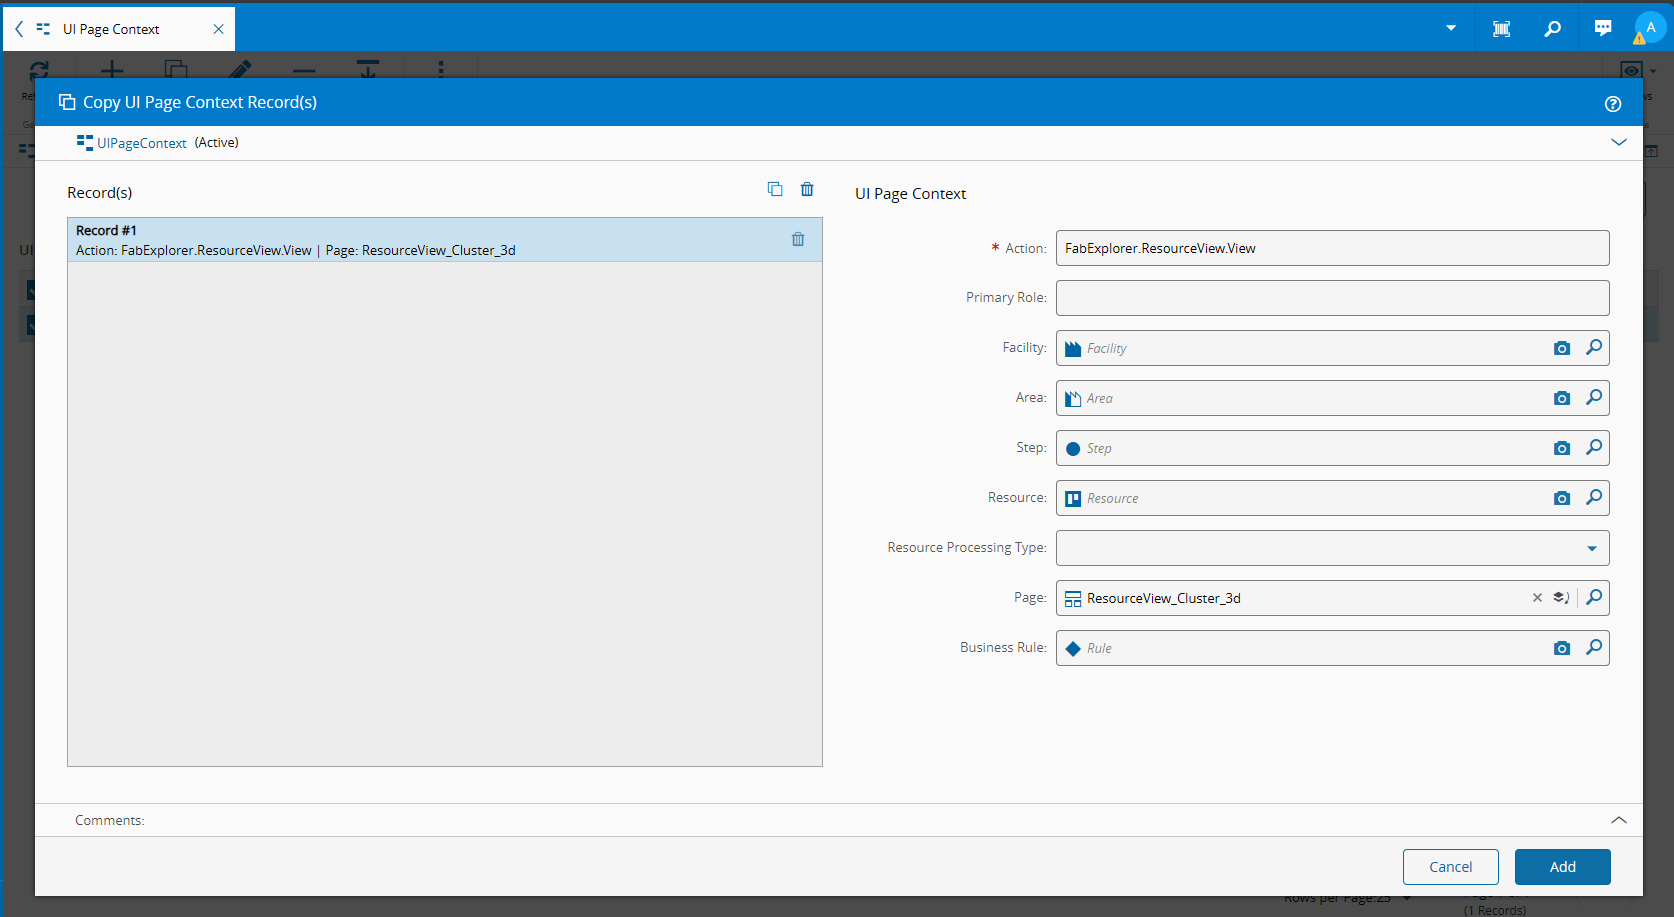
Finally we will have to override the default Resource View with our new ResourceView_Cluster_3d. The smart table UI Page Context allows us to do just that.
Let’s Now add the Bolt#
First, we will create the recipe:
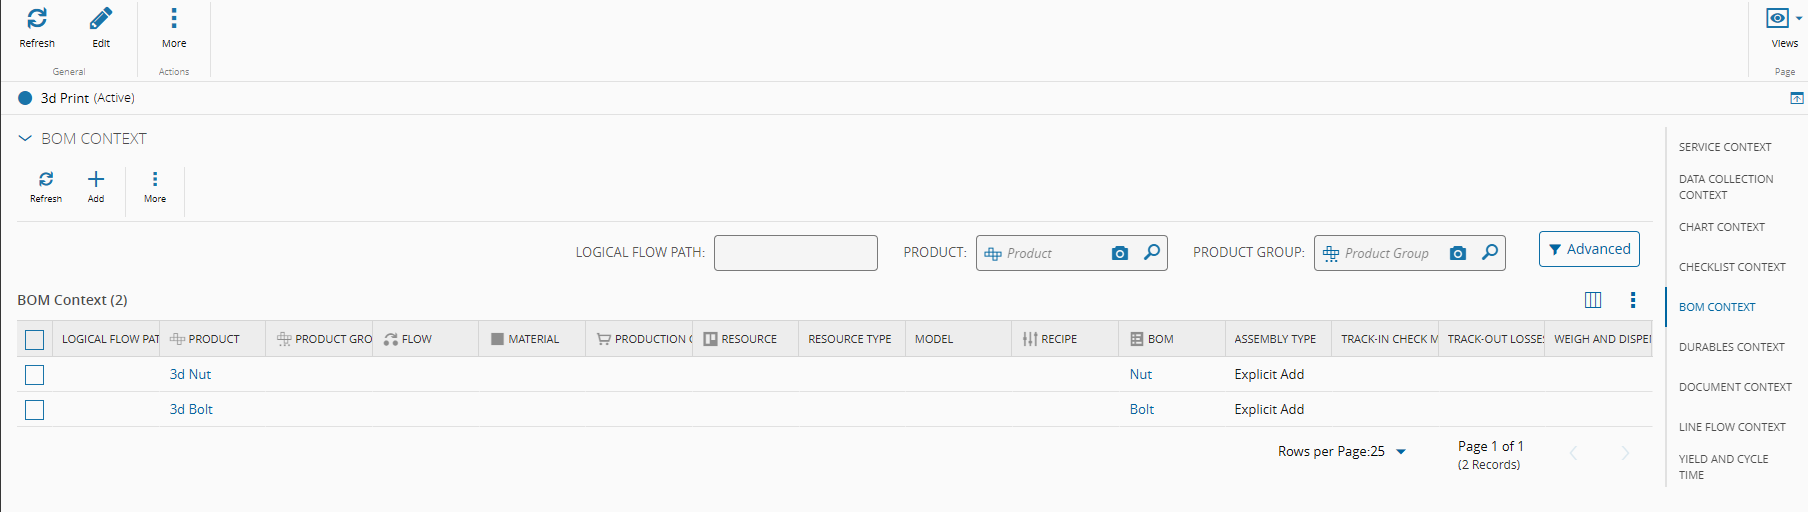
Now, we can create our BOM for our bolt.

In our 3d Print let’s add the services and bom context for the bolt.
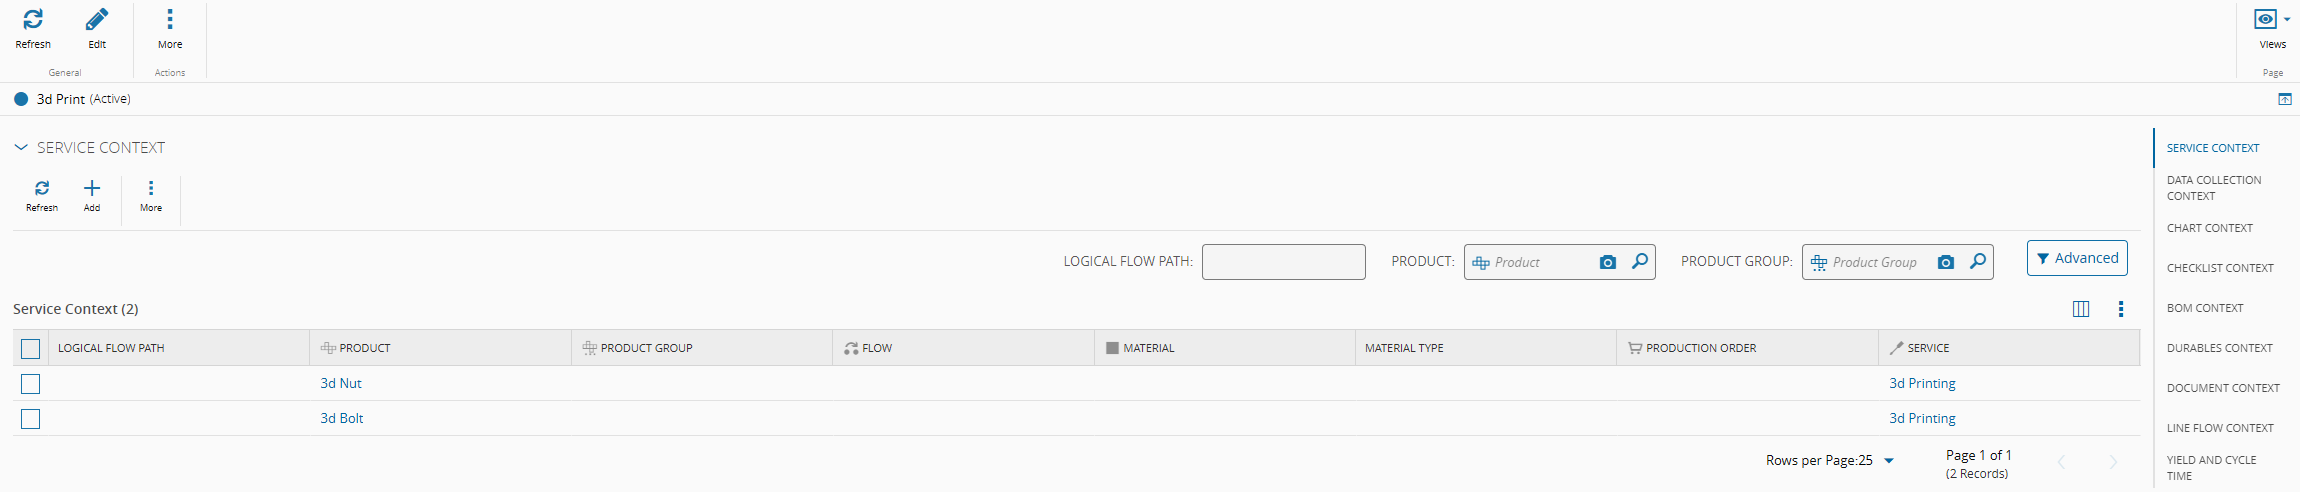
I created a Bolt-001 material and will now, like we did with the nut, produce a bolt.
We can also take a look at what happened in our process from the perspective of our raw materials. Looking at our raw material and consumable feeder:
We can also see how all of this information is now part of our material genealogy:
Summary#
We did it we created a 3D Printed Nut & Bolt. In a very simple example, we have recipe management, we have material tracking and recipe validation.